For 30 years, while classic rear-wheel drive VAZ models were produced, their design, in contrast to style and design, was virtually unchanged by the manufacturer. Therefore, owners are trying to modernize the car themselves - introducing various components from imported cars or more technologically advanced VAZ models.
For example, many owners do not like the way Ozone and Weber carburetors work, which are not capable of providing acceptable acceleration dynamics, uniform acceleration, and acceptable fuel consumption. Despite the fact that all this is already in Solex. That is why most car owners strive to install a licensed French Solex on their classics.
"Ozone" and "Weber" under certain road conditions excessively leaned the fuel mixture. This happened because the float moved in the float chamber when sharply entering a turn or climbing a steep mountain. Solexes do not have such a disadvantage - they are equipped with two-section float chambers, paired floats that move in other planes. The Solex device is more modern and advanced.
Which Solex to choose
Units produced by Dimitrovgradsky differ mainly in the geometry of the jets. There is a difference in the diameters of the diffusers, as well as in the size and design of the air jets. The cam profile also differs.
However, without any unpleasant consequences or modifications, absolutely any Solex from the entire series can be installed on a car for which the carburetor was never made. Many models and modifications of these carburetors were produced - they were equipped with VAZ-08, 09, AZLK-21412, ZAZ-1102. There are “Solex” for VAZ-2104, 05, 07. This all means that absolutely any unit from the mentioned line can be installed on rear-wheel drive VAZs without modifications or almost without them.
The result of tuning depends on the choice of a particular Solex. But in any case, the engine’s traction will improve and the car will accelerate smoothly. To save money, it is worth choosing the Solex modification on the Tavria - this is DAAZ-2181. If you need increased acceleration dynamics, then select DAAZ-21073. It features diffusers of larger diameter. This carburetor was created for engines with a displacement of 1.7, and after installing this Solex on a classic, you should prepare for high fuel consumption.
Solex models 2108, 21083, 21051-30 are considered by motorists to be the golden mean. The units are capable of providing better dynamic characteristics and lower fuel consumption when comparing their characteristics with Ozone.
Bottom line
After installation, the characteristics of the Six engine will acquire several pros and cons.
The advantages are that the engine will be more responsive, the maximum speed will increase (up to 160 -165 km/h), and the acceleration time to the first hundred will be reduced (instead of 15 seconds - 13). The modernization will not significantly affect the rated power, increasing it by 5 - 10 hp.
The only downside is fuel consumption. With normal, non-economical driving in the urban cycle, it will increase by 1 - 1.5 liters.
The general conclusion is this: installing this carburetor is a necessary thing, because for the price of 1 - 1.5 liters per 100 kilometers, you will get more driving comfort.
Important little things
Any Solex (except 21073) has jets with very thin holes. It should be noted that because of this, the jets are very sensitive to debris in the fuel, and the carburetor itself often becomes clogged with dirt. For this reason, fuel filters should be changed regularly. To increase reliability, you can install an injection fuel filter. It will be a little more expensive, but you can increase the interval between inspections of the unit.
If the decision to install a Solex carburetor on a classic is made, then in addition to the carburetor, additional spare parts may be needed. The unit can be installed with or without recreating the EPH system - only the unconnected solenoid valve will remain. The easiest way is to get by with this system. But experts say that although the EPHH allows for 5% fuel savings, the system is unreliable and often fails. And this significantly reduces the reliability of the entire unit.
To prevent the solenoid valve from cutting off the fuel supply to the Solex idle channel (after all, the EPHH unit is not installed as standard), it is necessary to remove the valve needle from the housing. But the easiest way is to connect the valve from the ignition switch.
When installing Solex on rear-wheel drive VAZs, you need to plug the return flow with a plug or connect it through a check valve to the fuel supply system to the fuel filter.
How to get the most benefit
It’s not enough to install Solex on a classic; to experience all the benefits, you also need to modernize the ignition system. Instead of the standard one, contactless ignition is installed. Any Solex is initially configured and designed to prepare a lean mixture. To ignite it effectively, a more powerful discharge is needed. A contact ignition system cannot produce such a discharge, but a contactless one can. Its coil can generate voltage up to 25 thousand volts. The spark plug gap will be no more than 0.8 mm.
New or used?
You can buy a new Solex for a classic, but it is also possible to purchase a used carburetor. In the second case, it is necessary to carry out an inspection - thoroughly clean the channels, polish the diffusers. In addition, it is better to purchase and replace jets.
But at the same time, you should not buy modern products - it is better to ask your friends and acquaintances for those that were made in the USSR. Modern jets found in repair kits often do not correspond to the calibration dimensions.
In order for the diffuser to work effectively, burrs and protrusions are removed from its elements using a file. Such defects create air turbulence, and this does not have the best effect on filling the cylinders.
What you might need
The first step is to purchase spare parts that will be needed during the installation of the Solex on a classic model VAZ:
- You should buy thin paronite gaskets. But they need to be made specifically for Solex. The holes in the gasket for diffusers differ from Webers and Ozones.
- Instead of two gaskets, you can buy one with two holes. It is placed between the carburetor and the getinax gasket. In addition, they take another one - with an oval hole. It is intended for installation between the manifold and the getinaks gasket.
- They also buy a return hose. Its length must be at least 80 centimeters. Otherwise, it will not reach the fuel line under the pump.
Preparing for work to replace the carburetor
It won’t be possible to simply swap the power supply units of the internal combustion engine, since the VAZ 2107 has a different control system and it is impossible to install a Solex carburetor from the VAZ 2108 model without modifications. If you already have a carb from the “eight”, then you need to purchase a Solex installation kit for the “classic”.
It consists of the following elements:
- choke cable from 2108-09;
- two thin gaskets for the carburetor (paper/paronite);
- one thick gasket for the carb from getinax;
- tee for gas hose;
- fuel hose 80-90 cm;
- check valve 2108;
- accelerator link with throttle rods 2108-09;
- clamps for the fuel hose 6-8 pcs.
To dismantle and subsequently install the power supply, you will need a tool. It includes: pliers, open-end wrenches 7, 8, 10, 13 mm. Screwdrivers: slotted and Phillips.
For reference! If the car is equipped with an old type distributor, then a contactless ignition should be installed on the vehicle. The fact is that Solex 21083 is designed for operation on a lean mixture. To ignite it, you will need an enhanced charge, which an ignition coil with a power of 25-30 kW can produce. An additional condition is to unscrew the spark plugs and set the gap on the electrodes to 07 - 0.8 mm.
Installation process
Now you can start installation:
- To protect the collector from dirt, the engine compartment must be thoroughly washed.
- Then the drives and cables, as well as hoses, are disconnected from the standard carburetor.
- To remove the choke cable casing, remove the bracket from the choke panel.
- The surface of the collector is carefully cleaned and sealant is applied.
- After these operations, you need to install gaskets in the form of a sandwich. First the thin one is placed, then the thick one, then the thin one again. The purpose of a thick gasket is to provide thermal insulation. And to make the installation process more convenient, the carburetor is installed on the manifold without a cover. The damper drive must be at the front of the car.
- They mount the throttle valve linkage - on the VAZ-2104 it will be more convenient if it is on the cylinder head side. The slide or “helicopter” is sometimes sawed through the center so that it fits evenly on the carburetor. And so that in normal operation the damper does not jam on the spring, plastic tips are installed on the rods.
Recommendations from specialists for adjustment 21073
With standard jets, Solex will not be able to impress with its dynamics. In this case, you can replace the carburetor with 21073. Without changes, installation is quite possible, but as a standard, a lean mixture will be prepared in the first chamber. Therefore, in the first chamber the motor will not be able to provide sufficient thrust for acceleration. The car will pick up speed very slowly.
The pace of movement will improve dramatically when the second chamber opens. And the car will jump forward like a goat. But fuel efficiency is very low.
The problem can be solved by selecting the main fuel jet in the first chamber of the carburetor. If you replace it from 107.5 to 110, you can get improved overclocking intensity. This is a compromise between economy and dynamics. Optimally - the 115th fuel jet in the first chamber. You can also set it to 117.5. But the consumption will increase even more. The mixture with this jet becomes over-rich, and the dynamics may worsen.
The air jets of the first chamber are 145, 150, 155. With a fuel jet of 117.5, you can install an air jet of 165.
Over the course of 30 years of production of “classic” rear-wheel drive VAZs, their design, unlike their appearance, has remained virtually unchanged. Therefore, car owners are constantly trying to modernize them, introducing new components and assemblies from foreign cars or more modern VAZs. Many, for example, are not satisfied with the operation of the Ozone or Weber carburetor, which do not provide good acceleration dynamics, uniform acceleration, low fuel consumption and low toxicity levels. At the same time, their “younger brother” Solex can do all this. This is why many people replace their original carburetor with a licensed “French” one. The Dimitrovgrad Automotive Aggregate Plant (DAAZ), under license from the French company Solex, produces about a dozen modifications of Solex carburetors for engines with different displacements. This carburetor model was originally created for front-wheel drive VAZ models, since “Weber” and “Ozone” installed on an engine transversely located in the engine compartment, in certain driving modes (during sharp acceleration, cornering, on steep climbs) over-leaned the fuel-air mixture . This happens due to unwanted movements of the float in the float chamber. Solexes do not have this drawback, since their float chamber is two-sectional, i.e. with paired floats that move in a plane perpendicular to the longitudinal axis of the car (and not parallel, like Ozone and Weber).
Solexes are divided into 4 modifications:
- eights (2181, 2108, 2183)
- 21051 for the classic 1.3l engine - a rarity
- 21053 for the classic 1.5L engine - can still be found, but not often
- 21073 for 1.7l (Niva)
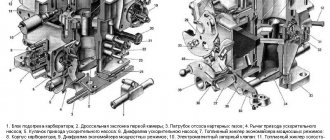
The modifications differ from each other in the cross-sections of the diffusers (21/23, 23/23, 23/24, 24/24, respectively) In addition, the “chisel” Solexes have different profiles for the cams of the accelerator pump drive and the starting device. Inside the modifications, they differ only in the sizes of the jets.
The seating dimensions and drives are the same for all, it’s just that in “chisel” carburetors the “normal” drive is covered with a plastic patch for attaching the damper drive cable.
To install ANY of the listed carbs on a classic you need:
- thick (10-15mm) plastic gasket - heat insulating. I saw them in two thicknesses - approximately 8mm and 15mm. From the point of view of thermal insulation, the second one is better (tested), but not every classic can close the hood with it;
- paronite on the inlet pipeline; · cardboard for the carb itself;
- a piece of thin hose for antifreeze 80cm + 2 clamps;
- plugs for unused pipes. In the worst case (21073), there are 3 of them. I made them from pieces of a vacuum supply hose to the distributor;
- set of rods and adapters for gas drive. Sold in some stores;
- check valve;
- tee;
- choke chisel cable (ours is short).
To get the maximum benefit from replacing this main element of the power system, it makes sense to upgrade the ignition system by installing a contactless one. Solex carburetors are initially configured to create a lean mixture. For its effective ignition, a more powerful spark discharge must be created on the spark plug. This can only be achieved by a contactless ignition system, the coil of which produces a voltage of up to 25,000 V, and the interelectrode gap of the spark plugs is 0.7-0.8 mm. Let me remind you that in a contact-transistor ignition system the above characteristics have values of 17000 V and 0.5-0.6 mm, respectively. The gap in the contact system can be increased, but this will cause accelerated failure of the bearing of the movable plate of the breaker, its contacts and the capacitor.
The installation itself does not cause any problems. All this must be done WITH the car COOL. I removed Ozone and the old gasket, put a paronite gasket, a thick plastic one on top of it, a cardboard one on top, and the Solex is placed on this sandwich. Do not tighten the nuts at first
A bracket from a set of rods and adapters is placed under the nuts closest to the engine. A two-arm lever is placed on it, which is removed from the bracket on the cylinder head cover.
The short thrust from the pedal is replaced by a long one. If necessary, it will have to be adjusted to length. Each person attaches the return spring as their imagination allows. The only better way to do this is closer to the pedal.
The suction cable is replaced with a chisel one.
To connect the heating of the throttle valves, remove the antifreeze hose from the intake manifold and put it (with a clamp) on the carb heating pipe, put the spare hose on the other end of the pipe and again on the intake manifold. If heating is not connected, then in cool, humid weather, due to throttling, frost may freeze on the edge of the damper and, as a result, unstable operation at idle.
The vacuum intake for the distributor is taken from the lower fitting on the right (along the direction of the car). The crankcase ventilation is connected to the fitting at the bottom of the carb, directed towards the cabin (lowest)
Before installation, I recommend setting (checking) the fuel level in the float chamber. To do this, unscrew the 5 screws of the carb cover, remove it, turn it over, collect the fallen cover fastening screws from the ground (if you find them) and check the gap to the gasket from the bottom point of the floats. It is in accordance with the manual d.b. 1mm. At the same time, I recommend checking the tightness of the needle valve (at least with your mouth). Replace the cover.
Again, before installation, I recommend checking (setting) the starting clearances of the air damper and throttle (approximately 2.5/1)
As a very desirable option, I recommend installing a fuel return line. Even if it’s not to the tank, but to the entrance to the gas pump, so be it.
I don’t recommend using plastic tees from glass washers - the plastic cracks, and it’s not water, but gasoline: We insert the tee into the gap in the gas hose up to the fuel pump, the hose with the valve is put on the corresponding fitting of the carb - then the hose going to the tee is put on the valve.
But it’s better, of course, to drag it into the tank!
Now for impressions and fine-tuning.
At first I set myself 21073. It seems that the secondary chamber does not open at all until you reach speed 120 - there is no need. Fuel consumption increased slightly (0.5 - 1l/100km). But there are practically no failures compared to Ozone and an excellent start has appeared. After selecting the jets, we managed to reduce the consumption somewhat (not dramatically). At the same time, slight (but not as large as Ozone) failures appeared.
Next, I tried (on a friend’s car) 21053 - there were no failures, the dynamics were good, the consumption remained almost unchanged compared to Ozone. They didn’t touch the jets - I drove it like that until I sold it.
Now I have 21083. The cam is accelerated. pump from 21073. I still think that this is optimal for a 1.5 liter engine. Excellent dynamics, but the consumption is too high (less, of course, than with 21073, but still :) - we will become poorer.
The common advantage of all Solexes is that the XX is more stable than that of the Ozones.
All Solexes “love” increased CO (0.7 or more). It can be less (it won’t stall), but it’s shaking, etc.
The disadvantage is overheating in traffic jams in the summer. To reduce this, in the summer I disconnect (unscrew) the throttle valve heating pipe.
Recommendations for setting up and fine-tuning Solex
The standard carburetor is fully operational and adjusted, but the car's dynamics are unsatisfactory. The simplest option to fix this is to install a DAAZ 21073 carburetor. Installation without changes is possible, but the first chamber prepares a lean mixture as standard. Because of this, when the first chamber is operating (when the throttle valve of the second chamber is closed), the engine does not provide sufficient thrust for intensive acceleration. The car will accelerate sluggishly in the first chamber and sharply increase the rate of acceleration when the second chamber is opened. The latter can create some difficulties when controlling traction on surfaces with low friction coefficients. The fact is that the car literally jumps forward when the second chamber is opened. True, there is another side to the coin - fuel efficiency. This is the main feature of the 21073 carburetor.
To fully realize the benefits of the increased diameter of the main diffuser of the first chamber, an increase in the throughput of the main fuel nozzle (hereinafter referred to as the GTJ) of the first chamber will help. The first option is a compromise between efficiency and traction capabilities, replacing the GTZ from 107.5 to 110. The intensity of acceleration in the first chamber will increase, but only slightly. The most optimal for the first chamber is GTZh 115. It is also possible to install GTZh 117.5, but the fuel consumption will increase slightly. It should be noted that installing a gas turbine engine with a throughput capacity of more than 117.5 leads to excessive enrichment of the mixture and, as a consequence, increased fuel consumption and (in most cases) deterioration in acceleration dynamics.
Compensating jets (hereinafter referred to as KJ), also known as air jets, affect the composition of the mixture with increasing vacuum in the main diffusers of the carburetor, which occurs with increasing engine speed. Up to medium speeds (~ 2500 rpm) they have little effect on the mixture composition, but with increasing speed their influence on the mixture composition increases. The arithmetic is simple: the lower the throughput of the fluid, the richer the mixture becomes as the engine speed increases. Therefore, when using GTZh with a throughput of 107.5 and 110, it is advisable to slightly enrich the mixture using KZH with a small throughput: 145, 150, 155. When using GTZH 115, you can use KZH both 155 and 165. Well, when using GTZH 117.5 it is better to put QOL 165.
All of the above applied to the jets of the first chamber of the DAAZ 21073 carburetor. The second chamber is a little easier. You can leave everything as is (GTZh 115, KZh 135), or you can install GTZh 120. The latter will slightly affect fuel consumption, but will improve the acceleration dynamics of the car. It should also be noted that it is not advisable to put maximum GTZ in both chambers. The best effect can be achieved with the maximum permissible enrichment of only one carburetor chamber. For example, with a moderate GTZ in the first chamber (107.5 or 110), it makes sense to enrich the second chamber by installing a GTZ 120. With this ratio, the first chamber will be moderately economical with acceptable acceleration dynamics, and the second chamber will compensate for the lean mixture when both throttle valves are fully open .
There are a number of other features associated with the operation of Solex carburetors. We will try to talk about some of them below.
The engine does not maintain stable idle speed. Or it is not possible to establish normal idle speed (800-1400 rpm depending on the camshaft), which is important if a camshaft with wide valve timing is installed.
- The idle mixture is too lean. The mixture quality screw is turned more than necessary. Solved by adjusting CO within 2%.
- There is an air leak after the throttle valve. It is necessary to check the mating plane of the carburetor, the tightness of the vacuum booster pipe and its seals, the tightness of the intake manifold and the gaskets between it and the cylinder head.
The engine stalls after releasing the gas.
- If both of the previous points are met, then it is necessary to replace the XX jet with a jet with a higher throughput. And also check the operation of the EPHH control unit.
Introduction
Any car makes its owner happy until any troubles begin to happen to it. Naturally, such circumstances upset every driver. If the car is not new, then the repair costs may be too high, and it is very difficult to resolve the issue on your own. However, real VAZ connoisseurs are trying to study their iron horse inside and out and carry out repair work themselves. This primarily concerns the repair of important components; many are interested in installing a Solex 21083 carburetor on a VAZ-2107.
The most popular carburetor for the VAZ-2107 is Solex
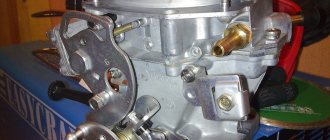
Since the release of VAZ cars with carburetor engines, parts from the following manufacturers have been installed on them: Ozone, Solex, Weber. But Solex carburetors were and continue to be the most popular. Let's look at the adjustment and tuning of the carburetor of this brand in a little more detail.
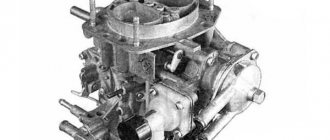
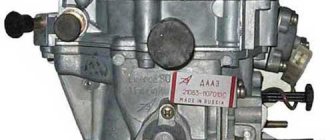
Carburetor VAZ 21083
The VAZ 21083 car was equipped with a Solex carburetor. Just like Ozone, it was intended for 1500 cc engines. Its float (primary) and secondary chambers were slightly enlarged, and the fuel level was correspondingly higher. Solex provided the Eight with the following technical indicators: power - 70 hp, rated speed - 155 km/h. At the same time, acceleration to 100 km/h took 15 seconds.
The characteristics are not particularly better than those of the VAZ 2106. But this is explained by a different engine structure. And here’s what the “Six” will show us, when equipped with this carburetor.
Preparatory activities
If a motorist is interested in adjusting the Solex VAZ-2107 carburetor with his own hands, he must first carry out a number of preparatory steps.
Initially, you need to warm up the power unit to operating condition (temperature 85–90 degrees).
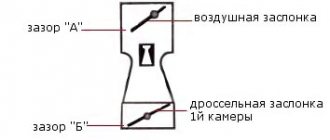
In the next step, you need to squeeze the handle of the air damper drive mechanism all the way; people simply call it “choke.” After this, the damper should be in a position in which the air channel is completely free, i.e., located in the direction of air movement.
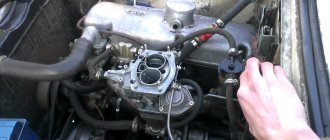
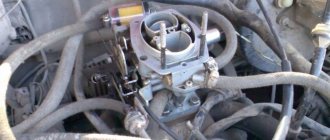
Installing a Solex carburetor on a VAZ classic
This video tells you how to install it
…
Installing a Solex carburetor on a VAZ classic (2106) part 1
Today Nail Poroshin will tell and show the main nuances of the installation
53rd
Carburetor
for the Classic! Everyone...
If there is a tachometer, the device must be connected to the engine being turned off. Otherwise, if there is no unit, the item should be skipped. The positive side of the device should go to the ignition coil, and the negative side should go to the “ground” of the vehicle (body, engine or battery negative). Before connecting the device, you should read the operating instructions.
The last action should be to start the engine, turn on the high beam optics and the heating device.
Adjusting the idle speed
Do-it-yourself adjustment of the Solex carburetor on a VAZ-2107 requires certain knowledge from the car enthusiast doing the repairs. The manufacturer recommends setting idle speeds in power units with carburetors 2108, 21081, 21083 from Solex, which vary between 750–800 per minute. It is very important to achieve stable functioning of the system in such a period. To do this, you need to rotate the “amount” screw of the fuel solution, while simultaneously setting the crankshaft speed.
Setting the required rotation speed often necessitates urgent adjustment of the “quality” screw adjustment. In cars in which such measures are being carried out for the first time, there should be a plastic plug installed at the manufacturer on the above screw; it is advisable to remove it. An awl or metal hook may be useful for this. If you don’t have both tools, you can screw a self-tapping screw into the unnecessary part, and then remove everything.
In order for the adjustment or installation of the Solex 21083 carburetor on the VAZ-2107 to be successful, the manipulation should be carried out in three steps. If this is not enough, the steps can be repeated several more times. Before solving such an important task, you need to check the correct installation of the ignition timing, as well as the functionality of the high-voltage wires. If everything works stably and does not cause any complaints from the owner, you must:
- Using a slotted screwdriver, turn the screw responsible for the “quality” of the fuel mixture in order to increase the engine crankshaft speed to the maximum limit. It is necessary to turn the unit in different directions until the “correct” position of the screw is determined upon reaching the maximum frequency value. You can adjust by ear or using the tachometer;
- put the screw for the “amount” of fuel “solution” in such a position that the revolutions reach 900 per minute. Scrolling the screw directly affects the opening of the throttle valve of the first chamber, which is why the revolutions begin to “jump” strongly. Otherwise, if the screw is turned counterclockwise, the throttle valve will close and the speed will drop. The main task of the position-regulating screw is to determine its optimal location;
- close the “quality tap”, achieving 800 rpm from the system.
If a motorist does not know how to install a Solex carburetor on a VAZ-2107, after the previous device has become obsolete or a “quality” screw needs to be replaced, one important feature should be taken into account: before adjusting the device, the screw must be tightened clockwise until it stops, and then unscrewed 3 turns and only then proceed with adjustment.
Settings
The unit requires setup
After you have installed Solex 21053 on the classic, you need to configure it. This is done in order to obtain better performance in the car's driving speed and reduce its fuel consumption. So, the first thing to start with is adjusting the fuel level in the float chamber. You can customize it using a special template. However, since gas pumps on cars are not always the same, you shouldn’t do this.
You need to adjust the level in the following way:
- Start the engine for five minutes and let it idle. I must say that it will start, even if the Solex is very weak and it’s high time to change the jets.
- After allowing the specified time to work, turn off the engine.
- Remove the fuel line hose. If this is not done, gasoline may flow over it and change the readings. Unscrew the screws securing the Solex cover and pull out the choke cable.
- When removing the cover, be extremely careful; if done incorrectly, you can damage the floats.
- Using any distance measuring device, determine the number of centimeters from the fuel level to the place where the cap used to be.
Both chambers will have different distances, but you need values from 23 to 25 cm. You can level the fuel level by bending the floats and draining all excess. Now you can put back everything that you removed from the carburetor in the process. Start the engine and watch both Solex cameras. If gasoline drips from them, then you need to reduce the amount of fuel a little more.
If the motor is acting up, it means you need to increase it. Then check the liquid level in the fuel drum again. Most likely, you will make 3-4 attempts before success. You can reduce the amount of time you spend at work by pumping gas by hand.
Important adjustment points
After the installed structural element has reached its optimal position, it is necessary to press the gas pedal: the motorist must check the functionality of the motor, which will “raise” the crankshaft speed without interruption. At the same time, there should be no sudden damping of the engine after the pedal is released. If there are negative aspects, you will have to re-adjust the carburetor.
The CO content in the exhaust gases of the power unit must also be checked; according to the rules, after such manipulations it should decrease. With ideal performance of all components, CO should fluctuate within 1.5%.
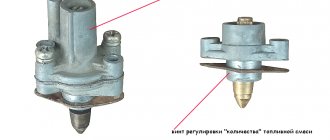
When the screws do not help normalize the speed, the car owner will have to additionally check the power unit, since such moments indicate that the fuel “goes” to the mixing chamber, bypassing the idle system. In this case, you need to pay attention to the carburetor solenoid valve to close it. At the same time, you should measure the diameter of the nozzle hole, which is sometimes larger than necessary.
Carburetor 2106
The standard option used on the Six engine is the “Ozone” sample. This is a two-chamber carburetor, with a falling air flow, emulsion type. The technical characteristics of the engine, when running, produced 75 horsepower, and the maximum speed was 155 km/h. Acceleration time to hundreds is 16 seconds.
The engine response is good, but when you press the gas pedal sharply, the car first chokes and then starts to move. This was explained by the fact that in the Ozone float chamber, the fuel level was insufficient, and during sharp acceleration there was not enough of it.
VAZ 2106 car owners were racking their brains over the question of which carburetor is better to install so that the engine's throttle response increases, while having minimal losses. Most opinions agreed that installing a Solex with a VAZ 21083 would be the best option.