Let's figure out why the diode bridge in a car generator burns
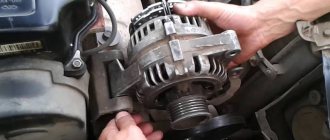
The main component in the electrical system of any vehicle is the generator. Without this unit, a serviceable car, even with a new, fully charged battery, will not drive for long. Therefore, this unit must be in working order at all times, that is, fully operational.
In this case, initial diagnostics of the car can be carried out without leaving the driver’s seat. However, repairs or detailed inspections require dismantling the DC source and then disassembling it to gain access to the diodes. But before this, the motorist must know the basic ways to check the diode bridge.
What is a generator diode bridge and what functions does it perform?
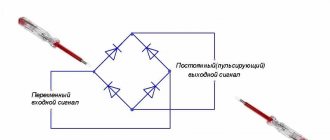
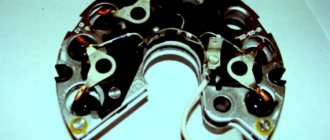
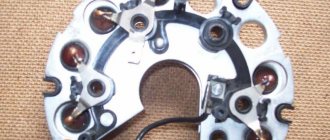
The rectifier unit (another name for the device) is an integral part of the generator and serves to modify the alternating current produced by the unit into direct current, necessary for charging the battery and powering all electrical appliances of the car.
It is located on the frame of the generator and consists of 4, 6, 9 or more diodes placed on two insulated aluminum or steel horseshoe plates that act as cooling radiators.
The main components of the bridge are semiconductor diodes (most often silicon) that conduct current in the required direction. They are the rectifiers that convert alternating current into direct current. The battery acts as a capacitor, softening the inevitable voltage drops.
Instead of diodes, the circuit can use valves of any type - for example, selenium columns, the principle of operation of the circuit will not change.
How to determine the health of the generator
Information about the operating status of the main unit responsible for generating electrical energy in the car is displayed on the dashboard for the convenience of motorists. The icon on the instrument panel that resembles a battery should go out after starting the vehicle’s power unit. This means that the power to the main electrical components has been switched from the battery to the generator. If the indicator does not go out, this indicates a breakdown in the electrical circuit. Problems may also be indicated by insufficient battery charge due to the lack of normal current rating.
How to replace the diode bridge of a VAZ 2110 - step-by-step instructions
Replacing the VAZ 2110 diode bridge occurs in the following order:
- First, remove the generator from the car and then click on the sides of the latches that secure the cover to the generator and remove it, and as soon as it is removed and set aside, proceed to removal.
Replacing the diode bridge VAZ 2110 step 1 - First, use a screwdriver or wrench (everyone attaches the voltage regulator differently), unscrew either the screws or bolts securing the regulator and pull it.
Replacing the diode bridge VAZ 2110 step 2 - Remove, while also disconnecting the wire connector from the regulator, then using a spanner or socket, unscrew the three bolts that secure the wires to the diode bridge and unscrew another bolt that secures the diode bridge itself and remove the wires.
- Having thrown them aside, use a Phillips screwdriver to unscrew the screw that secures the capacitor and remove the diode bridge and capacitor from the car generator.
Replacing the diode bridge VAZ 2110 step 4 - Installation of the diode bridge is carried out in the reverse order of removal, the whole operation is carried out easily and quickly, the main thing is to assemble everything correctly, do not forget and be sure to read the video at the end.
Main signs indicating a faulty diode bridge
A normally operating diode conducts current in only one direction. In the event of a breakdown, a current leak appears, which flows from the on-board network to the starter windings. Today, several types of diode bridges are installed on cars:
- diode bridge without additional cooling;
- diode bridge with passive cooling due to special radiators.
In addition, there are different types of connecting windings and connecting bridge platforms: using welding or soldering. The first sign that the generator is operating unstably due to a broken diode bridge is the rapid and frequent discharge of the battery. There are other reasons why you can indirectly determine the combustion of diodes in a rectifier:
- insufficient spark on the spark plugs;
- headlights with dim light during operation of the power unit;
- interruptions in the sound system;
- significant reduction in cooling fan power;
- poor operation of the air conditioning system.
If any of the above-mentioned signs are noticed, there is no need to panic, but it is better to find out why the diodes burned out, for which you should seek help from the service station specialists.
Video about repairing, checking and replacing a diode bridge
“The alternator in a 2004 Toyota Corolla failed six months ago. The relay-regulator and diode bridge were replaced at the service station. Two weeks ago, the battery charge indicator light came on again - this time it was necessary to replace the diode bridge. What could be the reason for such frequent generator breakdowns?”
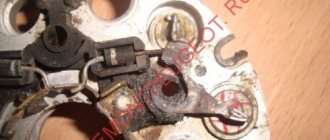
Generally speaking, the failure of diode bridges in Toyota Corolla of the specified and later model years is not such an unusual phenomenon. This problem is associated with a design feature of the Denso generator that manifests itself in our operating conditions, which is most likely equipped with the Corolla in question. The body of the diode bridge is made of aluminum, but the diodes are pressed into it in a steel shell. When moisture and salt enter the generator between the surfaces of the housing and the diodes, due to galvanic processes, an oxide film is formed, which impairs the transfer of heat generated during operation of the diodes, which causes overheating and subsequent burnout of the diodes. However, it takes quite a long time and a considerable amount of water and salt for the operating conditions of the diodes to deteriorate so seriously that they lead to malfunction. And for this reason, the diode bridge could fail the first time, but not the second time - after two weeks.
Such a short period of time raises doubts about the quality of the replacement bridge. True, there is a problem here too. It usually takes a day or two for a defective bridge to show its essence, but this one still lasted two weeks. If we assume that the repair of the generator was carried out without errors and using high-quality spare parts, then, according to the head of production at Modnikov LLC, Igor Nikiporenko , with whom we discussed the issue, the re-burnout of the bridge was most likely due to the fact that during replacement The external cause that caused the diode bridge to burn out the first time was not found and eliminated.
Here's what the specialist said: “The diode bridge is the unit of the generator set through which the generator supplies current to the on-board network. First of all, bridges fail due to exceeding the permissible load or due to constant operation with the maximum load. Excessive load can be caused by various reasons. The most common are a short circuit in the battery or the need to charge a very discharged battery while a large number of consumers are turned on at the same time. In addition, an additional load on the generator appears when some non-standard equipment has been installed, for example, a powerful music amplifier. There was a case when the bridge burned out in a diesel car due to the fact that the glow plugs were not turned off. I would definitely check the battery for shorts in the banks - perhaps the battery is taking on too much.”
We prepare the diode bridge for self-diagnosis
You can check the functionality of the generator bridge on your own if you understand how the diodes are connected. But before you start diagnosing, you need to carry out preparatory measures. To do this, you need to the generator to gain access to the diodes:
- The fasteners (bolts) holding the front and back covers are unscrewed.
- The next step is to disconnect the housing from the starter winding.
- If the bridge structure is collapsible, then the assembly is unscrewed.
- The positive terminal is disconnected from the generator.
- The method of attaching the minus is checked. If the terminal is independent, it is disconnected.
- After removing the front wall, the bridge is disconnected from the windings. For this purpose, a soldering iron is used to heat the leads until the solder boils, after which they are carefully moved to the side using a screwdriver.
After completing the preparatory work, you need to figure out the question of how to properly check that the diode bridge has burned out ?
We check the generator rectifier
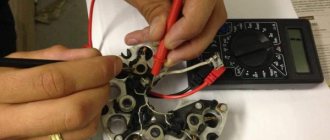
To make sure the rectifier is working properly, just check the diode bridge with a multimeter. Diagnostics of a diode bridge is carried out by “ringing” a semiconductor or electrical circuit. Before ringing, experts recommend inspecting the battery connection using an incandescent lamp to make sure the diode is working.
Diode bridge ringing is carried out in the following ways:
- Using a lamp. For unhindered access to the bridge, remove the generator cover; one zero contact is supplied from the battery to the bridge plate. Then the phase is supplied to the battery, and zero is supplied to the stator winding, and in the event of a breakdown, the lamp turns on.
- Using a tester (multimeter). In this case, it is necessary to set the multimeter to ohmmeter mode, and the resistance reading should be at least 400 Ohms.
A multimeter is considered the best device for measuring resistance and allows you to ring the generator diode bridge with great accuracy. The presence of a tester allows you to independently determine the malfunction of the diode bridge without visiting service centers.
At the initial stage of diagnostics with a multimeter, the device is connected to resistance. If the connection is correct, the tester emits a beep. Next, the diode bridge is removed from the stator winding, after which the ends of the device are connected to the radiator plate and diodes.
The value “1” on the multimeter is a sign that the diode is working properly. If the values fluctuate up or down, it needs to be replaced.
Since the design of a classic rectifier involves the presence of three pairs of diodes, their readings when changing poles should show approximately the same value.
Important! “Ringing” of the diode bridge must be done with each plate. A beeping sound during ringing is also a sign of equipment malfunction.
Signs of diode failure
The main problem in a rectifier bridge is the diodes. You should start checking the unit that generates electricity in the car only after identifying the following indirect problems:
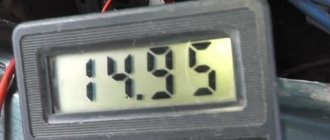
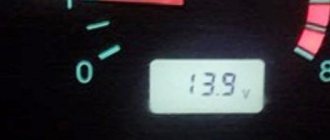
- the voltage at the generator output terminals is below 13.5 Volts;
- the indicator on the instrument panel inside the car continues to light after starting the power unit;
- the arrow on the voltmeter shifts to the red zone when readings are taken;
- The battery indicator does not light up after turning on the ignition.
Similar symptoms are detected when the voltage regulator breaks down; therefore, its serviceability is checked first. There are various reasons why a rectifier bridge fails, which requires its repair or complete replacement.
How to choose a tester?
Choosing a tester is no less important than diagnosing a rectifier, and a correctly selected device is a guarantee of successful equipment diagnostics.
If in the recent past, when purchasing a multimeter, car owners were faced with a shortage of equipment, now they can be purchased in almost every store.
Earlier we mentioned the incandescent lamp and, in fact, this is the cheapest device. Such a tester is suitable for identifying small faults in the rectifier, but is not suitable for finding more complex problems. Therefore, it is recommended to purchase modern multimeters, many of which are automatic and come with LCD screens.
In conclusion, I would like to draw attention to the following things:
- every car owner should be able to check the diode bridge on the generator, since this is considered a basic skill in servicing your own car;
- “conductivity”, “tseshka” and other testers do not always show the final result even when used correctly, so it is better to diagnose a breakdown using several devices;
- in case of replacing the generator rectifier, do not forget to protect it from moisture;
- buying parts on a spontaneous market will be cheaper than in a store, but there is a risk of buying a faulty product;
- To accurately diagnose a bridge, it is better to purchase several multimerts.
Why does the diode bridge burn out?
There are many situations that can lead to diode failure. However, the most common breakdowns include the following:
- the board was flooded with water;
- dirt, together with engine oil, penetrated inside the bridge and led to a short circuit;
- The polarity of the contacts on the battery has been reversed.
Experts are considering several options for checking the functionality of the generator rectifier. The first method involves using a multimeter. In the second case, a standard car light bulb is sufficient.
Causes of malfunctions
The practice of motorists shows that replacing a diode bridge can be caused by various reasons, but the main one is still a feature of factory production.
Therefore, let's take a closer look at the reasons for rectifier failure, which may lead to the need to replace the device.
Cause
Peculiarities
Many manufacturers use aluminum shells for diodes, which are not of high quality and reliability. It is recommended to choose steel shells. The experience of specialists and motorists shows that the best rectifiers today are made in Belarus
Moisture can penetrate inside the structure and lead to oxidation of the space between the housing and the diodes
Oil also leads to disruption of the functionality of the device if it penetrates inside the generator structure and specifically onto the diode bridge
Battery polarity confusion
If, when connecting a battery to a charger or when lighting a cigarette, you accidentally reverse the polarity, this will most likely lead to a breakdown or burnout of the bridge
If the battery does not hold power and constantly has a weak charge, the rectifier may be the culprit
Before you start replacing the device, you must first check the generator and bridge, thereby making sure that the rectifier is the culprit of the problem.
Advantages of a factory rectifier
Many people believe that when repairing a car it is better to use analog spare parts, which are more expensive but of higher quality. This is a fair statement for many spare parts, to be sure.
But if we are talking about a rectifier, then for a VAZ 2110 when replacing it is better to use the factory version, that is, a monolithic diode bridge.
This is explained by several important advantages. Namely:
- Affordable price, which allows you to perform inexpensive repairs yourself;
- Small size, compact device;
- The diodes used interact effectively with each other, their parameters match optimally;
- Due to the high-quality arrangement of diodes, the bridge operates in a single heating mode. This, in turn, allows you to avoid overheating with a high degree of probability;
- Easy to replace and install. The procedure is easy, which allows you to do the repair yourself.
Again I started having problems, this time with the generator (which I didn’t expect), backstory - in December 2007 I somehow didn’t start and decided to go and diagnose the battery, generator, starter (topic: Generator voltage) the test showed that it was most likely full diode bridge because the gene did not maintain the voltage at the load, so the battery was always undercharged. I somehow gave up on this matter :) In the summer of 2008, my generator light came on, I took it to the guys for diagnostics, they said, go for repairs - most likely the diode bridge is dead. They gave me the phone number of the Starters and Generators office, I made an appointment with them, I came, they measured everything, they took an oscillogram, they said yes, the diode bridge, they removed the gene, took it apart again, measured something on the board, they said yes, the bridge definitely (one of the phases burned out) ).. well, the bridge was replaced, the rear bearing in the gene was replaced because... buzzed a little.
Ok, I joyfully rode until December 2008, by which time I managed to bring the 2-year-old Atlas battery to a deep discharge a couple of times (the light in the cabin lasts for 4 days). In December, after another complete discharge, I took the battery home and charged it, but the status indicator on the battery remained black (charging is required), okay, never mind, I ordered a new battery, I wanted something good - I took an Optima RedTop 4.2l from St. Petersburg. All this went on for 2 months (I received it in February literally 3 weeks ago), until that moment I was driving on a dead battery