Print this article Font size 16
Today we will get acquainted with the stove and its structure on a VAZ 2110 car.
As you know, the heating system has a direct impact on the level of comfort. If in summer there is no special need for interior heating, then in autumn and winter it is problematic to imagine traveling without it. Theoretically, you can drive, but lower temperatures are unlikely to benefit your health.
Dismantling the heater
Device
First of all, you should know the very structure of the heating system in order to clearly understand what and how to repair, because for the VAZ 2110, interruptions in the operation of the heater are a typical phenomenon, and from time to time requiring the intervention of reliable hands - be it a driver or a service station worker.
For stable and high-quality driving in a car, it is recommended not only to be able to use the heating system, but also to understand the heater’s structure. The operating principle of the system can be found here: https://vazweb.ru/desyatka/otoplenie/otopitel.html
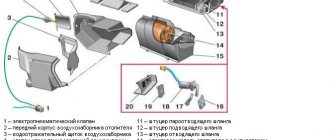
So, the heating system consists of: 1. The actual heater unit, which provides heating for the interior. It is represented (by importance of details):
- An electric motor on which a fan is also attached to pump hot air;
- A radiator, without which the entire system does not work. Moreover, unlike the old heater, the radiator of the VAZ 2110 stove of the new model does not have a tap that shuts off the flow of antifreeze (antifreeze) through the radiator. Thus, it is always (whether in winter or in summer) heated. This was done supposedly in order to eliminate leaks that were often observed through this tap, and also to heat the interior as quickly as possible when necessary. In the summer, the supply ventilation goes past the radiator, but still some VAZ 2110 owners, when repairing the stove, add this tap to the system;
- There are three dampers. One is responsible for air intake recirculation, the second opens/closes the heater duct, the third, the most important for the interior, controls the heater;
- A resistor that regulates the blowing speed.
Heater parts VAZ 2110
All parts are packaged in a block with additional valves, shields, and fittings. This entire device is housed in a housing and is located under the hood closer to the instrument panel.
2. The next block represents the air ducts of the VAZ 2110. They extend directly from the stove and provide:
- Interior ventilation through central nozzles;
- The air distributor works to supply heat (or regular air for ventilation);
- Two air ducts are directed to the rear of the cabin;
- There is a whole system of five nozzles for heating the feet;
- Two side air ducts provide heating for the side windows and part of the interior, providing better heating;
- Two nozzles for ventilation.
This, in a nutshell, is the principle of distribution of hot or cold air inside the VAZ 2110.
3. The electronic control unit for the stove operates from the passenger compartment. It includes:
- Controller handle. This device allows you to set the temperature in the cabin that the stove unit should produce. It turns on by turning the knob and sets the temperature from the air, the temperature of which will correspond to that outside, up to 30°C. Most often, this part is called the ACS controller (automatic heater control system);
- The temperature sensor is responsible for turning on the heater when the temperature in the cabin drops by 2 degrees against the set one. The sensor has a microfan, and if the control knob is in position A, then the micromotor in the stove block turns on and the damper begins to operate, ensuring proper heating. Therefore, before starting repairs of the heating system, the operation of this sensor is usually checked. It is located next to the heating lamp on the ceiling of the VAZ 2110. Since it is not repairable, in the event of a breakdown this device should be replaced immediately.
Ceiling interior air temperature sensor
Repair
As we have already noted, the design of stoves on dozens with carburetor and injection engines has practically no differences. Therefore, the repair instructions below are suitable for owners of a VAZ 2110 with both types of power units.
If you are planning to overhaul your old-style stove, we recommend starting with the purchase of a radiator. Use copper as it is more efficient and helps the heater work better.
To carry out repairs correctly, strictly follow the points presented in our instructions and rely on video materials.
- There is a plug on the engine block through which coolant is drained into any container. If you plan to use the same antifreeze or antifreeze again, choose clean containers.
- Next you need to move the frill forward. This process will take quite a long time, so be patient.
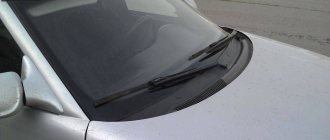
- Next, you need to remove the windshield wipers and get rid of as much as possible of everything that could interfere with the repair process.
- Remove the body of your stove. It is divided into two parts, which is important to know in advance. The front part of the stove body is removed directly along with the fan.
- After this comes the stage of dismantling the cabin filter. Check its current status. If the filter is dirty, this is an excellent reason to replace it.
- The next stage involves removing the second part of the housing.
- Loosen the clamps used on the hoses a little. This will allow you to easily remove the hoses.
- Having applied some effort, you can now finally remove the radiator from its seat.
Differences in design
The VAZ 2110 was equipped with stoves of the so-called new or old model. Both systems, including those on the VAZ, which has an injector instead of a carburetor, are not particularly different in design.
So, the immediate differences:
- The main difference between the new stove and the old one is in the design of the heater radiator. Therefore, if you are repairing a heating system and decide to install a new model instead of an old radiator, then take into account some nuances;
- In addition, the SAUO controller is also not exactly like that. 4 or 5 position controllers manufactured before the fall of 2003 have already been discontinued and are not suitable for new heater models;
- The micro-gearboxes are also different, starting from release in September 2003. They differ in resistors (shaft position sensors), so you need to check whether the resistor in the MMR model that you purchased is interchangeable.
Step-by-step instructions for removing and installing the stove
The heat exchanger of the VAZ 2114 car is located in an extremely inconvenient place. Therefore, when removing and installing it, you will have to do a fairly large amount of disassembly and assembly operations.
The VAZ 2114 heater is equipped with air ducts, ventilation nozzles and levers for regulating the warm air flow
Tools and consumables
To work you will need the following tools:
- Phillips and slotted screwdrivers with short and long handles (screwdriver);
- set of wrenches;
- container and rubber hose for draining coolant;
- rags, a piece of oilcloth.
Procedure for replacement
In order to remove the heater radiator of a VAZ 2114 car, you should perform the following operations:
First, drain the antifreeze on a cold engine. Then unscrew the screw located behind the plastic plug.
Remove the glove compartment. First, unfasten and detach the bottom half. Then remove the cover along with the light bulb. Unscrew the screws securing the upper part and, with slight pressure and rotation, lower it down. In total, you will need to unscrew six screws.
Unscrew the two upper and two lower self-tapping screws securing the instrument panel.
Remove the lower protective cover from the steering column. To do this, remove three self-tapping screws and three screws from below.
Pull the plug out of the cigarette lighter socket.
Disconnect the connectors of the pads from the car radio and remove it from the slide.
On both sides, unscrew the screws securing the plastic console.
Pull out the flags that regulate the position of the damper and remove the heater fan mode switch.
Disconnect the console from the panel.
On the console, disconnect the terminals from the buttons for turning on the lights, heated rear window, fog lights, etc.
Be sure to mark them with a marker or notches in order of location. Disconnect the console from the panel.
Disconnect the ashtray light connector.
Unscrew the two screws from the diagnostic connector and carefully completely disconnect the console.
Carefully remove the console and set it aside.
Unscrew the two screws securing the metal base to the floor - one on the left and the other on the right side of the bracket.
Unscrew the four self-tapping screws securing the front panel (“dashboard”) - two each to the left and right of the center of the console mounting.
First remove two large screws, then two smaller screws that secure the iron structure.
Pull the electronic control unit out from under the console.
To access the heating radiator, lift the left side of the dashboard using a jack.
In case antifreeze spills, place an oilcloth under the hoses and rags on it.
Unscrew the clamps from the hoses connecting the radiator to the engine cooling system. Remove the rubber tubes from the heat exchanger pipes. Drain the coolant from the radiator into a prepared container.
Remove the heater core from its socket. Install the new radiator by performing all operations in reverse order.
To prevent an air lock from forming in the cooling system, remove the hose from the throttle body after loosening the clamp. Pour antifreeze into the expansion tank in a thin stream.
At the same time, watch the end of the disconnected hose - as soon as liquid flows from it, put it in place and tighten the clamp.
Video: replacing the radiator of a VAZ 2114 stove
https://youtube.com/watch?v=JYC8ijuYJdg
During the operation of a car, situations arise that any car enthusiast can resolve independently. Replacing a stove radiator is precisely this type of operation. As you can see from the article, doing this yourself is quite simple. The main thing is that after removing and installing the radiator, you do not have any unnecessary parts left, and all screws and clamps are tightly tightened. Good luck on the roads!
VAZ 2110 stove diagram and functional features
As you know, the main functional purpose of a car heater is to supply warm or cold air inside the cabin. In order to have a practical opportunity not only to identify a malfunction, but also to eliminate it, you need to know how the VAZ 2110 stove circuit is designed. After all, there are different types of possible malfunctions and there can be both problems in the electrical circuit and in one of the elements of the stove itself. For a VAZ 2110, the heater diagram and knowledge of it will make it easier for the motorist to find a break and repair the heater.
The main reasons for poor operation of an electric furnace
Before you can directly begin to find a solution to a problem, you need to be able to identify it quickly and effectively. First, it is advisable to consider the general structure of the furnace. So, the heater furnace consists of the following components:
- mounting block fuse;
- incendiary lock;
- ignition switch together with its unloading relay;
- a special switch that regulates the operating mode of the furnace electric motor;
- additionally built-in resistor;
- stove motor;
- heated rear window of the car, which contains a heater adjustment button with a light indicator;
- a special functional element for heating glass.
VAZ 2110 stove wiring diagram
One of the reasons for the malfunction of the electronic circuit of the furnace may be the lack of functional activity of the heater electric motor at both low and high speeds. In this situation, you must proceed as follows:
- First you should make sure that the fuse has not accidentally blown;
- If a blown fuse is detected, it will urgently need to be replaced with a new one.
Note. Before proceeding directly to replacing the old fuse with a new one, it is necessary to first and without fail establish the cause of the burnout. If this is not done, the service life of the new fuse will most likely be short.
- There may also be a break or damage to the wiring at the point of its connection;
- to eliminate the above reason, it is necessary to check the electrical circuit according to the furnace diagram;
- after which, it is necessary to eliminate the impulse, if it took place;
- if the heating switch does not function, then the most likely cause is a stuck pusher or burnt contacts;
- to accurately diagnose a switch malfunction, you need to check the voltage level at the side terminals while changing the position of the switch in space (to do this, it is enough to apply current to the main terminal);
- if during diagnostics a change in voltage is not detected when changing the position of the switch knob, then it must be urgently replaced;
- there are a huge number of possible reasons for the electric motor to fail to operate: broken electrical connections or armature winding, immobilized cleaning brush, oxidation and/or contamination of the armature commutator;
VAZ 2110 heater radiator diagram
- It’s not difficult to revive the movements of the brush again; just disassemble it and then clean it;
- restoring the wires will also not be difficult, because the main thing is to find the location of the defect;
- if several of the above provisions do not produce results, then there is only one way out - a complete replacement of the heater electric motor;
VAZ 2110 stove electrical diagram
- sometimes, which is extremely rare, the cause of the malfunction may be the mounting block;
- There are many reasons for the faulty state of the mounting block, but the main ones are: at the soldering site, a complete or partial break in the electrical circuit, fire of current-carrying paths;
- The circuit should be checked according to the furnace diagram, otherwise it will simply be impossible to detect breaks and faults;
- the final practically probable cause may be an internal break in the circuit of the auxiliary (additional) resistor (see How to replace the heater resistor on a VAZ 2110);
DIY repair
Regardless of whether you have an injection “ten” or a carburetor, the repair procedure is carried out according to the same principle. If you decide to tune the system by adding new lighting, then the console will have to be disassembled. To provide improved illumination, it will be necessary to install diode bulbs instead of conventional lamps.
As for repairs, if it is necessary to replace the radiator, it is best to use a copper device, since it is more effective in itself:
- First, the antifreeze must be drained from the system through a special plug on the engine block.
- Then you need to move the frill forward - this step may take some time.
- Then you should dismantle the windshield wipers, as well as other elements that may interfere with the repair.
- After these steps, the housing of the heating system is removed - it is divided into 2 parts, the front one is dismantled with the fan itself.
- Next, you should remove the cabin filter element and check its condition. If you see that the filter is very dirty, then it should be changed.
- Then the second part of the heater housing is dismantled.
- Now you need to loosen the clamps on the pipes, after which you can remove the lines themselves.
- The last step is to remove the radiator and replace it with a new one. Subsequently, all steps must be repeated in reverse order for assembly.
Sorry, there are no surveys available at this time.
What to do if the VAZ 2110 stove does not heat up
Comfort in the cabin when operating the car in winter is ensured by a stove in the cabin. Before the advent of the “tenth” family of models, AvtoVAZ equipped its cars with a simple mechanically controlled heating system. Starting with the VAZ-2110 model, designers revised the design of the stove and improved its control mechanism. Such modifications increase the convenience of adjusting the heating operation, and sometimes cause failure or improper functioning of the interior heating.
Noisiness
Another fairly common “disease” of the VAZ 2110 associated with the stove is that it is very noisy. This doesn’t interfere with the flow of heat into the cabin, it’s annoying, and you expect: something is about to break.
So:
- if the noise is sharp, even “squealing,” the lower part of the heater, which is attached to the hooks, may have come unfastened;
- sometimes it is necessary to replace the stove body if the protrusions that hold the latch are broken;
- The fan is noisy. It needs to be dismantled, cleaned, and its electric motor inspected;
- The textolite washers hum, eliminating the axial play of the fan. You can use washers made from fluoroplastic or other material that provides the least friction to replace them. It is better to lubricate the washers additionally. Some craftsmen use machine oil for lubrication. This helps, but not for long because it is fluid. It is better to use a thick lubricant such as lithol, graphite, etc.
The design of the heating system of the VAZ-2110
The concept of interior heating on the VAZ-2110 remains the same - the air supplied to the cabin is heated by the cooling system. To do this, a radiator is installed in the cabin, under the front panel, which is included in the cooling system; heated antifreeze moves through it. The air passing through the radiator is supplied through the air intake. After heating, the air flow through the air ducts is supplied to the necessary areas - the windshield, legs, torso.
Forced air circulation is provided, which increases the efficiency of the distribution of warm flow throughout the cabin. For this purpose, the stove is equipped with a fan driven by an electric motor.
The air heating temperature is regulated by dampers. One of them allows the flow either through the radiator (for heating) or bypassing it. The damper divides the flow to obtain the desired temperature - one part of it goes through the radiator, and the second bypasses it, after which it is mixed, the degree of heating is regulated and supplied to the air ducts.
The second damper is designed to shut off the air supply to the cabin from the outside. Thanks to it, a closed air circulation mode is established.
How heating and ventilation work
There is supply and exhaust ventilation in the interior of the VAZ 2110. The windshield trim has holes through which air either spontaneously (when the car is moving) or forcibly - with the help of a heater fan - enters the passenger compartment. The supplied air exits through the provided slots - at the ends of the doors, between the upholstery, and door panels.
But you don’t need to think that the VAZ 2110 is all covered with cracks, and the air simply doesn’t stay in it.
In fact, all of the holes mentioned are equipped with valves that work “for release” and prevent (at least hypothetically) the spontaneous entry of air from the outside.
The design and operating principles of the heating system are discussed in detail here:
However, you can make high-quality tuning of the heating system, then the car will be truly comfortable.
Heating is done as follows:
- The air passes through the heater radiator, while warming up. The heating temperature is controlled by a relay;
- Next, the warm air is distributed through the air ducts;
- Special deflectors direct the main flow of hot air to the windshield and to the center of the cabin. The flaps can be used to block/open the flow to the side windows;
- There are two more flaps - for heating the front window and also for the feet of the driver and passengers. For this purpose, deflectors are provided for the front seats: one pair is at knee level, the other is almost on the floor. For rear passengers, there are air ducts under the front seats plus a pad on the floor tunnel;
- There are special handles to control air flows;
- The fuse located in the mounting block protects the entire electrical heating system from blowing.
Operating principle of the heater
If desired, you can carry out tuning, adjust the flow of heat to different parts of the VAZ 2110 interior, thereby improving comfort.
Stove control
Previously, the dampers on VAZ were controlled mechanically - the damper was connected by a cable to a handle on the heater control unit. Additionally, the heater was equipped with a tap to shut off the supply of antifreeze to the heater radiator, which was regulated by a handle on the control unit.
Video: The stove on the VAZ 2110 does not heat up? Replacing the heater damper gearmotor
On the VAZ-2110, the shut-off valve is no longer installed, and the heater is turned off in the summer using a damper, which, when completely closed, separates the radiator from the passenger compartment. The mechanical control of the dampers was replaced with an electromechanical one - a micromotor gearbox was installed. Heating control for VAZ-2110 includes:
- controller of the automatic heater control system (AHC);
- temperature sensor;
- damper position sensor;
- micromotor gearbox
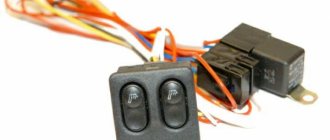
The controller is equipped with a front panel with two handles - the left one is responsible for adjusting the temperature, the right one is for operating the fan. Models of the 10th family use controllers, the difference between which comes down to the number of fan operating modes and the presence of an automatic operating mode.
Checking components
Naturally, disassembling the stove on a VAZ 2110 and checking its components is necessary if you are dissatisfied with its operation, and also if it cannot be adjusted.
So:
- The first thing to do is check to see if the fuse has blown. And although, if this happens, the thought immediately arises - change the blown fuse, do not rush. This is unlikely to immediately solve the problem; most likely, it is not the cause, but a consequence of some kind of failure that needs to be found;
- First of all, you need to check whether the damper moves when the parameters of the heater sensor change. Carefully, so as not to break the wire going to the backlight, remove the deflectors. Now you can clearly see whether the damper is turning or not. If you need to replace the heater damper, then installing an aluminum one instead of a plastic one will be justified;
- Check the resistance of the temperature sensor. If the temperature in the cabin is 16°C, then its resistance should be 250 Ohms, at 22°C - about 200 Ohms. If this is not the case, then installing a new sensor should help;
- It is also advisable to check the controller: remove it from the socket, turn on the ignition and, using the handle to change the temperature parameters, measure the voltage on the long connector. If the voltage does not change, then it is faulty;
- To check the gear motor of the stove, you will have to do a little disassembly: remove the frill, get to the drive of the gear motor (brown and pink wires are connected to it). Apply current from the battery to the connector. If it spins, it means it’s working, if not, you may need to install a new one;
- If the heater only operates in one position, the additional resistance (resistor) through which the fan is connected may have burned out. Installation of a new one is possible only from the engine compartment;
- Check if the wires in the controller are burnt out. To do this, it needs to be disassembled;
- On the right under the hood you will find the relay box. It is very possible that a wire has come loose from the relay responsible for operating the heater. At the same time, check the relay that turns on the heated rear window. If you do not have such heating, when tuning the stove, you can include this relay in the system;
- If the air entering the VAZ 2110 interior does not warm up sufficiently, be sure to check the antifreeze level, as well as the absence of its leakage from the heater;
Principle of operation
The operating principle of such a control system is simple - the driver uses the left handle to set the desired temperature (completely cold or in the range from 16 to 28 degrees). Based on the set mode, the controller supplies power to the micromotor gearbox and it sets the dampers to the desired position.
Two-way communication is used between these elements - a position sensor is installed on the gearbox, which “informs” the controller about the opening angle. Thanks to the installed temperature sensor (located on the ceiling), the controller constantly monitors the degree of heating of the air in the cabin, based on which it adjusts the position of the damper to maintain the temperature set by the driver.
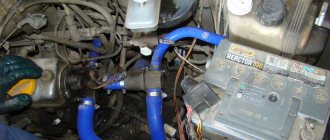
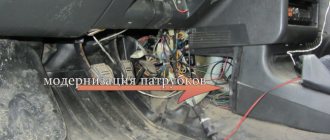
Changing tee hoses
As with any other repair work, you must follow the instructions below:
- the clamp that secures the filling hose to the tee must be loosened;
- the coolant is drained from the expansion tank;
- the clamp that fastens the tee hose to the branch pipe of the supply pump pipe becomes loose. Next, this hose is removed and the remaining antifreeze is drained;
- a rubber belt with all fastenings is detached from the expansion tank;
- dismantle the connector of the coolant sensor in the tank;
- the outlet hose is detached from the tank;
- this tank is removed and put aside, the same applies to the second steam exhaust hose;
- The screws securing the left soundproofing trim in the engine compartment are unscrewed.
Removing the upholstery should be done in this order:
- unscrew the self-tapping screw located on top, which secures the central upholstery;
- in the tank, remove the connector from the sensor designed to monitor the coolant level;
- the nuts that are located on the vacuum booster of the main brake cylinder are removed;
- then this cylinder and brake pipes are removed from the studs, they are removed forward, the pipes will bend;
- The hose is removed from the amplifier pipe; in this case, you need to bend the required angle of the upholstery in advance.
Now repair work will take place inside the car:
- The assembled vacuum booster with bracket and brake pedal is moved to the side. This frees up the necessary access to the hoses that are attached to the heating radiator;
- to disconnect the lower hose, you will first need to remove the upper supply hose;
- it is removed after loosening the clamp.
Installation of new parts must be carried out in reverse order.
Note! For better quality connections, it is recommended to install additional clamps immediately before installing the tee.
It is better to assess the performance of the stove at certain intervals. Timely inspection and necessary replacement of the hoses of the heater and cooling system of the car is the key to reliable engine operation. Naturally, to save time on repairs, you can turn to specialists at a service station, but, as practice shows, any repair is not cheap. Therefore, a good alternative would be to replace the hoses on the stove using the photo instructions with your own hands. To better complete the process, it is advisable to do everything as required by the instructions. And the price of the hoses themselves is not that high.
Malfunctions of the VAZ 2110 stove and their elimination
VAZ-2110 owners are faced with the problem of a non-working or malfunctioning stove. The malfunction boils down to the fact that the air does not heat up, the heater supplies hot air, or there is uneven heating - cold air goes to the windshield, but well-heated air goes to the foot area.
Why does the stove not heat well?
These symptoms occur due to a malfunction in the stove control system:
- Damage to the ACS controller.
- Malfunction of the micromotor gearbox.
- Damper deformed or jammed.
- Temperature sensor malfunction.
To identify the problem, first determine in which branch of the control system the malfunction occurred. To do this, start the engine, turn on the heater fan at maximum speed, and then turn the temperature control knob from “Min” to “Max” and listen to whether the noise changes from the fan operation. If the “controller-gearbox” branch is working properly, then the dampers move, and by changing the direction of air flow, the noise from the stove operation changes in tone.
But if the sound of operation does not change, the reason lies in the controller, gearbox or dampers.
To check the controller, replace it with a known good one and check whether the operation of the stove has changed. The next thing to check is the gear motor. The difficulty of checking is that it is located under the “jabot” on the engine side, and it is difficult to get to the gearbox. This control branch may not work due to jammed dampers.
To check the “controller-temperature sensor” branch, disconnect the wires from the sensor. Without its readings, the controller controls the damper based on the temperature set by the driver. If the problem with the operation of the stove lay in the temperature sensor, then after it is turned off, the normal functioning of the heating system will be restored, with the only difference that the automatic fan mode will stop working and the ACS will not be able to adjust the temperature of the air flow.
More often, problems arise with the controller and gearmotor. These units can be repaired, but since their price is low, it is easier to replace them with new ones.
Video: The stove on the VAZ 2110 does not heat up? Heater damper repair
Typical faults
Below are the main malfunctions of heating systems:
- When the heating is turned on, hot air blows. In this case, there may be many reasons. It is necessary to diagnose the heater motor, gear motor, temperature controller on the ceiling, and the ACS controller. In some cases, the problem lies in the radiator, which, due to incorrect operation, cannot warm up the air flow that passes through it.
- Often the cause of incorrect operation of the heating system is dampers that are unable to open or close well. Since the damper is made of plastic, it tends to deform over time; in this case, installing a metal damper will solve the problem. To understand the condition of this element, you simply need to dismantle the deflector. Turn on the heating and try turning the controls - if the damper does not respond to your actions at all, then you need to look for the problem further.
- Fan failure can be determined by the absence of characteristic noise. But if there is no noise, the problem may be a failed fuse or oxidized wiring contacts. In order to get to the fan, you need to dismantle the so-called apron.
- In the engine compartment there is a radiator for the heating system, next to the fan. To remove the radiator, the fan will also need to be removed. If the radiator begins to leak, you will be able to see puddles of coolant under the floor mats; sometimes this problem is caused by bad clamps. One way or another, it is necessary to determine the location of the leak and solve the problem to restore the system's functionality.
- Many owners of "ten" are faced with such a problem as the lack of backlight on the heater control panel. Car enthusiasts associate the lack of lighting with stove malfunctions, but this is completely wrong. If there is no backlight, this may only be due to the wiring (video author - Aleks B).