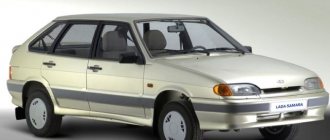
When in severe cold you have to get behind the wheel of a VAZ 2110, and you feel it with your back and with the ones below you. the seat is cold, you can’t help but think that it wouldn’t hurt to have heated seats in the car. The fact is that standard heated seats on the VAZ 2110 are found only in the luxury version of the last years of production, and in all other cars of this series heating is not provided. However, you shouldn’t despair, because anyone can do independent repairs and connect heating.
What is needed for this?
The first thing you need to figure out is what elements, materials and tools will be useful to you during the heating installation process.
| Element | Explanation |
| Heating elements | They are required for backs and seats. Experts recommend choosing the standard ones provided for the VAZ 2110. They are sold in sets for two seats. Their cost ranges from 1000 to 1400 rubles. The kit also includes wiring and buttons to turn the heating on and off. |
| Buttons | They are not always included. They are used to turn the seat heating system on and off. |
| Wiring | It serves to connect the heating to the vehicle’s on-board network |
| Foam rubber | If the seats are already quite worn, it would not hurt to replace the foam rubber, which is short-lived |
Choose only high-quality materials, purchase kits from trusted retail outlets. Heating is carried out by electricity, which is always dangerous to human life and health.
Popular
Since the relay is open, turning the ignition on again leaves the heating off and you must press the button again to turn it on. I didn’t take photographs of this process - everything is done locally anyway.
When they are inserted, a toothed metal plate is clamped on top with pliers and cuts through the insulation.
How to install heated seats in a car yourself? By the way, don’t be lazy and install other heating units.
Now you can put the rear trim element on the hooks. In this case, the on-board network will not be affected if the heating fails. Experts recommend choosing the standard ones provided for the VAZ. The connection of control, indication and button illumination was carried out with a two-core wire.
We recommend: Pue frequency of grounding checks
Simple universal heated seats and a diagram of connecting it to the car
I plopped down on the icy seat for a couple of seconds, started the car, pressed the heating button, and within a couple of minutes the seat was already warm. Element Explanation Heating elements These are required for the backrests and seats.
Do you use heated seats? This arrangement of switches will be the most successful from the point of view of ergonomics and comfort. The best opportunity for self-installation of heating elements remains in cars that already have a system installed, but not installed by the manufacturer.
With a correctly assembled circuit, the heating will function only when the ignition is on. Didn't find the information you are looking for?
Bend back the cover at the passenger's feet and remove the cover of the ECU box. The ideal option is either the center console if there is space for installing buttons, or in the space between the gearbox rocker and the handbrake. This option is quite rare on budget class cars. Unclip the trim on the dashboard where the various buttons are located. INSTALLING HEATED SEATS ON A CHEVROLET NIVA WITH YOUR OWN HANDS. HOW TO CONNECT SEAT HEATING.
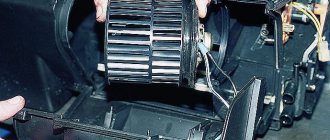
Dismantling works
To install heating elements, you first need to carry out a dismantling procedure. It includes the following activities.
- Unscrew the plastic fasteners that connect the seats to the body of your car.
- Remove the skids. Two pieces are located in front, and two more are located in the back.
- Remove the chairs from the interior, otherwise it will be extremely uncomfortable to work.
- Separate the back from the chair. To do this, there are bolts on the sides, which can be removed with a 10 mm wrench.
- On the back there is a plug for the headrests, which can be removed.
- The upholstery is removed from the hooks below. To do this, the hooks are slightly unbent.
- Now you can completely remove all the trim.
- Carry out a similar procedure with the second seat if you plan to install heating on it too.
While you are installing the heating, throw the upholstery into the washing machine. This will not harm her, and the interior will look newer and nicer.
Necessary equipment
To install the heating you will need:
- Special heating elements for the backrest and the seats themselves. Preferably standard ones, for the VAZ 2110. It is also possible to install heating not only for the driver, but also for the front passenger. Then you will need two sets. As a rule, a heating kit is sold immediately with heating elements for the two front seats, i.e. only 4 pieces. The price of a standard kit for a VAZ 2110 ranges from 1100 to 1300 rubles, the kit also includes wiring and on/off buttons; Set of standard seat heating
- Buttons that will be used to turn the heating on and off;
- Wires for connecting heated seats to the on-board network of the VAZ 2110;
- Tools: screwdriver, 10mm head;
- If your seats can no longer be repaired, then buy new foam rubber for them.
Installation of heating elements
Many people forget about the need to securely fix the elements responsible for heating the seats. As a result, over time they can shift, thereby disrupting the performance of the system.
To avoid such situations, experts advise sewing heating elements directly to the inside of the upholstery. Although today some car owners prefer another option, which uses double-sided tape. The elements are held on it quite reliably, and the tape is attached to the foam rubber itself.
Regardless of the chosen fixation method, reverse assembly looks the same for all options. This is the most difficult stage, so strictly adhere to the specified sequence of operations.
- Pull the covering back onto the back, where the heating was already fixed.
- Using a mallet, the plugs are driven into place. We are talking about plugs for headrests.
- Next, the fabric is stretched. The front one is pushed through the hole, and the back one is straightened down.
- The fabric from the front is draped over the hooks and then stretched. Just watch the degree of tension so that the fabric does not tear.
- Now you can put the rear trim element on the hooks.
- The next step is to insert the wire into the front and tension the sheathing.
- If you plan to change the foam rubber, cut out the new elements in strict accordance with the dimensions of the old material.
- Pay attention to the areas where the spring contacts the body and seat ties. To avoid squeaks, use pieces from the washer tube, or simply wrap several layers of electrical tape.
- Heating for the lower part of a car seat is often mounted using double-sided tape or sewn to the trim on the inside. You can use plastic clamps or wire brackets, which will prevent the heating elements from moving from their installation locations. After this, the plastic fasteners are tightened.
- Connect the backrest and seat.
- A wire is pulled through the hole in the frame and the foam rubber, with which the heating will be connected to the on-board network.
- The wiring connection is carried out strictly according to the diagram. It is necessarily included with the set of heating elements, so you don’t have to look for anything additional.
- The standard location for installing heating on and off buttons is the area near the handbrake. Although you can place them as you wish.
- It’s not uncommon for car owners to take an alternative route, installing a standard heating system on top of the seats, after which they put car covers on top.
Back
We hide the wires of the element in a thermal tube, thus creating a protected cable. Now the cable needs to be removed. The difficulty is that the back of the VAZ-2108 seat not only tilts back and forth, but also leans forward. This requires large cable runs - up to 10 cm. Therefore, it is necessary to provide an option for free movement of the cable. We will achieve this by running the cable in a ring at the inner end of the backrest under the upholstery: as the backrest moves, the cable ring will decrease or increase.
To fix and guide the cable, we sew a piece of fabric (sling, lace, etc.) under the upholstery with two “ears” through which the cable will be passed: a smaller “ear” - the cable from the element to the loop, a larger one - from the loop to the outlet further . We lay the cable, tilt the backrest completely back, pull out the cable, leaving a small loop - this will be the maximum length of the cable and the minimum loop. By tilting the backrest forward, we check the free movement of the cable and the change in the loop. Now you can close the upholstery.
Next, we prepare the lining of the back support. The cladding is normally secured with a screw at the bottom and a plastic clip at the top, which easily breaks and does not hold well. Here we will replace the clip with a regular screw and nut (it is more convenient to tighten them in the middle position of the backrest), for which it is enough to drill a hole in the lining, and there is already one in the support. Now we guide the cable along the stamping in the seat back support and turn it horizontally forward. We install a facing that securely fixes the cable, but leaves it free to move in the loop.
That's it with the backrest, let's put it aside for now and move on to the seat.
https://youtube.com/watch?v=VUbl0jy2rqw
Health issue
Today, medical professionals are still actively arguing about the harm of heating seats inside cars. Some believe that heating is harmful to men's health. Others, on the contrary, consider this a normal and even useful addition to the car.
The decision is yours in any case. But we recommend not to get carried away with high temperatures. Just warm up the seat a little before you hit the road. And then turn off the system.
If you find an error, please select a piece of text and press Ctrl+Enter.
Source
Location of fuses on the diagram for VAZ 2110, 2111, 2112
Today we will look at the location of fuses in VAZ cars of the tenth family, namely models 2110, 21102, 21103, 2111, 2112. We will also show where the fuses and relays are located on the diagram and talk about the purpose of each of them and how to replace the fuses with your own hands. We will also touch on the most common problems with fuses among owners of these cars, diagnostic methods and replacement.
I would like to say that car electrical systems, in particular fuses and relays in the VAZ 2110, 21102, 21103, 2111, 2112, are quite reliable. The service life depends on operating conditions and timely diagnosis and replacement with high-quality components.
Let's figure out why fuses are needed in a car. First of all, they are responsible for the safety of the wiring and other systems of the machine. It is important to understand that each specific fuse is responsible only for its task and in the event of a short circuit or failure, a fire is practically excluded. A specific fuse blows and this does not cause a chain failure of other systems.
Depending on the problem of failure of any component or part of the car for which the electrician is responsible, you need to understand whether the car can be operated with this malfunction or not. The traffic rules contain a list of faults that you cannot operate a car with. If you discover, for example, that the headlights have failed or the wipers are not working at all, you should immediately correct the problem. Well, you can drive a car with non-working power windows. So…
Injection injection system
For VAZ-2110 cars (8-valve injector), the electrical circuit differs slightly from that used in carburetor cars. Injection engines are much more complex, since they have an electronic control unit and a system of sensors and actuators. It is also worth noting that injection engines come with 8 and 16 valves. There are no carburetor engines with 16 valves. All wiring can be divided into engine compartment and interior wiring.
Their purpose is clear from the name. The engine compartment connects elements such as the starter, generator, sensors on the engine, etc. Interior wiring is necessary to connect the instrument panel, backlights, and various switches.
Dismantling works
To install heating elements, you first need to carry out a dismantling procedure. It includes the following activities.
- Unscrew the plastic fasteners that connect the seats to the body of your car.
- Remove the skids. Two pieces are located in front, and two more are located in the back.
- Remove the chairs from the interior, otherwise it will be extremely uncomfortable to work.
- Separate the back from the chair. To do this, there are bolts on the sides, which can be removed with a 10 mm wrench.
- On the back there is a plug for the headrests, which can be removed.
- The upholstery is removed from the hooks below. To do this, the hooks are slightly unbent.
- Now you can completely remove all the trim.
- Carry out a similar procedure with the second seat if you plan to install heating on it too.
While you are installing the heating, throw the upholstery into the washing machine. This will not harm her, and the interior will look newer and nicer.
Installation of heating elements
Many people forget about the need to securely fix the elements responsible for heating the seats. As a result, over time they can shift, thereby disrupting the performance of the system.
Dismantling
We begin tuning and repairs with the removal and subsequent disassembly of the seats, which is carried out as follows:
- We unscrew the plastic fasteners with which the seats are attached to the body;
- Unscrew the slides (2 each in front and back);
- We take the seats out of the cabin;
- Separate the backs. To do this, you need to unscrew the bolts on the sides with a 10mm wrench;
- Directly on the bottom of the seat you need to pull out 4 plastic fasteners and remove the trim;
- On the backrest you need to remove the plugs for the headrests. Then, at the bottom, remove the upholstery from the hooks, which will require slightly straightening them. Now you can remove the casing completely.
When making such repairs, it would be very good to wash the upholstery in a regular washing machine at the same time. This will not harm her, and driving a VAZ 2110 clean is somehow more pleasant.
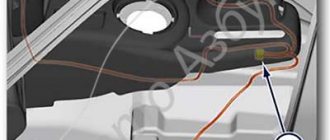
Location of additional fuses and relays
In the figure below we see how to get to the additional fuses of the car. Located to the right of the central panel, the screws are twisted and the cover is easily removed.
Removing the cover for diagnostics and replacement of additional fuses and relays
Below we see the fuses themselves, there are 6 of them, 15 Amps each.
Location of additional fuses
- Ignition controller,
- Sensors for oxygen, air flow, speed calculation,
- Fuel pump and relay, injectors,
- Fan,
- Gasoline pump,
- Ignition.
We remind you that F1-F20 are so-called fuses. This means that jumpers and other “tricks” are not acceptable when working. If you replace such a fuse with a jumper yourself, you risk system failure.
Standard heating, installed on your car in high trim levels
This is probably the most optimal option, for example, in some foreign cars there is no heating in the “base”, although in the “high” trim levels it is. You just need to purchase and install it yourself; this can be easily done either from an official dealer or from sellers of original spare parts. I want to warn you right away - as a rule, no complicated dances with a tambourine are required, because both the fuse box and the wiring will already be installed from the factory, you just have to connect the elements themselves and thermostats.
Of course, the only difficulty will be removing the seat trim, but now you will find a lot of instructions on the forums, I think this is not a problem at all.
Next, we simply glue it onto the foam rubber and put the standard covers back on – we cut in the buttons – we run the necessary wires, and the heating is all ready. The procedure is done by hand in half a day. If you look at the money, it turns out that for two front seats, two elements cost about 3,000 – 5,000 rubles, it all depends on the class of the car + wires and buttons, that’s about another 2,000 – 3,000 rubles. Total for an ordinary foreign car of class “B – C” is about 5,000 – 8,000 rubles.
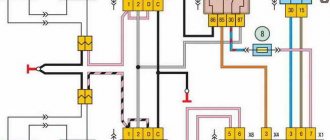
Fuse connection diagram
The figure below shows the order of connecting the plugs in the mounting block.
Drawing of connecting the plugs to the corresponding blocks of the mounting block.
The figure below shows a complete diagram with mounting block symbols.
From this diagram it is not difficult to figure out the order in which the plugs are connected.
- K1 - serviceability of lamps,
- K2 - windshield cleaner,
- K3 - turn signals, emergency lights,
- K4 - low beam,
- K5 - high beam,
- K6 - additional relay,
- K7 - heated rear window,
- K8 is an unused relay on VAZ models of the tenth family.
Why do you need heated seats?
Having such an option in the car is extremely necessary during periods of severe frost. Getting into a car that has been parked in the cold for a long time is unpleasant and dangerous for the health of the driver and passengers.
Overheating of seats also poses a danger to human health, as well as to the car.
There are many articles on the Internet about the benefits and harms of heating. Let's dot all the i's. Driving with a heater for long periods of time can be harmful to women and men. Accordingly, it is recommended to use the option consciously in order to protect yourself from cystitis or prostatitis.
General rules for using heating:
- Do not allow the seats to become overheated significantly.
- In cold weather, turn on the heating and do not sit on them for a while.
- Once the seats have been warmed up, turn off the system. Next, heat the interior with a stove.
- You cannot stay in the cabin in warm clothes for a long time.
Following these rules will allow you to protect yourself from overheating and not harm yourself.
Seat heating fuse VAZ 2114
Replacing the heated seat
It was difficult to figure out where he was.
Subaru tribeca b9 seat heating repair
This video partially shows the disassembly of the seat
, and heating
.. And before removing
the seat
...
Stories from our readers
“Fucking basin. "
Hi all! My name is Mikhail, now I’ll tell you a story about how I managed to exchange my two-wheeler for a 2010 Camry. It all started with the fact that I began to be wildly irritated by the breakdowns of the two-wheeler, it seemed like nothing serious was broken, but damn it, there were so many little things that really started to irritate me. This is where the idea arose that it was time to change the car to a foreign car. The choice fell on the melting Camry of the tenth years.
Yes, I had matured morally, but financially I just couldn’t handle it. I’ll say right away that I am against loans and taking a car, especially not a new one, on credit is unreasonable. My salary is 24k a month, so collecting 600-700 thousand is almost impossible for me. I started looking for different ways to make money on the Internet. You can’t imagine how many scams there are, what I haven’t tried: sports betting, network marketing, and even the volcano casino, where I successfully lost about 10 thousand ((The only direction in which it seemed to me that I could make money was currency trading on the stock exchange, they call it Forex. But when I started delving into it, I realized that it was very difficult for me. I continued to dig further and came across binary options. The essence is the same as in Forex, but it’s much easier to understand. I started reading forums, studying trading strategies. I tried it on a demo account, then opened a real account. To be honest, I didn’t manage to start earning money right away, until I understood all the mechanics of options, I lost about 3,000 rubles, but as it turned out, it was a precious experience. Now I earn 5-7 thousand rubles a day. I managed to get the car buy after half a year, but in my opinion this is a good result, and it’s not about the car, my life has changed, I naturally quit my job, I have more free time for myself and my family. You’ll laugh, but I work directly on the phone)) If If you want to change your life like me, then here’s what I advise you to do right now: 1. Register on the site 2. Practice on a Demo account (it’s free). 3. As soon as you get something on the Demo account, top up your REAL ACCOUNT and go to REAL MONEY! I also advise you to download the application to your phone, it’s much more convenient to work from your phone. Download here.
Heated seats on the VAZ 2110 can be installed from the factory, and if there is no such option, then you can install heated seats yourself .
Seat heating may vary: By type of heating element:
- Threads (frequent breakdown - breakage of the heating thread)
- Carbon fiber (considered more durable)
By heating areas:
- Heated seat only
- Heated seat and lumbar area (back)
By operating modes:
- On off
- Several heating power modes
- It only starts to heat up when you sit down
- Automatic temperature maintenance (standard heating has it)
- etc.
By location:
- On top of the seat cover (elementary installation)
- Under the seat cover (you will need to partially remove the covers)
25x30cm. Threads are used for heating. The heaters have built-in thermostats for electric seat heating. The thermostat circuit closes at a seat surface temperature of 25 +-5C, and opens when heated to 31 +-4C. The temperature difference between opening and closing the contacts of the built-in thermostat must be at least 5C.
Question/answer on fuses for VAZ 2110, 2111, 2112
We answer some questions sent on the topic.
Tell me, the left turn signal and high beam headlights on the VAZ 2110 stopped working, what could be the reason? Open the fuse and relay box, the contact may have come loose, move the wires, look and check, and if necessary, replace the fuses yourself.
Please tell me I'm already tired of it, the washer motor shorts, the light in the cabin with the clock and fuse F17 blows? Install a light bulb instead of a fuse, turn off all devices that are connected to this fuse. Turn on the ignition. If the lamp does not light, connect everything back one by one. Whichever one lights up, that's where the problem lies. If it lights up immediately, there is a short in the wiring.
Tell me what could be wrong, the reverse lights are dimly lit, if you remove one bulb, the second one starts to burn normally, put them back in place, both light up at half power. The brake lights on the same board light up normally. This problem is due to poor ground contact.
Why does fuse F8 melt? Look under the cover on the driver's side. If the catalyst was clogged, then the wires that go to heating were broken.
Why is the stove turned off, but hot air comes in? If the air is hot, but the switch is set to cold, then the electric drive of the faucet has soured.
The car starts only periodically when I turn on the ignition and the lights come on. I put the starter on direct and it starts. Tell me what is the problem? Place a relay between the lock and the starter, it won't help - it's the ignition switch.
Pinout of on-board computer VAZ 2114
In standard drawings of electrical equipment, the BC block section is missing due to its uselessness. Initially, it is assumed that the motorist will not independently repair or maintain the complex control unit. But some users still take risks and install the system themselves. In older versions of cars, such a module is missing or insufficient for comfortable operation of the car in its modern form.
To connect wires to the module, you will need to buy a standard 9-pin header and connect the following wires to it:
- 1 – green wire comes from the fuel consumption sensor;
- 2 – the ignition cylinder is powered through an orange cable;
- 3 – power core from the battery, usually a red wire with a white stripe is supplied;
- 4 – grounding or ground, standard color – black;
- 5 – 6k line, usually a gray wire;
- 6 – Mute – green shell with a red line;
- 7 – the backlight in the standard pinout is output from the marker optics key;
- 8 – a sensor that displays the remaining fuel in the car’s gas tank can be connected directly.