Drivers are notified of the presence of malfunctions in various vehicle systems using icons on the instrument panel. It is not always possible to decipher the meaning of such burning icons intuitively, since not all car enthusiasts are well versed in cars. In addition, on different cars, the graphic designation of the same icon may differ. It is worth noting that not every light on the panel only indicates a critical malfunction. The indication of light bulbs under the icons is divided into 3 groups by color:
- Red icons indicate danger, and if any symbol lights up in this color, you should pay attention to the signal from the on-board computer in order to take measures to quickly resolve the malfunction. Sometimes they are not so critical, and it is possible to continue driving the car when such an icon on the panel is on, but sometimes it is not worth it.
- Yellow indicators warn of a malfunction or the need to take some action to drive the car or service it.
- The green lamps of the symbols inform about the vehicle’s service functions and their activity.
We will present a list of the most frequently asked questions and an explanation of the icons and indicators that light up on the instrument panel.
There are many badges with a car silhouette emblem. Depending on additional elements, this indicator may have different meanings.
When such an indicator lights up ( a car with a key ), it informs about malfunctions in the engine (often a malfunction of a sensor) or the electronic part of the transmission. To find out the exact cause, you will need to perform diagnostics.
A red car with a lock lights up , which means that problems have arisen in the operation of the standard anti-theft system and it will be impossible to start the car, but if this icon blinks when the car is locked, then everything is normal - the car is locked.
A yellow vehicle indicator with an exclamation mark notifies the driver of a hybrid vehicle that there is a problem with the electric drive. Resetting the error by disconnecting the battery terminal will not solve the problem - diagnostics are needed.
the open door icon lit when a door or trunk lid is open, but if all the doors are closed and the light on one or four doors continues to shine, then often the problem should be looked for in the door terminals (wire contacts).
The slippery road icon begins to flash when the stability control system detects a section of slippery road and is activated to prevent slipping by reducing engine power and braking the slipping wheel. There is no need to worry in such a situation. But when a key, a triangle, or a crossed out skid icon appears near such an indicator, the stabilization system is faulty.
The wrench icon pops up on the display when it’s time to perform vehicle maintenance. It is an information indicator and is reset after maintenance.
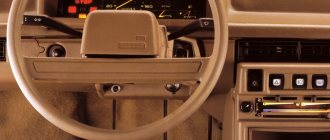
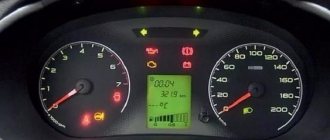
Description and location of indicators and instruments on the panel
Thanks to the tidy, the driver receives information about the condition of the car and the speed of movement.
Tidy Lada Kalina 2
A novice car enthusiast should know about the purpose of warning lights from the very first days.
Below is a description of the device:
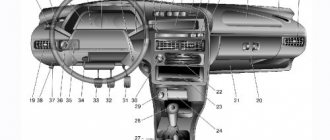
1 - tachometer - a device showing at what frequency the crankshaft rotates; 2, 4 — direction indicators, left and right, respectively; 3 — speedometer, displays the actual speed of the vehicle; 5 — coolant temperature indicator; 6 - indicator showing the fuel level in the tank; 7 — fuel reserve warning light; 8 - button with which the daily mileage readings are reset; 9 - a lamp indicating that the emergency lights are on, during which the side lights and turn signals flash, indicating a car malfunction; 10 — electric power steering lamp. Goes off when the ignition is turned on. If it continues to light, then the EUR is faulty; 11 — high beam indicator. The light is on if the high beam is on; 12 — indicator of the applied hand brake; 13 — external lighting indicator; 14 — airbag malfunction indicator; 15 — emergency oil pressure indicator in the car system; 16 — immobilizer warning light; 17 - liquid crystal screen displaying information from the on-board computer; 18 — seat belt malfunction indicator; 19 — battery charging lamp; 20 — emergency brake fluid level indicator; 21 - electronic brake force distribution light, red light indicates a malfunction; 22 — brake pad warning light; 23 — anti-lock braking system (ABS) indicator; 24 - a constantly burning orange light indicates problems with the engine.
After the engine starts, the indicators light up orange. If everything in the system works normally, then they go out after 1-2 seconds.
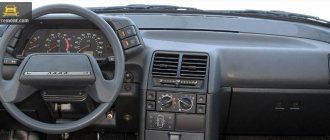
Tidy Lada Kalina
How to activate the immobilizer?
Kalina 1 and 2 cars are equipped with two ignition keys - black and red. The second is used to activate the immobilizer and is sometimes called the master key.
Before activation, the car owner should make sure that there are at least 10 liters of gasoline in the car’s tank. This is necessary so that the warning buzzer about the emergency fuel level does not interfere with the immobilizer settings.
- Sit behind the wheel and close the door.
- Insert the red key into the lock and activate the ignition.
- After three beeps, turn off the ignition and remove the key.
- Within 5 seconds, insert the black key and activate the ignition.
- After five (three and after a while two more) buzzer signals, turn off the ignition and remove the key.
- Within 5 seconds, install the red key and place it in the ignition switch position.
- Wait for the buzzer to sound five times and deactivate the ignition. The key must remain in the lock.
- A single buzzer will sound, after which you must turn on the ignition within 5 seconds.
- Wait another 5 seconds, after which the hazard warning lights should flash and the horn sound briefly.
- Turn off the ignition and, holding the key in the lock, wait for the immobilizer symbol on the instrument cluster to disappear.
On some vehicles, visual rather than audible indication is possible by flashing the immobilizer warning light on the instrument cluster.
The video from the avtohelpII channel shows the activation of the immobilizer on the Kalina 2 car.
Possible faults
The following malfunctions are possible with the dashboard:
- Fuel level or temperature gauges do not work. The reason may be faulty sensors or damaged wiring.
- When the tank is full, the fuel level needle drops to the zero position.
- The arrow on the fuel level indicator moves abruptly and often drops to the zero position.
- The fuel reserve indicator does not go out.
- If any indicators on the device do not light up, the reason may be burnt out light bulbs, insufficient contact between the light bulb socket and the printed circuit board, oxidation of contacts, broken wires, or a malfunction of the indicator sensor.
- If the speedometer is not working, the reason may be in the flexible drive shaft of the device: the nuts are poorly tightened, a break, mechanical damage, etc. (video author - RasH19).
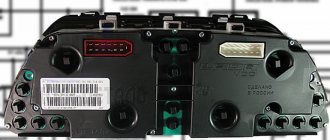
Instructions for dismantling and repair
Dismantling the tidy may be required to perform tuning, replacing backlight bulbs or repair work. You can find out how to remove the instrument panel on a Lada Kalina from the car's operating instructions.
LED instrument lighting
Tools and materials
Before disassembling the Kalina 2 instrument panel, you need to prepare the following materials and tools:
- a set of keys;
- Phillips and flat screwdriver;
- replacement parts and bulbs.
Before carrying out work, turn off the power to the vehicle by removing the negative terminal from the battery.
Removing the Kalina torpedo
Algorithm of actions
The disassembly procedure consists of the following steps:
- Using a Phillips screwdriver, you need to unscrew two self-tapping screws.
- Next, you need to remove the trim from the instrument panel.
- At the next stage, the spring clips are removed from the clutch.
- After unscrewing two screws, you need to slide the panel towards you.
- The latch holding the block must be pryed up using a flat-head screwdriver and turned.
- Next, you need to disconnect the connectors with the wires and you can safely remove the tidy.
- To remove the glass from the instrument panel, unclip the plastic clips.
After dismantling, you can replace faulty parts and lighting tabs. If the LED warning lights on the Lada Kalina have burned out, it is impossible to replace them, since they are soldered in. In this case, you need to change the entire instrument panel of the Lada Kalina 2. The Kalina instrument panel is assembled in the reverse order.
Thus, knowing how to disassemble the panel on Kalina, you can repair it yourself if the backlight or signal lights do not light up.
Checking the fuel oil level sensor
Checking it is quite simple; to do this, you need to unscrew the brake reservoir cap without disconnecting it from the connector. Then forcefully raise the “float”, then the lamp should go out; if this does not happen, then most likely the problem is in the sensor.
The next step is to check the control circuit. To do this, disconnect the sensor from the connector and insert a jumper into the plug, closing the two contacts together. When closed, the lamp should light up.
We hope our article was useful to you.
Video “Replacing light bulbs on Lada Kalina”
This video demonstrates how to replace the dash light bulbs (video created by IB Channel).
1200 rub. for the photo report
We pay for photo reports on car repairs. Earnings from 10,000 rubles/month.
Write:
Drivers are notified of the presence of malfunctions in various vehicle systems using icons on the instrument panel. It is not always possible to decipher the meaning of such burning icons intuitively, since not all car enthusiasts are well versed in cars. In addition, on different cars, the graphic designation of one icon itself may differ. It is worth noting that not every light on the panel only indicates a critical malfunction. The indication of light bulbs under the icons is divided into 3 groups by color:
Information icons
The machine icon may light up differently; it happens that the “car with a wrench” icon, the “car with a lock” icon, or an exclamation mark are lit. About all these notations in order:
When such an indicator lights up ( a car with a key ), it informs about malfunctions in the engine (often a malfunction of a sensor) or the electronic part of the transmission. To find out the exact cause, you will need to perform diagnostics.
A red car with a lock lights up , which means that problems have arisen in the operation of the standard anti-theft system and it will be impossible to start the car, but if this icon blinks when the car is locked, then everything is normal - the car is locked.
A yellow vehicle indicator with an exclamation mark notifies the driver of a hybrid vehicle that there is a problem with the electric drive. Resetting the error by disconnecting the battery terminal will not solve the problem - diagnostics are needed.
the open door icon lit when a door or trunk lid is open, but if all the doors are closed and the light on one or four doors continues to shine, then often the problem should be looked for in the door terminals (wire contacts).
The slippery road icon begins to flash when the stability control system detects a section of slippery road and is activated to prevent slipping by reducing engine power and braking the slipping wheel. There is no need to worry in such a situation. But when a key, a triangle, or a crossed out skid icon appears near such an indicator, the stabilization system is faulty.
The wrench icon pops up on the display when it’s time to perform vehicle maintenance. It is an information indicator and is reset after maintenance.
Warning icons on the panel
The steering wheel icon can light up in two colors. If the yellow steering wheel is on, then adaptation is required, and when a red image of the steering wheel with an exclamation mark appears, you should already be concerned about the failure of the power steering or power steering system. When the red steering wheel lights up, your steering wheel will probably become very difficult to turn.
The immobilizer icon usually blinks if the car is locked; in this case, the indicator of a red car with a white key signals the operation of the anti-theft system. But there are 3 main reasons if the immo light is constantly on: the immobilizer is not activated, if the tag on the key is not read or the anti-theft system is faulty.
The handbrake icon lights up not only when the handbrake lever is activated (raised), but also in cases where the brake pads are worn out or the brake fluid needs to be topped up/replaced. On a car with an electronic handbrake, the parking brake light may come on due to a glitch in the limit switch or sensor.
The coolant icon has several options and depending on which one is lit, draw conclusions about the problem accordingly. One red lamp with a thermometer scale indicates an increased temperature in the engine cooling system, but a yellow expansion tank with waves indicates a low coolant level in the system. But it is worth considering that the coolant lamp does not always light up at a low level; perhaps there is simply a glitch in the sensor or float in the expansion tank.
The washer icon indicates a low fluid level in the windshield washer reservoir. Such an indicator lights up not only when the level actually decreases, but also if the level sensor is clogged (the sensor contacts become coated due to poor-quality liquid), giving a false signal. On some vehicles, the level sensor is triggered when the washer fluid does not meet specifications.
The ASR icon is an Anti-Spin Regulation indicator. The electronic unit of this system works in tandem with ABS sensors. When such a light is constantly on, it means the ASR is not working. On different cars, such an icon may look different, but often in the form of an exclamation mark in a triangle with an arrow around it or the inscription itself, or in the form of a car on a slippery road.
Catalyst icon
It often lights up when the catalytic element overheats and is quite often accompanied by a sharp drop in engine power. Such overheating can occur not only due to poor cell throughput, but also if problems arise in the ignition system. When the catalyst fails, high fuel consumption will be added to the burning light.
How to disable the immobilizer with your own hands?
There is an option to temporarily disable the immobilizer, which may be required when installing an alarm system with auto start.
To install the bypass system, use:
- A control unit with a key or tag embedded in it. A key or chip is inserted into a device located deep in the dashboard. When autostart is activated, the alarm relay activates the unit and the engine starts, bypassing the main circuit.
- Blockless immobilizer bypass unit. A separate control device is installed that emulates an ignition key with a chip.
Another way to disable the immobilizer on Kalina depends on the type of ECM (control unit).
Bosch M7 4 block
Before you begin performing an operation on a car with a Bosch M7.4 unit, you must prepare:
- a computer or laptop with Winflashecu v.1.14 preinstalled (the distribution is available for free download);
- adapter and cord K-Line, for example, VAG-COM 409.1;
- pre-downloaded software for the unit with disabled immobilizer support;
- several wires with different lengths.
To disable the immobilizer on Kalina, you need to perform the following steps:
- Remove the wires from the battery terminals and disconnect the wiring harness connectors from the ECM installed under the hood of the vehicle. To disconnect, you need to remove the protective top cover and pull out the flat connector lock. All work is carried out on a large block. The small block can not be disconnected from the block.
- Insert the wire into contacts A4 and B2 from the harness side. These cables will be used to supply additional 12 V positive voltage. To do this, they are connected to the battery terminal through an intermediate switch.
- Reinstall the connector and fasten the fastener.
- Connect the adapter to the diagnostic connector located in the passenger compartment. The connector is located under a plastic cover installed on the center console.
- Set the data transfer rate to 38400 bps in your computer settings.
- Launch the Winflashecu application and select the port number, speed (38400 bps) and block type M7.4 in the dialog box. In the lower right corner of the window there will be a message “No connection”.
- Apply additional power to pins A4 and B2.
- Turn on the ignition. The “No communication” notification should change to “Communication with the ECU” and the buttons for starting operations will become active.
- Read the EEPROM (unit software) data and save it to the computer's hard drive.
- Select new software and load it into the unit’s memory using the “Write EEPROM” button.
- Wait for confirmation that the download was successful.
- Close the program and turn off the ignition.
- Remove the auxiliary power wires.
- Check whether the car can be started with a key without a chip. The immobilizer symbol will light up in the instrument cluster when starting and go out after a few seconds.
Bosch block 7 9 7
When installing the Bosch 7.9.7 control unit (Euro 2 standards), it must be modified by resoldering one resistor. It is best to entrust this task to a person who has experience with soldering small electronic components. After this, the block is “reflashed” according to the procedure described above.
Block January 7 2
In the case of using ECM type January 7.2, the procedure has a completely different look.
Before starting work you need to prepare:
- K-Line adapter, for example, VM9213;
- computer or laptop with ChipLoader 1.97.7 installed;
- soldering iron with a power of 25-40 W;
- solder and rosin;
- wires and switch;
- resistor with a resistance of 3.6 to 5 kOhm;
- plugs for connecting wires to the control unit;
- 12 V battery (standard or from an uninterruptible power supply);
In order to remove the immobilizer function from the unit, you should:
- Disconnect power from the vehicle's on-board network and remove the ECU.
- Wrap the block body with insulator.
- Assemble the diagram in accordance with the photo.
- Connect the adapter to the computer.
- Using the toggle switch, simulate turning on the ignition.
- Launch the application and establish a connection with the block.
- Read the factory data of the unit and save it to the hard drive.
- Read the EEPROM and click the “Delete IMMO” button. Wait for the confirmation window to appear with the text “Immobilizer successfully removed.”
- Close the application.
- Turn off the ignition with the toggle switch.
- Before installing the control unit on the car, you must turn off the signal from the immobilizer device. If the block is removed from the IMMO block, then it is necessary to close the contacts numbered 9 and 18.
Block January 5 1
To disable the immobilizer in the January 5.1 block, it is necessary to unsolder and reprogram the EEPROM flash memory. It is not recommended to perform this operation yourself, but rather to perform it in a workshop, since in the process of performing the task you will need a programmer and a hot air gun for soldering.
Reporting a malfunction
The battery icon lights up if the voltage in the on-board network drops; often this problem is associated with a lack of battery charge from the generator, so it can also be called the “alternator icon”. On vehicles with a hybrid engine, this indicator is supplemented by the inscription “MAIN” at the bottom.
The oil icon , also known as a red oil can, indicates a drop in the oil level in the car engine. This icon lights up when you start the engine, and does not go out after a few seconds or may light up while driving. This fact indicates problems in the lubrication system or a drop in oil level or pressure. The oil icon on the panel may have a droplet or waves at the bottom; on some cars the indicator is supplemented with the inscription min, senso, oil level (yellow inscriptions) or simply the letters L and H (characterizing low and high oil levels).
The airbag icon can light up in several ways: either the red inscription SRS and AIRBAG, or “a red man wearing a seat belt,” with a circle in front of him. When one of these airbag icons lights up on the panel, the on-board computer notifies you of a malfunction in the passive safety system, and in the event of an accident, the airbags will not deploy. Read the article on the website for the reasons why the airbag sign lights up and how to fix the problem.
The exclamation mark icon may look different and its meaning will accordingly be different. So, for example, when the red (!) light is on in the circle, this indicates a malfunction of the brake system and it is advisable not to continue driving until the cause of its occurrence is determined. They can be very different: the handbrake is up, the brake pads are worn out, or the brake fluid level has dropped. A low level is precisely what poses a danger, because the reason may not only be in heavily worn pads, as a result of which, when you press the pedal, the fluid disperses throughout the system, and the float gives a signal about a low level, the brake hose may be damaged somewhere, and this is much more serious. Although, very often the exclamation mark lights up if the float (level sensor) is faulty or shorted, and then it simply lies. On some cars, the exclamation mark is accompanied by the words “BRAKE”, but this does not change the essence of the problem.
An exclamation mark can also light up in the form of an “attention” sign, both on a red and yellow background. When the yellow “attention” sign lights up, it informs about a malfunction in the electronic stabilization system, and if it is on a red background, it simply warns the driver about something, and, as a rule, explanatory text is displayed on the dashboard display or combined with other informative text designation.
The ABS icon may have several display options on the dashboard, but regardless of this, it means the same thing on all cars - a problem has occurred in the ABS system, and that the anti-lock wheel system is not working at the moment. You can find out the reasons why ABS does not work in our article. In this case, movement can be made, but there is no need to rely on the ABS to activate; the brakes will operate as usual.
The ESP icon may either light up intermittently or stay on constantly. A light with this inscription indicates problems with the stabilization system. The Electronic Stability Program indicator, as a rule, lights up for one of two reasons - either the rotation angle sensor has failed, or the brake light sensor (aka “frog”) has died for a long time. Although, there can be a more serious problem, for example, the brake system pressure sensor is covered.
The engine icon , some drivers may call it the “injector icon” or check, may glow yellow when the engine is running. It informs about the presence of engine errors and malfunctions of its electronic systems. To determine the reason for its appearance on the dashboard display, self-diagnosis or computer diagnostics are performed.
The glow plug icon may light up on the dashboard of a diesel car; the meaning of such an indicator is exactly the same as the “check” icon on gasoline cars. When there are no errors in the electronic unit’s memory, the spiral icon should go out after the engine warms up and the glow plugs are turned off. Read how to check glow plugs here.
This material is informative for most car owners. And although absolutely all possible icons of all existing cars are not presented here, you will be able to independently understand the main symbols of the car’s dashboard, and will not sound the alarm when you see that the icon on the panel is on again.
What's the result?
As you can see, the car dashboard contains a large number of different pointers, indicators and symbols. The instrument panel of even the simplest car has basic indicators (engine temperature, oil pressure, handbrake engaged, etc.).
As for more modern cars with an ECM and a large number of systems and options, a huge number of additional icons are placed on the dashboard. In some cases, even an experienced driver cannot always determine what a particular icon and indicator on the instrument panel means.
We also recommend reading the article about what you need to know about transmission oil tolerances for manual transmissions. From this article you will learn about the tolerances and features of gear oils for manual transmissions.
For this reason, as well as in order to simplify interaction, the latest generations of cars are equipped with an on-board computer, and the dashboard receives an information display. The presence of a BC with a screen eliminates the need to use separate icons in the form of symbols and pictograms for display.
In fact, the on-board computer screen allows you not only to indicate an error that occurs, but also to immediately decipher such an error in text form, display informational, warning messages, etc.
Checking the oil level in an automatic transmission: how to check the ATF level. What else to pay attention to: color, smell, ATP contamination, etc.
What does tire marking mean, deciphering tire markings and symbols on the tire. Basic designations, additional designations, American markings.
How to choose the right engine oil for an old internal combustion engine or an engine with a mileage of more than 150-200 thousand km. What you need to pay attention to, useful tips.
Selection of ATF transmission oil in automatic transmissions. How to select oil for an automatic transmission by VIN, make and model of car. What to consider when selecting and replacing.
Tolerances and classification of transmission oil for a manual transmission: what needs to be taken into account when selecting a manual transmission fluid.
Expert opinion
It-Technology, Electrical power and electronics specialist
Ask questions to the “Specialist for modernization of energy generation systems”
The coolant temperature light is on: causes, diagnosis, solution to the problem. In this case, the coolant light may light up on the instrument panel not only when there are problems with antifreeze. Ask, I'm in touch!