It is not surprising that absolutely every modern car is equipped with a dashboard, because it is thanks to it that the driver can monitor the main features of the car. And the instrument panel of the VAZ 2114, 2115 is no exception. Simply put, such a panel plays the role of a link between a person and a vehicle.
As it developed, the dashboard was equipped with additional sensors and indicators that make driving a car more convenient and safe. If you want to know what elements are on the dashboard of the VAZ 2114, 2115, then be sure to read this article.
Indicator lights
Owners should know the description of the lamps and indicators of the VAZ 2114. This is necessary to assess the condition of their car and notice the problem.
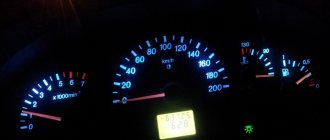
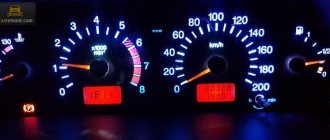
The designation of the light bulbs on the dashboard of the VAZ 2114 includes a battery icon (16). The light comes on when the battery is low. At the top between the speedometer and tachometer there are two green arrows (3 and 4), indicating that the left or right turn indicators are turned on. At the bottom of the panel there is an emergency stop icon in the shape of a red triangle (14). There is also a CHECK ENGINE light (13) on the device, which lights up red when there is a breakdown of the engine automation or in other cases. The panel has a blue light for high beam (10), which lights up when it is turned on, and a green light for low beam when it is turned on.
The designation of the indicators on the dashboard may be in different places depending on the year of manufacture of the car. But these lamps are present on all VAZ 2114. Knowing what the lights on the panel mean, you can notice a malfunction or your own mistake in time. For example, if the driver forgot to turn on the low beam or did not turn off the high beam when an oncoming car approached.
Helpful : Where is the dashboard ground located?
Polite lighting and door switches
Any alarm or security system is always equipped with an input connected to the door limit switches. In VAZ cars, the control wire can be connected to one point (A). Diodes are not used in this case:
Be sure to carry out the setup: the delay in polling the limit switches should be 20-30 seconds. If this is not done, false alarms will occur when the security system is turned on. The reason is the operation of the APS unit, which does not turn off the light after the driver's door is closed. The option in question is called “polite backlighting.”
In theory, pins 7 and 13 of the BSK are the connection points that need to be decoupled by two diodes. But as practice shows, it is better to implement a circuit with three additional diodes (see figure). The alarm is connected to point B, and setting the polling delay in this case is not required. Good luck.
Devices
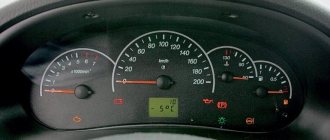
The icons on the VAZ 2114 dashboard also include instruments. Their presence is very important for driving. The instrument panel has the following devices:
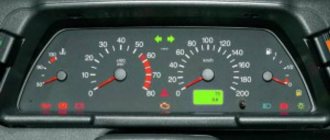
- On the left is the coolant temperature gauge. It has a division value of 20 degrees. The bottom number in it is 50, after two – 90 and then, at the top – 130 degrees. The danger zone is indicated in red. It starts at 105 degrees. When the arrow is in this zone, the engine should be turned off. Overheating can cause serious engine malfunctions.
- A tachometer is installed to the right of the coolant indicator. This device shows the current crankshaft speed. The scale has divisions of 5 units, digitization is performed after 10 units, the minimum value is 0, and the maximum is 80. To find out the number of revolutions, you need to multiply this value by 100. A red zone is set in the range 55 - 80. This indicates that the speed has become critical for the engine.
- To the right of the tachometer is a speedometer, showing speed from 0 to 200 km/h with a division value of 10 km/h.
- To the right of the speedometer there is a device that shows the level of gasoline in the tank.
The numbers on its scale mean:
- 0—empty tank.
- ½ - half a tank.
- 1—full tank.
If there is less than 6 liters of fuel left in the gas tank, an orange gas station icon appears at the bottom of the device.
Useful : Where is the dashboard fuse on a VAZ 2114?
The symbols on the panel also include a clock and a thermometer indicating the air temperature. This device is located under the tachometer. And under the speedometer there is a small display - an odometer, which reports the total and current mileage.
Installation specifics
Table of characteristics of a digital voltmeter.
If there are no problems during installation with digital voltmeters that are powered from the cigarette lighter, then models installed directly into the dashboard often force drivers to think about the order in which they are connected.
Most voltmeters on the market have two or three wires for connecting to the network, although there are models with four contacts. The wires have standard color markings:
- the red wire corresponds to “plus”;
- the black wire is connected to the negative;
- The white wire is responsible for controlling the backlight intensity and turning the device on and off.
In some cases, an unexpected problem arises when connecting the voltmeter in this way: it lights up dimly or refuses to work at all. The reason may be the alternative marking of the wires, in which the white wire is responsible for the “minus”, and the black wire for controlling the device.
The voltage sensor is installed in the standard place of the clock, but in some cases, when it is impossible to find free space for the voltmeter, you have to make a hole for it directly in the dashboard.
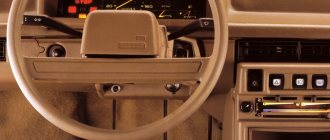
An excellent place to connect the device is the dashboard plug on the left side of the steering wheel. It is small in size and easy to remove and secure for processing.
Figure 1. Connection diagram for a voltmeter with a pulse stabilizer.
The voltmeter body has a raised surface: the frame around the display will protrude above the surface of the car panel. Thanks to this, the device will not fall inside the mounting socket, and will also hide uneven edges of the hole.
Dashboard buttons
The dashboard of a car contains several buttons. Next to the clock and thermometer there is a button that allows you to switch these indicators and reset the current mileage. The following buttons are located in the center of the instrument panel:
- parking lights;
- low beam
- front fog lights;
- rear PTF;
- heated rear window.
Also, many car owners move the hazard warning button here. The backlight of the button allows you to clearly see it in the dark.
Video text
Adapter for diagnostics ELM327 V1.5 ► https://ali.pub/2e82kw (this version is the most complete, unlike V2.1 and is suitable for a much larger number of cars with different ECUs)ELM327 - adapter for do-it-yourself diagnostics ►https: //ali.pub/3v6rfh
BI BSK VAZ (VAZ on-board control system display unit) The VAZ 2114 2113 2115 display panel and the VAZ 2110 on-board control system display unit often fail due to a breakdown of the Microswitch. Replacing the VAZ ignition switch just because of one switch is impractical.
►Restoring a 12 year old battery. RESUSCITATION. Polarity reversal and the second life of the battery https://www.youtube.com/watch?v=20e8PIrJkeA
In this video I will show my solution to the problem with the VAZ BSK, Refinement of the VAZ BSK (real-time mode) and Pinout of the BI BSK. Reworking the BSK is very simple and elementary!
The standard BSK polls all sensors ONLY when the ignition is turned on. This means that if the coolant level has dropped (the Coolant reservoir has burst or the pipe from under the clamp has leaked), the driver will not know about it until the next time he turns on the ignition, or sees the rapidly rising temperature of the Antifreeze (Antifreeze/water) Well and the “brake pad wear” indicator, also known as the VAZ 2114 pad wear sensor, monitors in real time, that is, constantly, with the ignition on.
Of course, it remains a big mystery why AvtoVAZ employees didn’t think of implementing the On-Line mode for the coolant level. After all, a brake pad sensor is present on a small number of Lada Samara cars, but a water level sensor (Coolant) is present on ALL cars.
The most common problem why the BSK VAZ 2114 does not work is the microswitch in the ignition switch. But before applying Plus forcibly (for example, from the side lights key/button), you need to make sure that fuse F16 is working properly.
The display unit of the on-board control system BI BSK 2114 is designed for installation in cars of the SAMARA and SAMARA-2 family (2108-21099 and 2113-2115) to indicate malfunctions of vehicle systems. The unit is installed in a standard location on the instrument panel and connected with the appropriate connector to the vehicle's On-Board Electrical Network (c) https://schetmash.com
BI BSK is located under the Standard BC (On-Board Computer), and in its absence - under the BC 2114 plug
BIBSK VAZ has outputs to signals from sensors:
-Relay for monitoring the health of lamps (needs modification if Diodes are used in Dimensions) -Door limit sensor -Oil level sensor -Coolant level sensor -Washer fluid level sensor -Seat belt sensor (unfastened belt sensor) -Brake sensor (pad wear sensor) - Driver door opening sensor (limit switch)
BSK VAZ 2113 2114 2115. BI BSK does not work. Revision + online___________________________
What standard trip computers exist?
Option 2. Installed instead of a small plug next to the ACS unit
These were installed on “luxury” dozens. There are models AMK 211000 without diagnostics, and AMK 211001, AMK 211002 with diagnostics. You can find out which one you have by looking at the numbers on the back cover. To do this, naturally, the MK must be removed. If on the back there are the inscriptions AMK-211001 or AMK 211002, and in clock mode, when you press the “clock” button, the inscriptions Err appear and then two more - great. You have a full-fledged bookmaker. If these are the inscriptions:
Unfortunately, this is a BC that either lacks diagnostic capabilities or has “cut-off” firmware.” Craftsmen resolder and reflash such models, but in my opinion they are not worth it.
It is very easy to remove such a MK. We disconnect the terminal of the “negative” wire from the battery terminal. We pry it off with a screwdriver...
remove the MK from its seat....
....disconnect the wire block from it.