Lamps used in VW Polo
The Volkswagen Polo uses several types of lamps, and they are all responsible for a specific action. For example, low and high beams have their own type of lamps, turn signals have their own, etc. It is not possible to replace the lamps, since the lamp sockets are made for different types of lamps.
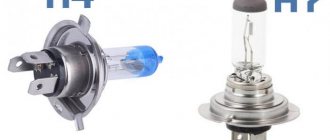
Below in the picture you can see five types of lamps used in the Volkswagen Polo Sedan.
It should be noted that the Polo Sedan was produced in two versions, pre-restyling and restyling, in these versions the headlights are different, for example, in the pre-restyling version of the Polo, one H4 high and low beam lamp is used, but in the restyled version of the Polo, the high and low beam are separated and have two lamps for low and high beam H7.
Polo Sedan lamp table
| Name of the lighting device | ECE lamp type | Power, W) | Number in the picture |
| Headlights | |||
| Low/high beam | H4; H7* | 60/55; 60* | 1 |
| parking lights | W5W | 5 | 5 |
| Turn signal | PY21W | 21 | 4 |
| Tail lights | |||
| Stop signal | Р21W | 21 | 3 |
| Reverse | Р21W | 21 | 3 |
| Rear PTF | Р21W | 21 | 3 |
| parking lights | W5W | 5 | 5 |
| Turn signal | PY21W | 21 | 4 |
| Lighting devices | |||
| Interior lighting | W5W | 5 | 5 |
| Room lighting | W5W | 5 | 5 |
| Trunk lighting | W5W | 5 | 5 |
* Applicable only in the restyled version of VW Polo, 2 pieces in one headlight, one lamp for low beam, the second for high beam.
Other lighting devices such as instrument panel, button illumination, etc. They use LEDs that are built into the unit itself and have a long service life. If any of the LEDs fail, the entire assembly must be replaced.
Replacing low beam lamps on Polo 2013-2015. (dorestyle)
In pre-restyling models, access to the rear of the canopy for maintenance is provided. This is convenient and safe from the point of view of possible damage to glass and paintwork. Replacement of light bulbs is carried out in the following order, the same for the left and right sides.
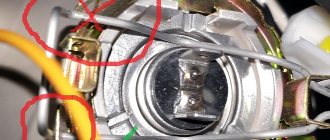
- On the back of the case, find a suitable connector with three contacts. This is a standard header for base/plinth type H4. The connector is placed directly on the contacts. The space between the contact block and the housing is covered with a rubber boot with a hole for power supply.
- Remove the connector from the housing by rocking and pulling it back. You must hold on to the block; pulling on the wires is unacceptable. There is no need to use force; with small displacements of the pads to the sides, the connection is undocked quite easily, there is no lock there.
- Remove the rubber boot.
- By simply pressing the protruding loop, the retaining spring is retracted back and down, after which the base is completely released and can be removed.
- The new H4 lamp fits neatly into place, exactly as its predecessor stood, with the flat horizontal contact facing up.
- Reinstall the wire retainer by lifting and snapping its bracket.
- Place the rubber boot and electrical connector in their original position. Make sure that it “sits” all the way and the contact is reliable.
- Test turn on the low beam to make sure everything is in order.
Do not touch the quartz flask with your bare fingers; the appearance of grease stains leads to an increase in temperature and rapid failure.
Video
When replacing the boot, you need to make sure that it tightly covers the gaps between the case and the base.
What are the brightest and best lamps for car headlights?
If you compile lists of light bulbs for car headlights according to some criteria, then the list of light bulbs that provide the greatest lighting power will look something like this: xenon lamps, incandescent lamps, LED, halogen.
Of course, this list may not be entirely correct, since specific models of light bulbs should be taken into account, since, unlike xenon and halogen lamps, LED lamps are constantly evolving and more and more new models are being introduced to the market.
If we make a list of lamps for headlights in descending order of service life, then the most durable will be LED, then xenon lamps, the service life of which provides five thousand hours of continuous operation, while halogen lamps differ in only five hundred hours of operation, and incandescent lamps have even less time.
LED lamps are good for everyone - they are constantly improving, they provide powerful lighting that helps drivers see even in rain and fog, they consume a minimal amount of electricity, but the price, alas, is terrible - prices are constantly rising.
Xenon lamps, for example, simply cannot be improved, and therefore the prices are high, but lower than for LED bulbs for car headlights, but higher than for all other types of lamps.
So, we can sum up all the car headlight bulb comparison lists with the following words. If high brightness and long service life are required, with low electricity consumption and at a more affordable price than LED lamps.
It's better to take xenon ones. If you don’t have extra money, then it’s better to buy halogen or incandescent lamps - the latter cost a penny, but do not last long and consume a huge amount of current from the battery.
LED headlight bulbs are the crowning achievement of lighting development over the last hundred years.
They consume little current, less than all headlight bulbs on the market, are easy to use, last a very long period, and, most likely, will completely “kill” all other types of light bulbs in the next five years.
But so far their cost is the highest, and not every motorist, even knowing about the many advantages of LED lamps, will dare to purchase them.
Expert opinion
It-Technology, Electrical power and electronics specialist
Ask questions to the “Specialist for modernization of energy generation systems”
Bulbs for VOLKSWAGEN POLO 2, 3, 4, 5, CLASSIC (VW POLO) buy, price, sale But it’s another thing when the moron sitting behind you I can’t say otherwise in an AvtoTAZ with garage xenon constantly blinds you. Ask, I'm in touch!
Headlight protection
During operation, under the influence of external factors, headlights may lose their transparency and attractive appearance. You can extend the life of lighting devices using various types of protective devices, such as liquid compounds, vinyl and polyurethane films, varnishes, etc.
The varnishes that the manufacturer uses to coat the headlights protect the optics from ultraviolet radiation, but cannot protect them from mechanical damage. To protect glass from gravel and other small particles, you will need:
- liquid ceramics;
- vinyl film;
- open-pore polyurethane film;
- closed-cell polyurethane film;
- special protective plastic kits.
It is generally accepted that the least reliable way to protect headlights is to apply various liquid compounds, such as ceramics. Vinyl film provides a slightly higher degree of protection, but its disadvantage is its fragility: after a year, such film loses its qualities. Open cell polyurethane film can last 5 years or more, but tends to yellow over time, which can ruin the look of a white car. The highest quality film coating for headlights is closed-cell polyurethane film.
An extremely high level of headlight protection is achieved through the use of special plastic kits . Such kits are produced especially for the VW Polo Sedan by EGR. The products of this company are distinguished by their quality and reliability; for the manufacture of kits, thermoplastic is used, made using a unique vacuum technology. The resulting material is significantly superior to headlight glass in strength, but is not inferior to it in transparency. The kit is made taking into account the features of the VW Polo Sedan body and is installed without drilling additional holes. Transparent and carbon options for such protection are available.
Replacing low beam lamps on Polo 2015-2019. (restyling)
On restyled versions, access is difficult, so replacing the low beam lamp will require removing the headlight. It's not as difficult as it might seem. You will need to remove a Torx screwdriver from the trunk. Or use a similar attachment from any tool kit for motorists.
The Torx screwdriver lies in the organizer placed inside the spare wheel; its shaft allows the installation of one of two sides with different calibers; you need to choose the appropriate one.
- On the upper part of the partition, suitable for the headlight housing, there are several screws with Torx heads; unscrew two of them located on the stampings. The one that holds the housing stop between them does not need to be unscrewed.
There are two options: disconnect the electrical connector coming from the back of the headlight, or leave it in place, but then it will be less convenient to work, the unit cannot be completely removed from the car, everything will have to be done hanging near the bumper. But if you have the skill, it's not difficult. To disconnect the block, you need to press the plastic clamp on it towards the supply wires and pull the contact group back.
- In addition to the two mounting screws, the headlight is held on the vehicle by two spring latches hidden under the bottom of the headlight. Apply some force while simultaneously rocking it up and down and pushing it over the bumper. The latches will release and the headlight will be removed.
Do not use excessive force, as this may damage the latches. It's better to spend a few extra seconds swaying.
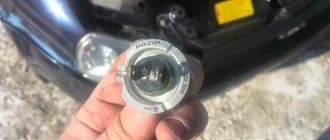
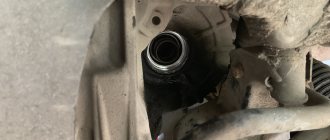
- The low beam bulb is located closer to the fender and is covered at the back with a rubber boot. It is larger in size than the one covering the second lamp.
- The plastic handle of the plinth must be turned counterclockwise by 30-40 degrees, which will remove it from the fixing grooves.
- Remove the lamp together with the socket, then gently rock it out of the socket, remembering how it stood with its protruding antennae relative to the connector.
- The new light bulb is installed with the same precautions, that is, without touching the bulb with bare hands. We recommend doing this with lint-free gloves.
- The headlight is assembled in the reverse order, the socket is turned clockwise until it stops in the grooves, the cap is installed in its proper place.
- The headlight is carefully inserted into the latches, the screws are screwed into place.
- After a trial run, you can proceed to the second side.
Video: replacing a light bulb
Fog lights
The vast majority of modern cars are equipped with fog lights. This is not a tribute to fashion trends in the automotive industry, but a truly necessary addition to head optics when driving with limited visibility criteria. Volkswagen models are no exception and are also equipped with fog lights.
Fog lights on a car are many times smaller than the main optics, but in adverse weather conditions they are much more efficient than the main lamp. Therefore, an addition to the main headlights of a car is necessary for its dangerous movement when the weather changes and visibility of the roadway deteriorates. This may be caused by snow, rain, heavy fog or smoke.
According to similar criteria, conventional optics are simply powerless, and future automobile traffic almost blindly becomes dangerous. This is due to the fact that the optics of the head, both high beam and main beam, are installed parallel to the roadway. Rain or snow is actually perpendicular to a row of headlights that simply begin to reflect off a particular wet wall. A similar phenomenon can be observed, for example, on the embankment of at least some river, where the light from street lamps is reflected in the water.
Features of fog curtain
Fog is also a thick mixture of small water particles that the headlights also do not flow through. Moreover, the higher the luminous flux (headlights), the worse the visibility on the road. But the fog “does not lie” completely on the ground, and there is always some free “dry” gap above the road.
All fog lights affect this. In this case, the light stream is oriented at a certain angle to the roadway in order to enter this “dry” gap, which allows the driver to create a part of the road in front of the car. The headlights should be located as low as possible to the roadway, where there is virtually no fog layer. It turns out that the lights glow, it seems, under the fog.
The main task of the PTF headlight is to illuminate the edge of the curb, which is a guide for the driver when driving in fog. In addition, the light from such headlights produces a thin and wide horizontal beam below the driver's field of vision and therefore does not produce a dazzling effect. Additionally, fog lights make the vehicle more visible to other road users in slow weather conditions. PTF should only be activated in accordance with the dimensions of the vehicle.
Features of choosing fog lights
What should car enthusiasts who decide to save money when buying a new Polo sedan do? After all, with PTF it is much more convenient to drive both around the city and in rural areas.
If finances allow, you can go to a car repair shop or dealership and order the installation of fog lights. You won’t have to wait long: the procedure will take no more than 40 minutes. If you don’t have extra cash in your wallet, you can install the headlights yourself. Yes, it will take a little more time, but you can save a decent amount.
How to turn on running lights on Polo?
Turn on the ignition (without starting the engine, all icons on the instrument panel should light up), wait 3 seconds, turn off the ignition, release the switch and move it to the neutral position.
The next step is to free the lamp from the socket - simply pull it up, gently rocking it to the sides. We remember its location in the cartridge.
The presented algorithm of actions is the only correct and possible one for the restyled Volkswagen Polo sedan. Only owners of the pre-restyling version of the car will be able to do the same without removing the headlights. One way or another, this task does not require the skill of an auto mechanic - all fastenings are technologically advanced and convenient.
Headlight adaptation
Dismantling the headlight may be necessary if it is replaced, or if it becomes necessary to remove the front bumper. In this case, you will need to disconnect the block with the power wire and unscrew the two fastening screws in the upper part of the headlight using a 20mm Torx wrench.
Video: removing the headlight of a VW Polo Sedan
After installing a new headlight (or an old one after repair), as a rule, it is necessary to adjust the direction of the light fluxes. At a service station, conditions for adaptation are better, but if necessary, you can adjust the headlights yourself. On the body of the headlamp, you need to find regulators that adjust the light beam in the horizontal and vertical planes. When starting the adjustment, you should make sure that the car is fueled and equipped, the air pressure in the tires is correct, and there is a load weighing 75 kg on the driver’s seat. The sequence of actions in this case is as follows:
- the light beam control switch is set to position “0” (i.e., there is only a driver in the car or a driver with a front passenger);
- low beam turns on;
- one of the headlights is covered with opaque material;
- the light beam is adjusted in the vertical plane by rotating the regulator, which is located closer to the axis of the car, with a Phillips screwdriver;
- the same manipulations are performed with the second regulator;
- the second headlight is closed and the procedure is repeated;
- PTF adjustment is performed in the same way.
It should be remembered that when adjusting the headlights, the car must be located on a strictly horizontal surface. The point of regulation is to bring the beam angle into line with the value indicated on the headlight. What does this mean? On headlights, as a rule, the standard angle of “incidence” of the light beam is indicated: as a rule, this value is expressed as a percentage with the headlight on next to it, for example, 1%. How to check if the adjustment is correct? If you park the car at a distance of 5 meters from a vertical wall and turn on the low beam, then the upper limit of the light flux reflected on the wall should be at a distance of 5 cm from the horizontal (5 cm is 1% of 5 m). The horizontal line on the wall can be set, for example, using a laser level. If the light beam is directed above a given line, it will blind oncoming drivers; if below, the illuminated road surface will be insufficient for safe driving.
Vertical and horizontal headlight adjustments are made using white controls
Lamp type
Before you start replacing, you need to select a lamp. H4 double filament halogen lamps are used here . They differ from single-strand ones in the base, which has three contacts. Starting in 2015, bulbs began to be used (pay attention to this) .
H4 lamps - until 2015.
H7 lamps - since 2015.
Such lamps are widespread, so there will be no problems purchasing them. It is better to choose elements with a power of 50–60 W , designed for 1,500 hours of operation. The brightness value in such lamps reaches 1,550 Lm .
Light bulbs that produce light blue light should be avoided. If in dry weather they illuminate the space well, then in snow and rain such glow will not be enough. Therefore, it is better to choose regular halogen lamps .
Stop lamp, turn, P21W 12V (BA15s) STELLOX 99-39038-SX
- Chuck version BA15s
- Installation location: Front
- Reverse lamp installation location; turn signal; stop signal
- Voltage 12 V
- Nom. power 21 W W
- Lamp type P21W
- Country of origin China
- Additional information 99-39038-SX_lamp! stop, turn, P21W 12V (BA15s)
- Type of incandescent lamp
- Cartridge version W2.1×9.5d
- Installation location of the turn signal lamp; stop signal
- Voltage 12 V
- Nom. power 3 W
- Lamp type W3W
- Country of origin: Germany
- Additional information Incandescent lamp 10 pcs per pack W3W 12V 3W W2.1×9.5d ECO (reliability and quality at an attractive price)
Expert opinion
It-Technology, Electrical power and electronics specialist
Ask questions to the “Specialist for modernization of energy generation systems”
Internal lamp lighting 1.2W 12V (W2X4.6d) STELLOX 99-39050-SX LED lamps are good for everyone - they are constantly improving, they provide powerful lighting that helps drivers see even in rain and fog, they consume a minimal amount of electricity, but with the price, alas, everything is terrible - prices are constantly rising. Ask, I'm in touch!
When it's time to change
DRL headlights on the Volkswagen Polo sedan play a decisive role in the safety of both the driver and other road users. Therefore, they need regular monitoring and timely replacement. Many VW Polo users note the extremely low durability of standard equipment.
This is due to the frequent use of optics and the desire of the manufacturer to save on parts. Factory lamp models for the Polo sedan are formally designed for 2 years of operation, but in practice their service life is 30% shorter. The first signs that your Polo lights need to be replaced are:
Anti-fog headlight
There are several ways to replace a light bulb: from underneath the car or by removing the headlight. The first method is carried out on an overpass or inspection hole.
Replacement steps:
- Turn the light bulb counterclockwise and remove it from the housing;
- Press the latch of the power chip, disconnect it from the lamp;
- Unscrew the screws securing the front fender trim, bend the front wheel trim;
- Install the new light bulb in reverse order.
The fog lamp is removed when it is necessary to replace the lamp housing or when replacing the front bumper. This is done using a special hook from the car kit. Replacement process:
- Press the pad latches, disconnect the power from the lamp connector on the back of the headlight;
- We remove the headlight so as not to damage the wiring;
- Unscrew the screws securing the fog lights using a Torx T-25 wrench;
- Replace the light bulb with a new one and reassemble.
- Insert the wire stripper into the hole for adjusting the headlights, carefully pull out the decorative strip, remove it, overcoming the resistance of the clamps;
- Turn the light bulb counterclockwise and remove it from the housing along with the socket;
Side turn signal
- We take out the cartridge, remove it from the cartridge case;
- We pull the pointer out of the hole;
- Move the side turn signal to the front of the vehicle;
- We replace the old light bulb with a new one and put everything back in place.
Dimensions
Performed symmetrically for left and right checkboxes:
- We take out the socket and change the light bulb without a base.
- Guide the lamp socket counterclockwise;
The light source for the rear lights changes as follows:
- Remove the light from the body so as not to damage the car's paint;
- Unscrew the fastening nut;
- Using a flat-head screwdriver, lift the latch of the red connector, press the latch, disconnect the wires;
- Reassemble the lantern in reverse order.
- Remove the negative terminal from the battery;
- Pull the cutout on the side panel towards you;
- Hook the chuck between the clamps;
- Press the latches on the lamp socket, remove the pad from the lamp;
- Unlock the socket and replace the light bulb;
- Open the trunk;
For those car enthusiasts who want to make their Volkswagen Polo bright, you can purchase multi-colored LED chameleon lamps. They are equipped with two LEDs on the sides and are built into the dimensions of the flashlight. The light bulbs shine brightly and abundantly, with a power of 2.0 W.