Instructions for replacing the VAZ 2107 wheel bearing
Replacing the front wheel bearings, as recommended by the manufacturer, should only be done in pairs.
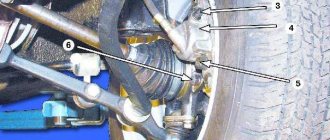
We jack up the car, be sure to place some kind of stand under the body to avoid an accident, unscrew and remove the wheel.
Next, you need to remove the caliper; to do this, you need to unpin the two bolts on which it is attached and unscrew them. To prevent the caliper from dangling and getting in the way, tie it to the lever.
Then you need to remove the cap that covers the hub nut. We unscrew the nut (on the left side there is a left-hand thread, on the right side there is a right-hand thread), remove the lock washer and pull out the outer bearing.
Pull the hub towards you and remove it from the axle along with the brake disc. Using a twelve key, unscrew the two guide bolts and remove the brake disc from the hub.
Attention! The brake disc is removed from the hub to make it easier to replace the bearings, but this is not necessary.
Next, using a screwdriver or other tool, pry up the oil seal and pick it out, take out the split spacer ring, if you have one, and the internal bearing.
Now you need to select old and unusable lubricant from the inside of the hub and wash everything thoroughly.
After which it is necessary to knock out the old bearing races; this can be done using a regular drift, a large screwdriver, a tube of the appropriate diameter or other tool.
Primary shaft of the VAZ 2107 gearbox
In total, the design of the “seven” gearbox has three shafts:
- primary;
- secondary;
- intermediate (through which the first two shafts interact).
However, the leading role is assigned to the primary one, since it is through it that the interaction of all the gears in the machine on other shafts begins.
The input shaft of the VAZ 2107 gearbox is manufactured together with a constant mesh gear. This element has oblique splines, which allows it to cling to the shaft teeth as clearly as possible. In addition, in addition to four gears, a synchronizer is also installed on the shaft, which allows the shaft to move simultaneously with the helical gear.
There are splines on the front of the product - it is on them that the clutch disc is located. To allow the input shaft to rotate easily, it is equipped with two roller bearings:
- front - at the end of the crankshaft;
- rear - in the front wall of the gearbox housing.
The input shaft of the VAZ 2107 has strictly verified dimensions:
- total length of the cylinder - 160 mm;
- shaft length to spline disk - 87 mm;
- diameter - 25 mm.
Replacing bearings and hub cuffs for VAZ 2106
EXECUTION ORDER
To carry out this work, remove the hub from the steering knuckle.
We take out the brake pads and remove the caliper (see Replacing the front wheel brake caliper).
We hang the caliper in the wheel well so that the brake fluid supply hose is not strained.
Unscrew the hub nut and remove the washer and inner race of the outer bearing.
If necessary, if the outer bearing cage is damaged along the way, do not press out the outer ring of the bearing, but replace only its inner part
However, at the first opportunity we install a completely new bearing.
Carefully, trying not to damage the cuff, remove the hub together with the brake disc from the steering knuckle axis.
Using a 12mm wrench, unscrew the two guide pins and...
...remove the brake disc and spacer from the hub.
We clean the inner cavity of the hub from old lubricant, wash all parts with kerosene and add fresh lubricant.
To remove the outer race of the outer bearing, secure the hub in a vice. With a beard, trying not to damage the hub, we hit the perimeter of the outer ring of the bearing and...
...knock it out of the hub.
We take out the hub cuff by prying it off with a screwdriver.
A spacer bushing is installed under the cuff.
We remove the inner bearing from the hub in the same way as the outer one.
We press the outer rings of the bearings in a vice, using the corresponding rings from old bearings.
The old rings should be oriented with a smaller cone diameter inside the hub to facilitate their removal after pressing in the new rings.
Using caution, you can press the inner races of the bearings with light blows of a hammer through the gasket.
We put Litol-24 lubricant in an amount of about 40 g into the internal bearing separator and the internal cavity of the hub.
Cover the new cuff with the same lubricant.
Install the inner bearing into the hub. We install the spacer bushing.
Carefully press in the new cuff using a hammer and a suitable tool (installation blade).
Trying not to damage the cuff, install the hub on the steering knuckle. Lubricate and install the inner ring of the outer bearing, the washer and tighten the hub nut. We adjust the clearance in the hub bearings (see Adjusting the clearance in the front wheel hub bearings) and install the protective cap. Before installing it, put Litol-24 lubricant in the hub cap.
Replacing the Front Wheel Hub of a VAZ 2106
VAZ 2106 Changing the oil in the front wheel bearing
To replace the lubricant in the front wheel bearings of a VAZ 2106 car, you will need keys for 12 17. 27, as well as 27 heads, a special mandrel for installing the oil seal, a wrench, kerosene, fatty litol-24. , a small container for washing parts and beards. The oil in the hubs must be changed in accordance with the schedule in the service book. Poor quality of lubricant, presence of dirt in it, as well as its absence. All these reasons significantly reduce the life of wheel bearings. If that's all you need, then you can start repairing:
- Remove the front steering wheel and decorative cap.
- Then remove the brake pads.
- Use a wire brush to remove any dirt from the brake caliper and its mounting bolts.
- Next, remove the caliper to unscrew the upper and lower mounting bolts. The hydraulic brake hose should not be removed, move the caliper out of the way and secure it so that it does not hang on the hydraulic brake hose.
- Turn the wheel mounting bolt so that the hub does not rotate with the mounting blade, unscrew the guide pins, then unscrew the wheel mounting bolt.
- Take off the ring distance, take off the brake disc.
- Then, using a hammer, namely lightly tapping the edge of a screwdriver, you need to cut off the hub cover and remove it.
READ How to Adjust the Mirrors of a VAZ 2109
Change the hub vase of the front wheel
2101-07. We install new bearings, oil seal, nut.
replacement hub for VAZ 2101.2107
Educational reviews about car repair. Spare parts for foreign cars order at Kyiv Ukraine |
The hub locking nut is anti-lock, so unlock, unscrew and remove
Then, carefully moving the hub toward you so as not to drop the washer and bearing, remove the roller cage and outer bearing outer race. You can now remove the hub. Remove the hub using a screwdriver, tear off the old stuffing box using a screwdriver, remove all old grease, wash with gasoline and wipe with a clean cloth
Next, remove the spacer and the inner bearing ring. Use a screwdriver to remove the ring distance, which should be washed with clean gasoline or kerosene.
- Look again at all defective parts, rinse with clean kerosene.
- After the hub and bearings are washed, the oil can be started. Fill the inner clutch sleeve with grease and lubricate the cage and inner race of the bearing.
- Now install the bearing in position, first you need to place the selector and the inner race of the inner bearing into the hub, then install the spacer ring, which will be completely pressed into the outer race of the inner bearing, and then install the new oil seal and all rights Through the spacer on the wood using a hammer we press seal in the ring.
READ Replacing Cabin Filter Ford Focus 3 Video
This oil change wheel bearing front wheel VAZ 2106 is completed, put the hub back in order, reverse removal, After installation, adjust the hub bearing clearance. Dilute the oil into the bearings on the other side of the car.
Installation and adjustment of new parts
The insides of the outer bearing are removed, and the old grease is removed from the opened hole. To get to the insides of the second part, you will need to pull out the oil seal by prying it with a mounting spatula or a powerful flat-head screwdriver. It is recommended to wash the inner surface of the hub together with the remaining clips in it with gasoline or diesel fuel. Sequence of further work.
- Place the hub on 2 wooden boards and attach a punch or other metal rod with a pointed end to the holder from the inside. Lightly tapping with a hammer, knock the part out. During the process, the punch needs to be moved so that the clip comes out evenly. Turn the hub over and perform the same operation on the other side.
- Now you need to study the condition of the surface of the hub seats. If traces of turning the clips are visible, you should think about replacing it. It is possible to somewhat extend the “life” of the hub, for this they use the old antiquated method. Small notches should be made on the surface of the seats with a core or chisel. After pressing the clips, they will sit tightly on these bumps and will not turn for some time.
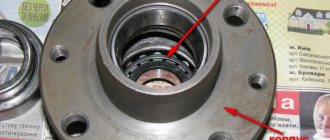
Hub diagram: 1. Outer ring cage with rollers and inner ring 2. Outer bearing outer race 3. Hub 4. Inner bearing outer race 5. Inner bearing cage with rollers and inner ring 6. Oil seal
- Coat the new clips with a thin layer of thick lubricant, then insert one of them into the hole without distortion. Place an old part of the same size on top and, with light blows of a hammer, press the clip flat into the seat. Repeat the operation on the other side of the hub.
- After carefully lubricating the rollers, place the bearing into the pressed race. You need to start from the inside of the hub. Next, install the oil seal in the same way as described in paragraph 3. Thoroughly lubricate and insert the second bearing; coat both parts generously with thick grease. Wipe both working surfaces of the brake disc from grease and place the hub on the axle axle. Tighten the fastening nut and lightly tighten it with a wrench.
Further assembly is carried out in the reverse order; after completion, the front hub of the VAZ 2106 is tightened with a nut with little force. You can check the correct adjustment by pulling the suspended wheel with your hands on its upper and lower parts.
In this case, a slight play should be felt; the bearing should not be tightened “tight”. After tightening, the nut must be hammered with the sharp part of the hammer, placing it on the side of the nut opposite the groove in the trunnion axis. By hitting it with a second hammer, a depression is made that does not allow the nut to rotate on its own.
Bearing Failure Determination
Some recommendations will help you make sure that you need to replace the wheel bearing on your VAZ 2107:
The easiest way to determine the need to replace the hub unit is to grab the front wheel and shake it in different planes
If you feel the presence of play, then it’s time for a more detailed diagnosis and most likely replacing the bearings. The front wheels of the car should be hung on a jack, while being sure to take precautions: pull the handbrake, install shoes and additional stands under the car. Grasp the top and bottom of the front wheel with your hands and then make movements. It is important to wobble the wheel, not the car as a whole.
Thus, you can accurately determine whether the product in question needs to be replaced. Another way to determine the need for replacement is to listen for humming, knocking, and grinding noises in the wheel as it rotates.
Having decided that you really need to replace the VAZ 2107 wheel bearing, you need to purchase new products and begin the replacement workflow.
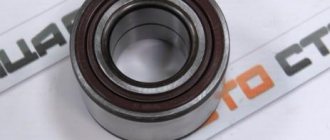
Replacement features
The front hub of the VAZ 2107 car has a pair of roller bearings, one of which is called internal, and the second external. The manufacturer recommends replacing these products in pairs, on both front wheels of the car. We will find out further what the replacement of the parts in question is.
Initially, it is necessary to tear off the nuts securing the front wheel of the VAZ 2107 car. After this, install the jack and jack up the front part of the car. At the same time, do not forget to install shoes under the wheels, as well as a special safety stop to prevent the jack from falling.
- Removing the caliper. Changing the front wheel bearing is much more difficult than replacing the rear one, but it can be done even with no experience. First of all, the 2 bolts that secure the caliper are uncoiled, after which they are unscrewed. It is not necessary to disconnect the brake hose; it is enough to tie up the removed caliper so that it does not interfere with further work.
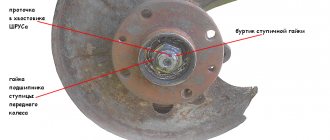
- Removing the outer product. The cap is removed using a screwdriver, behind which there is a hub nut. The nut must be unscrewed, for which you will need to use a chisel and a hammer. Behind the nut there is a lock washer that must be removed. Now you can pull out the outer bearing.
- Removing the hub. To remove the hub, you need to pull it towards you. It is removed along with the brake disc. To disconnect the disk itself after removal, unscrew the two “12” bolts. The brake disc is removed to make replacement easier, but it is not necessary to disconnect it.
- Removing the inner bearing. Using a screwdriver, you need to pry off the oil seal located on the inside and covering the inner bearing, then pick it out and pull out the split spacer ring. The ring may not stand, so we focus on the situation. After this, the inner bearing can be removed.
- Next, the old clips are removed using a special puller or an ordinary steel tube of suitable diameter. The next stage of replacement involves cleaning the inside of the hub from old grease, after which you can begin assembly.
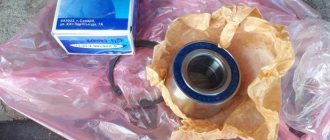
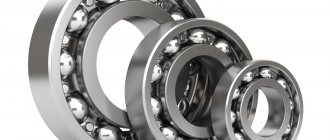
What bearings to put
When a wheel bearing requires replacement, the question immediately arises of which part to install. Many people advise using original components. However, today the quality of parts leaves much to be desired and the issue of choice remains quite relevant.
Table: type, installation location, and size of bearings
| Installation location | Bearing type | Size, mm | Quantity |
| Front wheel hub (outer support) | Roller, conical, single row | 19,5*45,3*15,5 | 2 |
| Front wheel hub (inner support) | Roller, conical, single row | 26*57,2*17,5 | 2 |
| Rear axle shaft | Ball, radial, single row | 30*72*19 | 2 |
Manufacturer's choice
When choosing a manufacturer of a wheel bearing for a VAZ “Seven”, we can recommend SKF, SNR, FAG, NTN, Koyo, INA, NSK. The companies listed have many locations around the world. These products are of high quality and meet the most stringent requirements.
Among the domestic manufacturers that supply bearings for cars of the Togliatti plant, we can highlight:
- CJSC "LADA Image" - manufactures and sells original Lada wheel bearings through secondary markets;
- Saratov plant - produces parts under the SPZ brand;
- Volzhsky Plant - uses the Volzhsky Standard brand;
- Vologda plant - sells products under the VBF brand;
- Samara plant SPZ-9.
Replacing the rear wheel bearing of a Lada Granta with your own hands
- We install the new hinge and lightly press it into the cavity.
- Evenly tighten the hinge until it touches the outer edge.
- We fix the retaining ring and install the hub in its original place.
Installation in a regular place. Assembly of the structure
- Apply a thin layer of graphite grease, put the assembly on the shaft, and secure it with a nut.
- We complete the tightening with a torque wrench (tightening torque 30 Nm).
- Use a chisel to counter the nut and put on the cap.
This completes the disassembly, assembly, and replacement of the rear wheel bearing.
It often happens that during the process of dismantling the hub mechanism, a bolt or pin breaks. The reasons for this are different, ranging from the old age of the metal to manufacturing defects.
So, how to remove a broken bolt. We carry out the work in several stages:
- mark the center of the stud;
- drill with a drill to 2.5, after 5.5, 9.5 mm;
- scroll with a bolt with a diameter of 9.5 - 10.0 mm;
- remove remaining metal and shavings.
Adjusting the wheel bearing on a VAZ 2107
You can correctly tighten the front wheel bearing of a VAZ 2107 as follows:
If play and noise cannot be eliminated in this way, the bearing must be replaced.
The replacement procedure is quite simple. To replace the VAZ 2107 wheel bearing, you will need:
The work is carried out on a lift or after raising the front wheel with a jack.
- lift the car on a lift or “hang” the wheel using a jack;
- Unscrew the wheel mounting bolts;
- remove the wheel;
- unscrew the caliper mounting bolts;
- remove the brake caliper;
- pry up the protective cap of the hub with a screwdriver and remove it (sometimes you need to use a hammer for this);
- straighten the dented side of the hub nut, which prevents it from unscrewing spontaneously;
- unscrew and remove the washer nut;
- remove the hub from the car;
- pull out the bearing cage;
- remove the ring separating the outer and inner hub bearings;
- knock out the bearing races from the seat using an extension and a hammer;
- thoroughly clean the bearing installation area from old grease and dirt using rags and kerosene;
- press in the outer and inner bearing races
- thoroughly lubricate the internal separator;
- insert the internal separator;
- fill the inter-bearing space with lubricant by approximately 40%;
- insert the spacer ring;
- press in a new oil seal;
- install the hub on the axle;
- lubricate the external separator;
- insert external separator;
- install the external separator in place;
- put the washer in place and tighten the hub nut until it stops;
- achieve free rotation of the hub in the absence of play by smoothly unscrewing the nut;
- bend the side of the nut with a chisel or screwdriver, thereby preventing it from unscrewing;
- Reinstall the brake caliper and tighten the mounting nuts;
- install the protective cap;
- put the wheel in place and tighten the wheel bolts;
- lower the car.
Tips for replacing a wheel bearing
Timely elimination of play is a guarantee of long bearing service.
Welcome, friends, to the DIY car repair website. While driving your car, noise occurs in the front part of the suspension, a hum, sometimes even a whistle, this indicates that the VAZ 2107 wheel bearing most likely needs to be replaced.
In the front hub of the VAZ 2107 there is a pair of roller bearings, one internal, and the other, of course, external.
How to check a wheel bearing
- Jack up the car so that the wheel rotates freely.
- We place the stand under the threshold of the car.
- When the wheel rocks in different planes, a knocking noise occurs; it could be a bearing, a ball joint, or possibly a steering linkage, so let’s check further.
- We turn the wheel by hand; when noise appears, it will immediately become clear to you that the bearing needs to be replaced.
In the same way as described above, we check the other side of your vehicle, since most likely the hub bearings have worn out there too.
Do-it-yourself adjustment of the clearance in the VAZ-2107 wheel bearing
Spring has arrived, and with it it’s time to change to summer tires. At the same time, it is necessary to check the clearance in the tapered bearings of the front wheel hubs and adjust it. Since a large gap leads to a decrease in the service life of both the bearings themselves and the tire tread, vibration may occur and deterioration of vehicle controllability at speeds.
So, we need:
- new hub nuts - left and right
- torque wrench (you can do without it)
- wheel wrench
- 27mm socket or open-end wrench
- hammer, flat screwdriver
- some new bearing grease
To begin, remove the wheel, decorative cap and hub cap to provide access to the nut.
We put the wheel back, but without the caps, fasten it with at least two bolts diagonally and hang it on a jack. Don't forget to put chocks under the wheels and put the car in gear.
Now, sharply shaking the wheel by the rim in a vertical plane with one hand (to eliminate play in the steering linkage), we apply a finger to the washer and hub with the other finger and determine the presence of noticeable axial play.
If this is inconvenient, then you can simply pump the wheel with both hands by the upper and lower rims with sharp movements, visually by the nut and by ear determining the play. It should be no more than 0.02-0.08 mm. In my case, it felt like it was about half a millimeter.
To exclude the influence of other gaps, for example, in the silent blocks of the levers, ball joints and steering linkage, you can ask an assistant to press the brake pedal. In this way we will fix the bearing and the hub - and the play should disappear. If it does not disappear, then its source is not in the bearing.
Once you are convinced of the opposite, you can begin adjusting the gap: use a socket or a 27 wrench to unlock and remove the old nut and put on a new one
But, for prevention, before tightening the new nut, let's inspect the outer bearing, to which we have free access - carefully remove the washer and take it out. We wipe off the old grease and carefully inspect - pitting, visible wear of separators, shells and chips on rollers and rings are not allowed
In our case everything is fine.
Now we fill the hub cavity with new grease, lubricate the bearing and put it back, then the washer and tighten the new nut by hand. The nuts on the left and right sides of the car are different - the nut on the right side has marks on the edge, the one on the left does not.
We take a torque wrench and tighten the nut with a torque of 19.6 N m (2 kgf m), while simultaneously rotating the wheel in both directions so that the bearings self-align.
Then we loosen the nut back and tighten it with a torque of 6.8 N m (0.7 kgf m). And after that we once again finally weaken it by 25°. We check for any play - it should be almost unnoticeable.
If this method did not help us and the play is still significant, then we can use the old “old-fashioned” method - we tighten the nut until the gap completely disappears and gradually unscrew it until a very slight one appears, accordingly also rotating the wheel so that the bearings fit into their places.
We make sure that the adjustment is correct - the wheel should rotate freely, without “biting”; for a more accurate determination, you can press it with a screwdriver or remove the brake pads. That's it, lock the nut, jamming its shoulder into 2 grooves on the trunnion, using a handy tool (screwdriver, bit).
We fill the hub cap with fresh grease and hammer it into place, tighten the remaining wheel bolts. We do the same on the other side.
We carry out the final check of the correctness of the adjustment on the road, driving about 1-2 km and trying not to use the brakes. We check the heating of the hub bearings by hand - it should tolerate it. If the heating is significant and the hand can no longer tolerate it, then it is necessary to carry out the adjustment again or replace the bearings.
Source
Sign of a faulty VAZ classic wheel bearing.
A faulty bearing usually produces extraneous sounds in the form of a hum or grinding sound, and the wheel can also hang on such a bearing due to wear or due to a poorly tightened wheel nut.
To diagnose a bearing, it is enough to hang the wheels (or each separately) and rock the wheel in different directions. If there is play when rocking in all planes (wheel rotation left and right and tilt up and down), the wheel bearing may need to be replaced. But the backlash can also be due to tired silent blocks or ball bearings. To exclude a suspension malfunction, you need a second person who will check whether the wheel wobbles together with the steering knuckle or walks separately from it. If the wheel moves separately from the steering knuckle, then the wheel bearing is definitely faulty (in this case, tightening the wheel nut may briefly save the situation).
A sign of a malfunction may also be extraneous sounds when the wheel rotates (usually a hum, sometimes a grinding sound) or its uneven rotation.
You can also determine a faulty bearing by an excessively heated wheel (for example, if the front right wheel disc is much warmer than the front left one). But you can’t compare the temperature of the rear and front wheels because... They have brakes of different designs.
And so, let’s summarize everything we’ve read. The wheel bearing is replaced if:
- The wheel dangles separately from the steering knuckle.
- A hum and grinding noise is heard when the wheel rotates.
- The wheel does not spin evenly.
- The wheel rim gets very hot.
About the operation of wheel bearings
The service life of this element will be reduced if the wheel offset is incorrectly selected.
Here the fracture load increases due to the impact of the machine’s weight. In addition, tires with the wrong radius lead to premature wear: in this case, the force that acts on the mechanism during lateral acceleration increases. This factor can often be observed on large SUVs, where the wheels are quite large.
Also, the bearing's service life is reduced if it is installed in a car with faulty shock absorbers: higher shock loads are observed here. A brake system that is damaged will release excess heat into the bearing. Incorrect wheel alignment angles can lead to load redistribution.
Repair of distributor on VAZ 2106
Many people believe that it is not advisable to repair or rebuild the distributor on the VAZ 2106 - it is easier to install a new one. This statement is not always true.
The service life of the distributor is 30-50 thousand km, so if it fails earlier, it makes sense to do repairs, because, most likely, only a few parts have worn out. In addition, it is possible to perform a kind of prevention and significantly increase its service life.
The VAZ 2106 distributor is a rather complex mechanism, so when working with it, it is advisable to mark all the parts so that after assembly it works normally. After you have removed the distributor, you need to unclip the brackets and remove the cover.
Underneath there is a rotor, which is secured with two screws. Unscrew them and remove the rotor. Below it, on the metal plate of the regulator, are two opposing spring-loaded weights. Before removing them, mark one of them and the spring so as not to be confused during assembly.
Then you need to unscrew the screw that goes into the housing from the back side near the vacuum regulator and remove the capacitor secured by it.
Under the regulator plate with weights there is a contact group secured with two screws. Unscrew the screws and remove it. The rod from the vacuum regulator is protected by a lock that must be removed.
Now, having released the rod, you can unscrew the bolts securing the vacuum booster to the distributor body and disconnect it. In order to remove the shaft together with the support plate, you need to knock out the locking pin, which is located in the oil protection ring.
Once the pin is knocked out, you can remove the ring and lock washer, and then remove the shaft itself. Now you can remove the bearing and race, which were located under the support plate. In the previously removed contact group, you need to free the axle from two washers, and then remove the contact itself. The distributor has been disassembled and now you can begin to assess its condition.
First of all, you should pay attention to the condition of the shaft bearing and the presence of lubricant in it - if the bearing has signs of wear or there are signs of lubricant leakage on the cuffs, it must be replaced. Check the condition of the shaft, especially the place of its contact with the inner sleeve of the housing and the sleeve itself. If there are visible signs of wear on the shaft or sleeve (which is rare, but it happens), it is better to replace them together (if you replace only one part, then during the “grinding in” process) the new one will begin to deform the old one)
Inspect all the terminals of the distributor and contact group - there should not be the slightest trace of oxide on them.
If there are visible signs of wear on the shaft or bushing (which is rare, but it happens), it is better to replace them together (if you replace only one part, then during the “grinding in” process the new one will begin to deform the old one). Inspect all the terminals of the distributor and contact group - there should not be the slightest trace of oxide on them.
If rust appears, you need to carefully clean it with zero-grit sandpaper, then rinse it in gasoline, dry it and wipe it with a dry cloth. Check the operation of the vacuum regulator - press the rod and tighten the fitting with your hand. If the traction doesn't come out, everything is fine.
All the main faults are described above, but still pay attention to every detail - if something shows signs of wear, it is better to replace it immediately so as not to do the same job twice.
During the assembly process, to seat the bearing, work only with spacers or on a bench. All contacts must be securely tightened. The distance between the breaker contacts should be around 0.3 mm. For ease of installation, lubricate the splined part of the shaft with engine oil.
Replacing a VAZ 2106 hub is done quite rarely, since the part lasts a long time, at least 150 thousand km. The main reason why the replacement operation is performed is wear of the bearing seats, as a result of which the bearing races begin to rotate. The fault can only be determined by removing the hub and removing the bearing races. If they rotate in their seats, then after removing the lubricant, clear marks will be visible on the inner surface.
Symptoms of a problem
The wheel bearing must always be in good condition. If the part becomes unusable, this can lead to an accident, since the malfunction is accompanied by large wheel play. As a result, the disc may be sheared off the wheel bolts. If such a situation occurs at high speed, a serious accident cannot be avoided. This indicates that the hub bearing needs periodic inspection, and if play is detected, it needs to be adjusted or replaced.
The main manifestations of a part malfunction are:
- Dry crunch. When a bearing breaks, a metallic crunching sound occurs while driving. It appears as a result of uneven rolling of the rollers due to damage to the separator. It is difficult to confuse this sound with any other.
- Vibration. If the element in question has severe wear, vibration appears, which is transmitted to both the body and the steering wheel. It indicates severe wear of the bearing cage, which can lead to seizure.
- The car pulls to the side. The problem is somewhat reminiscent of the case with incorrect wheel alignment adjustment, since the faulty element does not work correctly due to its parts being wedged.
Definition of failure
To determine the condition of the wheel bearing, you need to perform a few simple steps:
- Hang the front wheel on the desired side using a jack, not forgetting to put the car on the handbrake and install stops under the rear wheels.
- Place a support under the lower suspension arm and remove the car from the jack.
- Take the wheel with both hands (top and bottom) and perform movements from yourself to yourself, and no play or knocking should be felt.
- Spin the wheel. If the bearing has become unusable, a grinding noise, hum or other extraneous noise may appear.
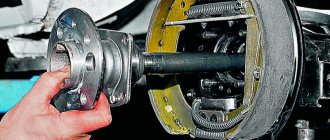
Rounded fist
An equally important element of the six's chassis is the steering knuckle. Force is transmitted to it from the steering linkage through the lever, resulting in the rotation of the wheels of the front axle. In addition, ball joints (upper and lower) are attached to the assembly through the corresponding eyes. On the reverse side of the steering knuckle there is an axis on which the hub with bearings is placed. The hub element is fixed to the axle with a nut. The left trunnion uses a nut with a right-hand thread, and the right one uses a left-hand thread. This was done in order to prevent the bearings from being tightened while moving and to avoid overheating and jamming.
Malfunctions
The resource of the steering knuckle is practically unlimited, if you do not take into account the quality of roads and neglect of adjusting the wheel bearings. Sometimes a product can travel 200 thousand km. The part is made of cast iron and can withstand heavy loads. However, if it fails, then the owners of Zhiguli cars often change it along with the bearings and hub
It is necessary to pay attention to the steering knuckle when the following symptoms appear:
- the car began to pull to the sides, and the problem is not eliminated by adjusting the wheel alignment;
- It was noticed that the wheels turned out at a smaller angle. The cause may be problems with both the steering knuckle and the ball joint;
- wheel break. This happens due to the breaking of the threaded part of the steering knuckle or the ball joint pin, which happens relatively often on Zhiguli cars;
- unadjustable play. If the wheel bearings were adjusted untimely or incorrectly, then in the places where they are installed, the steering knuckle axis will gradually wear out, which will lead to the appearance of play, which cannot be eliminated by adjustment.
Sometimes it happens that during car repairs a small crack is discovered on the steering knuckle. Some car enthusiasts advise fixing the problem by welding. However, it must be taken into account that safety directly depends on the condition of the steering knuckle. Therefore, such elements should not be repaired, but replaced with known good ones or new ones.
How to increase wheel turnout
Many owners of the VAZ 2106 and other “classics” are interested in the issue of increasing wheel turnout, since the model in question has a rather large turning radius, which is not always convenient. Those who are seriously involved in tuning their car simply install a set of suspension elements (levers, bipod) with changed parameters. However, such sets for the average owner of a VAZ “Six” may not be affordable, because for such pleasure you will have to pay about 6-8 thousand rubles. Therefore, other more affordable options are being considered, and they exist. You can increase the wheel inversion as follows:
- We place the car on the pit and dismantle the bipod installed on the inside of the hub.
- Since the bipods have different lengths, we cut the longer part in half, remove the part, and then weld it back together.
Replacing the front wheel bearing
Work on replacing a wheel bearing begins with the preparation of tools and materials. You will need:
- set of socket wrenches;
- screwdriver;
- chisel;
- hammer;
- pliers;
- extension for knocking out the bearing race;
- new bearing, seal and lubricant;
- rags;
- kerosene.
How to remove
To dismantle the part, lift the front wheel using a jack. In a service station, work is carried out on a lift. When replacing a bearing, the following sequence of actions must be performed:
- Unscrew the fasteners and remove the wheel.
- Unscrew the fastening and dismantle the caliper.
How to put
After dismantling the wheel bearings and cleaning the hub itself, you can begin installing new parts. The work is performed in the following order:
- Press in the races of both bearings.
Video: how to replace the front wheel bearings of a VAZ 2107
What to lubricate
Litol-24 is used to lubricate wheel bearing separators. It is also used to apply a new oil seal to the working edge during installation.
Bearing nut tightening torque
The need to tighten the hub nut arises after replacing the bearings or during their adjustment. The nut is tightened using a torque wrench to a torque of 9.6 Nm, while the hub is turned several times to install the bearings in place. Then loosen the nut and tighten it again, but with a torque of 6.8 Nm, after which it is locked in this position.
Checking the condition of the bearing
Checking the condition of the front wheel bearing is not that difficult. You just need to jack up the front wheel, where the bearing is supposed to be worn out. If the car is front-wheel drive, you need to set the gearbox to neutral, put chocks under the rear wheels and put the car on the handbrake. Rear-wheel drive cars use both a gearbox (1st gear is installed) and a handbrake.
You need to grab the jacked wheel with your hands at the top and bottom, and check for play with rocking movements. In a bearing in normal condition there should not be any play, not even the slightest.
Additionally, you need to spin the wheel around the axle. The wheel should rotate easily; the presence of any jamming, as well as a slight crunch or noise, will indicate that the front wheel bearing needs to be replaced.
Video: Diagnostics of the VAZ front wheel bearing.
If you have the appropriate equipment, you can make a replacement in a garage, but you must first purchase a new bearing, as well as related spare parts (hub nut, oil seal, retaining rings).
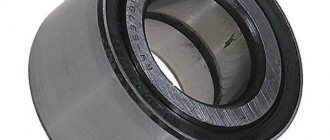
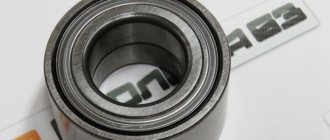
As for the bearings themselves, they differ on different cars. For example, the VAZ-2106 has two tapered roller bearings at the front, but the Chevrolet Aveo has a double-row angular contact ball bearing.
Due to the differences in these elements used, work to replace them is carried out slightly differently. Therefore, let’s look at how to replace the front wheel bearing on the above models.
Replacing the wheel bearing on a VAZ 2101-VAZ 2107
Welcome! Wheel bearing - why do we need a bearing at all, we think you know, but for those who don’t know, in a nutshell let’s say that in order for any parts to rotate, rotate, etc., there are several types of bearings, namely plain bearings and rolling bearings (This is based on the type of friction), bearings are also classified according to where they will be used, for example, take a sliding bearing, classification “Radial” - it takes a radial load and is designed to work in difficult conditions, its maximum temperature can reach as much as 400 °C, and the speed of relative movement of surfaces can be a maximum of 40 m/s,” there are also bearings classified as “Support”, “Self-aligning” and others.
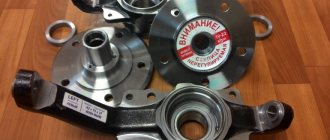
Note! To replace the hub bearing, you will need to purchase: A repair kit for the hub (There will be bearings and lubricant), as well as stock up on hammers, screwdrivers and all the necessary keys, and of course, choose a free day and get to work!
Where is the wheel bearing located? Having read the name itself, you can already understand that the bearing is connected to the hub, and so it is located in its inner part, usually when replacing this bearing, people remove the brake disc together with the hub, because separating the brake disc is only a waste of time, but changing the bearing on the installed hub will not work at all, so it will need to be removed (without removing the brake disc) and then replaced.
When should you replace a wheel bearing? When will it start to hum, but the whole point is that it is very difficult to determine when you drive a car all the time, because the bearing will start to hum strongly only when it has actually all broken down and become unusable, so checking this way is not an option, for more For an accurate check, you will first need to hang the wheel (First the right front, then the left, it doesn’t matter, both wheels need to be checked) and after that, turn it by hand, it should spin without any jamming and hum (extraneous sound), there should be no (Only the pads can touch the brake disc, but this sound will be completely different, you can distinguish how the bearing hums and how the pads rub), for more details on how to check it, see the video below, it will be said about this hum, and more about how to determine by rocking whether the bearing has become unusable or not yet.
Preparing and disassembling the unit
The manufacturer does not know which wheel will be replaced, so he completes the product with both nuts. Additionally, you need to purchase an oil seal, which is located at the rear of the hub and does not allow grease to leak out. You can carry out the work on a level surface, securing the car with the hand brake so that it does not roll away.
It is recommended to first remove the brake pads from the caliper, then it will be easier to put it back.
Now you can completely unscrew the nut, pull out the washer and remove the hub from the axle axle by hand. After this, you need to remove the old grease from all parts; it contains metal shavings.
VAZ 2106 rear wheel bearing replacement
VAZ 2110VAZ 2106 rear wheel bearing replacement
Replacing a VAZ 2106 hub is done quite rarely, since the part lasts a long time, at least 150 thousand km. The reason why the replacement operation is being performed is wear of the bearing seats, as a result of which the bearing races begin to rotate. The fault can only be determined by removing the hub and removing the bearing races. If they rotate in their seats, then after removing the lubricant, clear marks will be visible on the inner surface.
A sign of wheel bearing wear is a hum and vibration from one of the front wheels. To accurately determine the origin of the humming sound, the car is jacked up and the wheel is rotated by hand in different directions. If a loud noise is heard, then the bearings need to be replaced. The service life of these parts averages 40-50 thousand km. Disassembling this unit on a VAZ 2106 car, removing old parts and installing new ones is a simple task and is accessible to every car enthusiast.
Return
The front rolling bearings are roller, cone type, consisting of two parts: external and internal. Good quality products are sold complete with the required amount of lubricant and two clamping nuts. The nuts differ in their thread, on one it is left-handed, on the other - right-handed, the first will fit the axis of the right axle, the second - to the left.
The manufacturer does not know which wheel will be replaced, so he completes the product with both nuts. Additionally, you need to purchase an oil seal, which is located at the rear of the hub and does not allow grease to leak out. You can carry out the work on a level surface, securing the car with the hand brake so that it does not roll away.
Before lifting the car with a jack, you need to pull out the metal boot covering the hub nut and loosen the latter with a 27 mm wrench. Then the wheel bolts are loosened, the car is jacked up and the wheel is removed. The next step is to remove the brake caliper, which is attached to the axle with 2 bolts; they need to be unscrewed, the part removed and moved to the side.
It is recommended to first remove the brake pads from the caliper, then it will be easier to put it back.
Now you can completely unscrew the nut, pull out the washer and remove the hub from the axle axle by hand. After this, you need to remove the old grease from all parts; it contains metal shavings.
Return
VAZ 2106 | replacing rear wheel hub bearings
| You will need |
|
Before starting work
Remove the brake drum (see subsection 7.2.1.).
The hub has two single-row roller bearings. During operation, it is necessary to adjust the clearances and replace the grease in the bearings.
If, when rocking a suspended wheel, you feel play that cannot be eliminated by adjustment, or noise appears while driving, there is a possibility that the hub bearings have failed.
One of the hub bearings may fail. The bearings should rotate freely, without jamming. Rollers and bearing rings must not have holes, chipping or signs of wear. Replace the defective bearing.
| EXECUTION ORDER | ||
| 10. In the same way, press the outer ring of the front bearing into the hub (with a smaller inner diameter inside the hub). | 11. Lubricate both bearings and | 12. outer bearing rings, and also fill the inner cavity of the hub between the bearing rings with lubricant. |
| 13. Lubricate the working edge of the new oil seal with Litol-24 grease. | 14. Reinstall the rear bearing and oil seal with the working edge facing the inside of the hub. | 15. Using a suitable mandrel, press the oil seal into the hub until it stops (flush with the end of the hub). |
| 16. Install the protective ring and press it onto the hub until it stops. After this, reinstall the brake drum and adjust the clearances in the bearings (see subsection 5.2.4.). |
automn.ru
Rear axle repair and gearbox replacement
Depending on the cause of the breakdown, the following repair work may be necessary to restore the transmission’s functionality:
- replacing the VAZ 2106 gearbox oil seal;
- replacement and adjustment of the main pair;
- Troubleshooting differential and shank bearings and replacing them if necessary;
- replacement of VAZ 2106 gearbox.
Repair with replacement of bearings and (or) elements of the main gearbox pair is very difficult in technical terms. It requires special knowledge and tools in the process of adjusting the VAZ 2106 gearbox. As a rule, this unit is adjusted either at the factory or in specialized workshops. By watching a video about repairing a VAZ 2106 gearbox, you can see this for yourself. Meanwhile, in order to prevent damage to this transmission element, it is necessary to monitor whether the shank nut is tightened and whether there is any oil leakage from the seals.
Replacing the VAZ 2106 gearbox oil seal is necessary in case of transmission oil leaking from under it. Simply tightening the nut is not enough. Therefore, before we learn how to adjust the VAZ 2106 gearbox, we will learn how to replace a leaking oil seal. To carry out repair work you will need:
- a set of open-end wrenches and socket heads;
- puller for removing the oil seal;
- Litol-24 lubricant;
- mandrel for installing a new oil seal;
- hex wrench for unscrewing the drain plug;
- hammer;
- container for draining oil;
- transmission oil.
It is best to carry out work on replacing the rear axle gearbox oil seal in the inspection pit.
Replacement is carried out in the following order:
- We unscrew the plug to drain the oil, and, replacing the container, drain it.
- Unscrew the driveshaft from the rear axle gearbox flange.
- Unscrew the flange nut, counting the exact number of turns, and write down the value.
- Remove the flange. It usually comes off easily, but you can easily tap it with a hammer once it's firmly in place.
- If there are shells on the surface of the flange, or wear in the place where the oil seal fits, it must be replaced.
- Using a puller, remove the worn oil seal of the VAZ 2106 rear axle gearbox.
- Lubricate the new oil seal with Litol-24 grease to facilitate its installation.
- Using a mandrel, lightly hammer the oil seal into place.
- We install the flange and tighten the nut exactly the same number of turns that we wrote down.
- We attach the driveshaft to the rear axle.
- Fill the VAZ 2106 gearbox with oil to the level of the filler neck. It is recommended to use gear oil from well-known manufacturers. It would be useful to add a molybdenum additive to it to reduce friction between parts.
After repairs, it is also necessary to check the condition of the breather and, if necessary, clean it. If there is a need to completely replace this unit, then you need to know that the gear ratio of the VAZ 2106 gearbox is 3.9, and the car’s speedometer readings are guaranteed. Read about how to remove a VAZ 2106 gearbox in other articles on our website.
The device of the hub on the Lada Grant
Front
- rounded fist;
- external and internal dirt-reflective metal rings;
- front roller bearings;
- hub;
- washer;
- hub nut;
- retaining ring, plug.
Rear hub device
- hub mechanism axis;
- metal ball bearing;
- mud ring;
- retaining ring;
- washer;
- screw;
- sealing ring;
- rubber boot;
- hub cover.
Resource for replacing hub mechanism elements
The average service life of wheel joints is 80 – 85 thousand km. The indicator is average, as it depends on the following factors:
- quality of workmanship of the part;
- frequency of operation of the technical device;
- driving style;
- quality of road surface;
- aggressive environment;
- high operating temperatures;
- compliance with technical inspection intervals.
Signs that a hub needs to be replaced
- the appearance of uncharacteristic noise during wheel rotation;
- wheel runout in the steering column;
- vibrations at different speeds. Sometimes there is vibration at a certain speed;
- metallic grinding noise as the wheel rotates;
- front wheel hub play.
Diagnostics of the hub mechanism
- We place the car on a level platform, squeeze the parking brake if we are checking the front row. For the rear, we install wheel chocks.
- Let's jack up the front (rear) part.
- We turn the car wheel and carry out troubleshooting.
- We shake the wheel up and down with our hands. In good condition there should be no play. Otherwise, we dismantle and replace worn elements.
Replacing the front hub of Lada Granta
- We place the car within the perimeter of the repair area and provide priority safety measures.
- Let's jack up the right (left) side.
- Unscrew the bolts and remove the wheel.
- Let's unlock the hub.
- On the back side, unscrew the two bolts that guide the brake caliper.
Location of two bolts
- We remove the caliper, hang it on a wire (we fix it on the steering tip).
- Unscrew the hub nut and remove the brake disc.
Removing the hub nut
- We unscrew the two bolts - the rack clamps. If necessary, we use a liquid to remove deposits like WD-40.
- Disconnect the strut with the steering knuckle and unscrew the ball joint fasteners.
- We remove the CV joint.
Next, install the new hub assembly and assemble the structure in the reverse order.
Replacing the front wheel bearing of Lada Granta
- The front hub joint is located in the steering knuckle housing, remove it. Pre-clamp the structure in a stationary vice.
- We install the metal spacer - the head at “22” on the surface of the hub. We apply targeted blows with a hammer to press it out.
- We disconnect the inner race of the hinge and remove the separator with metal balls.
- To remove the outer part of the hinge, use pliers and remove the retaining rings.
- To dismantle the inner part of the cage we use a chisel. Gently tap with a hammer.
- Use a puller to press out the axle shafts.
What tools will you need?
Description of replacing the timing belt on a Daewoo Nexia car, with a Sons 8-valve engine, with photographs and videos.
Before replacing the rear wheel bearing of a VAZ-2108, you will need the following tool:
- A 30" head and a knob, as well as a piece of pipe. You can even use a spanner wrench, but it must be strongly curved to make it easier to install into the hub hole on the nut.
- Punch or thin chisel. It is advisable to sharpen the chisel in advance. This tool is needed to straighten a jammed edge on a nut.
- It is advisable to have three-legged and two-legged pullers. The first is necessary to dismantle the wheel hub, and the second to remove the inner race of the bearing.
- Pliers for removing and installing retaining rings.
- It is advisable to have a puller on hand to remove and install the bearing into the hub.
- You will also need any type of keys for “12”, “13”, “14”.
- You can't do without a hammer and wooden spacers.
Be sure to buy a good bearing, it is advisable to also buy a nut. It is not recommended to use the old one. You can purchase an assembled VAZ-2108 rear hub, this will greatly facilitate repairs, but will hit your wallet hard.