02 April 2020 Lada.Online 45 174 0
The Chevrolet Niva instrument cluster is designed to display driving characteristics, the current state of vehicle systems that ensure traffic safety, as well as the correct operation of the entire vehicle as a whole. If you are a novice driver, then this description of the dashboard will help you understand the readings of instruments and indicators.
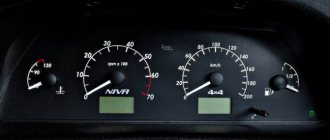
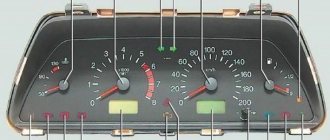
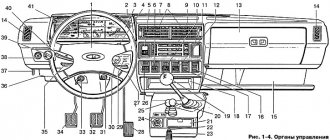
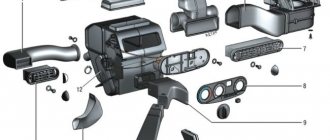
Symbol designations on the Chevrolet Niva instrument panel
The stock 2004 version has a number of mechanical gauges and analogue icons. In the photo above the panel elements are numbered. The symbols are described below.
| Number | Meaning |
| 3/4 | Standard turn signals also illuminate when the hazard lights are activated. |
| 7 | Indicator of the minimum amount of fuel in the tank. Refuel. |
| 8 | This indicator indicates that the side lights are on. |
| 9 | The brake system is in disrepair. The system needs to be diagnosed. |
| 10 | The high beam of the head optics is on. |
| 12 | Digital mileage indicator, general on top – daily on bottom. |
| 13 | This indication indicates that there is a problem with the engine. In this case, you need to immediately go to the service station. |
| 14 | Emergency light indicator. |
| 15 | Digital display – daily time indicator. Also, during self-diagnosis, an error code is displayed here. |
| 16 | The battery is low. Check the generator and its drive belt. |
| 17 | Handbrake activation lamp. |
| 18 | The oil pressure in the crankcase is too low. |
| 19 | Reserve indicator. |
There is also an additional row of light bulbs on the dashboard, located outside the dashboard.
| Number | Purpose |
| 1 | Empty |
| 2 | The center differential lock is activated. |
| 3 | The immobilizer is activated. |
| 4 | There are problems with the operation of the ABS module; the entire device needs to be checked completely. |
| 5/7 | Backup lamps. |
Panel buttons
Push-button switches are located to the right of the instrument panel. The following description is given in order from left to right.
Exclamation mark on the Shnivy tidy: what does it mean
Indicates problems in the car's electronic systems. Check for additional indicators that light up at the same time. Often this is accompanied by the car not starting.
Drivers mainly look for reasons in nodes:
SRS on the Chevrolet Niva dashboard
If the indicator on the Shnivy dashboard lights up, it only indicates that there are problems in the car’s security system. Check the airbags, belt sensors and wiring.
What is a torpedo
All cars have a dashboard (board), which is located in front of the passenger compartment. In a Niva Chevrolet car, it is a plastic covering on which almost all vehicle control elements are located. Although the panel is not a necessary part for driving a car, without it driving turns into complete dissatisfaction. Under the socket there are parts that can fail from time to time. And sometimes, to get to them, it is necessary, as they say, to disassemble half the car. Let's take a closer look at the stages of removing a torpedo from a Niva Chevrolet car.
Steps for removing the instrument panel
The reason for removing the panel may be not only the breakdown of parts located under the panel, but also the following points:
- Car interior modernization;
- Insulation and noise reduction of the interior;
- Cleaning the car heater;
- Replacement with a new, improved one.
Removing the Niva Chevrolet dashboard is carried out in stages. You need to arm yourself with a simple set of tools and get started.
- Stage 1. The car is disconnected from the battery. This is necessary, because there is a huge amount of wiring on the instrument panel, which can accidentally be shorted during removal. To do this, simply disconnect the negative terminal from the battery.
- Stage 2. First of all, the part of the casing located under the steering wheel is removed. The five fastening screws are unscrewed with a screwdriver, and this casing, consisting of two parts, is removed.
- Stage 3. The steering wheel and the switches located on the side are removed. The steering wheel is removed by unscrewing the nut located inside the steering wheel. Remove the steering column shaft. How to remove the steering wheel and its parts can be found in the relevant sections.
- Stage 4. The car radio and its installation location are removed from the passenger compartment. Let's start removing the floor covering. To remove the A-pillar trim, you need to unscrew four screws. The ignition switch is also removed.
- Stage 5. We proceed to disconnecting the wires. The blocks with wires located at the bottom near the gas and brake pedals are disconnected and marked with a marker. The wires supplying the car's anti-theft system are disconnected. The power supply of the instrument board consists of three blocks, which are also detachable.
- Stage 6. The ground wire of the car is unscrewed from the stud. Under the hood, you need to remove the filter, which is designed to filter the air entering the cabin.
- Stage 7. Most of the liquid is drained from the expander, and the clamps suitable for the heater radiator are disconnected.
- Stage 8. Work is carried out with a wrench inside the car. The bolts securing the panel to the stand and the stand to the bracket are unscrewed. The cross member strut is removed. A cross member of the instrument panel is attached to the steering shaft bracket, which can be removed by unscrewing four bolts.
- Stage 9. All visible and invisible bolts securing the instrument panel are unscrewed. These fasteners are located on top near the glass and on the side. The front air duct, which is designed to supply cold and warm air into the cabin, is removed.
- Step 10. You can remove the dashboard. It is best to do this together, so that one person observes the removal processes from inside the panel. Otherwise, any power wire or part may be damaged or broken.
Errors on the Shnivy panel
When performing self-diagnosis of the BC, the following faults may appear on the display.
| Number | Decoding |
| There are no problems in the system. | |
| 1 | The ECU controller is faulty. |
| 2 | Fuel level indicator is broken. |
| 4/8 | High or low voltage inside the on-board network. Check that the generator set is operating correctly. |
| 12 | The warning lamp diagnostic circuit is faulty. |
| 13 | Open circuit DK1 |
| 14/15 | High/low signal level from DTOZH. |
| 16/17 | High/low voltage inside the on-board network. Here the distributor and battery are checked. |
| 19 | The DPKV is transmitting the wrong signal. |
| 21/22 | Likewise for TPS. |
| 23 | The intake air temperature sensor is reporting incorrect data. |
| 24 | Open circuit of the vehicle speed meter. |
| 25 | DD produces erroneous information. |
| 27/28 | Potentiometer CO – increased/lowered value. |
| 33/34 | The absolute pressure sensor is faulty. |
| 35 | The XX regulator is faulty or does not work correctly. |
| 41 | Phase sensor - incorrect signal. |
| 42 | The ignition control circuit is damaged. |
| 43 | DD – errors in the operation of the highway. |
| 44 | The fuel mixture is too lean. |
| 45 | Opposite meaning. |
| 49 | Loss of vacuum in the fuel line. Check the line for leaks. |
| 51 | The PROM is faulty. |
| 52 | RAM failure or circuit malfunction. |
| 53 | Increased voltage in the circuit. |
| 54 | The octane corrector is torn or out of order. |
| 55 | ECU circuit error. |
| 61 | Oxygen sensor degradation. |
Most errors can be caused by the overlap of several problems. For example, 8+2=10.
Shnivy tidy does not work: reasons
Usually this is damage to the module's power circuit, moisture/condensation on the board, or mechanical damage caused by improper repair.
The problem is simple when studied in detail, and can be easily eliminated without the help of specialists.
The shield does not light up
If it just goes out (the backlight has failed), check the corresponding fuse inside the mounting block. Next you need to follow the wires towards the tidy. Here the condition of the contact groups and the presence of oxidation on the terminals are checked. If there are such problems, the problems should be eliminated.
If only some of the light bulbs stop lighting, dismantle the device and check the lighting elements directly for damage.
Shnivy's shield is blinking
A typical problem in cars that are driven on rough terrain or broken roads. A symptom of trouble is that the device periodically goes out while driving or blinks quickly.
Instrument needles Strings stuck
In such a situation, check the systems.
How to remove the tidy
Follow the simple procedure.
Reassembling the unit is performed in reverse order.
The standard Shnivy panel is a well-thought-out module with informative and easy-to-read information. The simple design ensures the reliability of the unit and the absence of serious breakdowns during operation.
Specialization : Graduated from the State Automobile University, worked for 20 years at GAZ-56, now I drive a Zhiguli.
Let's bring Shniva to mind: Our own icons in the BKL (Indicator lamp block)
I decided to add functionality to the ShNivovsky BKL, especially since it still does not use all the potential inherent in it. Attention! If you have a FAM or ReSHN with ABS+SRS, then the BCL is full-fledged, all indicators are wired. If you have a ReShN in the basic configuration (without ABS), then you do not have a BCL, instead there is a plug. Therefore, you will have to buy it separately if you want to make your own badges) If you have a pre-restyle, then the BKL has a short board and only the first 3 badges are soldered. You can read about how to make such a BCL full-fledged here
Competitors
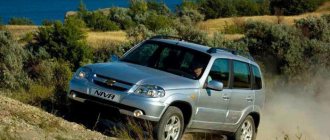
The Chevrolet Niva in the new body was able to perform worthy of its competitors:
- Renault Duster;
- Lada 4×4 Urban 3D;
- Suzuki Jimny;
- Nissan Terrano;
- Lada 4×4 Urban 5D.
But this is not a complete list of its competitors. The strongest opponent is Renault, as it has an attractive design, first-class equipment and is inexpensive. The new Niva SUV competes with serious cars. They all have their advantages and disadvantages.
BC Chevy-Master (VAZ-master). Instructions
After identification I found the instructions. I post it for myself and other users.
CHEVY-MASTER VERSION 4.1 ROUTE ON-BOARD COMPUTER FOR Chevrolet Niva CARS WITH BOSCH MP 7.0 CONTROLLERS EURO 2/ EURO 3
MANUAL
The VAZ-MASTER on-board computer is designed to display route information, information about the current values of engine parameters and its components, as well as to control the operating modes of the electronic engine control unit. VAZ-MASTER 4.1, at the operator’s choice, allows you to display the values of the following parameters:
1. Total fuel consumption, l. 2. Instantaneous fuel consumption in l/100 km with a moving car, l/hour with a stationary car. 3. Average fuel consumption l/100 km 4. Coolant temperature in degrees. C. 5. On-board voltage, V. 6. Engine speed, rpm*10 7. Vehicle speed, km/h 8. Average speed, km/h 9. “Black box” speed, km/h 10. Injection controller error codes. -manage operating modes: 11. Erase the controller error code. 12. Adjust the total flow meter to reduce the error. 13. Automatically adjust the brightness of the computer indicator (when the side lights are on/off) 14 Warming up, drying, testing spark plugs. 15. Test the operation of the fuel pump on/off. 16.Forcibly control the cooling fan on/off.
OPERATION The menu sequence is cyclical and has the following functions:
Total flow meter adjustment mode.
Description of instrument panel icons Niva Chevrolet (LADA)
The Chevrolet Niva instrument cluster is designed to display driving characteristics, the current state of vehicle systems that ensure traffic safety, as well as the correct operation of the entire vehicle as a whole. If you are a novice driver, then this description of the dashboard will help you understand the readings of instruments and indicators.
General appearance and varieties
At the moment, there are several options for the instrument panel on the Niva Chevrolet and Niva Treval.
| Picture number | Years of manufacture | Applicability | Catalog number |
| 1 | 2006-2007 | Chevrolet Niva | 21230-3801010-00 |
| 2 | 2006-2009 | Chevrolet Niva | 21150-3801010-00 |
| 3 | 2009-2018 | Chevrolet Niva | 21230-3801010-10 |
| 4 | 2018-2019 | Chevrolet Niva | 21230-3801010-15 |
| 5 | 2019-2020 | Chevrolet Niva | 21230-3801010-17 |
| 6 | 2020… | Lada Niva Travel | 21230-3801010-17 |
Despite the external differences, these shields differ only in appearance, lighting, software and functions of the built-in BC. Otherwise, the icons and designations of these panels are absolutely the same.
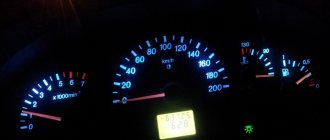
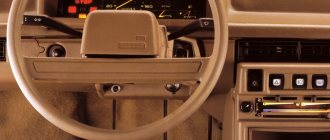
Description of devices
1. Coolant temperature gauge
. The red zone warns of engine overheating. If the arrow moves into the red zone, you should stop, let the engine cool down and eliminate the cause of overheating.
5. Speedometer (km/h)
induction type shows at what speed the car is currently moving. The speedometer drive is electric from a sensor installed on the transfer case housing.
6. Fuel level indicator
. Provides information about the approximate amount of fuel in the tank. To determine the correct position of the fuel level indicator, you must place the car on a flat, horizontal surface. Turn off the ignition. After 3 sec. turn on the ignition. The indicator will be in the position corresponding to the amount of fuel in the tank. It is recommended to perform this procedure before refueling the vehicle or if you suspect incorrect readings on the fuel level gauge.
12. Mileage indicator
. The top line of the indicator indicates the total mileage of the car, and the bottom line is a daily counter of the distance traveled. Reset the daily counter readings by holding button 11 pressed for more than 3 seconds with the car stopped. The daily counter is also reset when the terminal is removed from the battery.
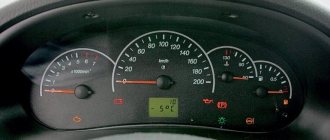
15. Time indicator
, temperature and voltage of the on-board network. Switching between the indication of time, ambient temperature and on-board network voltage is carried out by briefly pressing button 11. When the ignition is turned on:
When the outside air temperature rises above +3 °C and drops again to +2 °C:
The instrument cluster displays the air temperature around the temperature sensor located in the engine compartment.
When the car is parked for a long time with the engine running, the air temperature in the engine compartment increases, and this is reflected in the readings of the ambient temperature sensor.
When the car starts moving, the air temperature readings change. The hours and minutes are set in the time display mode by rotating button 11 towards the signs “h” - hours and “m” - minutes.
After removing the terminal from the battery and then restoring the connection, the time is counted from zero.
11. Trip counter reset button
, switching the display of time, ambient temperature and on-board voltage.
Possibilities of the daily mileage reset button
The mileage reset button on the Niva Chevrolet and Niva Travel has a lot of useful functions:
- Setting the time.
- View the outside temperature and on-board voltage.
- Mileage reset.
- Starting the self-diagnosis system
Each possibility should be considered separately.
Setting the time
Turn the barrel switch fully clockwise to set the clock. Shifts will take place one hour at a time. To adjust the minutes, you need to turn the button counterclockwise. The time will be saved independently and will be reset only after the battery is disconnected or after the instrument panel on the Niva is rebooted.
View outside temperature
To display the outside temperature on the left display, you need to briefly press the button and release. Pressing the button again will display the on-board network voltage on the display, if provided for by the version of the panel.
Mileage reset
To reset the mileage on your Niva Travel, press the button and hold until “0.0” appears on the bottom line.
Self-diagnosis system
The instrument panel on the Niva Chevrolet is being diagnosed. To do this do the following:
- With the ignition off, press and hold the mileage reset button.
- Turn on the ignition.
- You can release the button, and the arrows on the dashboard will begin to move and all the lights will light up. This way the panel checks the functionality of all elements.
- Pressing the button again will display the software version.
- Another press will show engine error codes.
Despite the possibility of engine diagnostics, its readings are not always correct and therefore do not inspire confidence. For diagnostics, you should use appropriate software and devices.