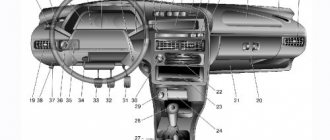
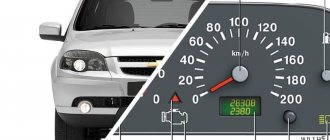
VAZ-2115 dashboard diagram
The controls of the VAZ-2115 passenger car are located in accordance with the UNECE norms and regulations. For greater ease of use of handles, buttons, switches and control devices located on the dashboard, they have graphic symbols indicating their functional purpose.
Rice. 1.1 Instrument panel of the VAZ-2115 (diagram).
The dashboard diagram (Fig. 1.1) includes controls:
1 – lever-switch for headlight or turn signal modes.
2 – nozzle for blowing the front door glass.
3 – instrument cluster.
4 – steering wheel.
5 – button to turn off sound signals.
6 – button to turn off the alarm. Pressing the button causes the warning light and direction indicators to flash.
Photo 1. Hazard switch off button
7 – ignition switch combined with an anti-theft device. Never turn off the ignition or remove the key from the lock while driving, otherwise the steering will be blocked and the vehicle will lose control. The ignition key can have three positions:
- 0 – “disabled”. Consumers are disconnected, the key can be easily removed. When the key is removed, the closing mechanism of the anti-theft system is activated. To guarantee the steering shaft block, turn the steering wheel left or right until it clicks. To turn off the anti-theft device, you need to insert the key into the ignition and, turning the steering wheel left and right, turn the key to position “I”;
- I – “ignition”. The ignition is on, the key is not removed, the steering is unlocked;
- II – “starter”. The key cannot be removed, the steering is unlocked. The position is achieved by turning the key to overcome the elastic force of the spring. The key is not locked in this position; it must be held by hand for the starter to operate. The ignition switch is also equipped with a starter activation unit while the engine is running.
To repeat turning on the starter after a failed start attempt, you need to move the ignition key from position “I” to position “0”, and then again to position “II”.
8 – switch lever for windshield washer and windshield wipers.
9 – immobilizer sensor, transmits a special code from the code key through the immobilizer to the engine control unit.
10 – set of signal lights for the on-board control system. The complex contains (Fig. 1.2): 1 – oil level drop signal; 2 – low level signal in the windshield washer tank; 3 – low coolant level signal; 4 – door open signal; 5 – signal of malfunction of the brake light and side lights; 6 – signal of wear of the linings on the brake pads; 7 – the signal indicates that the seat belts are not fastened.
11 – external lighting switch.
12 – block of keys for turning off fog lights, fog lights, heated rear window.
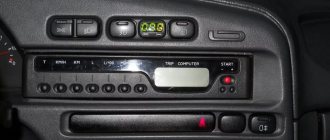
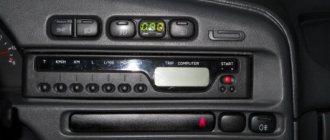
13 – trip computer, installed on some vehicles, designed to display one of the parameters: current fuel consumption (or average total fuel consumption), average speed, distance traveled, current time, time on the road.
14 – plug.
15 – control lamp for anti-lock braking system (ABS). Installed in place of the plug, if equipped with an anti-lock braking system.
16 – airbag control lamp. If the pillow itself is present, it is installed in place of the plug.
17 – central nozzles of the ventilation and heating systems of the cabin.
18 – cover of the glove box (upper). To use the upper glove compartment while the lower glove compartment lid is open, press the upper lid lock lever. The lock lever is located in the niche of the lower glove compartment on top.
19 – side nozzle of the ventilation and heating systems of the cabin.
20 – glove box cover (lower). To open it, you need to press the lock handle to the handle. If the external lighting is turned on, a special illumination of the inside of the box will automatically work.
21 – magazine shelf.
22 – control panel for interior ventilation and heating systems.
23 – socket for audio equipment. It is planned to install audio equipment that meets international standards in size and mounting principle.
24 – ashtray.
Watch a video of testing the dashboard of a VAZ-2115 passenger car here:
How to remove the dashboard of a VAZ-2115
If you decide to remove the instrument panel and carry out independent tuning or DIY repairs, you will need:
1. — Disconnect the ground wire from the battery.
2. — Remove the fastening screws to remove the steering shaft casing.
3. — After disconnecting the wires, remove the ignition switch.
4. — Remove the handles from the heater control levers
5. — Remove the headlight hydraulic adjustment handle.
Rice. 2.1 Instrument panel and its elements: 1 – instrument panel; 2 – dashboard trim; 3 – bracket; 4 – plug; 5 – ashtray; 6 – right cross member; 7 – right console screen; 8 – instrument panel; 9 – central bracket; 10 – left console screen; 11 – left cross member.
6. Remove the screws and disconnect the right 7 and left 10 screens from the instrument panel panel 8 (see Fig. 2.1).
7. Unscrew the screws securing the instrument cluster.
8. Unscrew the screws connecting the right cross member 6 to the dashboard panel 8.
9. Remove plug 4 and unscrew the screw securing the instrument panel panel 8.
10. Remove the instrument panel 8 as an assembly with switches for instrument lighting, fog lights, rear window heating, hazard warning lights and the cigarette lighter.
11. Disconnect all electrical wires.
12. To remove panel 1 assembled with trim 2, remove the screws securing the instrument panel to bracket 3 and left cross member 11.
13. If necessary, you can remove the screws and remove the dashboard trim, as well as the interior ventilation nozzles and air ducts.
Installation of the dashboard is carried out in the reverse order.
Operating principle of the on-board computer
Cars such as the VAZ-2109 were equipped with devices that acted as routers. Let us remember that these were carburetor cars. But the VAZ-2114 and 2115 began to be equipped with injection power plants, which required the use of a completely different type of device.
Therefore, the main functions of the on-board computer on these cars are diagnostics, as well as control of the operation of almost all vehicle systems.
The principle of operation of the on-board computer on the VAZ-2115 is as follows:
Installation and repair instructions
To replace the PP on a VAZ 2115 tuning, taking into account the pinout, follow these steps:
- First, disconnect the cable that goes to the cigarette lighter.
- Dismantle the control panel cover; to do this, find two self-tapping screws at the edges and unscrew them. Also unscrew the screws that secure the PP at the top and bottom.
- Dismantle the cover; this will require some effort. The pad itself is held on by clamps, so the plate will need to be rocked a little.
- Next, disconnect all the wires that are connected to the control panel - these are the connectors for the light alarm, clock, speedometer, fuel level sensor, etc.
- Dismantle the control panel; to do this, you will need to unscrew four more bolts on which it is fixed. Be careful at this stage - do not damage the wiring.
Actually, at this point the procedure for dismantling the control panel can be considered complete. If you need to change light bulbs, simply remove the sockets and install new indicators. To remove the cartridges you will need to turn them counterclockwise, do this carefully so as not to damage them. Further assembly is carried out in reverse order.
Brief instructions for operating the on-board computer
There is no need to memorize all kinds of error codes. It’s best to simply find the designations of all the errors on the Internet, where, by the way, they are freely available, print them out on a piece of paper and carry them with you in the car all the time. And when you see a particular error code on the computer information board, it won’t take you much time to understand what exactly it means, you just need to look at the previously printed list.
By the way, it often happens that the on-board computer issues a danger signal for absolutely no reason. The reason for this may be the on-board computer processor or some sensor that is not working correctly. Remember, no one is immune from electronic errors. Nevertheless, in the vast majority of cases, the VAZ-2115 on-board computer works quite correctly.
We present to your attention the most common error codes with their interpretation:
If the numbers 4, 6 or 8 appear on the car’s on-board computer while driving, you should immediately stop, fix the problem and only then continue driving. But after this you will need to reboot the processor. The error can be reset by simply holding down the daily mileage key for a few seconds.
Meaning and decoding of codes
Self-diagnosis codes
When performing diagnostics, it is necessary to take into account that the number on the screen may indicate two summed errors. For example, 9 indicates the presence of two faults - numbered 1 and 8.
Table of decoding codes for flashes calculated during diagnostics.
The data obtained allows you to quickly find the faulty element and eliminate the cause of the error.
The video from the Garage channel shows diagnostics on a VAZ 2115 using a scanner and laptop.
Controller errors
The most common controller errors encountered during diagnostics are listed in the table.
Reset errors
After self-diagnosis, finding out the cause of the problem and correcting the breakdown, the errors can be reset.
- Turn on the ignition.
- Open the hood and remove the negative terminal from the battery. Wait about a minute, connect the wire back and close the hood.
- Turn off the ignition.
- Turn on the ignition again and start the engine. The Check Engine light may come on briefly and then go off.
If the symbol remains illuminated, there is an ongoing problem with some sensor or wiring in the vehicle. It can only be found out using a special scanner. It is necessary to conduct additional diagnostics to determine the problem node. Then carry out repairs and clear any existing errors using a computer diagnostic program for the ECU.
Resetting errors on cars with an electromechanical instrument cluster is carried out by disconnecting the negative terminal of the battery from the on-board network for 10 seconds. The ignition must be turned off.
Expert opinion
It-Technology, Electrical power and electronics specialist
Ask questions to the “Specialist for modernization of energy generation systems”
Catalog of icons on the car dashboard To restart the starter after a failed start attempt, you need to move the ignition key from position I to position 0, and then again to position II. Ask, I'm in touch!
What to do if the on-board computer on the VAZ-2115 stops working
Of course, you can try to fix the problem yourself. But it’s still much better if a real specialist does this. It is he who will be able to reliably determine the cause of the device malfunction.
But before going to the service center, the first thing to do is check fuse F3, which could simply have blown. It is installed in the power supply circuit of the VAZ-2115 processor. If, after replacing the fuse, the on-board computer still shows no signs of life, you can also check the connectors connected to it. We repeat that if you are not an electrician, and generally do not have much knowledge of electronics, this task should be entrusted to a professional.
Remember, any malfunction that the on-board computer shows can be eliminated, just like a breakdown of the on-board computer itself. But, as they say, it is better to prevent a problem than to solve it later. Therefore, each car should be kept in good condition, undergo technical inspection on time and replace spare parts that are out of order. Among other things, it is better not to allow spare parts to break at all, but to replace them as they wear out. Only in this case will driving the car be safe from a technical point of view, and during the trip there will be no emergency situations associated with improper operation of the car.
The serviceability of your car is a guarantee of the safety of both the driver and passengers.
Source
Basics
VAZ-2115 - the dashboard (designations are given in this article) fully complies with all European quality standards, therefore it takes into account additional space for the on-board computer and radio.
Before you start processing the appearance of your car's panel, thoroughly understand its technical characteristics and components. The car will seem much more attractive if you take into account the color of the car itself, as well as the color of the electronics and additional inserts, as well as the color of the arrows and sensors.
Designation of icons on the dashboard of the VAZ 2115
The following describes the warning lights and panel indications, which are indicated and numbered in the photo above.
| Number in order | Decoding |
| 3/4 | Turn signal indicators. They light up at the same time when the alarm is activated. |
| 7 | Minimum fuel level light. Lights up when the gas tank is empty. |
| 8 | Indicator for turning on external lighting. |
| 9 | The brake system is faulty. The brake fluid level and pad wear should be checked. |
| 10 | The high beam headlights are activated. |
| 12/15 | Information displays, basic information about the daily time and mileage is displayed here. |
| 13 | Emergency light activation key. |
| 14 | Check engine light. If it lights up, further movement is not recommended. |
| 16 | The battery is low. The operation of the generator should be checked. |
| 17 | The indication indicates that the handbrake lever is raised. |
| 18 | The warning light means that the engine oil pressure has dropped below normal. |
| 19 | This indicator is used exclusively on carburetor cars. The light indicates that the throttle valve is in the open position. |
Tidy 2115: description and purpose of buttons and knobs
If everything is simple with the levers on the steering rack, there is a headlight position switch and a turn signal switch on the left. Buttons are more difficult.
Lada 2115: the oil light on the center panel is on
If an icon in the shape of a watering can appears on the console, this indicates that there are problems in the engine lubrication system. This is caused by a drop in the oil level in the crankcase or a pump malfunction. If the engine is old, the problem may be caused by clogged oil lines.
What does the exclamation mark on the Lada 2115 tidy mean?
On the "tag" the symbol is used in only one form - a red indicator in a circle. The icon indicates a malfunction in the vehicle's brake system. If this symbol lights up while driving, stop and find the cause of the breakdown. Usually it is enough to add fluid to the expansion tank or replace worn pads.
The battery light on the dash is on 2115
A red battery icon indicates that the battery is not charging properly. A complete diagnosis of on-board systems associated with the generator set and its wiring is required.
System problems
Summarizing the experience of drivers, the most common problems occur in the ignition switch. The limit switch in it should receive 12 volts. Sometimes it is the installers who confuse the diagram, after which the BSK not only does not see the door, but also does not work at all. To check functionality, you must disable the limit switch. If the BSK turns on, but does not see the door, then the problem is here.
For other cases, you will have to resort to checking the systems one by one according to the pinout diagram:
Instrument cluster Key switches On-board control system Trip computer External mirror control unit Control of interior ventilation and heating Fig. 1.2. Controls The location of the controls is shown in Fig. 1.2. 1 – front door glass blower nozzle. 2 – lever for switching direction indicators and headlights. 3 – sideways.
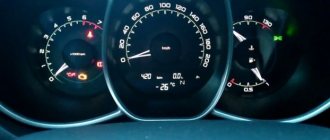
Rice. 1.3. Instrument cluster 1 (Fig. 1.3) – coolant temperature indicator. The transition of the arrow to the red zone of the scale indicates overheating of the engine. In this case, check the operation of the thermostat and electric fan of the cooling system. 2 – tachometer. Indicates the engine speed. The yellow zone of the scale indicates the engine operating mode is high.
1.2.3 Key switches
Switching on and off consumers is done by sequentially pressing the switch key. When the exterior lighting is turned on, the key symbols are illuminated: – side light switch. The side lights are turned on and off by successively pressing the button. When the side lights are turned on, the indicator in the button itself lights up; – headlight switch. By pressing the key.
Rice. 1.4. On-board control system The on-board control system block is shown in Figure 1.4. 1 – indicator of insufficient oil level in the engine crankcase. Lights up orange if the oil level in the engine crankcase has dropped below the “MIN” mark of the indicator. Before adding oil, check whether there is any oil leakage due to loss of tightness of the lubrication system. 2.
Rice. 1.5. Trip computer The trip computer (Fig. 1.5) is installed on some of the cars produced and is designed to measure, accumulate and display one of seven parameters on a digital display: – fuel consumption (current, average, total); – average speed; – distance traveled; – current time; – travel time. When you press the button.
Some of the cars produced are equipped with electrically controlled exterior mirrors. WARNING When the ignition is turned off, the trip computer indicator turns off, but the accumulated information and clock progress are saved. If the battery is disconnected, all accumulated information is lost. When the voltage drops in the on-board network.
Rice. 1.7. Interior ventilation and heating controls: 1 – heater electric fan switch; 2 – lever for supplying air to the driver’s and passengers’ foot area; 3 – heater tap control lever; 4 – air supply lever to the windshield; 5 – nozzle for blowing glass of the front doors; 6 – rear window heating switch; 7 – side nozzle; 8 – central nozzles; 9 – lever.
The purpose of the instrument panel (ID) on any car is to inform the driver about the operating status of the main components and mechanisms. Depending on the car brand, the purpose of the PP elements may be different. In this article we will talk about what the indicators installed in the instrument panel are responsible for in the VAZ 2115 and how to replace the device if necessary.
Description of faults
| Serial number | Decoding |
| 1 | There are problems with the ECU. |
| 2 | The fuel level sensor is providing incorrect data. |
| 4/8 | There are problems with the machine's power supply. |
| 12 | The error lamp circuit is faulty. |
| 13 | Lambda probe – power supply circuit open. |
| 14/15 | Temperature sensor incorrect signal. |
| 16/17 | There is a short circuit in the on-board network. |
| 19 | DPKV incorrect data. At the same time, the car often does not start. |
| 21/22 | Typical TPS errors. Cleaning the damper is usually sufficient. |
| 23/25 | The intake air temperature meter has failed or is stuck. |
| 24 | Speed sensor is broken. |
| 27/28 | DC is faulty. |
| 33/34 | The air flow meter is not working properly. |
| 35 | The idle speed control sensor is faulty. |
| 42 | The ignition system circuits are broken or not working correctly. |
| 43 | The knock sensor is damaged. |
| 44/45 | The composition of the fuel mixture is incorrect. |
| 51/52 | ECU memory module errors, |
| 53 | CO2 setting sensor error. |
| 54 | The octane corrector is faulty. |
| 55 | The composition of the fuel mixture is incorrect. |
| 61 | The oxygen sensor has failed. |
Tidy 2115 stopped working
Occurs after power surges or moisture getting under the panel (condensation). If the device has completely failed, but other elements of the car are working, check the fuse and wiring of the element.
When only part of the panel does not show or the board lighting has failed, perform diagnostics of the illuminators and their contact groups.
Tidy does not light up
If the backlight does not function, as well as the dimensions on the left side of the car, check the corresponding fuse. When the insert is working properly, you will need to diagnose the mounting block for voltage.
Panel 2115 blinks
It happens when the device does not work correctly. The backlight blinks and the elements constantly jump. There are problems with contacts here. The pads may become loose or oxidized.
The solution to the problem is to clean the contacts from oxidation and tighten/replace the pads.
The temperature sensor on the device 2115 does not work
The solution lies in diagnosing the system and correcting breakdowns.
The arrows on the dashboard 2115 do not work
The fault lies with the blown fuse F3. Before replacing it, be sure to diagnose the wiring and eliminate problems and possible short circuits.
Purpose of VAZ 2114 devices and interpretation of the symbols on them
Located on the left side of the dashboard, directly in front of the driver's seat, the VAZ 2114 instrument cluster plays an important role in driving. It contains pointer instruments, VAZ 2114 indicators with electronic digital windows and signal lights for various purposes.
The numbers on the scale indicate:
The graphic symbol of a gas station at the top of the device indicates a fully filled tank. At the bottom right, an indicator in the form of a gas pump lights up in orange, indicating that the remainder in the tank is less than six liters.
How to transform the surface?
Another way to transform the dashboard is to change its surface. It can be covered with leather, given a unique shade, or special overlays can be used. However, please note that very often such methods will require dismantling the dashboard.
Despite the complexity of this method, the instrument panel will look very impressive. However, it is very important to carefully consider the choice of materials. They must match the technical specifications of your iron friend.
Designation of light bulbs and indicators on the instrument panel of the VAZ 2114
The dashboard, by definition, is designed to contain instruments, indicators and switches that could inform the driver about the current state of various vehicle systems, signal an emergency during the operation of the car or the failure of any units, as well as using buttons and switches control individual equipment or mechanisms.
The designation of icons on the instrument panel of the VAZ 2114 is made in accordance with all requirements and standards that call for the unification of symbols so that they are absolutely clear to every driver. The symbols on the instrument panel of a VAZ 2114 with the latest injection engine are located mainly in the lower part of the instrument cluster:
Indicators VAZ 2114
1 - the icon of the light indicating that the oil level in the engine crankcase has dropped below the minimum level, lights up in red;
2 - this light indicates an insufficient level of washer fluid; it lights up orange when the remainder in the tank is less than one liter;
3 - this icon, lighting up in orange, indicates a decrease in the coolant level in the expansion tank with a cold engine below the permissible level;
4 — warning light icon for unlocked doors, lights up red;
5 — fault indicator for “brake lights” or dimensions;
6 - this is a warning light for a malfunction in the brake system, indicating that the brake pads are worn out;
7 - light bulb icon that indicates unfastened seat belts.
On earlier versions of the car, the designation of the light bulbs on the dashboard of the VAZ 2114 in the lower part is slightly different, when viewed from left to right:
Designation of icons on the instrument panel of the VAZ 2114
In addition, car enthusiasts should know what the lights on the VAZ 2114 instrument panel mean, indicating the performance of the lighting equipment or the condition of the engine:
Instrument panel indicators for VAZ 2108–2115 cars
The dashboard has pointer devices and indicator icons that inform about the operating modes of the vehicle and make it easier to control.
Here is a list of pointer devices that make driving easier:
- speedometer (displays vehicle speed);
- tachometer (displays engine speed);
- odometer (records the daily and monthly mileage of the car);
- thermometer (shows the temperature of the power unit);
- fuel level indicator, including critically low;
- indicator of lack of charging current;
- economizer (flow meter);
Instrument panel indicators of VAZ 2108 cars
Most of these devices are found on all dashboards, but some are found only on certain models. Where they do not exist, control of potentially dangerous processes is entrusted to the on-board computer.
Here is a list of indicator signs:
- turning on the alarm;
- engaging the parking brake;
- carburetor choke position;
- turning on the glass heating;
- direction indicator;
- turning on headlights in various modes;
- notifications about various faults.
In various combinations, these informers are found on all dashboards; without information from them, controlling the car is very difficult.
Speedometer
This device was installed on all modifications of VAZ 2108–2115 cars, and it was always made in an analog version, that is, in a round window there was a segment scale along which the indicator arrow rotated. Odometer windows are installed inside the scale, above and below the center of the needle. It does not have an identification mark, except for the inscription with units of measurement. On the dashboard it was placed in the center or on the left side. Correct control of the car in a turn is impossible without speedometer readings.
Tachometer
This device was not installed on all cars; carburetor cars of the Samara-1 family did not have a tachometer, so drivers had to determine the engine operating mode by ear. The scale is made on the same principle as the speedometer, but instead of kilometers per hour, it indicates the number of crankshaft revolutions per minute. The scale is divided into 3 unequal parts:
- 0–5.5 thousand rpm means permissible speed.
- 5.5–6 thousand rpm means the engine is running at overspeed.
- 6–8 thousand rpm means critical overspeed, which poses a threat to the engine.
It also does not have an identification mark, but thanks to the scale markings it cannot be confused with anything. On the dashboard it is always located on the right. The tachometer makes it easier for inexperienced car owners to drive the car, and also helps to change gears on time.
Engine temperature gauge
This device is made in the form of a dial indicator with a flat scale, divided into 4 parts corresponding to different temperatures:
- 0–50 degrees means the engine is cold.
- 50–90 degrees means gradual warming up.
- 90–110 degrees means that the power unit has reached operating mode.
- 110–130 means overheating, threatening to boil the cooling system.
Engine temperature indicator VAZ 2108
An instrument temperature indicator with such markings was installed on each car, and so that the driver would not confuse it with another device, there was an icon underneath it, symbolically depicting a thermometer in a container of boiling water. Driving the car when the readings are off the charts leads to engine failure.
Fuel level indicator
This device is similar to the previous one, but with different marks:
- empty tank;
- half tank;
- full tank.
It is located in the lower center or on the right side of the dashboard, and the symbolic gas station sign clearly identifies it. The signal for a critically low fuel level has the same icon, which is located nearby and illuminated by a red LED. The inclusion of this sign means that there is several kilometers of fuel left and you need to urgently look for a gas station.
Lack of charge current indicator
On all cars, this icon was made in the form of a pictogram indicating a rechargeable battery (AB), which lit up when there was no charging current. In addition, some cars with carburetor engines were equipped with a dial voltmeter, the readings of which helped to assess the condition of the battery and charge efficiency. Under this arrow pointer there was an icon that conventionally depicted a battery.
On cars with an injector, such checks are carried out by the electronic engine control unit (ECU), so there is no need for a pointer device; in case of any defects, the “Check engine” icon, also known as the “Check” sign, lights up.
Flow meter
This instrument indicator was installed only on cars with a carburetor engine. Outwardly, it is similar to other pointer devices, but its flat scale is divided into 2 parts:
- on the right (white) means the optimal position of the gas pedal;
- on the left (yellow) means excessive pressure on the gas pedal.
It doesn’t have its own sign, but it does have the inscription “Econ”; paying attention to its readings makes it easier to drive the car in the most economical mode.
Hazard warning light
This icon on the instrument panel of a VAZ 2115 lights up when you press the hazard warning activation button. They installed it only on 2 models of panels – 2108 (carburetor cars) and 2114 (injection Samara-2 and the entire “Tenth” family). For cars with panel 21083 (all Samara-1 models with an injection engine), this instrument indicator was combined with the corresponding button located on the “dashboard”, so when you press this button, a light inside it lights up. Moreover, on the instrument panel and the button there was one sign - a triangle within a triangle. When the sign turns on, it means that the driver has activated the hazard warning lights.
Instrument parking brake indicator
This icon is located in the lower left corner of the instrument panel and is schematically represented by a circle with the letter “P” inside, as well as two brackets on the sides, symbolizing the pads. The same shape of the instrument indicator is found on other cars, and on carburetor cars it is also located in the lower left corner, and on injection cars of the first Samara family, in the lower right corner. When the driver turned on the handbrake, the corresponding sign lit up and a sound signal sounded.
Carburetor choke position indicator
This icon is only found on carbureted vehicles and is located at the bottom of the dash, to the left of the speedometer, but is only activated where an automatic carburetor was installed from the factory. When the sign is on, it is a signal to the driver that the engine is completely cold and cannot be driven yet.
Heated glass indicator
This icon is only on cars with a carburetor engine; on the first generation Samara with an injector, it is placed on the “dashboard” and is illuminated from the inside with a corresponding light bulb. Effective control of glass defrosting is impossible without this informer, because only through it does the person driving know that the heater is receiving voltage.
Direction indicators
Turn signal icons are designed as two arrows pointing left and right. Their location depends on the instrument panel model:
- 2108 – bottom left.
- 21083 – bottom center.
- 2114 top center.
Direction indicators VAZ 2109
When the driver turns on the turn signals, the corresponding signs begin to flash and a clicking sound is heard, synchronous with the flashing.
Icons for turning on headlights in various modes
These indicators inform the driver about the different operating modes of the headlights, and their location and number depend on the type of instrument panel. All icons resemble a schematic representation of a light bulb or headlight. With their help, the driver controls the headlights, choosing the most optimal mode.
Identification of buttons
It is also important to know the designation of the buttons on the VAZ 2114 panel. On the instrument cluster on the right side there is a button (11), with which the time and temperature on the digital indicator are switched, and when pressed for 5 seconds or more, the current mileage is reset, if pressed this button on a stationary car.
In the central part of the dashboard are located in a row:
Double headlight switch. Button 1 turns on the dimensions, button 2 turns on the low beam;
Buttons on VAZ 2114
Key switch block. The first 1 turns on the front fog lights, the second 2 turns on the rear fog lights and the third 3 turns on the heated rear window.
Source
Backlighting is the best way to tune the instrument panel
Today, tuning the instrument panel using backlighting is much easier than it was five to ten years ago. Previously, you would have had to buy several meters of wires, LEDs, fuses, and other parts. It would take you several days to tune the panel. Today this is much easier, faster and cheaper to do. To do this, you just have to purchase a small piece of LED strip. It is attached very simply and does not require additional costs.
Instrument panel VAZ 2114, 2115
It is not surprising that absolutely every modern car is equipped with a dashboard, because it is thanks to it that the driver can monitor the main features of the car. And the instrument panel of the VAZ 2114, 2115 is no exception. Simply put, such a panel plays the role of a link between a person and a vehicle.
As it developed, the dashboard was equipped with additional sensors and indicators that make driving a car more convenient and safe. If you want to know what elements are on the dashboard of the VAZ 2114, 2115, then be sure to read this article.
Panel installation
If you decide to replace the instrument panel of a VAZ-2115 (the price of the decree device is lower), then it must be replaced only taking into account the pinout. And to do this you need to perform the following steps:
- First of all, disconnect the cable that is connected to the cigarette lighter.
- Begin removing the control panel trim. Examine it carefully; along the edges you will find several screws that need to be unscrewed. After this, also find the screws responsible for fixing the dashboard at the top and bottom, and unscrew them.
- Now you need to dismantle the cover. Please note that this is not very easy to do, since it is held in place using clamps. Therefore, without making sudden movements, start swinging it in different directions.
- You need to disconnect all the wires that go to the panel itself. This includes a clock, alarm, speedometer, and others.
- Dismantle the control panel. It is secured with four bolts that you will have to remove. This stage is considered the most dangerous. You need to make all movements as carefully as possible, as there is a high probability of damaging the wires.
That's all, as you can see, removing the dashboard is not difficult. Now you can carry out the necessary repair work on your car.
Designations of light bulbs, indicators, icons and buttons on the instrument panel of VAZ 2114, 2115
First, let's look at the descriptions and meaning of the panel icons and buttons, regardless of whether the car is equipped with an injector or a carburetor.
1 — A control sensor that measures the temperature of the coolant in the engine cooling system. During normal operation of the power unit, the antifreeze temperature should not exceed 90 degrees. But minimal deviations are sometimes acceptable. If you notice that the engine begins to overheat frequently, be sure to contact a car service center for help. Sometimes the sensor itself may give incorrect results.
2 — A device such as a tachometer processes information that comes from the crankshaft and displays it on the panel. The tachometer readings indicate the number of engine revolutions.
3,4 — Turn indicators. If the indicators flash simultaneously, but slowly, this may indicate a possible problem with the bulbs themselves or in the electrical wiring network.
Instrument panel lighting for VAZ 2114, 2115. Diagnostics, repair.
The instrument panel is a rather complex unit, and accordingly it can fail, like any other part of the car. The panel often does not work or stops lighting.
What are the main problems that can be observed with a faulty dashboard of the VAZ 2114, 2115:
1. The main illumination of the PP has disappeared, but the remaining sensors continue to work or vice versa. Most often, this problem occurs when the panel fuses fail. They are marked F16. In addition to illuminating the panel, such a fuse is also responsible for the turn signals, as well as the hazard warning lights, and the reversing lights. If the hazard lights and turn signals work normally, then most likely the problem is in the electrical circuit, or a short circuit may have occurred.
The video below shows how to fix the dashboard backlight:
2. The speedometer and tachometer are not working properly. In this case, it is first recommended to check the crankshaft position sensors, as well as speed sensors. If these sensors work correctly, then the problem may be poor electrical contact or damage to the wiring itself.
3. If some sensors do not work, but other elements work correctly, then the light bulbs may have failed. In this case, you just need to replace them with new ones.
4. If the arrow indicating the fuel level in the tank or the coolant level has dropped to the very bottom, or vice versa is always in the upper position, then most likely the problem is in the sensors or electrical circuit. There is no need to rush to replace sensors. First check the wiring to see if it is working properly and if there is any short circuit. In this case, it is best to turn to professionals.
5. It often happens that in general the dashboard works normally, but from time to time there are interruptions in the operation of some sensors. Often the cause is in the electrical circuit. The reason may also be due to incorrect operation of the processor.
VAZ 2114 check light is on: eliminating misfire in the cylinder
A common and unpleasant problem, but don’t rush to get upset, it can be completely eliminated. Your car's jerking behavior may be caused by a misfire in the fourth cylinder. In addition, because of this, the car’s power decreases and fuel consumption also increases. At the moment the fuel-air mixture is supplied, three cylinders have to work at full power, and the last one - the fourth - calmly cools down. As a result: a loss of about 25% of the car’s power.
Misfire can occur for a number of reasons: unsatisfactory condition of the car's ignition system, low quality fuel. However, with bad gasoline, the car may not start at all. If you refuel at a certified gas station, then this point should be omitted. Let's go further. Check the status of the following system elements:
- Unscrew the spark plugs and assess their condition. They must be free of soot and mechanical damage.
- Check the condition of the high-voltage wires, they can also cause misfire in the cylinder
- Due to depressurization of the cylinder, compression could drop. Be sure to measure it and make sure that the compression is normal
- What is the mileage of your car? The engine could become unusable due to wear of its main structural elements
In any case, I would recommend that you go to a service station and adjust the car's ignition. If the compression is normal and the general condition of the engine is satisfactory, focus your efforts on diagnosing the car’s ignition system. With the camshaft sensor, everything is banal and simple - replace it with a new copy. It is not that expensive, and the work is quite within the capabilities of every owner of the “fourteenth”. Good luck!