Niva 4x4 instrument panel diagrams
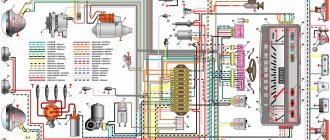
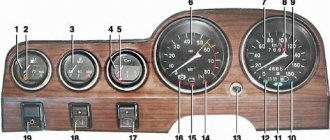
1 – plug connector block with conventional numbering of plugs;
2 – tachometer; 3 – voltage stabilizer; 4 – instrument cluster lighting lamp; 5 – coolant temperature indicator; 6 – fuel level indicator; 7 – resistor 470 Ohm, 0.25 W; 8 – resistor 36 Ohm, 5 W; 9 – warning lamp of the toxicity reduction system; 10 – control lamp for heated rear window; 11 – fog light indicator lamp; 12 – control lamp for high beam headlights; 13 – indicator lamp for external lighting; 14 – indicator lamp for direction indicators; 15 – voltmeter; 16 – brake fluid level warning lamp; 17 – diode IN4002;
1 – tachometer; 2 – voltage stabilizer; 3 – instrument cluster lighting lamp; 4 – coolant temperature indicator; 5 – fuel level indicator; 6 – warning lamp of the toxicity reduction system; 7 – indicator lamp for heated rear window; 8 – fog light indicator lamp;
9 – control lamp for high beam headlights; 10 – indicator lamp for external lighting; 11 – indicator lamp for direction indicators; 12 – voltmeter; 13 – brake fluid level warning lamp; 14 – oil pressure warning lamp; 15 – differential lock warning lamp; 16 – fuel reserve warning lamp;
Let us remind you that on the website you can find reports on the modification or repair of a domestic SUV.
Key words: 4x4 instrument panel
Found an error? Select it and press Ctrl Enter..
- Discounts and promotions for the purchase of LADA in March 2022
- Tuning the exterior and interior of the Lada Granta for 200,000 rubles
- Replacing and checking the knock sensor on LADA cars
- Photos of spoilers for Lada Priora hatchback, sedan and station wagon
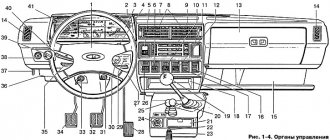
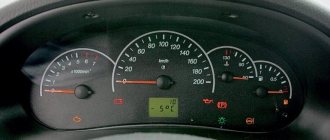
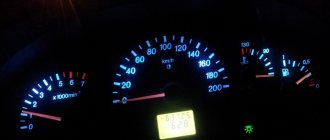
Designation of indicators on the Niva tidy
The diagram of the VAZ 21213 instrument cluster is shown above, the designation of the elements of the control panel is as follows:
- Coolant temperature controller, which also informs the driver about the engine temperature. If the sensor needle rises above the optimal value (enters the red zone), you must stop and turn off the engine to prevent it from overheating. Before further operation of the car, it is necessary to determine the causes of overheating of the internal combustion engine.
- A tachometer that tells the driver at what speed the crankshaft is moving. If the number of revolutions exceeds the permissible value and the arrow moves into the red zone, this may negatively affect the functionality of the engine as a whole.
- Left turn signal activation indicators, turns on only when the steering column switch is switched.
- Right turn signal.
- Speedometer, thanks to which the driver can know at what speed his Niva 21213 injector is traveling.
- Fuel level controller in the tank.
- A symbol that lights up when there is insufficient gasoline in the tank. If this lamp lights up, then there are less than 6 liters of fuel left in the tank.
- Dimensional lighting.
- The Niva instrument panel is also equipped with a brake emergency light. It may appear when the volume of fluid in the hydraulic drive reservoir has dropped below the permissible level. Operation of a car with such a problem is not allowed until it is eliminated.
- Distant lighting.
- Key for resetting daily mileage readings. To reset the values, the button must be pressed for five seconds, while the car must stand still.
- Mileage traveled by the car. The total mileage is indicated at the top, and the daily mileage at the bottom.
- An indicator indicating the need for engine diagnostics. When the ignition is turned on, this indicator always lights up; it should go out after the engine starts. If the lamp continues to burn, this indicates that not everything is in order with the engine.
- Emergency light signaling.
- Clock, outside temperature.
- Battery charge icon.
- The handbrake activation symbol should always light up in red.
- A light indicating a lack of engine fluid level always appears when the ignition is turned on, and after starting the engine it should go out. If the light remains on, this indicates that oil needs to be added to the engine.
- Reserve indicator (video author - Andrey Vlasov).
Also interesting: Generator Niva 2121, 21213, 21214: which one is installed, replacement
Let's bring Shniva to mind: Our own icons in the BKL (Indicator lamp block)
I decided to add functionality to the ShNivovsky BKL, especially since it still does not use all the potential inherent in it. Attention! If you have a FAM or ReSHN with ABS+SRS, then the BCL is full-fledged, all indicators are wired. If you have a ReShN in the basic configuration (without ABS), then you do not have a BCL, instead there is a plug. Therefore, you will have to buy it separately if you want to make your own badges) If you have a pre-restyle, then the BKL has a short board and only the first 3 badges are soldered. You can read about how to make such a BCL full-fledged here
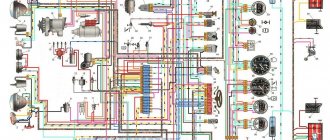
Pinout of the instrument panel VAZ 2121
| Plug no. | Plug address | |
| Block X1 (red or orange) | Block X2 (white or other color except red/orange) | |
| 1. | ─ | ─ |
| 2. | To terminal “15” of the ignition switch | High beam warning lamp |
| 3. | Low voltage tachometer input | To the gab. lighting (control lamp) |
| 4. | To the instrument lighting control | To terminal “15” of the ignition switch |
| 5. | High voltage tachometer input | To hazard warning switch |
| 6. | Housing (weight) | To output "D" of the generator |
| 7. | To terminal “50” of the ignition switch (starter) | ─ |
| 8. | To the parking brake warning lamp switch | Fog lamp warning lamp |
| 9. | ─ | Rear window heating indicator lamp |
| 10. | To the fuel reserve lamp | Check Engine |
| 11. | To differential lock sensor | To fuel level sensor |
| 12. | To emergency oil pressure sensor | Check Engine |
| 13. | To brake fluid level sensor | To coolant temperature sensor |
Possible faults
If the instrument panel of the VAZ 21214 has stopped working, this may be caused by various reasons.
What malfunctions are typical for the device:
- Light bulbs don't work. If all the backlight fails at once, most likely the problem lies in poor power supply. If only a few or one lamp does not work, then the indicator should be replaced with a new one.
- The speedometer does not work. An electronic problem can be solved by dismantling the device and looking for a bad contact or a failed board element. The problem of tachometer breakdown is solved in the same way.
- Mechanical damage to the device due to impacts and other impacts on it. If the device stops working because of this, it must be removed and tested to determine the failed element.
- Broken wires, this malfunction can also be attributed to mechanical failures.
- Once connected, the new device may not work due to incorrect connection.
- Oxidation of the contacts on the plugs, which may cause sensors and controllers to not work. The problem is solved by cleaning the contacts.
Also interesting: Chevrolet Niva fuse box with description (up to 2009 model year)
Information icons
The machine icon may light up differently; it happens that the “car with a wrench” icon, the “car with a lock” icon, or an exclamation mark are lit. About all these notations in order:
When such an indicator lights up ( a car with a key ), it informs about malfunctions in the engine (often a malfunction of a sensor) or the electronic part of the transmission. To find out the exact cause, you will need to perform diagnostics.
A red car with a lock lights up , which means that there are problems in the operation of the standard anti-theft system, often this icon means that the car does not see the immobilizer key and it will be impossible to start the car, but if this icon blinks when the car is locked, then everything is normal - the car under lock and key.
A yellow vehicle indicator with an exclamation mark notifies the driver of a hybrid vehicle that there is a problem with the electric drive. Resetting the error by disconnecting the battery terminal will not solve the problem - diagnostics are needed.
the open door icon lit when a door or trunk lid is open, but if all the doors are closed and the light on one or four doors continues to shine, then often the problem should be looked for in the door terminals (wire contacts).
The slippery road icon begins to flash when the stability control system detects a section of slippery road and is activated to prevent slipping by reducing engine power and braking the slipping wheel. There is no need to worry in such a situation. But when a key, a triangle, or a crossed out skid icon appears near such an indicator, the stabilization system is faulty.
The wrench icon pops up on the display when it’s time to perform vehicle maintenance. It is an information indicator and is reset after maintenance.
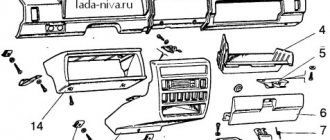
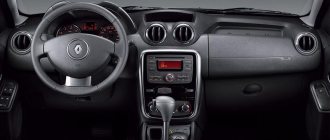
Removal and installation instructions
How to remove and install the dashboard on a Niva:
- First, you need to remove two plugs from the control panel lining and unscrew the screws. Next, unscrew the screws that secure the tidy visor.
- The right side of the panel facing is pulled out, the pads from the keys are removed, as well as the connector. Next, the control panel trim is removed from the left side; by doing this, you can dismantle the button for activating the side lights and optics. After this, the panel lining can be completely dismantled.
- The two screws of the tidy are unscrewed, the shield itself is removed, and all connectors and plugs are disconnected. If there are problems with the operation of the shield, they are resolved at this stage. The device is being repaired, it is soldered, and burnt-out light bulbs are replaced.
- Next, the shield is installed. When installing, keep in mind that the holes in the steel strip located under the tidy must line up correctly. Further installation is carried out in the reverse order of removal.
1. Unscrew the screws of the lining. 2. Remove it. 3. Disconnect the instrument plugs.
Video “Replacing tidy at home”
The main nuances and features of replacing the control panel on the Niva are shown in the video below (author - Vladimir Kucher).
Loading …
Read news about the new Niva
- Instrument panel Niva Chevrolet designations. Improving the Chevrolet Niva dashboard
- Diagram and pinout of the Niva 4x4 instrument panel (VAZ 2121, 2131) » Lada.Online
- Instrument cluster Chevrolet Niva tuning
- The instrument panel and its replacement on a Chevrolet Niva
- FROST car air conditioners // Online store // Prices // Air conditioners for cars Lada VAZ, VolksWagen Polo, Daewoo Matiz
- Installing fog lights on a Chevrolet Niva
- Installation and repair of the VAZ 2121 Niva transfer case
- Tuning for VAZ Niva 4×4 (LADA Niva) buy with delivery throughout the Russian Federation
Headlights flickering at idle
Automotive electronics are extremely complex from the point of view of diagnostics and repair, especially if several elements or connecting wires fail at once. At the same time, a modern car cannot exist without electronics, and the driver is obliged to maintain it in good condition. If you happen to encounter such a problem as blinking headlights at idle engine speed, it is necessary to identify its cause as soon as possible and eliminate it, which will be discussed in this article.
Important: Below are recommendations that can solve not only the problem of blinking headlights at idle, but generally the malfunction of lighting at low speeds. For example, the following tips will help you troubleshoot a problem if the interior lights blink at idle or the dashboard lights blink