We hang up the rear of the car and remove the wheels. We place an adjustable support or jack under the gearbox and lightly load the suspension.
We disconnect the driveshaft from the flange of the main gear drive gear (see VAZ driveshaft (classic)).
We disconnect the hydraulic brake hose from the steel tube, plugging it with a plug to prevent fluid leakage from the brake system.
Disconnect the branch of the rear parking brake cable from the equalizer.
We disconnect the drive rod for the rear brake pressure regulator from the bracket on the bridge beam.
Disconnect the upper ends of the shock absorbers and rear suspension rods from the body.
Remove the springs and shock absorbers from the beam.
We disconnect the longitudinal and transverse rods from the brackets on the bridge beam.
You can remove the rear axle in another way, by disconnecting the rods and shock absorbers not from the body, but from the bridge itself.
Lower the jack and remove the rear axle along with the rear suspension parts.
Installation of the rear axle is carried out in the reverse order of removal.
After disassembling the rear axle with removal of the gearbox and axle shafts, you can visually determine the absence of deformation of the beam.
It is enough to look inside the empty beam from the flange side - the centers of the holes for the axle shafts should be located on the same line. The slightest distortion is noticeable to the eye.
The bent beam must be replaced. The deformation of the beam can be accurately determined.
Checking the rear axle beam
Carefully check the technical condition of the beam, especially when repairing a car that has been involved in an accident.
A deformed beam can cause rear axle noise and accelerated tire wear.
The deformation of the bridge beam is checked in both horizontal and vertical planes.
Having attached flange A.70172 to each end of the beam, install the beam with flanges on identical prisms located on a test plate at least 1600 mm long so that the contact surface of the crankcase to the beam is in a vertical plane.
Check the deformation of the beam by placing a square against the outer (Figure 1) and side (Figure 2) surfaces of the A.70172 flange; if the beam is not deformed, the square will fit tightly.
The amount of deformation is checked with a feeler gauge. If the 0.2 mm feeler gauge passes on any flange, the beam must be straightened.
Using a square, check the perpendicularity of the gearbox mounting surface relative to the supporting surface of the A.70172 flange. The 0.2 mm probe should not pass through.
Rotate the bridge beam 90° and install it on the prisms. The square applied to the outer surface of the flange must fit tightly, otherwise, check the amount of deformation with a feeler gauge. The 0.2 mm probe should not pass through.
If the deformation exceeds the specified value, straighten the beam.
After making all the adjustments, thoroughly rinse the beam, clean the magnetic plug, replace it and check:
– quality of welds and beam tightness;
– cleanliness inside the beam (no burrs, chips and oil residues) and cleanliness of the beam breather.
After this, paint the outside of the beam to protect it from corrosion.
The VAZ 2107 rear axle gearbox is replaced when humming and noise occurs in the rear axle, as well as oil leakage. This occurs as a result of breakage of the teeth of the planetary gear or shank, as well as wear of bearings and seals.
Sequence of work when replacing axle gearbox
In order to remove the gearbox from the rear axle, you must first remove the wheels and axle shafts.
It is better to replace the axle gearbox on a lift or inspection pit, but if they are not available, you can get by with a jack.
It is necessary to completely raise the rear of the car on both sides, and then remove the wheels and brake drums.
Next you need to remove the brake pads. To do this, use pliers to remove the upper and lower tension springs, after which the brake pads are released. When removing the pads, you need to remember how the spacer plate is located so that there are no problems during assembly.
After removing the pads, through the hole in the axle shaft, unscrew the four bolts securing the axle shaft flange to the bridge stocking.
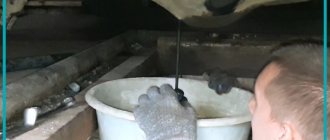
You need to drain the oil from the axle housing into a prepared container. To do this, unscrew the drain plug located on the rear of the axle housing.
Next, the axle shaft is removed. To remove the gearbox from the axle, both axle shafts must be removed. To remove the second axle shaft, you must perform the same manipulations as with the first axle shaft.
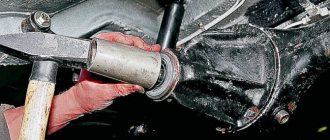
Now we disconnect the driveshaft from the gearbox shank. To do this, you need to unscrew the four nuts and remove the bolts, then lower the cardan to the ground.
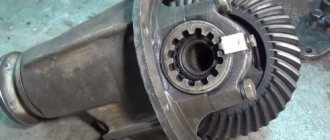
Next, the bolts that secure the gearbox to the axle are unscrewed in a circle, and after that the gearbox itself is removed from the axle housing.
Before installing a new gearbox, it is necessary to thoroughly clean the seat on the bridge casing: as a rule, pieces of the gasket from the removed gearbox remain there, which will not provide proper sealing.
After installation, reassembly is performed, after which it is necessary to pour oil into the bridge and inspect all connecting places for leaks. Upon completion of all these activities, the replacement of the VAZ 2107 rear axle gearbox is considered complete.
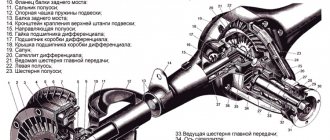
The VAZ-2107 gearbox is necessary to transmit torque from the gearbox to the rear wheels. Inside the mechanism there are gears that are lubricated with transmission oil. If there is a malfunction, these gears begin to make noise. It’s even difficult to call it noise; most likely, the sound produced can be defined as a hum. The ride becomes so unbearable that the ears become blocked, so it is necessary to repair the gearbox.
Device
In order for the car to move, it is necessary to transmit the rotation of the engine to the wheels. But the engine speed is too high, and a mechanism that changes the gear ratio is needed to properly distribute the torque. Due to the gearbox and the different speeds of the internal combustion engine, the driving speed changes and the main torque of the rear axle takes over the rotation and transmits it to the wheels through the gears.
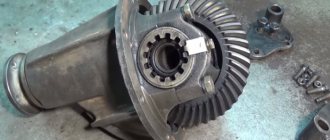
- the flange attached to the drive gear (shank) of the REM is an intermediate link between the cardan shaft and this gear;
- the shank of the main pair, at one end of which there are grooves for pressing into the flange, at the other end there is a bevel gear with a small number of teeth;
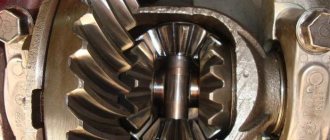
- the driven gear (planetary) meshes with the drive gear and forms the main gear with it;
- a center differential that allows the rear wheels to rotate at different angular speeds.
The differential design is very simple: the mechanism consists of two gear axles, two satellites and a satellite pin. From the gearbox ZM the movement is transmitted to the drive shafts on which the wheels are mounted.
How to determine a breakdown
The cost of the VAZ-2107 gearbox is very high, and repairs are difficult. Not every driver can handle servicing this mechanism. Therefore, before starting work, you need to make sure that it is this gearbox that makes the noise. Follow these steps:
- On a flat stretch of road, accelerate from 20 to 90 km/h. Listen for any strange noises coming from the rear of the car. Do this carefully, acceleration should be smooth.
- Then you need to release the gas and apply engine braking. Pay attention to whether any extraneous sounds appear from the rear gearbox.
- After this, accelerate the car to 100 km/h, turn on neutral speed and turn off the engine. At the same time, while the car is moving by inertia, note for yourself whether any extraneous noise occurs.
Practical way to determine
The most accurate way to determine the gear ratio is to count the number of teeth on the drive and driven gears. Then the larger number is divided by the smaller number, which gives the desired result. For example, in the domestic model VAZ-2106, the number of teeth on the drive shaft is 41, and the number of teeth on the differential driven gear is 11. As a result, dividing one number by another, we get: 41: 11 = 3.9.
This method of determination is the most accurate, but at the same time not at all practical. Because for this option it is necessary to disassemble the gearbox and get the necessary parts. And this is not only inconvenient, it is always expensive.
Gearbox diagnostics
In order to finally make sure that there is no problem with the rear axle gearbox of the VAZ-2107, you must perform the following steps:
- Stop the wheel chocks under the front wheels.
- The entire rear of the vehicle must be raised using jacks so that the axle is suspended. Be sure to place the machine on supports.
- Start the engine, then shift into gear and add gas. The main thing is to ensure that the speedometer shows the same speed that you reached while driving.
In the case when, during acceleration without load, extraneous noise still remains, you should understand that there are no problems in the gearbox itself. It is necessary to carefully review all other mechanisms included in the drive design. But if, when there is no load, noise does not come from the gearbox, you will have to repair it. The fact is that when gears wear out, they only make noise under load.
Calculation method
Is it possible to find out the gear ratio of an unknown car without disassembling the gearbox? It turns out there is such a way. To do this, the axis on which the gearbox is installed is hung on supports. The position of the drive shaft and wheels is remembered. It is convenient to do this with simple marks. Then the wheels are turned until the marks coincide again, counting the number of revolutions of the wheels and shaft separately. It is more convenient to carry out this procedure with an assistant.
After obtaining experimental data, the number should be calculated by dividing the number of shaft revolutions by the number of wheel revolutions. The accuracy of this method is approximate and is improved only by being careful when counting and combining marks.
Why does the gearbox break?
The gearbox on the “seven” is very reliable; on many cars it covers both 100 and 300 thousand km. Moreover, not a single repair was carried out during this period. But on some vehicles, gear wear appears much earlier, usually due to improper operation.
Reasons why gearbox gears fail:
- The lubricant in the gearbox is not replaced.
- Poor quality oil is used. Only high-quality transmission oil must be filled into the rear axle, as well as into the steering gear of the VAZ-2107.
- Extreme vehicle operating conditions, heavy loads and frequent slipping.
- Insufficient amount of lubricant in the gearbox.
In other words, if you monitor the condition of the VAZ-2107 gearbox seals, the oil level, and most importantly, do not allow excessive loads on the drive, then the mechanism will last for many years.
Checking the serviceability of the shank oil seal
The first sign that it is necessary to replace the shank oil seal on a VAZ 2107 is the presence of traces of lubricant, dust and dirt on the outer part of the rear axle. Determining the presence of leaks on the rear axle is not difficult. To do this, you need to climb under the car and inspect the bridge.
If the oil seal is worn significantly, a puddle of oil may be found under the car. If the problem is not resolved in a timely manner, oil may leak out of the bridge, which will lead to its rapid breakdown. Despite the fact that the cuff is a small part in a car, its serviceability plays a very important role.
What tools are needed for removal
In order to make repairs, you need to remove the rear axle. To do this you will need the following tools:
- Socket and open-end wrenches.
- Punch and chisel.
- Hammer.
- Bearing ring puller.
- A simple pencil (or better yet, a core).
- Torque wrench.
- Set of probes.
- Container for draining lubricant.
- Calipers.
It is advisable to carry out repairs by placing the car on a viewing hole or lift. But if there are no such amenities, you can raise the entire rear part as much as possible above the ground. Just make sure that the front wheels are secured as securely as possible.
Gearbox repair
When making adjustments and repairs to the rear gearbox, you must have certain skills, as well as follow technology. A mandatory requirement is that you must have special tools, pullers and stands at your disposal. If you do not have all these tools, then it is better to have the rear gearbox repaired by a professional.
If you have never tried to repair rear gearboxes, but really want to do it, it is better to first learn from experienced mechanics. Disassembling the VAZ-2107 axle gearbox is not difficult, but this is a vehicle component that requires very high-quality maintenance. You shouldn't skimp on this.
Self-locking differential
The most common way to increase a car's cross-country ability is to install a self-locking differential. The main advantage of this device is that it prevents wheel locking “forever”. This is important because preventing lockup from engaging when not required helps protect the axle shafts from critical loads.
There are the following types of differential locks:
- Disc - implemented through the use of friction clutches. These clutches come into action as soon as the wheels begin to rotate at an uneven speed. The disadvantage of this mechanism is that it requires the use of expensive gear oil, and also requires quite frequent adjustment work to set up the unit. This is far from the best mechanism for a VAZ 2107 car.
- Viscous coupling blocking - the operation of such a device is based on the use of sticky discs immersed in a special liquid. It hardens when heated, allowing the gears to engage—that is, the differential locks. The liquid heats up when the angular speed of the wheels on the axle changes (when the speed of rotation of the wheels becomes different). The disadvantage of this mechanism is that they require complete sealing of the assembly, and work effectively only during short-term slipping.
- Screw locking or worm locking is the best option for automatic locking for the VAZ 2107. The mechanism is implemented using worm screws, which rotate when the car drives in a straight line, and when the angular speed of the wheels changes, they shift into grooves, thereby locking the differential. As soon as the car gets out of the mud captivity, the blocked mechanism resumes its normal operation by moving the worm screws to their places.
- Planetary - the operating principle is similar to a worm circuit, only instead of gears, balls are used. Due to the balls, the wheels are blocked, and they come into operation when the traction force between the engines and the axle changes. Compared to a self-locking worm gearbox, a planetary gearbox costs about 2 times less.
In addition to automatic differential locking, there is also a forced one, which is activated if necessary.
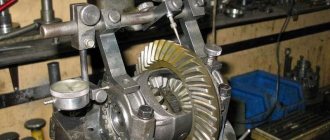
Disassembling the unit
To disassemble the gearbox, you will need to do the following:
- Unscrew the shank securing nut.
- Remove the flange, then remove the drive gear along with the adjusting rings.
- Remove the oil seal, inner race on the bearing and oil deflector.
- Using a puller, remove the outer rings from the bearings.
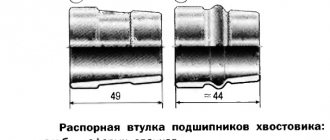
- Disassemble the drive gear along with the differential mechanism. Subsequently, the spacer sleeve must be replaced.
When disassembling the mechanism, be sure to mark the bearing caps so that they can be installed in the same way during reassembly. It is recommended to use a pencil or core to make marks. Label the right and left covers to avoid confusion during installation. It is advisable to mark these covers using a core.
Using a drift and a hammer, you need to remove the separator and the inner rings. Please note that you should not knock too hard. The rings are knocked out by lightly tapping in a circle. If you hit only one point, the ring will not come out. When repairing a rear gearbox, the bearings or the main pair are usually replaced. These are the most vulnerable elements of the system.
Correct assembly
When using old parts, only the oil seal and spacer sleeve are changed. When replacing elements of the main pair, it is necessary to use a new spacer washer for the shaft gear and bearing. The washer is selected according to the size, which can be found on the shaft itself. The adjustment ring is mounted and pressed with an attachment onto the inner bearing race.
Requires installation of a spacer sleeve. It is placed in the crankcase. A new oil seal is installed. Next, put on the flange and tighten everything with a new nut. When installing new bearings, the nut must be tightened with a force of 16-200 kgf meter. After running-in, the force will drop to 6. When using old bearings, tightening occurs in the same way as the oil seal.
The differential is assembled and installed in place. If the semi-axial gears had axial play, then thickened washers are installed. After this you can screw on the lids.
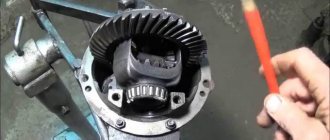
A specialized wrench is made to adjust the bearings.
The main pair is adjustable. The nut must be tightened from the main gear until the gap disappears. The shtangel will help measure the gap.
Then the second nut is tightened and tightened a couple of teeth. The first nut has a gap of 0.08-0.13 mm. It will be noticeable if you pick up the gear: a faint knock of teeth will appear.
While controlling the gap, slowly tighten both nuts until they increase by 0.2 mm. This ensures that the bearings are tensioned correctly. Next, the gear is turned by hand and backlash is tested. If it is the same in different positions, then locking plates are installed, tightened with bolts. If this is not the case, then they say that the differential box is deformed, and therefore it needs to be replaced.