If you notice that you have to apply significant force to slow down or stop the car, and the brake pedal travel when the engine is running has decreased and become stiffer, you need to diagnose the vacuum brake booster (VBS). Replacing the VUT, if necessary, can be easily done with your own hands.
Before checking the vacuum brake booster, you must make sure that the hose connecting its valve to the intake manifold is tight. This can be done by visually checking its integrity or by attempting to pump air using a compressor with a pressure gauge into a hose or rubber bulb that has been removed and plugged on one side.
What is a brake booster valve
Many cars use a vacuum brake booster to increase braking force. It creates a constant flow of brake fluid into the master cylinder, increasing brake pressure and helping the vehicle stop faster. This element is very often found on cars, SUVs and pickup trucks. Over time, the brake booster can become damaged or wear out. The same thing can happen with the brake booster control valve.
The brake booster valve is an element of the vehicle's brake system and is designed to remove air from the brake booster and prevent it from entering the cylinder. This ensures that the brake system pipes are protected from air contamination, which can seriously reduce the effectiveness of the braking system. The valve connects the vacuum booster housing and the vacuum hose - a safe technical solution that ensures the brakes work even when the engine is turned off.
Typically, the brake booster control valve is not checked during periodic maintenance. However, there are situations in which the valve may show signs of wear or complete failure. The following are some signs that can help you determine that there may be a problem with your brake booster control valve. Remember that these are just general signs. To accurately determine the cause of the malfunction and carry out repairs, you must contact a qualified specialist.
VUT maintenance
As practice shows, checking the vacuum brake booster is an important procedure. This mechanism very often causes trouble for drivers. Sometimes there is a loss of sealing of the chambers or disturbances in the functioning of the valves. If signs of problems appear, the unit should be diagnosed, and if a malfunction is identified, repairs should be carried out.
You are only allowed to replace parts with those models that are recommended by the vehicle manufacturer. No one forbids taking other devices, but they must have suitable characteristics and sizes. The use of a unit that creates weak force will provoke a deterioration in the controllability of the machine. For example, you cannot install a two-chamber “vacuum” instead of a single-chamber one. Firstly, this is pointless, since the “feel of the pedal” is lost due to the high power. Secondly, replacement is expensive.
When buying an amplifier, the car owner must take into account the equipment. The elements are sold assembled with or without a cylinder, clutch. You may have to buy fittings, fasteners, etc.
Replacement is carried out in accordance with the vehicle repair instructions. First, the driver needs to unfasten the rod, remove the cylinders (clutch), hoses, amplifier, and then reassemble in the reverse order. If you plan to change not only the vacuum chamber, but also the cylinder, then before the procedure you need to disconnect the pipelines from the circuits and drain the liquid. Next, the pedal travel is adjusted. If everything is done correctly, the braking system will immediately begin to work smoothly.
Stiff brake pedal
When the brake booster control valve is working correctly, the brake pedal is pressed easily and smoothly. If the valve malfunctions, controlling the brake pedal becomes noticeably more difficult. Instead of being soft and light, the pedal becomes hard and tight. It is very difficult to press. This is due to increased pressure in the master cylinder, which the control valve is designed to regulate. Abnormalities in the brake pedal operation are a sign of possible brake malfunction and indicate the need for immediate diagnostics of the brake system.
Checking the VUT check valve
The cause of poor performance of the vacuum brake booster may be a malfunction of the check valve to which the hose from the intake manifold is connected. To diagnose the latter, you need to remove the hose, remove the valve from the VUT body and put a rubber bulb from a syringe or hydrometer on it from the outside (to which the hose is connected) and squeeze it. If, after releasing the bulb, it remains compressed, the check valve is working properly.
Otherwise, it must be replaced. In a similar way, you can check the inlet hose for leaks in the absence of a compressor.
Diagnostics of the vacuum brake booster can be easily carried out in just a few minutes through simple manipulations without the use of any measuring instruments or tools. For a more objective check, try the various methods suggested in the article. Before doing this, do not forget to check the condition of the hose leading to the VUT from the intake manifold.
The main signs of failure of the vacuum brake booster control valve are a stiff or, on the contrary, soft brake pedal, as well as complete inoperability of the pedal.
Softness of the brake pedal
As the brake booster control valve malfunction worsens, air begins to enter the brake system lines. In this case, the air that should be removed from the system using the control valve enters the master cylinder and then into the brake system pipes. This causes a drop in brake pressure and a soft brake pedal. In addition to the feeling of softness on the pedal, this entails an increase in the brake response time.
In such a situation, you should immediately diagnose the brake system. Once air enters the brake system, it becomes “locked in.” To remove it, the brake system must be bled. If you observe the described symptoms, immediately stop driving and have your brake system professionally diagnosed.
Methods for diagnosing VUT
If one of the above symptoms is detected, you should immediately check the vacuum brake booster for functionality without removing it from the car. Diagnosis is simple:
- Start and warm up the engine.
- Leaving the engine idling, use your hand or pliers to press down the vacuum outlet pipe leading from the manifold. Another option is to disconnect it from the fitting and plug the latter with a wooden wedge.
- Constant behavior of the motor indicates the tightness of the system. The serviceability of the air valve is checked in another way, described below.
- If the speed of the power unit has stabilized or increased, air is leaking through the VUT or supply hose.
The brakes stopped working
In the worst case scenario, the brake booster control valve fails completely, resulting in complete inoperability of the brake system. Fortunately, such an outcome is unlikely. But if suddenly it does occur, carefully stop the car, tow it home and contact a qualified specialist in the diagnosis and repair of brake systems. Depending on the severity of the case, the matter may be limited to only replacing the valve, but serious repairs of the entire brake system may be required.
The brake booster control valve is an important element of the braking system, ensuring driving safety. That is why the presence of the described symptoms should not be ignored or postponed “for later”. Contact a qualified mechanic who can professionally diagnose and repair your vehicle's brake system.
The effectiveness of your car's brakes is important - if the brake system does not work effectively, an accident may occur. To ensure precise brakes, a booster is installed on all modern cars; it ensures that the vehicle stops instantly when you press the pedal.
Repair of the vacuum brake booster is necessary if the brakes become “wobbly” and you have to press the pedal with great force to brake.
Repair of vacuum brake booster VAZ 2106, 2107, 2108, 2109, 2110
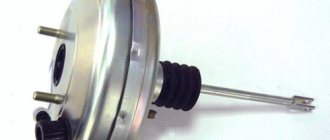
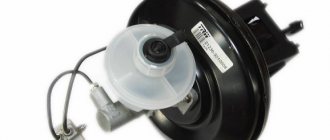
The vacuum brake booster (abbreviated as VUT) of VAZ vehicles makes the driver’s work easier - it enhances the effect of pressing the pedal in the braking system (TS). This unit consists of the following main parts:
- valve;
- metal case;
- diaphragms;
- piston;
- rod;
- powerful return spring;
- a pusher that connects to the brake pedal;
- protective cover;
- flange for installing a check valve.
The body of the device is divided into two halves by a diaphragm, and the master brake cylinder is installed on the side where the vacuum is created. A vacuum (vacuum) is created by connecting this part of the housing to the intake manifold of the internal combustion engine, and when the engine is not running, the channel closes the check valve installed in the VUT flange. Air (vacuum) with the help of a rod and piston when pressing the brake enhances the braking effect, thereby making the driver’s work easier - there is no need to press the pedal with great force. After releasing the pedal, a powerful return spring allows the diaphragm inside the housing to return to its original position. When the engine is turned off, no vacuum is created in the system and the vacuum brake booster does not operate.
On VAZ-2106-07 and VAZ-2108-10 cars, brake boosters are installed that differ in appearance, but the principle of operation of the devices is the same. We check the serviceability of the VUT as follows: press the brake pedal and start the engine - if the pedal “falls” (lowers under the pressure of the foot), the VUT works.
The main problem with a vacuum booster is damage to the diaphragm. When the diaphragm is ruptured, air penetrates from the outer part of the housing into the vacuum cavity, and a vacuum is not created in the device. But the malfunction may not necessarily lie in the device itself - often the VUT does not work due to air leaks or for other reasons:
- the “vacuum” check valve is faulty;
- there is air leakage from the hose connecting the intake manifold to the brake booster;
- there is no compression in the internal combustion engine cylinder where the vacuum comes from.
It should be noted that the vacuum brake booster on VAZ 2106-10 vehicles is connected by a hose to the fourth cylinder of the engine.
Design and operating algorithm
The first passenger cars produced in the last century were not equipped with “vacuum seals”. To sharply slow down the car in case of emergency braking, the pedal had to be pressed with a force of about 80 kg. The device of the vacuum brake booster installed on modern vehicles makes it possible to reduce the mentioned force to a light press.
To diagnose malfunctions of this unit, you need to know its design and operating principle. The amplifier is a cylindrical metal housing, inside of which the following elements are located:
- a diaphragm pushed by a return spring;
- air valve with two channels - atmospheric and vacuum;
- in the center of the body there is a rod connected at one end to the brake pedal, the other to the main cylinder, and a diaphragm is attached to it;
- vacuum supply pipe from the engine intake manifold connected to the check valve.
In fact, the body of the “vacuum generator” is divided by a membrane into 2 separate chambers. The first is supplied with vacuum from the power unit, while in the second the air pressure is equal to atmospheric pressure. The chambers communicate with each other through the channels of the air valve, which alternately open when the driver presses and releases the pedal.
Removing the vacuum booster 2106-07
Removing the VUT on a VAZ classic car is quite simple, and if you have minimal plumbing skills, this work is not difficult to complete. We remove the unit as follows:
- we turn off the engine, disconnect the main brake cylinder (GTC) from the “vacuum chamber”, the cylinder is held on by two nuts. There is no need to disconnect the brake pipes and hoses from the turbocharger; we simply move the cylinder to the side;
- we pull the hose off the check valve, while holding the valve so as not to pull it out and break it;
- in the cabin, remove the fixing bracket on the brake pedal and release the VUT pusher;
- then in the cabin we unscrew the four nuts that hold the “vacuum unit”, dismantle the unit - it is removed in the engine compartment.
Amplifier device
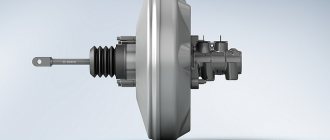
The design of the vacuum booster involves a round housing on which the brake cylinder is located. This sealed element is placed in the engine compartment. However, there is an additional type of mechanism called a hydraulic vacuum booster. It is included in the hydraulic part of the drive.
The diaphragm divides the body into chambers. The vacuum one is located near the same cylinder, and the atmospheric one is not far from the stop pedal. The intake manifold in cars with a gasoline engine acts as a source of vacuum. And in diesel engines this work is taken over by an electric pump.
Disassembling vacuum booster 2109
It is not difficult to disassemble VUT 2108-2109, but for disassembly it is necessary to fix the device. We disassemble the node in the following order:
- clamp the “vacuum sealer” in a vice;
- using a screwdriver on the body, we bend the grooves with which the two halves are held together;
- when almost all the rivets are straightened, it is necessary to hold the outer part of the body - a spring is installed inside the device, and it can shoot. If the old diaphragm is put back into place, there is no need to push the screwdriver far inward, as the rubber seal may be damaged;
- remove the rubber covers from the fastenings (2 pcs.);
- dismantle the plastic casing together with the diaphragm and pusher assembly;
Typically, the repair kit for the VAZ-2109 vacuum amplifier contains a diaphragm, a cuff, a boot, covers (2 pcs.) and a valve. All parts should be changed so that you don’t have to redo the work later. When assembling a vacuum amplifier, it is better to immediately fix the diaphragm on a plastic casing, this will make it easier to mount the unit.
It doesn’t matter which side the spring is placed on, but when assembling the amplifier, you will have to make an effort to get the holes in the housing onto the studs.
Repair of UAZ vacuum brake booster
Problems with the vacuum booster of UAZ vehicles can be identified by the following symptoms:
- the engine suffers, and since on UAZ engines the vacuum hose goes to the manifold of the first cylinder, if the VUT is faulty, this particular cylinder is not completed;
- a hissing is heard under the hood - the diaphragm is poisoning the air;
- the brake pedal is hard and does not press when starting the engine;
- There are wet leaks between the turbocharger and the amplifier (brake fluid is leaking).
If leaks of the brake fluid are detected in the area of the VUT, it is necessary to urgently change or repair the GTZ, but if the liquid has already entered the vacuum booster, most likely the VUT will also have to be repaired.
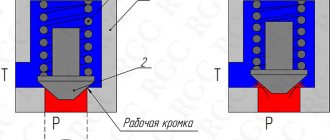
Another common malfunction in the brake system is failure of the check valve. This simple mechanism is very easy to check - you just need to blow into it. The valve should be blown freely in one direction (when rarefied air is supplied from the manifold), but air flows in the opposite direction with great difficulty. If the valve is faulty, it is blown freely in both directions.
VUT device
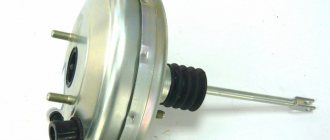
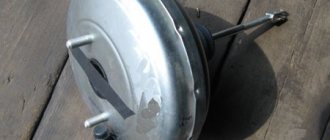
The vacuum brake booster in most cars is located near the engine shield and is a monolithic block with a turbocharger and a brake fluid reservoir.
To enhance the braking force, the VUT design uses:
- metal case;
- a separating diaphragm made of plastic material;
- check valve;
- pedal assembly pusher;
- follow-up valve;
- hydraulic cylinder rod;
- return spring.
Replacing VUT on UAZ vehicles
The amplifier is removed on cars produced by the Ulyanovsk Automobile Plant according to the same principle as on VAZ cars. Let's consider replacing VUT using the example of a UAZ-31519 car:
- first of all, we unscrew the two fastenings of the GTZ to the “vacuum”, usually the cylinder is secured with nuts 17, without disconnecting the brake pipes, we move it to the side;
- under the hood, in the area of the windshield, unscrew the 2 bolts of the VUT amplifier bracket, the standard bolts are 14 mm turnkey;
- in the cabin, at the connection of the rod with the brake pedal, pull out the cotter pin; for this you will need pliers;
- remove the connecting pin;
the two lower nuts of the amplifier bracket are located in the car interior, they are turnkey 17, unscrew this fastener;
- pull off the hose from the fitting of the device, dismantle the VUT;
- disconnect the bracket from the “vacuum” - to do this, unscrew the four nuts (they are 17 mm);
- the check valve is not included with the part, so we move it from the old VUT to the new one;
- We connect the bracket to the new amplifier, carry out the assembly - we install all the parts in their places.
Features of repair of UAZ vacuum amplifiers
Unlike the vacuum amplifiers of VAZ cars, the VUT housing on UAZ cars is very durable, and it is not at all easy to halve it. You can bend the protrusions using a pry bar and a hammer, but this way the work is done in violation of the technology - according to the instructions, you need to rotate one half relative to the other. The biggest problem during disassembly is the “halving” of the body - sometimes these parts boil so much that it is impossible to disassemble the assembly. Car owners are advised not to press one body into another under any circumstances - then turning will definitely not work.
Another problem in repairing “vacuum units” is the low quality of spare parts in the repair kit; sometimes the installed parts are not enough for six months. Motorists advise not to do repairs, but to buy a new spare part, although there is another disadvantage - VUT for cars like UAZ-469 or UAZ-452 is not cheap, about 3 thousand rubles. As an option, you can pick up a “vacuum” from a foreign car at a car disassembly shop, whose mountings fit the main brake cylinder, and install it on the car by fitting it. The result is cheaper and more reliable - imported parts, even in used condition, last for several years without any complaints.
Vacuum valve manufacturers
Products of this type are produced by both domestic and foreign companies. King Lai models are especially popular. This is a Taiwanese company that has been specializing in the manufacture of gates, valves, bellows and other equipment used in vacuuming for more than 10 years. Standard models are made from high quality stainless steel. This ensures maximum sealing of the system. However, if necessary, you can order valves from other materials that are more resistant to increased loads.
It is worth highlighting another Taiwanese company called HTC. This is a proven manufacturer of vacuum fittings. The company's assortment includes all the necessary components. If we talk about the pricing policy, the cost of the products is quite low with a very high quality of execution. Thanks to this, HTC successfully competes even with the most successful Russian manufacturers.
King Lai Vacuum Valves
The German company Oerlikon Leybold Vacuum produces not only individual elements, but also complete installations used for vacuuming. Models of this brand are popular all over the world due to their good and reliable workmanship, reliability and ease of maintenance. If necessary, the client can order components or products from a specific material. Among foreign manufacturers, it is also worth highlighting the VAT company, which has been on the market for more than 45 years. VAT produces high-quality vacuum equipment, including gates, valves and other elements. This brand is popular all over the world.
Among the leaders in the domestic market it is worth highlighting. The manufacturer produces ready-made vacuum systems and spare parts. The cost of the equipment is quite affordable, and the quality is not inferior to German. If necessary, the client can order non-standard equipment that will fully meet the requirements of his project.
To achieve maximum performance and uninterrupted operation of the system, it is important to pay attention to all elements of vacuum installations. Valves play an important role in the functioning of the equipment, so elements of this type must not only be made of strong and durable materials, but also installed correctly. The equipment manufacturer in the accompanying documents for the installations always indicates the type of fittings that is preferable to use. It is also important to carry out timely maintenance and repair of vacuum systems.
Adjusting the rod of the vacuum brake booster UAZ
Often, after replacing the VUT, problems appear, and the car no longer brakes as well as it did before with a working “vacuum system” - the brake pedal takes off at the very end, or the system does not fully release the brakes. The whole point here is the rod that presses on the GTZ piston - it may not be adjusted from the factory. This rod has an adjusting screw, which is secured with a locknut. On UAZ cars (we don’t take the “Patriot” model into account), we check the rod adjustment as follows:
- push the rod all the way back;
- take a metal ruler or feeler gauge to adjust the valves and lay it along the body;
- We measure the protrusion above the body with a caliper - the rod should extend approximately 7.8-8.0 mm;
- if this distance does not correspond to the norm, loosen the lock nut and use the adjusting screw to increase or decrease the length of the rod;
- Having established the desired size, fix the screw with a lock nut.
Even on the UAZ Hunter, the pedal can “take” at the very end, and it has a large free play. It is necessary to pay attention to the position of the pedal - if it is too low from the floor in the cabin, it needs to be adjusted:
- unscrew the brake light mounting nuts on the brake pedal;
- disconnect the wires from the brake light sensor;
- Use two 19 mm nuts to raise the pedal, press the brake to check the free play, and if the pedal is adjusted normally, tighten the nuts.
Replacing the vacuum brake booster on VAZ 2108, VAZ 2109, VAZ 21099
Welcome! Vacuum brake booster - it is attached by a bracket to the engine shield (This is the shield that separates the engine compartment and the interior of the car) and the master brake cylinder is installed in it, which, by the way, also needs to be replaced from time to time (When this cylinder wears out, problems with the brakes begin, the car may not brake, only two wheels out of all four available can brake, the brake fluid can still run out quickly and the cylinder itself can leak), thanks to this cylinder and thanks to the vacuum booster, braking occurs on modern cars, by the way, the vacuum brake works thanks to the intake manifold ( On injectors, due to the receiver) and therefore when the engine is started, the brakes are soft and very easy to press, but when you turn it off, the air pressure in the intake manifold disappears and the pedal becomes much (tangibly) heavy.
Replacement and cost
In any situation when a breakdown is detected, timely replacement of the entire assembly is necessary. It is possible to correct some shortcomings in the form of replacing the valve, but this procedure may not bring a lasting effect, since the part itself in many cases (if we talk about the VAZ 2109 model) must be replaced due to its advanced age. After installing a new part, be sure to make adjustments.
Breakdowns of vacuum amplifiers do not happen so often with this model, however, due to their age (production of the model was discontinued in 2004), the amplifiers gradually wear out and become unusable over time.
There are many suppliers of parts for VAZ cars on the market. The average price (cost) of a new amplifier is about 2000 rubles.
How to replace the vacuum brake booster on a VAZ 2108-VAZ 21099?
Note! If suddenly your vacuum brake booster fails, then proceed to replace it and buy a new one; we categorically do not recommend repairing your original one, because it is unlikely that anything good will come of it, especially since you will have to buy an additional repair kit anyway, but This is also wasted money and it is not yet known whether you will be able to correctly replace all the worn parts in it or not, then you will have to assemble the vacuum unit in such a way that the air does not bleed out of it and it works perfectly!
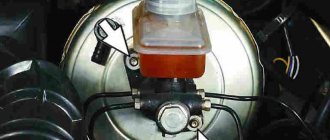
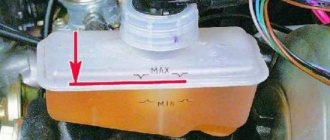
Removal: 1) Before you begin removing the brake booster, check whether the vacuum hose (Indicated by a blue arrow) is connected normally to the check valve (Indicated by a red arrow), be sure to start the car and see if air is leaking from this hose or from the valve ( You just don’t need to disconnect anything, everything is disconnected in the photo, just so you can understand where the valve is located, where the hose is and where this whole system is connected, by the way, the connection location is indicated by a green arrow).
Note! We fully recommend walking along the hose, it is connected to the intake manifold fitting, check everywhere to see if air is leaking from somewhere, otherwise replace the hose or check valve with a new one!
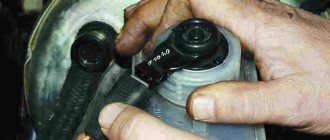
2) After a complete check, proceed to removing the vacuum seal from the car; to do this, first disconnect the wire block indicated by the arrow from the top cover of the brake reservoir and move it to the side.
3) Then, with pliers, move into the car interior and crawl under the place where the pedals are installed, the same pusher that we talked about a little higher will be attached to the brake pedal (or rather, to its bracket), this pusher comes from the vacuum brake booster and when the pedal is squeezed out, the vacuum pump starts working, this pusher will need to be disconnected, to disconnect it, remove the locking bracket with pliers (see photo 1) that secures the finger and then remove the finger from the brake pedal bracket (see photo 2) and you can immediately disconnect pusher
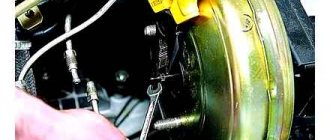
4) After the operations have been completed, you will need to move into the engine compartment again and while there, disconnect the hose that is connected to the check valve (It is attached with a clamp, the check valve is indicated by a blue arrow in the photo) and then unscrew the two nuts (Their approximate location is indicated by red arrows ), which attach the master brake cylinder to the vacuum brake booster and then carefully remove the cylinder from the brake booster, but you don’t need to remove it and the metal brake pipes that are connected to it don’t need to be disconnected either.
5) And finally, unscrew the four nuts that secure the bracket on which the brake booster is located to the engine shield (Two nuts are indicated by arrows), as soon as they are unscrewed, you can slowly remove the booster along with the bracket, if you suddenly want to separate them, then after removal , unscrew the two nuts that secure the bracket to the brake booster and you can separate these two things.
Installation: The new brake booster is installed in the reverse order of removal; if it suddenly turns out that there is no bracket on it, then remove the bracket from the old one by unscrewing the two nuts as we have already said.
Note! You can see a clear example of how a faulty brake booster can affect engine idle speed from the video clip, which we have also attached below:
Repeat the steps described in the section “How to remove the brake master cylinder”. When replacing the vacuum booster, you don’t have to completely unscrew the master brake cylinder, but just disconnect the fittings that are located on the left side and move the brake cylinder to the side. It's up to you.
Bleeding the system
After completing any repair work that involved replacing vehicle parts, it is necessary to perform bleeding. It is carried out with the aim of eliminating air from the main line and equalizing pressure.
To work, you will need keys “8” and a cylinder, a jack, a transparent container, a hose and brake fluid. The car is driven onto a flat area. The fastening nuts are loosened, and then the body is raised using a jack. We unscrew the nuts and dismantle the wheel.
Remove the cap from the fitting, putting on the hose. The second end of the hose is placed in a container prepared in advance. At this time, you need to ask someone to get into the car and depress the brake pedal 4-6 times and then hold it down. After this, you need to unscrew the fitting with a key, but not all the way. Loosening will result in fluid leakage. We wait for the brake pedal to go down, only then tighten the fitting.
Bleeding is done until the brake fluid flows without air. All the same actions are carried out with the other wheel. The rear brakes require similar work. As soon as the procedure is completed, you need to add brake fluid to the reservoir and check the brakes on a calm road.
Check and signs of malfunction of the VAZ 2109 vacuum brake booster
The vacuum booster on the VAZ 2109 must be checked every 45,000 km. When the vacuum booster fails, the force on the brake pedal increases significantly, which negatively affects vehicle control. Fuel consumption also increases due to air leaks into the engine cylinders.
With the engine not running, press the brake pedal 5-6 times.
We start the engine while holding the brake pedal depressed. The pedal should move forward. If this does not happen, check the attachment of the vacuum hose to the check valve and to the fitting on the inlet pipe.
If necessary, tighten the hose clamp on the engine inlet pipe.
If the hose does not fit tightly on the check valve, change it.
Check the operation of the amplifier again using the above method. If the pedal does not move forward, the brake booster is most likely faulty and needs to be replaced.
Checking the vacuum brake booster of VAZ 2109
Checking and signs of malfunction of the vacuum brake booster of the VAZ 2109 The vacuum booster on the VAZ 2109 must be checked every 45,000 km. When the vacuum booster fails, the force on the brake pedal increases significantly, which negatively affects vehicle control. Fuel consumption also increases due to air leaks into the engine cylinders. Read more.
Troubleshooting
The problem with a non-working amplifier can only be fixed if the pipeline, check valve or its seal is damaged.
Troubleshooting should be done sequentially:
- we check the tightness of the pipeline clamps and the condition of the tube at the clamping points (cracks often appear in them);
- inspect the condition of the amplifier check valve seal. Over time, this rubber element delaminates due to which the tightness of the vacuum chamber is lost (hence the hissing when braking);
- We change the pipeline along with the clamps. It is inexpensive, so it is easier to change it than to check for leaks, especially since it is quite difficult to fix a crack. After replacement, we check the functionality of the amplifier;
If replacing the pipeline does not produce results, the amplifier itself must be replaced, since this unit is considered non-removable and cannot be repaired.
During the work process, it is not superfluous to check the check valve. There are two ways to do this.
The first involves dismantling this element. Next, you need to blow with your mouth into the fitting that installs the valve into the amplifier. At the same time, it must allow air flow to pass unhindered.
Then we do the opposite action - we draw in air through the same fitting. A working valve should not allow air to pass through.
If you don’t want to remove the valve, which could cause the seal at the connection to be broken, you can do this: start the engine and let it run.
Then press the brake pedal all the way, hold it in this position and turn off the engine.
If the valve is working properly, it will close (due to the lack of vacuum from the manifold), while the vacuum will remain in the vacuum chamber, so the pedal will not provide resistance (there is no need to create additional pressure to hold it).
Finally, a little about vacuum pumps. In a mechanical assembly, to eliminate knocking, some simply remove the rod and that’s it.
In this case, the pump will not work, but since it is auxiliary, turning it off will not greatly affect the performance of the amplifier (although the pedal will still become a little “harder”).
But in some cases, simply changing the position of the rod helps (turn it 180 degrees).
As for the electric pump, it is often simply replaced, since it is difficult to repair.
Failure of the “vacuum seal” is a rather rare failure, but unpleasant - to slow down and stop the car, the driver has to press the brake pedal hard. A sudden failure of the mechanism while driving can provoke an accident - the driver does not have time to change lanes and apply the required force at the right time. To identify signs of critical wear of an element, it is proposed to consider the operating principle of a vacuum brake booster (VBR) and diagnostic methods in a regular garage.
Replacing the vacuum brake booster of VAZ 2109.
The vacuum brake booster (VBR) is the heart of your car’s braking system. It is this that creates sufficient force for good braking; the safety of driving a car directly depends on its serviceability.
Today’s article is devoted to the symptoms of a faulty vacuum brake booster, and I will also describe a step-by-step procedure for replacing this part on a VAZ 2109 car.
Checking the membrane and chamber tightness
There are several ways to check the serviceability of the vacuum brake booster (VBS), but to ensure that it is 100% operational, it is better to use them all. First of all, press the brake pedal several times with the engine off. When pressed for the first time, the pedal will lower with a fairly insignificant force by about 1/3 of the full stroke, with each subsequent press it should become tighter and the stroke should decrease. If this does not happen, the VUT is most likely faulty, and diagnostics of the vacuum brake booster is required. Next, we will tell you how to check the vacuum brake booster on Kalina.
Signs of a faulty vacuum brake booster.
Signs of a VUT malfunction include:
- Insufficient braking efficiency;
- “Heavy” brake pedal (I wrote in more detail here);
- Reducing engine idle speed when pressing the pedal.
At the first two signs, the “vacuum seal” should be checked; it is not at all a fact that it has failed. When the idle speed decreases when you press the brake pedal, first, you need to check the air leaks into the vehicle’s intake tract, as well as on all vacuum hoses. If there is no air leak, the part needs to be replaced.
Signs of problems at work
Malfunctions of the vacuum amplifier and the components that ensure its operation are sure to manifest themselves, and quite clearly.
If the vacuum reservoir does not function, this will be accompanied by a “stiffness” in squeezing the pedal.
If this element completely fails, it is very difficult to press the brake pedal (to verify this, it is enough to press the pedal 4-5 times with the engine not running; on the last squeeze, the resistance will be very high).
Since the vacuum is taken from the intake manifold, the loss of tightness of the vacuum booster may be accompanied by a change in engine operation during braking (although this should not happen).
Moreover, in some cases, the speed of the power plant may drop when you press the brake pedal (even to the point of stopping the unit), while in others, the speed increases.
Everything is simple here - if there is a leak in the vacuum seal, air will leak into the manifold, which affects the proportions of the air-fuel mixture, hence the change in engine operating mode.
Another obvious sign is the appearance of hissing when the pedal is depressed. The appearance of such a sound indicates the appearance of air leaks.
As for vacuum pumps, mechanical ones can make knocking noises, and constantly (the drive rod is usually to blame for this), while in electric ones the operation noise increases, and strong heating is also possible when the motor is running (here the fault usually lies in the drive motor).
Replacing a VAZ vacuum brake booster on a 2109 car - step-by-step instructions.
The operation of replacing the “vacuum seal” is not very complicated and does not require special tools.
However, there is no need to rush when replacing VUT. Attention and accuracy should be your faithful assistants when performing this operation.
- Disconnect the VUT rod from the pedal.
It is necessary to pull out the cotter pin that connects the VUT rod and the pedal. To prevent the cotter pin from falling out, it is secured with a locking bracket; it can be easily removed using pliers.
- Disconnect the main vacuum hose from the vacuum tube.
It's simple! There is no need to unscrew anything, the hose (indicated by the red arrow) is simply removed from the VUT fitting, with a little force, but it can be removed.
- Disconnect the brake master cylinder (MBC) from the brake booster.
In order to disconnect the GTZ from the “vacuum manifold”, you need to unscrew two nuts (indicated by the red arrow, the second nut is located on the opposite side of the master brake cylinder). After we have unscrewed the main turbocharger, we move it closer to the front of the car, trying not to greatly deform the brake pipes.
There is absolutely no need to create extra work for yourself and unscrew the brake lines from the main circulation pump (indicated by green arrows). By unscrewing the brake lines from the main circulation pump, you will air the brake system and after replacing the vacuum brake booster it will need to be bled. To do this, you need brake fluid and an assistant who will pump the brake fluid with the pedal while you bleed air from the system.
- Disconnect the VUT from the car body.
The amplifier is attached to the car body through a bracket. It, in turn, is attached to the car body with four nuts that you need to unscrew. At this stage you will have to sweat a little. Because access to the bracket mounting nuts is difficult. Have a little patience and everything will work out.
After the nuts are unscrewed, remove the vacuum seal from the engine compartment.
- Disconnect the mounting bracket from the VUT (as in the photo).
The VUT is attached to the bracket using two nuts. Unscrew these nuts and disconnect the part. Fortunately, this is not very difficult to do. Access to the nuts is great.
- Install the mounting bracket onto the new brake booster.
What you did in the previous paragraph must be repeated in reverse order. Install the mounting bracket onto the new vacuum seal.
- Install a new vacuum brake booster on your car.
Install the new part on the machine in the reverse order of disassembly. I pay special attention to the connection between the VUT rod and the brake pedal; many people forget to do this. I would like to draw even more attention to the mandatory installation of a locking bracket on the cotter pin securing the brake pedal to the rod of the vacuum brake booster.
After final assembly, recheck the tightness of all nuts and bolts. Check the installation of the vacuum hose. As you can see, the procedure for replacing the vacuum brake booster on a VAZ 2109 does not require any special skills or complex tools. The most important thing is attention, accuracy and a small set of the simplest keys.
How to repair or replace parts
Hisses when braking (with video example)
In the following video you can hear this characteristic sound:
By the way, according to the instructions, the standard “vacuum unit” of the VAZ-2110 cannot be repaired, only replaced, but we “do it ourselves.” And judging by the number of different instructions for self-repairing cars posted on the Internet, it can be argued that any domestic car enthusiast with more than five years of experience can safely be awarded the title of design engineer in absentia. Therefore, we will consider the repair procedure, especially since the difference in cost between the repair kit and the vacuum booster itself is disproportionately high.
In any case, first we will have to dismantle the VUT; for this we will need a minimum of available tools.
Tools
- Open-end and socket wrenches in sizes “10”, “13”, “17”;
- Powerful flat screwdriver;
- Repair kit or VUT assembled;
- Sealant and a little desire to do it yourself.
Dismantling
At this stage, we have a choice: either do everything as the manufacturer’s instructions say (disconnect the main brake cylinder from the VUT, unscrewing all the brake pipes from it, and then bleed it) or a little simpler and with little cost (simply moving it away to the side).