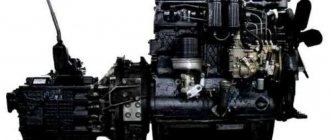
Gearbox VAZ 2106: GENERAL INFORMATION
The gearbox in a car is designed to change the value of torque transmitted to the wheels of the car from the crankshaft of the power unit (in our case through the driveshaft). This is necessary to ensure optimal load on the power unit when the machine moves in various modes. VAZ 2106 cars, depending on the modification and year of manufacture, were equipped with four- and five-speed manual gearboxes. The gear shift in such devices is carried out manually by the driver using a specially designed lever.
DEVICE
The first “sixes” rolled off the assembly line with a four-speed gearbox. They had four forward speeds and one reverse. Since 1987, the VAZ 2106 began to be equipped with five-speed gearboxes, with an added fifth forward speed. It made it possible to almost completely “unload” the car’s engine during long high-speed trips. The five-speed gearbox was designed on the basis of a four-speed one. Both of these boxes are interchangeable, and their designs are largely similar.
The six-speed four-speed gearbox consists of:
- crankcase with covers;
- primary, intermediate and secondary shafts;
- stage switching devices.
The five-speed gearboxes of the VAZ 2106 have almost the same design as the four-speed ones
The gearbox input shaft is mounted on two bearing supports. One of them (front) is mounted in a socket at the end of the crankshaft. The rear bearing is located in the wall of the gearbox housing. Both bearings have a ball design.
The rotation of the secondary shaft is ensured by three bearings. The front one has a needle design. It is pressed into a bore on the first shaft. The middle and rear bearing supports are installed in a special housing in the crankcase and the mounting hole in the rear cover, respectively. They have a ball design.
The gears of the first three stages are located on the secondary shaft. All of them are engaged with gears on the intermediate shaft. The front part of the shaft is equipped with special splines used for fastening the synchronizer clutch for the third and fourth speeds. The reverse gears and speedometer drive are also installed here. The intermediate shaft is also mounted on two bearings: front (ball) and rear (roller).
Stage synchronizers have the same design, consisting of a hub, coupling, springs and locking rings. The gears are switched by means of a mechanical drive, which consists of rods with forks that engage with movable (sliding) clutches.
The shift lever has a two-part design. Its upper and lower parts are connected using a collapsible damping device. This is necessary in order to simplify the dismantling of the box.
The five-speed gearbox is similar, with the exception of some changes in the rear cover and the design of the intermediate shaft.
MAIN TECHNICAL CHARACTERISTICS of the VAZ 2106 gearbox
The main parameter that determines the operation of the gearbox is the gear ratio. This number is considered to be the ratio of the number of teeth on the driven gear to the number of teeth on the drive gear. The table below shows the gearbox ratios of various modifications of the VAZ 2106.
TABLE: VAZ 2106 Gearbox Ratios
| VAZ 2106 | VAZ 21061 | VAZ 21063 | VAZ 21065 | |
| Number of steps | 4 | 4 | 4 | 5 |
| Gear ratio for each stage | ||||
| 1 | 3,7 | 3,7 | 3,67 | 3,67 |
| 2 | 2,1 | 2,1 | 2,1 | 2,1 |
| 3 | 1,36 | 1,36 | 1,36 | 1,36 |
| 4 | 1,0 | 1,0 | 1,0 | 1,0 |
| 5 | No | No | No | 0,82 |
| Reverse gear | 3,53 | 3,53 | 3,53 | 3,53 |
WHAT TRANSMISSION TO PUT?
Some owners of “sixes” with four-speed gearboxes are trying to improve their cars by installing five-speed gearboxes on them. This solution allows you to make long trips without putting much stress on the engine and with significant fuel savings. As can be seen from the table above, the fifth gear ratio of the standard VAZ 21065 gearbox is only 0.82. This means that the engine practically does not “strain” when driving in fifth speed. In addition, if you move no more than 110 km/h, then a working power unit in such a situation will consume no more than 6–7 liters of fuel.
GEARBOX FROM ANOTHER VAZ MODEL
Today on sale you can find new gearboxes from the VAZ 2107 (catalog number 2107–1700010) and VAZ 21074 (catalog number 21074–1700005). They have characteristics similar to those of the VAZ 21065. Such gearboxes can be installed on any “six” without any problems.
GEARBOX WITH A FOREIGN CAR
Among all the foreign cars, there is only one, the gearbox with which can be installed on a VAZ 2106 without modifications. This is the “big brother” of the classic VAZ - the Fiat Polonaise, which even looks like our “six”. This car was produced not in Italy, but in Poland.
“Polonaise” even looks similar to our “six”
Also for the VAZ 2106 the box from Polonaise-Caro is suitable. This is a high-speed version of the regular Polonaise. Below in the table you will find the gearbox ratios of these cars.
TABLE: TRANSMISSION NUMBERS FOR FIAT POLONEZ AND POLONASE-CARO CARs
| "Polonaise" | "Polonaise-Caro" | |
| Number of steps | 5 | 5 |
| Transmission ratio for: | ||
| 1 gear | 3,77 | 3,82 |
| 2 gears | 1,94 | 1,97 |
| 3 gears | 1,30 | 1,32 |
| 4 gears | 1,0 | 1,0 |
| 5 gears | 0,79 | 0,80 |
The only thing that will need to be altered when installing a gearbox from these cars is to widen the hole for the gear shift lever. In Fiats it is larger in diameter and has a square rather than a round cross-section.
The Polonaise gearbox is installed on a VAZ 2106 with virtually no modifications
How to install a new gearbox?
As soon as the old one is removed. Clean the junction between the engine and the gearbox. Be sure to check the clutch. If it needs replacing, it is better to do it now to avoid these difficulties in the future.
With the help of a partner, install the new transmission and drive it into the engine. It is worth noting that one of the most difficult procedures is inserting the transmission input shaft into the rear crankshaft bearing, so you will need a lot of physical strength and a little patience. After the box is attached, tighten the nuts securing the gearbox to the engine.
Install the crossbar and tighten it. Now the front box is securely fixed. At this time, you can already hang individual elements. These include: the speedometer drive, contacts for turning on the reversing lights and the clutch drive. After all this “trifle” has been installed, you can put the driveshaft in place. To do this, insert it into the slot of the elastic coupling and put on the fixing seal. Next, using a screwdriver and pliers, bend the metal antennae to the oil seal.
The final step is to install the cross member and tighten it. After this, you can install the exhaust system and connect the battery terminal
The VAZ 2106 can be equipped with a four-speed or five-speed gearbox. The five-speed transmission is based on the four-speed, so both transmissions are interchangeable and have most of the same parts.
Since the manufacturer installs only five-speed gearboxes on VAZ 2106 cars of the last years of production, and they are gradually displacing four-speed ones from service, repair of a five-speed gearbox will be considered as more complex.
Repair
Malfunctions that require box repair.
Loud noises in the box
Worn gear teeth or synchronizer teeth;
The shafts in the housing are loose, and during operation they undergo axial displacement.
MAIN FAULTS in the VAZ 2106 gearbox
Being a mechanical device, especially one subject to constant loads, the gearbox cannot help but break down. And even if it is serviced in accordance with the requirements of the car manufacturer, the time will still come when it becomes capricious.
The main malfunctions of the VAZ 2106 gearbox include:
- oil leakage;
- noise (crunching, crackling, squealing) when turning on the speed;
- a sound uncharacteristic of gearbox operation that changes when the clutch is depressed;
- complicated (tight) gear shifting;
- lack of fixation of the gear shift lever;
- spontaneous switching off (knocking out) of gears.
Let us consider these malfunctions in terms of the reasons for their occurrence.
OIL LEAKING
Leakage of lubricant in the gearbox can be determined by marks on the ground or by the engine crankcase protection. You cannot delay fixing this problem, because an insufficient oil level will certainly lead to a number of other malfunctions. The causes of leakage may be:
- damage to shaft seals;
- wear of the shafts themselves;
- high pressure in the gearbox due to a clogged breather;
- loosening the crankcase cover bolts;
- violation of the integrity of the seals;
- loosening the oil drain plug.
NOISE WHEN SWITCHING INTO SPEED
Extraneous noise that occurs when shifting gears may indicate the following malfunctions:
- incomplete disengagement of the clutch (crunching);
- insufficient oil volume in the box (hum, squeal);
- wear of gears or synchronizer parts (crunching);
- deformation of locking rings (crunching);
- bearing wear (hum).
SOUND UNCHARACTERISTIC FOR TRANSMISSION OPERATION
The appearance of a sound that is uncharacteristic of the normal operation of the gearbox and disappears when the clutch is depressed may be due to:
- low level of lubricant in the box;
- damage to gears;
- bearing failure.
COMPLEX GEAR SHIFT
Problems with gear shifting that are not accompanied by extraneous noise may indicate such malfunctions as:
- deformation or damage to the gear shift forks;
- difficult movement of fork rods;
- complicated movement of the movable coupling of the corresponding transmission;
- jamming in the hinge joint of the shift lever.
NO LEVER LOCKING
If the gear shift lever returns to its previous position after switching on the speed, the release spring is most likely to blame. It can either stretch or break. It is also possible for one of its ends to slip from the attachment point.
TURNING OFF (KNOTTING OUT) SPEEDS
If the gears are switched off uncontrolled, the following malfunctions may occur:
- the synchronizer spring is damaged;
- the synchronizer ring is worn out;
- blocking rings are deformed;
- rod sockets are damaged.
TABLE: VAZ 2106 GEARBOX MALFUNCTIONS AND METHODS FOR THEIR ELIMINATION
| Gearbox noise | |
| Bearing noise | Replace defective bearings |
| Wear of gear teeth and synchronizers | Replace worn parts |
| Insufficient oil level in the gearbox | Add oil. If necessary, eliminate the causes of oil leakage |
| Axial movement of shafts | Replace bearing retaining parts or bearings themselves |
| Difficulty shifting gears | |
| Sticking spherical joint of the gear lever | Clean the mating surfaces of the ball joint |
| Gear shift lever deformation | Correct the deformation or replace the lever with a new one |
| Stiff movement of the fork rods (burrs, contamination of the rod seats, jamming of the locking blocks) | Repair or replace worn parts |
| Tight movement of the sliding clutch on the hub when the splines are dirty | Clean the parts |
| Deformation of gear shift forks | Straighten the forks, replace them if necessary |
| Spontaneous shutdown or unclear gear shifting | |
| Wear of balls and rod seats, loss of elasticity of clamp springs | Replace damaged parts with new ones |
| Wear of synchronizer blocking rings | Replace locking rings |
| Broken synchronizer spring | Replace the spring |
| Wear of synchronizer clutch teeth or synchronizer ring gear | Replace clutch or gear |
| Oil leak | |
| Wear of the oil seals of the primary and secondary shafts | Replace seals |
| Loosening of the gearbox housing covers, damage to the sealing gaskets | Tighten nuts or replace sealing gaskets |
| Loosening the clutch housing to the gearbox housing | Tighten the nuts |
Reasons for changing the oil
Changing the gearbox oil on a VAZ 2106, or indeed any car, can have several reasons:
- Basically, the gearbox oil is changed when the car has driven 35,000 kilometers or after 3 years of operation, as the oil loses its properties.
- One more point - after purchasing a used car, it is highly advisable to replace or at least check the oil level in the units, including the gearbox.
- If, when checking the oil level, it turns out that it is not enough, then replacement is necessary. You can simply add oil, but ONLY if you know what kind of oil is filled and if the oil in the gearbox is in good condition. If the oil is black or coffee-colored, this is also a sign that it needs to be changed.
Also, after repairing the gearbox, it is not advisable to refill with the same oil - it is much better to replace it with new one. Now let's start changing the oil ourselves and start with tools and accessories.
REPAIR OF GEARBOX VAZ 2106
The process of repairing a “six” gearbox comes down to replacing broken or worn elements. Considering that most of even the smallest parts of the box can be dismantled without problems, there is no point in restoring them. It is much easier to buy a new spare part and install it in place of the faulty one.
But in any case that requires repair of the gearbox, it will need to be removed from the car and disassembled. This may take a whole day, or maybe more than one. Be sure to take this into account if you decide to repair the gearbox yourself.
HOW TO REMOVE THE TRANSMISSION
To dismantle the gearbox, you will need a lift, overpass or inspection hole. It is also advisable to have an assistant present. As for the tools, you will definitely need:
- hammer;
- chisel;
- pliers;
- keys for 13 (2 pcs);
- key to 10;
- key to 19;
- hex wrench 12;
- slotted screwdriver;
- crosshead screwdriver;
- mounting blade;
- support for supporting the gearbox during dismantling (special tripod, strong log, etc.);
- container for collecting oil from the gearbox.
Dismantling procedure:
- We lift the car on a lift, or place it on an overpass or inspection hole.
- We climb under the car. Place a clean container under the gearbox drain plug.
- Use a 12mm hex to unscrew the drain plug. We wait for the grease to drain.
- We find the handbrake cable equalizer and remove the spring from it using pliers. The spring can be removed using pliers
- Loosen the cable by unscrewing the two nuts with a 13mm wrench.
To remove the equalizer, you need to unscrew two nuts - We remove the equalizer. We move the cable to the side.
- We apply marks on the cardan shaft and the flange of the main gear at the point of their connection using a hammer and chisel. This is necessary so that when installing the cardan, its centering is not disturbed. It will need to be installed using these marks. The marks are necessary in order to place the cardan as it was before dismantling
- We unscrew the nuts connecting the flanges with a 13mm wrench and disconnect them.
The nuts are unscrewed with a 13mm wrench - We bend the fixing tendrils of the sealing clip with a thin slotted screwdriver and move it away from the elastic coupling. The clip mustaches need to be bent with a screwdriver
- We dismantle the safety bracket by unscrewing the nuts securing it to the body.
To remove the bracket, you need to unscrew the nuts with a 13mm wrench - We dismantle the cross member of the intermediate support by unscrewing the nuts with a 13mm wrench. The support nuts are unscrewed with a 13mm wrench
- We move the front part of the cardan, removing it from the splines of the elastic coupling. To remove the shaft from the coupling, it must be moved back
- We dismantle the driveshaft.
- Let's go to the salon. Using a slotted screwdriver, remove the protective cover from the gearshift lever and disconnect the rings along the edge of the hole in the carpet.
The fixing rings are removed using a screwdriver - Using a Phillips-head screwdriver, unscrew the screws securing the cover.
To remove the cover, you need to unscrew 4 screws - Remove the cover.
- We disconnect the locking sleeve with a thin slotted screwdriver, lightly pressing the shift lever.
The bushing is detached using a screwdriver - We dismantle the lever.
- Let's move on to the engine compartment. We bend the eye washer, leveling it with a hammer and a mounting spatula.
- Using a 19mm wrench, unscrew the bolt securing the box.
Before unscrewing the bolt, you need to straighten its eye washer - Unscrew the two starter fixing bolts using a 13mm wrench.
- Using the same wrench, unscrew the lower starter fixing bolt.
To disconnect the starter, you need to unscrew 3 bolts with a 13mm wrench - We get down under the car. Unscrew the four bolts holding the clutch starter cover in place.
To disconnect the cover you need to unscrew 4 bolts - Using pliers, unscrew the nut securing the speedometer cable.
- We put a stop to support the box. We ask an assistant to monitor the position of the gearbox. Using a 19mm wrench, unscrew all the crankcase mounting bolts (3 pcs).
When unscrewing the remaining bolts securing the gearbox, it must be secured - Unscrew the two nuts of the gearbox cross member.
To remove the cross member you need to unscrew two nuts - Moving the box back, remove it from the car.
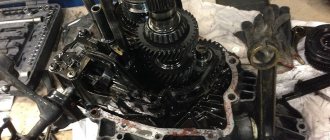
DISASSEMBLY OF GEARBOX VAZ 2106
Before disassembling the gearbox, it is recommended to clean it from dirt, dust, and oil leaks. In addition, make sure you have the following tools on hand:
- two thin slotted screwdrivers;
- impact screwdriver;
- key to 13;
- key to 10;
- key to 22;
- puller for retaining rings;
- vice with workbench.
To disassemble the gearbox, you must:
- Using two screwdrivers, push the spacer pieces to the sides and then remove it.
To remove the bushing, you need to move its sectors apart - Remove the flexible coupling along with the flange.
To remove the coupling you need to unscrew the nuts with a 13mm wrench - Remove the gearbox support by unscrewing the nuts securing it using a size 13 wrench.
To disconnect the support, you need to unscrew two nuts with a 13mm wrench - Unscrew the nut on the speedometer drive mechanism using a 10mm wrench.
To remove the drive, you need to unscrew the nut with a 10mm wrench. - Remove the drive.
- Unscrew the reverse light switch using a 22mm wrench. Remove it.
The switch is unscrewed with a 22 key - Using a 13 key, unscrew the gear shift lever stopper.
The locking bolt is unscrewed with a 13 mm wrench - Remove the bracket by first unscrewing the nuts with a 13mm wrench. The bracket is secured with two bolts
- Using the same wrench, unscrew the nuts on the back cover. Disconnect the cover and remove the gasket.
A sealing gasket is installed between the crankcase and the cover - Remove the rear bearing.
The bearing can be easily removed from the shaft - Remove the speedometer gear.
The gear is fixed with a small steel ball - Remove the fork and reverse gear idler.
The fork is secured with a nut 10 - Disconnect the rear speed separating sleeve.
- Remove the retaining ring and gear.
The gear is secured with a retaining ring - Using a puller, remove the retaining ring on the secondary shaft and remove the driven gear.
To remove the gear, you must remove the retaining ring. - Remove the four bearing retaining plate screws. If the screws have become rusty, you may need an impact screwdriver to do this. Dismantle the plate, remove the axle.
It is better to unscrew the screws with an impact screwdriver - Using a 10mm wrench, unscrew the nuts on the cover (10 pcs). Remove it, being careful not to tear the sealing gasket.
The cover is secured with 10 bolts - Disconnect the clutch housing from the gearbox by unscrewing the nuts using keys 13 and 17.
To disconnect the clutch housing you will need keys 13 and 17 - Using a 13mm wrench, unscrew the fastener cover bolts. Remove the cover.
The cover is secured with two bolts - Remove the reverse gear shift rod.
The rod is simply removed from the crankcase - Using a 10mm wrench, unscrew the bolt holding the third and fourth speed forks.
The bolt is unscrewed with a 10 mm wrench - Remove the rod and its locking blocks.
Along with the rod, the locking blocks must also be removed. - Remove the first and second speed rods from the gearbox.
To remove the rod, you need to pull it towards you. - Unscrew the bolt securing the third and fourth stage forks.
- Pressing the clutches and using a 19mm wrench, unscrew the bolt securing the front bearing on the intermediate shaft.
To unscrew the bolt, you need to engage two gears at once by pressing the clutches - Use two thin screwdrivers to remove the bearing. To remove the bearing, you need to pry it off with screwdrivers.
- Disconnect the rear bearing. To remove the rear bearing, you need to push it from the inside.
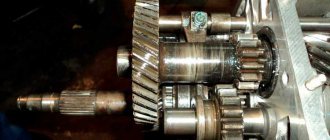
- Remove the intermediate shaft.
To remove the shaft, you need to lift it from the back - Remove the gear shift forks.
Forks are mounted on the secondary shaft - Remove the input shaft with bearing.
The input shaft is removed along with the bearing - Remove the needle bearing. Bearing mounted on secondary shaft
- Using a screwdriver, remove the locking key at the rear of the secondary shaft.
The bearing is secured with a key - Remove the rear bearing.
The bearing is removed from the socket using thin screwdrivers - Pull out the secondary shaft.
- Clamp it in a vice and disconnect the synchronizer clutch that engages third and fourth gears. Before removing the coupling, the shaft must be installed vertically, clamped in a vice
- Remove the retaining ring using a puller.
- Remove the synchronizer hub. To dismantle the hub, you need to remove the retaining ring.
- Remove the next retaining ring.
- Disconnect the third gear.
The gear is secured using a locking ring. - Place the first speed gear in an open vice and knock the secondary shaft out of it with a hammer.
The gear is knocked off the shaft using a hammer and a soft metal spacer. - After this, remove the second speed gear, clutch, hub, and first speed bushing.
- The synchronizer mechanisms of the first, second and fourth stages can be disassembled in the same way.
- Release and remove the retaining ring on the input shaft.
The bearing is secured with a retaining ring - Place the bearing in a vice and knock the shaft out of it.
- Remove the gear shift lever by disconnecting the return spring and unscrewing the fastening nuts.
The lever is held by a return spring
If faulty gears, synchronizers and forks are discovered during the disassembly of the gearbox, they should be replaced immediately. Parts that have visible signs of wear or damage should be considered defective.
VIDEO: DISASSEMBLING a VAZ 2106 gearbox
REPLACING BEARINGS
If, when disassembling the gearbox, it is discovered that any of the shaft bearings have play or visible damage, it will need to be replaced. All bearings in the VAZ 2106 gearbox have a non-separable design, so there can be no talk of any repair or restoration here.
In the gearbox, the rear bearing supports of the primary and secondary shafts are subject to the greatest load. They are the ones that fail more often than others.
REPLACING THE INPUT SHAFT BEARING
If the gearbox has already been disassembled and the input shaft and bearing assembly has been removed, simply knock it off the shaft with a hammer. Pack the new bearing in the same way. Usually, there are no problems with this.
There is another option for replacing the bearing without completely disassembling the box. It is suitable when you are absolutely sure that the rear shaft bearing is faulty. Let's look at it in more detail.
Work order:
- Remove the gearbox from the vehicle.
- Follow steps 1–18 of the previous instructions.
- Remove the outer and inner retaining rings.
The bearing is secured by inner and outer retaining rings - Pull the shaft towards you, sliding it out of the crankcase.
- Insert the slot of a large screwdriver into the groove of the bearing and fix it as firmly as possible in this position.
The bearing must be fixed by inserting a screwdriver into its groove. - Holding the outer race with a screwdriver, apply gentle blows to the shaft until the bearing comes off it.
- Place the new bearing onto the shaft.
- Move it to the seat.
- Using a hammer, press the bearing into place, striking its inner race lightly.
To install a new bearing, you need to hammer it with a hammer, applying gentle blows to the inner race - Install retaining rings.
HOW TO CHOOSE A PRIMARY SHAFT BEARING
In order not to make a mistake in choosing a bearing, it is important to know its parameters. We need an open radial ball bearing of the sixth accuracy class. Domestic enterprises produce such parts under catalog numbers 6–50706АУ and 6–180502К1УС9. All products of this type must be manufactured in accordance with the requirements of GOST 520–211.
TABLE: MAIN CHARACTERISTICS OF BEARINGS 6–50706АУ AND 6–180502К1УС9
| Options | Values |
| Outer diameter, mm | 75 |
| Internal diameter, mm | 30 |
| Height, mm | 19 |
| Number of balls, pcs | 7 |
| Ball diameter, mm | 14,29 |
| steel grade | SHH-15 |
| Load capacity static/dynamic, kN | 17,8/32,8 |
| Nominal operating speed, rpm | 10000 |
| Weight, g | 400 |
REPLACING THE REAR OUTPUT SHAFT BEARING
The secondary shaft bearing can be removed and installed only with the gearbox disassembled. To do this, it is necessary to perform the work provided for in paragraphs 1–33 of the instructions for disassembling the gearbox. After dismantling the bearing, a new one is installed in its place, after which the gearbox is assembled. No special tools are required to remove or install it, nor is physical strength required.
SELECTION OF SECONDARY SHAFT BEARING
As in the previous case, when choosing the rear bearing of the secondary shaft, it is important not to make a mistake with the markings and parameters. In Russia, such parts are produced under article number 6–205 KU. It is also a radial type ball bearing. They are manufactured according to the requirements of GOST 8338–75.
TABLE: MAIN CHARACTERISTICS OF BEARING 6–205 KU
| Options | Values |
| Outer diameter, mm | 52 |
| Internal diameter, mm | 25 |
| Height, mm | 15 |
| Number of balls, pcs | 9 |
| Ball diameter, mm | 7,938 |
| steel grade | SHH-15 |
| Load capacity static/dynamic, kN | 6,95/14,0 |
| Weight, g | 129 |
REPLACING PRIMARY AND SECONDARY SHAFT SEALS
Oil seals (cuffs) in the gearbox are used to prevent lubricant leakage. If oil leaks from under the shaft, in most cases the oil seal is to blame. And it needs to be replaced. To replace the seals on the primary and secondary shafts, you will need to remove the gearbox. The tools you will need are a hammer, a drift, pliers and a cylindrical mandrel with a diameter equal to the diameter of the metal body of the cuff.
The shaft seal is pressed into the seat of the front cover of the gearbox housing. When it is disconnected from the crankcase, you must:
- Place the end of the drift against the metal seal housing on the outside of the cover.
- Apply several blows with a hammer to the drift, moving it around the circumference of the oil seal housing.
The old oil seal is removed by knocking out - From the back of the cover, grab the cuff with pliers and remove it from its seat.
On the back side of the cover, the oil seal is picked up with pliers - Install a new cuff, lubricating it with grease.
- Using a mandrel and a hammer, press it into the lid seat.
To replace the secondary shaft oil seal, you will need pliers with thin ends, a hammer and a mandrel that matches the size of the seal.
Complete disassembly of the gearbox is not necessary here. It is enough to remove the elastic coupling and tear off the flange connecting it to the cardan from the shaft splines.
This is followed by:
- Use a screwdriver to pry the cuff from the metal body.
- Remove the cuff.
The cuff can be easily removed with a screwdriver - Lubricate the new oil seal with grease.
- Install the cuff into the seat.
- Press in the cuff using a hammer and a mandrel.
The oil seal is pressed in using a mandrel and a hammer
SELECTION OF PRIMARY AND SECONDARY SHAFT SEALS
To select the correct seals, it is advisable to know their catalog numbers and sizes. All of them are presented in the table.
TABLE: CATALOG NUMBERS AND SEAL SIZES
| Primary shaft | Secondary shaft | |
| Catalog number | 2101–1701043 | 2101–1701210 |
| Inner diameter, mm | 28 | 32 |
| Outer diameter, mm | 47 | 56 |
| Height, mm | 8 | 10 |
OIL FOR GEARBOX VAZ 2106
The coordinated operation of the gearbox elements depends on the quality of the lubricant that washes them, as well as on its volume. The oil in the VAZ 2106 gearbox must be changed every 50 thousand kilometers. At least, these are the requirements of the manufacturer. But you need to check the lubricant level at least once a quarter.
WHAT OIL TO PUT INTO THE VAZ 2106 GEARBOX
In accordance with the requirements of the plant, only gear oil from groups GL-4 or GL-5 according to the API classification must be filled into the VAZ 2106 gearbox. As for the viscosity class, the following SAE classes are suitable:
- 80W-85;
- 80W-90;
- 85W-90.
The required oil volume for a four-speed gearbox is 1.35 liters, for a five-speed gearbox - 1.6 liters.
CHECKING THE OIL LEVEL IN THE TRANSMISSION
To find out what level of lubrication is in the box, the car must be driven onto a horizontal overpass or inspection hole. The engine must be cold. The oil level in the gearbox is determined by unscrewing the oil filler plug. It is unscrewed using a 17 key. If oil pours out of the hole, everything is in order with the level. Otherwise, it needs to be topped up. But there is one nuance here. You can only add oil of the class and type that is already in the box. If you do not know what kind of lubricant is in the gearbox, it must be drained completely, and only then a new one must be filled in.
DRAINING OIL FROM GEARBOX VAZ 2106
To drain the lubricant from the “six” gearbox, the machine must be installed on an overpass or pit. The engine must be hot. This way the oil will drain faster and in full.
The oil drain plug is located in the lower crankcase cover. It is unscrewed with a 17 key. Before unscrewing it, you need to place a container under the hole to collect the oil. When the lubricant drains, the plug is screwed back on.
HOW AND WHAT TO FILL OIL IN THE VAZ 2106 Gearbox
To fill the six gearbox with oil, you will need a special syringe or a thin hose (must fit into the oil filler hole) with a funnel. In the first case, lubricant is drawn from a container into a syringe, and then squeezed out of it into the filling hole. The process continues until the lubricant flows out of it. After this, the oil filler hole is screwed in.
When using a hose and funnel, you need to insert one end into the hole and raise the other end at least half a meter above it. The lubricant is poured into a funnel inserted into the other end of the hose. When oil begins to flow out of the box, stop pouring, remove the hose and tighten the plug.
Learn about repairs and maintenance
Our experts answer the most frequently asked service questions.
Why is timely oil change necessary?
How often should you change your engine oil? The basic rule that car owners should follow is to change the oil every 10,000 km, or once a season (spring and autumn).
What improvements will occur as a result of gearbox tuning?
The factory gearbox has a number of disadvantages, for example: “long” gears, loss of torque when shifting. Gearbox tuning will help you customize your car to suit your wishes.
Is it worth replacing the gearbox with a repaired one?
Of course it is, with one important note. The gearbox must be repaired in a “trusted” place and have a warranty.