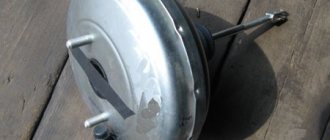
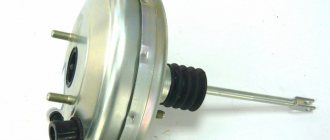
The vacuum brake booster of the fourteenth is a casing with a valve inside. It is divided into two parts by a rubber layer - a diaphragm - one part is atmospheric, and the second represents the vacuum space, which is connected to the intake pipe from the engine.
Vacuum booster
The amplifier valve is a plastic casing that contains the main parts that are subject to wear and cause trouble for the driver in the form of gearbox rattling. The composition is as follows: on the support bushing there is a rod, which is adjacent to the piston and its own buffer. Actually, the valve itself is on its pusher and return springs along with the filter.
The vacuum booster functions as follows: you press the brake to the floor, at this time the piston and valve pusher move in such a way that this opens the space between the two compartments of the unit. Then, a vacuum compartment moves into this space and takes in air. Air presses on the damper between the two parts of the amplifier, creating different levels of pressure in one and the other part. Due to this difference, the valve itself and the rod move, respectively. By lowering the pedal, all parts return to their places, the system ceases to function.
As with all parts of the system of any car, repair of the vacuum brake booster is inevitable. In order to decide on the repair work - whether it will be a DIY garage repair or whether you should go to a service center - you must first determine the signs of a malfunction in the VAZ 2114 vacuum brake booster.
Signs of a malfunction of the vacuum brake booster of the VAZ 2114
Brake booster malfunctions have several fatal negative consequences:
- Significant reduction in vehicle control during braking cycles. In the absence of the amplifier, the load on the gas pedal increases proportionally - the pedal goes hard, and the braking effect is significantly reduced. For an unprepared driver, such behavior of the car can come as a shock and lead to a traffic accident due to the increased braking distance; If the brakes malfunction, a car loses significant braking potential and becomes practically uncontrollable;
- The gas pedal is slow. When moving, the pedal is very difficult to press. This is a clear sign of a malfunction of the amplifier housing diaphragm chamber. In this case, the car must be operated with great care, since it has lost a certain effectiveness of the braking system;
- A sign indicating a faulty brake system lights up on the dashboard at short intervals. This symptom may also relate to other malfunctions in the brakes, but in combination with a tight brake pedal it clearly indicates a faulty booster. The electronic unit of the car constantly monitors all systems for operability (and although on the VAZ 2114 model this unit has not been considered modern for a long time with its functions, it copes with its functions at a good functional level and with high efficiency despite the small number of sensors);
Deterioration in the braking performance of the system, along with other signs, indicates a direct involvement of a faulty brake booster in the risk of an accident. This symptom is the main one among all the others; however, operating a car with a very weak brake system is very dangerous - the circuits in this case do not receive additional force and cannot effectively brake.
Troubleshooting most often involves replacing the faulty element with a new unit - this will save repair time, since resuscitation of an old product will require no less time and a slightly lower cost of parts. That is why car enthusiasts most often resort to complete replacement of a failed part.
How to check the vacuum brake booster of a VAZ 2114
The process of checking the vacuum brake booster on a VAZ 2114 is as follows:
- Press the brake to the floor 4-5 times with the engine not running. This will create uniform pressure in the two parts of the amplifier. When you press the brake, the valve will immediately show itself: if it squeaks, then you need to seriously think about it.
- After the pressure has become uniform, start the fourteenth. But at the same time you need to keep the brake to the floor. If everything is in order with the brake booster system, the pedal will rise after the engine starts. If this does not happen, then repair is definitely required.
- In the event that you realize that there is a problem with the amplifier, you need to look to be sure how the hose is secured and what condition the flange is in. If the fastenings at any point do not correspond to the norm, this may affect the fact that the pedal does not lift, and in fact the fault will be on a separate incorrect fastening, and not on the entire system as a whole.
Service replacement cost
You may not be able to change the part yourself because you don’t have enough tools, knowledge, or a place where you can do it. In this case, you can contact a car service; the repair price will be around 1000 rubles, taking into account the average prices in Russia. In this case, the total repair budget will be around 3,000 rubles , unless replacement of additional elements is required. There is one important advantage when contacting a service center. When people who know their stuff work there, they will be able to identify other shortcomings of the system during the analysis and show them to you clearly so that you know exactly what you are paying for. Remember that repairs should be made immediately when the problem is diagnosed, since driving with a broken vacuum booster is very dangerous. For this repair you do not need special knowledge, so you can easily replace the vacuum booster yourself, saving a third of your budget.
Source
Vacuum brake booster VAZ 2114 - which is better, selection criteria
In order to choose the best vacuum brake booster for the VAZ 2114, I recommend that you pay attention to the following points:
- Price. Price is one of the most important criteria for choosing a vacuum amplifier. You should not buy cheap Chinese options in order to save money, since they will not last long. It is advisable to give preference to products in the mid-price category - not the most expensive, but not the cheapest.
- Package. This packaging, used by a genuine manufacturer, is made by Point of Sale. You should not buy goods from market traders. There are plenty of good, trusted auto parts stores in any city. Ask to see certificates and documentation for the parts.
- Label. The label should be clearly legible - the date of production of the part, the production batch number and the name of the manufacturer. I am made of corrugated cardboard.
Replacing the vacuum brake booster of a VAZ 2114 - step-by-step instructions
To replace the vacuum brake booster of a VAZ 2114 you will need a certain set of tools and materials. It includes:
- Screwdriver Set;
- Pliers;
- Socket wrench for 13 and 17 millimeters;
- Special wrench for brake pipes;
- New plugs;
- New fittings.
And so let’s begin the replacement process itself:
- Removing the vacuum booster can be difficult due to the brake cylinder. Therefore, we advise you to remove it first. Another option is to disconnect the pipes from the brake cylinder and move them to the side for a while. Here you decide for yourself what is more convenient for you.
- The cylinder is not the main problem. It is difficult to cope with the mounting of the vacuum booster. It's just not very convenient to do this. This is the design of the VAZ 2114.
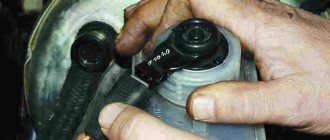
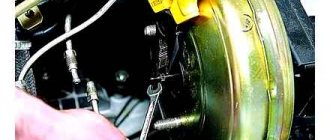
- Start with the valve - remove the hose fasteners from it, remove the support bush, after which you can pull out the brake pin.
- Next, using a 13 mm wrench, all four fasteners of the vacuum booster are dismantled.
- After all the inconveniences of the work done, you can remove the element and get ready to install a new amplifier in its place.
- To do this, you will have to install a special mounting frame. The frame is tightened with a 17 mm wrench, after which the new component is installed inside the car.
- If you want to make your work as easy as possible, do not forget to first connect the brake pedal to the booster with your finger when reassembling it. After this, it is much easier to cope with putting the vacuum seal back into place.
When replacing the vacuum booster, be sure to change the old vacuum hose at the same time. This element is far from eternal, therefore, as it wears out, it will negatively affect the quality and efficiency of the new vacuum seal.
Also check out
- It is often recommended to disconnect the tubes that complicate the process of removing the VUT, but you can do without this.
- Three of the four tubes coming from the brake cylinder make it difficult to remove the cylinder. To dismantle the cylinder, you can unscrew only one nut to “10”.
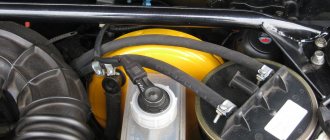
- Disconnect the hose that goes from the intake manifold to the vacuum booster valve.
- Remove the mounting bracket. It is better to use a special cardan (its image is in the photo). The VUT itself is attached to the body with four turnkey nuts “13”.
- Move the mounting bracket to the new vacuum brake booster (you will need to unscrew a couple of nuts to “17”).
Reassemble in reverse order.
Why does the vacuum brake booster of the VAZ 2114 hiss?
The car's braking system is subjected to constant loads, and with the so-called sporty style of city driving, it is also subject to overloads. This happens regularly even with a measured and leisurely rhythm - there is no escape from this problem.
Therefore, this unit must be regularly tested to ensure maximum driving safety for the driver and passengers. So it is in the story with vacuum brake boosters. As a rule, problems in its operation occur due to the failure of a special diaphragm located inside the device. It bursts, cracks, and ceases to perform its duties—to create a vacuum. Sometimes the exhaust valve also malfunctions - it is for these reasons that the vacuum brake booster begins to hiss.
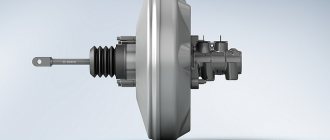
Design and operating algorithm
The first passenger cars produced in the last century were not equipped with “vacuum seals”. To sharply slow down the car in case of emergency braking, the pedal had to be pressed with a force of about 80 kg. The device of the vacuum brake booster installed on modern vehicles makes it possible to reduce the mentioned force to a light press.
To diagnose malfunctions of this unit, you need to know its design and operating principle. The amplifier is a cylindrical metal housing, inside of which the following elements are located:
- a diaphragm pushed by a return spring;
- air valve with two channels - atmospheric and vacuum;
- in the center of the body there is a rod connected at one end to the brake pedal, the other to the main cylinder, and a diaphragm is attached to it;
- vacuum supply pipe from the engine intake manifold connected to the check valve.
In fact, the body of the “vacuum generator” is divided by a membrane into 2 separate chambers. The first is supplied with vacuum from the power unit, while in the second the air pressure is equal to atmospheric pressure. The chambers communicate with each other through the channels of the air valve, which alternately open when the driver presses and releases the pedal.
The classic vacuum brake booster works according to the following algorithm:
- Until the driver activates the brake system, both chambers communicate via a vacuum channel. Since the pressure in them is the same, the pusher and rod remain motionless.
- After pressing the pedal, the rod moves forward and the connection between the two chambers through the vacuum channel is interrupted. The valve opens another passage connecting the atmospheric chamber with outside air.
- Due to the pressure difference, the diaphragm bends towards the vacuum, thereby helping to put pressure on the pusher and the piston of the main hydraulic cylinder.
- When the driver takes his foot off the pedal, the valve produces the opposite effect - it closes the atmospheric channel and opens the vacuum channel. The pressure in the chambers is equalized, the spring pushes the membrane back to its original position.
Vacuum for VAZ 2114, its selection and replacement
VUT (vacuum brake booster) is an indispensable thing for a comfortable and safe ride. Research shows that this part can reduce the effort required for effective emergency braking by almost 200% (from 13 kg to 7 kg at a deceleration of 6 m/s).
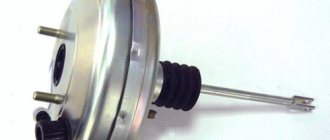
Vacuum brake booster
Today, the automotive spare parts market is replete with VUTs for VAZs (it is worth mentioning that the information presented in the article is applicable for the VAZ 2115 and VAZ 2113) from a variety of manufacturers - from cheap Chinese models of dubious quality to very expensive models. In general, VUT of more or less acceptable quality will cost you about 1 thousand rubles.
We can confidently recommend for purchase “SPORT” vacuum cleaners from Polytech-Auto (Togliatti), the quality of which has been tested by numerous car enthusiasts. The warranty service life of such VUTs is one year, but in practice, they last much longer. According to reviews, replacing a VUT with a VAZ does not take about 3-4 years.
From this article you will learn how to change the vacuum on a VAZ 2114 with your own hands, without spending money on service stations.
SIGNS OF MALFUNCTION AND CHECKING THE VACUUM BRAKE BOOSER
As soon as you have any doubts about whether the vacuum pump is working properly, you need to immediately check the vacuum brake booster of the VAZ 2114. It is worth noting that brakes are one of the key systems of any car, on which the life and safety of you and yours directly depends passengers, therefore, no negligence or irresponsibility is acceptable here.
Signs of a faulty vacuum brake booster, which indicate that the vacuum brake on a VAZ is broken, are as follows:
- The need to apply more force than before to press the brake pedal;
- Deterioration in the braking efficiency of a vehicle at the same pedal pressure.
As soon as any of these factors appear, immediately begin checking the spare part. To do this, you need to turn off the engine and press the brake pedal several times with sufficient force, then stop it in the middle of the range of motion (your foot fixes the pedal), and restart the engine.
If the vacuum brake booster of the VAZ 2114 is working properly, then the pedal itself will fall a little to the bottom, but if the vacuum booster fails, the pedal will remain in the same position.
After identifying the problem, you need to find out what exactly is wrong with the vacuum seal. This requires a visual inspection. In general, the inspection is carried out on the following points:
- The vacuum chamber is checked for tightness of the connection between the check valve and the pipe;
- The integrity of the fixing flanges is checked;
- A situation is possible when, due to wear in places of bends, the pipes have cracked, this is evidenced by characteristic wet marks on their surface;
- Often the main reason for failure of the vacuum seal is damage to the shank - check the protective cap on the seal; it should not stick. Remove the cap and start the engine; if you hear a hissing sound after bleeding the shank, that’s the problem.
NECESSARY TOOLS FOR THE JOB
Upon completion of the diagnosis, when the need to replace the part is obvious, before starting work it is necessary to prepare the tools and spare parts required for replacement.
First of all, purchase a new vacuum brake booster for your VAZ 2114; we also recommend replacing the connecting hose at the same time if it shows any signs of wear.
Replacing the vacuum on a VAZ 2114 requires the following tools:
- Pliers;
- Open-end and socket wrenches with a diameter of 10, 13 and 17 mm;
- Screwdriver.
Look at the condition of the plugs and fittings; you may need to replace them too, so when purchasing the necessary materials, do not forget to purchase them.
REPAIR AND REPLACEMENT OF THE VACUUM BRAKE BOOSTER WITH YOUR OWN HANDS
It’s worth clarifying right away that replacing the VAZ 2114 vacuum booster itself is not anything overly complicated, and if you have the above tools and one and a half to two hours of free time, it can be done at home without any problems, so in order to repair the vacuum brake booster, it is not necessary to contact a service station.
Let's consider replacing the vacuum seal on the fourteenth with our own hands step by step:
- First of all, it is necessary to dismantle the rod that connects the vacuum seal and the brake pedal. This, as a rule, does not cause any inconvenience - just pry out the locking plate with a knife or screwdriver and unscrew the locking element;
- Next, open the hood and move to the engine compartment. We need to disconnect the TC (brake cylinder) and the vacuum seal. This is done with socket or ring wrenches, depending on what connections were used for fixation (usually ordinary nuts). There is one dubious issue here that you will have to decide: the fact is that you can do it in different ways - disconnect at the same time all pipes from the brake cylinder, which will make removing the VUT somewhat easier, since nothing will interfere with the process, but subsequently you will need to re-bleed the brakes. Or leave them in place and try to remove the VUT by unscrewing only the 10 mm nut that secures the tubes to the inner surface of the body.
- After the TC is moved to the side, we need to remove the hose that connects the VUT and the manifold;
- Next, we remove the vacuum seal from its attachment to the body wall; it is fastened with 13 mm nuts, so for dismantling we will need the appropriate wrench;
- We remove the amplifier along with the bracket on which it is attached. According to reviews, in rare cases, in order to remove the VUT, it may be necessary to unscrew the strut spacer;
- Now you only need to install a new VUT, using a similar algorithm in reverse order.
It is worth saying that the vacuum brake booster of the VAZ 2115 and VAZ 2113 changes in a similar way, so this instruction is applicable for these cars as well.
Vacuum booster VAZ 2114: do-it-yourself replacement
The VAZ 2114 vacuum booster is exactly the same in design as the one used on early model cars - 2108, 2109. It is necessary to improve comfort when driving a car. You can remember the first kopecks, which did not have an amplifier - you had to press the pedal with great force to squeeze the cylinder rod. It is with the help of a vacuum that it is possible to increase the force applied to the rod several times. It is also worth mentioning that the effectiveness of emergency braking using VUT increases by approximately 200%. If without VUT you need to apply a force of 13 kg, then with it it is much less - only 7 kg.
Symptoms of a problem
There are a lot of vacuum amplifiers on the market, and they all differ not only in manufacturer, but also in quality. In recent years, the market has been conquered by Chinese analogues, which are of relatively lousy quality, but due to their prices beat their competitors. But skimping on brake system components means exposing yourself to danger. An amplifier of normal quality will cost you about 1000 rubles. Vacuum amplifiers produced by Politekh-AVTO have good reviews. The warranty on them is only a year, but in reality they last at least five.
Your safety depends on the condition of the braking system. This must be taken into account primarily when carrying out repairs and diagnostics. Therefore, a careless attitude is unacceptable. Signs of malfunction characterizing the failure of the VUT:
- It is necessary to apply more force to the pedal when braking.
- Braking efficiency deteriorates (it feels like you are pressing the pedal with the same force, but the rod moves worse).
But these symptoms can also appear if pipes and lines are contaminated. Therefore, it is possible to judge the failure of the VUT only on the condition that the serviceability of the remaining components is not in doubt. To check the VUT, you need to stop the engine and press the pedal hard several times. Then press down so that it is under pressure and start the engine. If the vacuum brake booster of the VAZ 2114 is working properly, you will feel the pedal sink significantly. Well, if it fails, it will be in its original position.
The next step is to identify a specific breakdown:
- Check whether the connection between the pipe and the check valve is tight.
- Are the fixing flanges intact?
- Pay attention to the condition of the pipes themselves - they sometimes crack in bends. A characteristic feature of this malfunction is the presence of wet marks.
- Very often the shank is destroyed. It is necessary to check the cap that is located on the seal. Remove it and start the engine. If even after all these procedures a hissing sound is heard, then the fault is in the shank.
Design features and operating principle
The first thing you should understand is the design features of the vacuum brake booster and the subtleties of its functioning in the system. As a rule, the device is located in a common block with the main cylinder. In the initial state, the channel connecting the system with the surrounding air is closed.
In turn, the second channel remains open. At this stage, the diaphragm, which is located inside, receives identical pressure on one side and the other. In addition, thanks to the action of the return spring, it is always located in its original position.
When the driver presses the brake, a special rod moves, deflects slightly and closes the entrance to the channel. At the same time, another channel opens, connecting the VUT with the surrounding air.
After this, atmospheric flows converge on both sides and press each with its own force. Due to the pressure difference, the return spring is compressed, and the rod itself moves with the cylinder piston.
After reducing the force (while the foot remains on the pedal), the channels open so much that the movement of the piston assembly is completely blocked, and the VUT itself is in standby mode and ready for work. In such a situation, any change in the position of the pedal leads to an adjustment of the pressure difference in the device. As a result, the car stops if the driver presses on the pedal, or continues to move when the foot is released.
Vacuum booster device
When you press the pedal hard, there is a sudden change in pressure, causing the brakes to work at their limit. It is believed that thanks to VUT, the efficiency of the vehicle’s braking system increases by 5-7 times. As soon as the pedal is released, the diaphragm returns to its original position.
If the vacuum brake booster system does not work, diagnostics, identification of the cause and prompt elimination of the defect are required. How to do this will be discussed below.