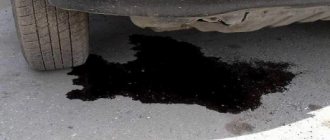
The Chevrolet Lacetti, a popular car in Russia, which has an F14D3 or F16D3, 1.4 or 1.6 liter engine under the hood, has a chronic disease. This is an oil leak from the valve cover gasket.
There are several reasons for this:
- The cover is made of polymer material and has a different temperature expansion coefficient with the aluminum cylinder head;
- Metal bushings for the cover fastening bolts protrude beyond the plane of the mating surface and do not allow the gasket to be pressed more tightly to the block head;
- The original cover gasket is poorly executed; it is too thin and narrow.
All these factors lead to the fact that after 40 - 50 thousand km. mileage, engine oil begins to ooze from under the cap. This is especially true for spark plug wells, as leaking oil accumulates there.
As a result, the spark plugs float in the engine oil, there is no great harm from this, but there is no benefit either. In addition, oil attracts dust from the engine compartment.
The surface of the spark plugs becomes dirty and conductive paths appear, along which high voltage from the electrodes partially “drains” onto the body. The efficiency of the ignition system decreases.
Removing the valve cover and replacing the gasket
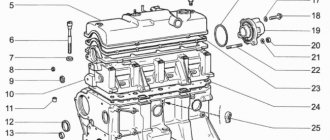
The valve cover on a VAZ 2106 has to be removed in many cases, from the procedure for tensioning the timing chain, adjusting the valves and ending with disassembling the engine. It is not difficult to remove and can be done in 10 minutes if you have the necessary tools, a full list of which I will give below:
- Heads for 8 and 10
- Extension
- Ratchet or crank
- Pliers
Before you begin this repair, you will need to perform some procedures to gain access to remove the valve cover. Namely, the first step is to remove the air filter housing, since it will get in the way.
To do this, unscrew the three nuts securing the filter cover and remove it, and then remove the filter:
Then unscrew the 4 nuts securing the body to the carburetor:
And remove the housing, having first disconnected the hose from the air intake breather:
Now you need to disconnect the carburetor damper drive rod by lifting it up and moving it to the side. If you have a retaining ring, you must first remove it:
It is also worth immediately disconnecting the choke cable. To do this, first loosen the nut with a size 8 wrench, which is shown by the arrow in the photo below, and use pliers to slightly release the cable clamp (bolt):
Then we remove the choke cable, since it is free and is not attached to anything else:
After this, you can begin to unscrew the eight nuts securing the valve cover of the VAZ 2106. The most convenient way to do this is with a ratchet with a long extension and a 10-mm socket.
When all the nuts are unscrewed, we try to lift the valve cover and remove it from the studs. It is finally removed at a certain angle; you will have to turn and tilt it a little on different sides so that it does not catch on anything and comes out freely.
After the valve cover is removed, you can carry out the necessary procedures, which is why it was removed. If the gasket needs to be replaced, it can be changed just as easily. Remove the old gasket, carefully wipe the seat on the cylinder head and put the new gasket on the studs. Before installation, it is also advisable to wipe the cover very well so that it is dry.
Installation is carried out in the reverse order of removal. Don’t forget to put back the carburetor cable and rod, and also put on all the disconnected hoses.
Preparing for replacement
An important part of the valve cover gasket replacement procedure is its choice, since it determines how long you will no longer touch this process. The manufacturer and mechanics at official Chevrolet showrooms recommend using only the original gasket with catalog number gm-96353002. Its cost is not so high as to replace it with any analogues, the quality of which is often lower.
It is also very important to choose a good sealant that can withstand high temperatures and is not affected by car oil. The best option would be Permatex Ultra Black - a specialized sealant designed for these purposes. It is identical to the original one with catalog ID gm-9985675, but costs much less.
To replace the valve cover gasket, you will need the following list of tools and accessories:
- head at 10;
- socket wrench 10;
- ratchet with dynamometer;
- pliers;
- flat blade screwdriver;
- alcohol;
- sealant.
What is needed for replacement. We select materials
When selecting consumables, it is very important to pay attention to the quality of gaskets and sealants if we use them. Instead of a liquid for cleaning carburetors or injectors, a solution of kerosene and solvent is suitable, you can also use a paint degreaser
We have already partially figured out the article numbers and names of materials required to replace the gasket. All that remains is to put it all together:
- Standard set of tools.
- Torque wrench.
- Liquid (aerosol) for cleaning carburetors or injectors.
- Sealant optional, we indicated the brands above.
- The gasket itself. It can be like the original GM 965 14 596 for a 1.8 liter engine or GM 963 53 002 for 1.6 and 1.4 liter engines. There are many analogues on the market - these are VictorReinz 155345601 (1.4 and 1.6 l), and PartsMall 963 53 002, and 963 51 213 with a T-shaped profile.
- New bolts for valve cover GM 94 500 909.
Gasket GM 965 14 596
And now we are patient and begin the replacement.
Replacing the valve cover gasket on a Chevrolet Lacetti
The work itself will not take more than half an hour if you strictly follow the algorithm of actions and collect all the necessary consumables.
The work proceeds as follows:
- Open the hood and remove the negative terminal from the battery.
Remove the negative terminal.
- Unscrew the plastic decorative trim.
The plastic cover is marked with an arrow.
- Carefully loosen the clamps securing the breather and ventilation valve hoses. If desired, you can replace it too. The branded valve number in the catalog is GM-96 495288.
Loosen the clamp and remove the hose on the right.
Remove the two hoses on the left.
- Using a screwdriver and pliers, carefully disconnect the contact block from the camshaft position sensors, and move the wiring harness to the side.
Disconnect the wiring harness from the camshaft position sensor.
- We remove the caps from the spark plugs and move the high-voltage wires to the side.
- The timing gear drive protection cover may not be removed, but on occasion it makes sense to check the condition of the drive belt. The casing is secured with 10mm bolts from the left side of the motor.
Check the condition and tension of the drive belt.
- Now you can unscrew all 15 valve cover bolts. We do this with a ten socket wrench.
Unscrew the cover mounting bolts with a 10mm wrench.
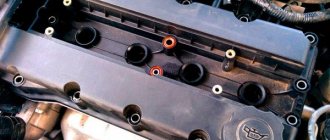
- We remove the cover and admire the camshafts. The cover should come off along with the gasket.
Remove the cylinder head cover.
- We take out the old gasket and thoroughly wash the cover inside and out.
Remove the old gasket from the valve cover and wash the cover thoroughly.
- We clean the mating surface on the block head and degrease it.
We clean the surface of the block head from oil and old sealant.
- Degrease the sealing surface of the lid and apply a thin layer of sealant. You must not overdo it with the sealant so that excess does not wander through the oil channels of the engine.
Apply a thin layer of sealant into the groove of the cover and install a new gasket.
- We install a new gasket and apply a minimum of sealant to the plane of the block head.
Apply a little sealant as shown in the picture.
- We put new O-rings on the bolts.
We install new o-rings.
- Place the cover in place and install the bolts.
Install the cover.
Useful tips
It is very important to use a torque wrench when tightening the bolts, firstly, the bolts can easily break, and secondly, if at least one of them is pinched, the cover can be deformed, and if the bolt is not tightened enough, an oil leak will occur. Nominal torque for valve cover bolts: 10 Nm
Tighten the bolts with a force of 10 Nm.
Bolt tightening order.
Hold the panel
Everything else is assembled in the reverse order, but it’s better not to install the decorative panel yet. For a couple of hundred kilometers you need to monitor the oil leak. Depending on the sealant used, its hardening time can vary - from several hours to a day, so it is not advisable to start the engine immediately after assembly.
Collecting consumables and tools
Therefore, it would be a good idea to buy a set of brand new bolts. Their catalog number is 94 500 909. It is better to buy them with a reserve, they cost about 20 rubles apiece, and for the lid you need 15 pieces.
Set of bolts article number - 94 500 909 and REINZ gasket article number - 15-53456-01.
Bolt head seals
In addition to the bolts and gasket, the seals for the bolt heads will need to be replaced. Branded GM-96353007 quickly lose elasticity and leak oil. The public, as a rule, installs o-rings from the KamAZ engine, white silicone ones, and there are no complaints about them.
Kamaz rings for valve cover bolts.
Selecting a sealant
This should be written on the packaging (sensor-save). The sealant must withstand high temperatures; Permatex RTV Silicone High-Temp, Permatex Ultra Black have a good reputation; any other high-temperature compound can be used. In addition, it is advisable to find a suitable degreaser and aerosol cleaner for carburetors. We will use it to wash the valve cover. You can use a mixture of solvent and kerosene in equal proportions.
Permatex RTV Silicone High-Temp Sealant.
Permatex Ultra Black Sealant.
Tools
Now let's select the tools:
- Set of keys and screwdrivers.
- Pliers.
- It is highly advisable to use a torque wrench when tightening the cover bolts.
If everything is ready for replacement, you can start working.
Troubleshooting options
Most car owners strive to deal with oil leaks. We can identify the main ways to improve the situation.
Replacing the gasket with a new one
A new high quality valve cover gasket is purchased. Some people prefer products from the Victor Reinz brand, others like Elring gaskets. These products compare favorably with others; they have a T-shaped cross-section, increased thickness of the working part, and “sit” better in the grooves of the lid.
A heat-resistant sealant is added to help the gasket. At the same time, O-rings are installed around the bushings of the cover mounting bolts.
Another advice from experienced people is to cut off the protruding parts of the bushings flush with the mating plane of the cover. All these measures eliminate oil leakage, at least temporarily.
Installing a new valve cover.
There is a new style valve box cover. In it, the bolt bushings no longer protrude outward. The cover part number is GM 251 922 08. The delivery set includes a gasket, O-rings for the bolts and a PCV valve.
Paired with a high-quality “original” gasket, such a cover can protect the engine from oil leaks.
The cover bolts should be tightened “crosswise”, from the center to the periphery, preferably in two or, better yet, three steps. The last tightening must be done with a torque wrench, tightening torque no more than 10 N*m.
Then let the sealant harden, this takes from half an hour to two hours, start the engine, warm it up for 15 - 20 minutes. Then check the tightening torques of each cover mounting bolt. If necessary, tighten the bolts.
Aluminum Valve Cover Installation
You can find aluminum valve covers in auto shops. For example, these:
They are made in China. There are practically no negative reviews about them. The covers are equipped with a “original” gasket. Some of the Lacetti owners bought them in Russia, others purchased the covers using the Ali Express service. The issue price is from 5 to 8 thousand rubles. Those who have supplied such products report on thematic websites that problems with oil leakage have been radically resolved.
Which method to choose is up to the owner of the Lacetti to decide.
Little trick
Not every motorist has a torque wrench. And the tightening of the cover bolts must be done with its help, otherwise you can get uneven pressure on the gasket along the plane, which will sooner or later cause an oil leak.
There is a fairly simple way out. It is easy to find a spring steel balance or even an electronic steel balance in the household. It is easy to lengthen the socket driver to the required size, for example, 0.5 meters. There is no head and wrench, you can screw the extension to a spanner or even an open-end wrench.
The tightening torque of the valve cover bolts is 10 N*m or approximately 1 kgf*m. With a shoulder of 0.5 meters, the force with which to pull the wrench extension will be 2 kgf. Quite realistic and not difficult! Of course, the accuracy of such a homemade product will be less than that of a real torque wrench, but this is much better than tightening the bolts “by eye.”
How to replace the Lacetti valve cover gasket
We must understand that we are dealing with a not very perfect valve cover and any dirt or foreign particle on the plane of the cylinder head will again lead to oil leakage
It is very important to be extremely careful while working, strictly observe the tightening torques of the bolts and cleanliness. Otherwise, we won't be able to get rid of oil leaks.
The work will not take more than an hour if you follow a certain algorithm:
- Remove the negative terminal from the battery.
- Unscrew the decorative cover, if there is one.
- Loosen the clamps securing the crankcase ventilation system pipes, remove two pipes on the left and one on the right.
- Disconnect the connector with the wiring harness from the camshaft position sensor.
- We remove the high-voltage wires by removing them from the spark plugs.
- Using a 10mm socket, unscrew the bolts securing the valve mechanism cover, there are 15 of them.
- Remove the cover.
- Thoroughly wash and degrease the valve cover from the inside, remove the old gasket, and degrease the mating surface of the block head.
- If you want to use sealant, apply a thin layer to the gasket and the plane of the head.
- We insert a new gasket into the cover.
- We put it in place, put seals on the bolts and tighten them.
- We press the lid according to the diagram and observing the force.
After installing the cover without sealant, the engine can be started immediately. It is better to leave the decorative cover alone for now and observe the behavior of the gasket for several days, and then replace it if no leaks are observed. Good luck to everyone and a clean engine!
How to Replace a Valve Cover Gasket
I won’t describe the detailed process, because a year has already passed since that moment, but I think the information is relevant for everyone. I will describe the main points. What was purchased:
The amount is not shabby to replace a regular gasket, but when it leaks every other day, there simply could not be another solution.
Everywhere, in absolutely all their manuals, car enthusiasts describe replacement with sealant. But a friend asked me - why is there a sealant if you have a plastic lid? All previous “masters of their craft” at the service station installed a gasket on the sealant, so after the purchase it was decided NOT to use the sealant! Because, logically, it violates the integrity of the gasket and it is not provided there from the factory; it was the home-made people who came up with the idea of adding it there during installation. I decided not to engage in such homemade work and do everything according to the rules, in any case, there is a key, I can change it myself (I thought).
When replacing, there are banal steps - unscrew the bolts, remove the cover, clean it, remove the stuck rings from the grooves, or rather, what is left of them. We clean the adjacent surface on the engine from previous specialists who coated everything with sealant and install it in the reverse order. The difficult part may be installing the cover without sealant; usually it is smeared a little so that it does not fall out of the plastic grooves, but the Victor Reinz
from the “deshman” one in that it has bosses that allow it to fit tightly into the groove and be held in it.
Nuances
In my opinion, my gaskets started leaking after a few days for 3 reasons.
That is why it was decided to order a torque wrench, because at the services everyone does it by hand! And then from the rings, as we saw above, there is nothing left! This is because they deteriorate at the time of installation, and not during operation. But this is my subjective opinion and conclusion.
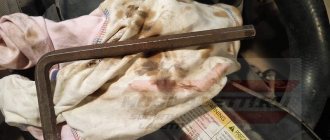
Photo of the work done:
There may be errors in my manual and personal experience, but at least I have increased the service life of the gasket to a year. It’s been dry under the hood for exactly a year, now it’s sweating in the timing belt area, but I’m already thinking it’s the camshaft oil seal, it doesn’t look like a gasket, because it was leaking in other places during both the first and second replacement. By the way, the leak starts exactly where the sealant is applied, so once again - there is no need to use sealant on plastic lids! He will bring you grief! Without using sealant in the place where it used to leak, and this is in the place of the bosses - dry! Conclusion - there is too much sealant there! If you have any questions, ask, I will answer, it is difficult to find help in such situations when there are long-forgotten forums on the Internet with no answers.
- 5
- 4
- 3
- 2
- 1
(5 votes, average: 5 out of 5)
don't be stingy, like it Subscribe to updates:
First replacement
I won’t tell you that the service man did this procedure for me for half a day and the next day I saw an unscrewed bolt after his work, I will only say that my gasket literally went through. Immediately after a few days the engine started leaking again. It's possible that this old oil gets shiny again when it warms up, so after a few months I washed the engine and within a few days it was back in oil.
I didn’t change it again, because it was nonsense, I just installed a new one and changed it again? Everywhere they write that this is a Lacetti sore, but not in a couple of days? Everyone writes about something, what? It doesn’t work for me. Well, okay, I scored. By the way, another friend who didn’t tighten the bolts enough came to the conclusion that it was leaking from under the HEAD! The photo shows that the darkest part is somewhere in that area. In fact, there are no leaks there, read on. But, in fact, I could get a job for 7 thousand rubles. for completely disassembling the engine and grinding the cylinder head, simply because this Vasya is sure that the leak is coming from there. I went to another service station - they told me that everything was ambiguous here, I needed to wash it, degrease it and drive another 5 thousand km and observe. Now, that's a different conversation! I think all car enthusiasts hate service stations because of specialists like these.
Comment navigation
Respect. I have been looking for such information for a long time. I've probably changed about 5 gaskets in 5 years (a gasket every year) Now oil is pouring like a stream from under the cover. This time I’ll do according to your advice (nothing to lose, I’m sick of this jerk already) First, I’ll check the pressure of the crankcase gases, and then grind off the face guides. I’ll definitely write back (in half a year) I’ll add you to my bookmarks. Good luck to everyone in this difficult task.
under load I think the glove will not only “stand up”, but will also increase when the vacuum in the intake manifold decreases and the crankcase gas pressure becomes greater
Signs of valve cover gasket failure and its causes
There are several signs of failure of the Lacetti valve cover gasket, and it is quite easy to identify them even without being a professional auto mechanic:
- the appearance of oil in the spark plug wells and on the spark plugs;
- oil drips on the engine block under the valve cover;
- constant loss of oil after long-term engine operation.
The latter may be a sign not only of a gasket leak, but also of other engine malfunctions. But in combination with one of the first two, the loss of oil only confirms the likelihood that the gasket under the valve cover has become unusable.
The Lacetti valve cover gasket can fail for several reasons. Firstly, this is the systematic overheating of the car. Due to the constant violation of the temperature regime, the material from which the gasket is made loses its elasticity and becomes very hard, which leads to its delamination.
Secondly, the use of low-quality sealant when installing the gasket. It may simply not withstand the temperature to which the engine heats up and leak oil.
Thirdly, overtightening the nuts on the valve cover studs, which leads to mechanical damage to the gasket.
The fourth and most common reason for valve cover gasket failure is time or mileage. The manufacturer and most experienced Lacetti owners recommend changing it after 3 years of operation or 80 thousand kilometers.
Purpose of the gasket
The Chevrolet Lacetti valve cover gasket must reliably prevent engine oil leakage by sealing the joints between the cylinder head and the cover of this block. The gasket is installed directly under the valve cover, in a special groove. The gasket material is special rubber, which has increased wear resistance and is resistant to high temperatures.
The valve cover gasket looks something like this
Sequence of actions and recommendations
It is recommended to perform the operation carefully and not to overtighten the bolts, as they break easily. If you tightened most of the bolts and then broke them, you will have to unscrew all the bolts, remove the broken one and screw everything in again
- The first step is to remove the decorative trim of the motor.
- On the right side of the valve cover, you need to loosen the clamp and disconnect the hose.
Remove the engine decorative trim. Loosen the clamp and remove the hose on the right and two tubes on the left.
We also disconnect the two tubes that go to the upper left part of the mechanism. After this, you need to disconnect the cable block from the camshaft position sensor. We also disconnect the wires that go to the spark plugs. Remove the air filter housing and the upper timing case.
Disconnect the wiring harness from the camshaft position sensor. This is done this way - with a screwdriver or, if the thickness of your fingers allows, then with your finger we press the metal latch located to the right of the block against this same block and remove the block upwards. Disconnect the wires from the spark plugs and put them aside. Next you need to remove the air filter housing and the upper timing case. But I don’t do this, he doesn’t really interfere. It’s just that when you put the cover in place, the timing case will need to be pulled just a little to the left. I do this without problems. If you can't, then remove this cover.
We unscrew all the bolts that secure the valve cover (15 pcs). dismantle it along with the gasket. It is necessary to clean and degrease the contact points between the gasket and the motor. We remove the old gasket and wash the cover. We wash the existing grooves especially carefully. We recommend washing the crankcase ventilation valve at the same time. We install sealing rings into the grooves of the valve cover. After this, install the gasket in the corresponding grooves. Apply a little sealant to the bending areas. There are only 4 such places. We mount the cover together with the gasket.
Using a 10 mm socket wrench, unscrew all 15 bolts securing the valve cover and remove it from the engine along with the gasket. We wipe and degrease the contact points between the gasket and the engine. At the same time, we look at the condition of the timing belt while there is access. Remove the old gasket from the valve cover and wash the cover thoroughly. Especially the grooves in it and the channels of the crankcase ventilation system.
Install the bolts and tighten them in the sequence shown in the image below. When tightening, it is best to use a torque wrench - the force should be 10 N.m. If the key is not at hand, tighten it with one hand, the same thing will happen. We connect all the previously disconnected hoses and wires.
It is better to make several test rides before installing the motor cover. This is done to ensure that there are no leaks. After this you can mount it back.
Replacement process
To replace the gasket you will need the following tools:
- 10 mm socket wrench.
- Phillips screwdriver or pliers for removing clamps.
- New gasket.
- Sealant. To avoid unnecessary problems, it is better to buy one that is safe for oxygen sensors.
- O-rings for bolts - 15 pcs.
- Valve cover cleaner.
You should also pay attention to the year of manufacture of the car, since this determines which rings you need to purchase. If the car was manufactured before 2012, then the catalog number of the rings is 96353007. If the year of manufacture is after 2012, then the ring number will be 25185121. This is necessary to know, since the rings are not interchangeable.
Diagnosis of gasket condition on a Chevrolet Lacetti
An oil leak can occur as a result of engine overheating, then the cover becomes deformed and loses its seal. This is rare, but mostly oil oozes from under the cap and penetrates into the spark plug wells simply due to the gasket losing its elasticity and the sealant losing its properties.
Oil leakage occurs as a result of loss of elasticity of the valve cover gasket.
At the first appearance of traces of oil, and even more so when oil appears in the spark plug wells, you should not wait, but look for a new gasket as soon as possible.
Huge variety of articles
The market offers about a dozen gaskets for the cover of Lacetti engines; they are the same for 1.4 and 1.6-liter engines.
Valve cover gasket GM 96 353 002.
Oil leak from under the valve cover
Oil leaking from under the cylinder head cover.
Oil leaks from under the valve cover in engines with a single camshaft are not as common as in twin-shaft engines.
The Chevrolet Lacetti is equipped with 1.4 and 1.6-liter twin-shaft engines with a fairly large valve cover and a complex-shaped gasket. We’ll find out how to change it quickly and correctly with our own hands right now.
What will not help if the Lacetti valve cover gasket is leaking?
Now about the mythical methods that supposedly solve the problem of valve cover gasket leaks.
- The first is that the bolts stretch out, lengthen, etc., which prevents them from fully tightening the cover. Everywhere they advise replacing them with new ones or filing them down, making them shorter. The price of one bolt now is 2 bucks, and there are 15 of them. You need to work on just the bolts. Simple measurements refute this myth. Here are two bolts, on the left is the old one (more than 100 thousand km), and on the right is the new one. Both are twisted with the same force of 10 Nm.
- Second, the gasket must be seated on the sealant. Apart from major problems during repeated replacement and the possibility of clogging the oil receiver in the engine, this procedure will not bring anything else. As practice has shown, there is no real and tangible benefit from using sealant. There was a case when a motorist changed the gasket on his car for 5 hours. Of these, 4 hours spent trying to carefully clean everything of the sealant that had been used on him during the previous gasket replacement. As a result, the gasket leaked anyway, and a lot of time and nerves were spent replacing it.
- The third is to grind down the bushings on the valve covers to press the gasket more tightly. To be honest, they did not try to solve the leak problem using such a drastic method, because there are often cases that after this the lid bursts and these are completely different problems.
Lacetti engine valve cover bolt tightening diagram
Tighten the valve cover and replace the gasket yourself - this is what most Chevrolet Lacetti owners do. But not everyone knows how to do it correctly, which leads to leakage from under the cover.
Video
The video will tell and show how best to replace the valve cover gasket of a Lacetti engine.
What does the cap do and why does it leak?
By and large, the valve cover in any engine simply should not allow oil to splash while the engine is running, since in most cases it does not receive load from internal pressure. More precisely, it should not receive it.
Crankcase gases
In fact, the cause of an oil leak may be crankcase gases that create excess pressure above the gas distribution mechanism.
A leak from under the valve cover gasket is a problem for the Chevrolet Lacetti.
In the Chevrolet Lacetti, the crankcase ventilation valve is also responsible for the circulation of crankcase gases. If it is clogged, the pressure under the cap will increase, gases will begin to squeeze out the oil, and the first weak link in their path will be the gasket. In this case, the gasket, no matter how high-quality it is, will not last even five thousand miles. Therefore, if we notice oil leaking from under the Lacetti valve cover, it is worth unscrewing and checking the condition of the crankcase ventilation valve. This can be done in a few minutes with any aerosol carburetor cleaner.
Good and bad lids. Version two
As you know, the Chevy Lacetti has a plastic valve cover. Naturally, the engineers took this step in order to reduce the cost and lighten the engine. This affected the rigidity of the lid. In addition, plastic, even the best one, does not resist thermal deformation as actively as aluminum alloy. Once the engine is thoroughly overheated, the valve covers will begin to move, then there is no need to talk about tightness, the oil will penetrate under the gasket.
To check this version, remove the cover and install it on a flat steel plate (or on glass in extreme cases). If there is a gap of at least a millimeter between the stove and the lid, there is a chance that the gasket will leak. Planning the lid (drawing out the mating plane) is a waste of time, because the plastic is thin and by removing some of the material we will only make it worse, the lid will become even less rigid. The best solution in this situation is to replace the cover.
Version three: gaskets and rings
If we know for sure that the surface of the lid is perfectly flat, the vent valve is clean, but the gaskets are still leaking, the problem is most likely in the gaskets themselves. In addition, some people underestimate the role of the O-rings that are installed under the bolt heads. When replacing the gasket, it is imperative to change these rings. Branded GM seals harden very quickly and begin to leak oil, while rings from Kamaz that are almost the same size (they are white and cost an order of magnitude cheaper) can withstand high temperatures and completely retain elasticity for the entire service life of the gasket.
O-rings for bolts from Kamaz fit perfectly on the Lacetti
But gaskets also come in different quality. The frequency of replacement mainly depends on their quality. Some people prefer to use expensive German ones, while others prefer cheaper domestic ones, but having saved on gaskets, we often replace them. For example, a branded gasket GM96 353 002 costs about 450 rubles, but its service life does not please many. In addition, the material profile is simple square. The Parts Mall96 353 002 gasket performs a little better, but the Victor Reinz gasket with catalog number 155345601 received the best reviews. It has a T-shaped profile, and due to this there is a large area of overlap of the plane of the block head.
Fourth version: bolts, sealants and hands
The gasket, even the highest quality one, must be installed with sealant. It must withstand high temperatures and not harm the catalyst. Many companies produce similar products in huge quantities, but sealant is different from sealant - only one that says “sensor-save” and “High-Temp” on the packaging is suitable for the valve cover. If the manufacturer has indicated these two important properties, then the composition of the sealant should already interest us. If applied correctly it will work great.
The 15 bolts that hold the valve cover to the head plane can stretch over time, causing the metal to fatigue and the threads to become loose. Therefore, many people advise changing the bolts with each replacement. Moreover, when tightening, old bolts have a habit of breaking. One bolt costs about 20 rubles (cat. No. 94 500 909), which won’t hurt your pocket too much.
Replacing the valve cover gasket on a Chevrolet Lacetti
The work itself will not take more than half an hour if you strictly follow the algorithm of actions and collect all the necessary consumables.
The work proceeds as follows:
- Open the hood and remove the negative terminal from the battery.
Remove the negative terminal.
- Unscrew the plastic decorative trim.
The plastic cover is marked with an arrow.
- Carefully loosen the clamps securing the breather and ventilation valve hoses. If desired, you can replace it too. The branded valve number in the catalog is GM-96 495288.
Loosen the clamp and remove the hose on the right.
Remove the two hoses on the left.
- Using a screwdriver and pliers, carefully disconnect the contact block from the camshaft position sensors, and move the wiring harness to the side.
Disconnect the wiring harness from the camshaft position sensor.
- We remove the caps from the spark plugs and move the high-voltage wires to the side.
- The timing gear drive protection cover may not be removed, but on occasion it makes sense to check the condition of the drive belt. The casing is secured with 10mm bolts from the left side of the motor.
Check the condition and tension of the drive belt.
- Now you can unscrew all 15 valve cover bolts. We do this with a ten socket wrench.
Unscrew the cover mounting bolts with a 10mm wrench.
- We remove the cover and admire the camshafts. The cover should come off along with the gasket.
Remove the cylinder head cover.
- We take out the old gasket and thoroughly wash the cover inside and out.
Remove the old gasket from the valve cover and wash the cover thoroughly.
- We clean the mating surface on the block head and degrease it.
We clean the surface of the block head from oil and old sealant.
- Degrease the sealing surface of the lid and apply a thin layer of sealant. You must not overdo it with the sealant so that excess does not wander through the oil channels of the engine.
Apply a thin layer of sealant into the groove of the cover and install a new gasket.
- We install a new gasket and apply a minimum of sealant to the plane of the block head.
Apply a little sealant as shown in the picture.
- We put new O-rings on the bolts.
We install new o-rings.
- Place the cover in place and install the bolts.
Install the cover.
Useful tips
It is very important to use a torque wrench when tightening the bolts, firstly, the bolts can easily break, and secondly, if at least one of them is pinched, the cover can be deformed, and if the bolt is not tightened enough, an oil leak will occur. Nominal torque for valve cover bolts: 10 Nm
Tighten the bolts with a force of 10 Nm.
Bolt tightening order.
Hold the panel
Everything else is assembled in the reverse order, but it’s better not to install the decorative panel yet. For a couple of hundred kilometers you need to monitor the oil leak. Depending on the sealant used, its hardening time can vary - from several hours to a day, so it is not advisable to start the engine immediately after assembly.
Collecting consumables and tools
Therefore, it would be a good idea to buy a set of brand new bolts. Their catalog number is 94 500 909. It is better to buy them with a reserve, they cost about 20 rubles apiece, and for the lid you need 15 pieces.
Set of bolts article number - 94 500 909 and REINZ gasket article number - 15-53456-01.
Bolt head seals
In addition to the bolts and gasket, the seals for the bolt heads will need to be replaced. Branded GM-96353007 quickly lose elasticity and leak oil. The public, as a rule, installs o-rings from the KamAZ engine, white silicone ones, and there are no complaints about them.
Kamaz rings for valve cover bolts.
Selecting a sealant
This should be written on the packaging (sensor-save). The sealant must withstand high temperatures; Permatex RTV Silicone High-Temp, Permatex Ultra Black have a good reputation; any other high-temperature compound can be used. In addition, it is advisable to find a suitable degreaser and aerosol cleaner for carburetors. We will use it to wash the valve cover. You can use a mixture of solvent and kerosene in equal proportions.
Permatex RTV Silicone High-Temp Sealant.
Permatex Ultra Black Sealant.
Tools
Now let's select the tools:
- Set of keys and screwdrivers.
- Pliers.
- It is highly advisable to use a torque wrench when tightening the cover bolts.
If everything is ready for replacement, you can start working.
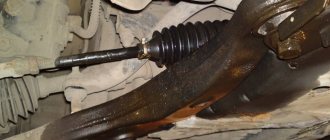
Chevrolet Lacetti Removing camshafts and valve lifters
Operations to identify a faulty hydraulic pusher are performed after a short period of time (15–20 minutes) after stopping the engine. Remove the cylinder head cover (see Replacing the cylinder head cover gasket).
...we press on it with a screwdriver, trying to press the pusher into the socket of the cylinder head (in this case, the corresponding camshaft cam should be facing the pusher with the “back of the head”, i.e., do not press on it).
In this case, a working hydraulic pusher will move in the cylinder head socket with significant force, compressing the valve spring. If, with little effort, the hydraulic pusher itself is pressed, it must be replaced.
To do this, remove the camshaft pulley (see Replacing the camshaft oil seal).
Using a “10” head, evenly, in several steps (half a turn per pass), unscrew two bolts securing each of the five camshaft bearing caps.
Remove the camshaft bearing caps.
The first (far right) cover is different from the other covers.
We remove the exhaust camshaft from the cylinder head beds. If necessary, similarly dismantle the intake camshaft.
Remove the oil seal from the shaft journal.
We remove the hydraulic pusher from the socket in the cylinder head.
Before installation, lower the new hydraulic tappet into a container with clean engine oil and press the plunger pair of the hydraulic tappet several times until air bubbles stop coming out of the hole in its bore.
Install the hydraulic pusher in the reverse order. Other hydraulic pushers are replaced in the same way. Before laying the camshaft in the cylinder head bed, apply a thin layer of engine oil to the support journals and cams of the shaft.
Having laid the shaft, install the shaft bearing caps in accordance with the order of their designation in the cylinder head and the markings on the outer surface of the caps.
The order of designation of covers in the cylinder head
Cover marking No. 1.
Markings of caps No. 6 (pictured on the left) and No. 9 of the camshaft bearings.
We tighten the bolts securing the shaft bearing covers and evenly, moving from cover to cover, in several stages (gradually increasing the tightening torque) tighten the bolts to the required torque (see.
Tightening torques for critical threaded connections). We press in the camshaft oil seal (see Replacing the camshaft oil seal). Further assembly is carried out in reverse order.
After replacing the hydraulic tappet, the engine may operate with increased noise for a short time until the hydraulic tappet is pumped.
Source: https://www.chevrolet-lacetti.dv13.ru/dvigatel/snyatie-raspredelitelnyx-valov-i-gidrotolkatelej-klapanov/
Types, design and characteristics of valve cover gaskets
Valve cover with gasket and their place in the power unit
Regardless of the type, all valve cover gaskets have a fundamentally identical design. This is a flat elastic part that follows the shape of the plane of contact of the cover to the cylinder head, and has holes for fasteners and other parts. The gasket is placed under the cover and, due to its elasticity, seals the gap between the cover and the cylinder head (filling micro-irregularities and compensating for small deviations of their mating surfaces from the plane), ensuring its sealing.
In this case, gaskets can have different designs:
- Whole (non-breaking) - an ring gasket or a gasket of a more complex shape (for example, under the covers of engines with two camshafts on the cylinder head) without breaks, which is simply installed under the cover;
- Composite - a gasket with gaps and inserts for sealing the camshaft inlet or other parts;
- Complete - in addition to the main gasket, the kit may include additional ring seals for spark plug wells and other holes in the cover.
Valve cover gaskets can be divided into several types according to the material of manufacture and applicability with different types of cylinder head.
Depending on the material used to make the gaskets, there are:
- Rubber;
- Rubber cork;
- Paronite;
- Cardboard.
The first type of product is made on the basis of heat-resistant and oil- and petrol-resistant rubber, which is modified with the help of additives and subsequent vulcanization.
Valve cover rubber gasket
The rubber gasket is made from various types of rubber; it is the most elastic, however, due to the shortcomings of the manufacturing material, it can significantly change its characteristics when the temperature changes (soften at high temperatures, become less elastic in the cold) and generally has less durability.
Rubber cork valve cover gasket
Rubber cork gaskets are made from rubber with added granulated cork or other porous fillers. This material provides a high degree of sealing and vibration isolation, however, gaskets made from it are very demanding on the quality of installation and installation of the cover; they often require additional treatment with liquid sealant and have a limited service life.
Paronite gaskets are made from paronite, a rubber-based material with various mineral additives, which is subsequently molded and vulcanized. Paronite can be asbestos or non-asbestos, but today manufacturers are abandoning the use of asbestos in favor of safer materials. Also, paronite gaskets can be ordinary unreinforced or reinforced with steel wire, thin perforated sheet metal, etc. It is paronite cylinder head cover gaskets that are most widely used today due to their high reliability, resistance to negative influences and good sealing qualities.
Cardboard gaskets are made from special grades of thick paper that have been processed to become resistant to oils, gasoline, water and other negative influences. These gaskets are the cheapest, but they are the least reliable, so today they are used on the simplest engines.
Based on their application, valve cover gaskets can be divided into two groups:
- For common cylinder heads - in in-line and V-shaped engines with a head and cover common to all or one row of cylinders;
- For separate cylinder heads - in engines with individual heads and covers for each cylinder.
Structurally, the gaskets for common and separate heads do not differ; they only have different sizes for the corresponding covers.
Cylinder head cover gaskets are manufactured according to automaker standards, and they can also comply with domestic standards GOST 481-80, GOST 15180-86 and others.
Review of popular sealants
A review of valve cover sealants will help car owners decide on which brand to choose, since there are currently a lot of such products available in stores and car markets. And only reviews after actual use can fully answer which sealant is better. Being extra careful when choosing will help protect you from purchasing counterfeit goods.
Black Heat Resistant DoneDeal
This is one of the highest quality sealants made in the USA. Designed to operate in the temperature range from -70°C to +345°C. In addition to the valve cover, the product can also be used when installing engine and transmission oil pans, intake manifolds, water pumps, thermostat housings, and engine covers. It has low volatility, so it can be used in engines with oxygen sensors. The sealant composition is resistant to oil, water, antifreeze, lubricants, including motor and transmission oils.
The sealant withstands shock loads, vibration and temperature changes. At high temperatures it does not lose its performance properties and does not crumble. The product can be applied to already installed gaskets in order to extend their service life and improve heat resistance. Does not cause corrosion on metal surfaces of engine components.
Product code - DD6712. Package volume: 85 grams. Its price as of the end of 2022 is 450 rubles.
ABRO 11-AB
A good sealant, popular due to its low price and decent performance characteristics. It can also be used when installing various other gaskets on the vehicle. Therefore, this tool will certainly be useful to you in the future when repairing your car.
On the left is the original ABRO packaging, and on the right is the fake one
Features and Specifications:
- maximum use temperature - +343°C;
- has a chemically stable composition that is not affected by oils, fuels, antifreeze, water and other process fluids used in the car;
- excellent resistance to mechanical stress (significant loads, vibrations, shears);
- comes in a tube with a special “spout” that allows you to apply a thin layer of sealant to the surface.
Note! Currently, a large number of counterfeit products are sold in car markets and stores. In particular, ABRO RED, which is produced in China, is essentially an analogue of a sealant with much worse performance characteristics. Look at the pictures below so that in the future you can distinguish the original packaging from the counterfeit one. Sold in a tube weighing 85 grams, the price of which is about 350 rubles as of the end of 2021.
Another name for the mentioned sealant is ABRO red or ABRO red. Has matching color packaging.
Victor Reinz
In this case we are talking about a sealant called REINZOPLAST, which, unlike silicone REINZOSIL, is not gray, but blue. It has similar performance characteristics - a stable chemical composition (does not react with oils, fuel, water, or aggressive chemicals). The operating temperature range of the sealant is from -50°C to +250°C. A short-term increase in temperature up to +300°C is allowed while maintaining performance characteristics. An additional advantage is that the dried composition is easy to remove from the surface - it leaves virtually no traces on it. Is a universal sealant for gaskets. Catalog number for ordering 100 g. tube - 702457120. Average price is about 480 rubles.
The advantage of Victor Reinz brand sealants is the fact that they dry quickly. You will find exact operating instructions on the packaging, but in most cases the algorithm for use will be as follows: apply sealant to the work surface, wait 10...15 minutes, install the gasket. And unlike other sealants, your car's engine can be started within 30 minutes (although it's better to wait extra time if you have it).
Dirko
Sealants of this brand are produced by Elring. Popular products of this brand are the following products - Dirko HT and Dirko-S Profi Press HT . They have similar characteristics, both among themselves and in relation to the sealants described above. In particular, they are resistant to the listed process fluids (water, oils, fuel, antifreeze, etc.), and have proven themselves under conditions of high mechanical loads and vibration. The operating temperature range of Dirko HT (a tube weighing 70 grams has code 705.705 and a price of 600 rubles as of the end of 2021) is from -50°C to +250°C. A short-term increase in temperature up to +300°C is allowed while maintaining performance characteristics. The operating temperature range of Dirko-S Profi Press HT is from -50°C to +220°C (a tube weighing 200 grams has code 129.400 and a price of 1600 rubles for the same period). A short-term increase in temperature up to +300°C is also allowed.
Types of sealants TM Dirko
There is also a composition called Dirko Spezial-Silikon (a tube weighing 70 grams has code 030.790), which is designed specifically for sealing oil pans and crankcase covers. It is especially advisable to use it on surfaces that are subject to deformation during operation. Its operating temperature range is from -50°C to +180°C.
As for installation, after applying the product to the surface, you must wait 5...10 minutes. Please note that the time should not exceed 10 minutes, since the protective film is formed within the specified time period. After this, you can apply the gasket to the sealant.
Anaerobic sealant Permatex Anaerobic Gasket Maker
Anaerobic sealant “Permatex” is a thick composition that, when vulcanized, quickly compacts on an aluminum surface. The result is a strong but elastic connection that is resistant to vibration, mechanical stress, aggressive process fluids, and temperature changes. Sold in a 50 ml tube, the cost is about 1100-1200 rubles as of the end of 2022.
Other popular brands
Currently, the market for sealants, including high-temperature ones, is very saturated. It is necessary to understand that the range of different brands in the corners of our country is different. This is primarily due to logistics, as well as the presence of its own production facilities in a particular region. However, the following sealants are also popular among domestic car enthusiasts:
- CYCLO HI-Temp C-952 (tube weight - 85 grams). This is a red silicone car sealant. It is rarely found on sale, but is considered one of the best similar compositions.
- Curil . Also a very popular series of sealants from the above-mentioned Elring company. The first brand is Curil K2. Temperature range from -40°С to +200°С. The second is Curil T. Temperature range is from -40°C to +250°C. Both sealants have a wide range of applications, including use on the engine crankcase. Both sealants are sold in a dispenser tube weighing 75 grams. Curil K2 has code 532215 and costs 600 rubles. Curil T (article 471170) costs about 560 rubles as of the end of 2021.
- MANNOL 9914 Gasket maker RED . This is a one-component silicone sealant with a working temperature range from -50°C to +300°C. Very resistant to high temperatures, as well as fuel, oil and various process fluids. The sealant must be applied to a degreased surface! Complete drying time is 24 hours. The price of a tube weighing 85 grams is 190 rubles.
All sealants listed in this section are resistant to fuel, oils, hot and cold water, weak solutions of acids and alkalis. Therefore, they can be used as a valve cover sealant. Since the winter of 2017/2018, at the end of 2021, the cost of these funds has increased by an average of 35%.
Aluminum Valve Cover Tightening Torque
This is a rather important nuance. The tightening torque for the plastic cover is 10 Nm. But you shouldn’t pull the aluminum cover like that. Much less effort is needed here for several reasons:
The plastic cap is tightened through metal grommets in the cap. That is, we actually tighten the bushings that are attached to the cover. And the aluminum cover is completely pulled in and puts pressure on the gasket with its entire perimeter and can simply cut it (there have been such cases)
The aluminum valve cover gasket is very soft. Well, simply very! Therefore, it compresses with much less effort. And if you overdo it, then it just squeezes out.
I tightened it to just under 8 Nm. But this is too much in my opinion. No more than 5 Nm is required.
Tightening occurs in several passes. And there are more of these passes than when tightening the plastic cover. This happens for the same reasons.
Here is the installed cover
Now you can install either the decorative cover that came with the cover, or install the original “slab”.
But for now I drive and observe.
Tightening diagram
Many car enthusiasts have encountered the need to properly tighten the valve cover after replacing the gasket. For this purpose, there is a special scheme developed and recommended by the manufacturer.
Lacetti engine valve cover bolt tightening diagram.
When tightening, it is best to use a torque wrench - the force should be 10 N.m. If the key is not at hand, tighten it with one hand, the same thing will happen.
It is better to make several test rides before installing the motor cover. This is done to ensure that there are no leaks. After this you can mount it back.
The valve cover tightening scheme for the Lacetti engine is quite simple. It was developed by the manufacturer to help motorists. If everything is done correctly, there will be no leakage after tightening.