How to remove the Niva 21214 starter in 10 minutes. The cause of the malfunction of the removed starter NIVA VAZ 21214
Preparation for quick removal of the starter in extreme conditions. Quickly remove the starter and eliminate the cause of a possible malfunction. How to remove the acoustic pipe from a Niva receiver Why do you need an acoustic pipe https://www.youtube.com/watch?v=fXPZ5dVIEXQ As you noticed, the lower bolt of the starter was deliberately never screwed in again, after the first removal of the starter during the initial period of operation of the car. Also, the heat shield of the starter, whose lower mounting bolt quickly sticks when driving through mud, was not put in place. Because of this, in order to remove the screen, you have to cut off the lower attachment point or tear the screen itself. I don't want to go through this procedure a second time. The fact that there is no lower mounting bolt for the starter and a heat shield has its advantage for field drivers who often operate their vehicles, for example, in the conditions of Siberian swamps, river fords and frosts. Very often the cause of a starter malfunction is simple. For example, as in this video, or even funnier - the red wire (also shown in the video) from the solenoid relay has simply oxidized or weakened. It is enough to MOVE it and the starter will spin. You can make the starter spin if the nickels in the solenoid relay are burned by closing (carefully, with something not large in size, but massive and iron, without touching the mass of the engine body) the power wires on the solenoid relay. It's easy to do all this without a screen. And if necessary, the starter can be easily removed. It happens, for example, that the starter breaks down, and the car is parked at the entrance, and it’s -30 outside! Yes, even in the summer! You still need to remove the starter. Negotiate with your neighbor about a garage? Or take it to service? But you can remove it EASILY AND QUICKLY yourself, right at the entrance. Buy a new starter or solenoid relay from your local store. And an hour later the car drove off. And if the car is parked in a puddle or mud, then crawl under the car and turn the bottom bolt? In short, there are many life situations where the absence of a bolt and a heat shield will greatly simplify your life. The author of the video does not pretend that others will perceive his opinion and his proposed method of solving the problem as the only correct one. Decide this for yourself. The author simply suggested the option: “How to remove the Niva 21214 starter in 10 minutes and determine the cause of the malfunction of the removed Niva 21214 starter” https://youtu.be/n_PmQADIfNg
Loading ..
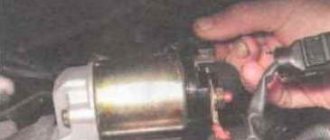
So I immediately unscrewed it. Now you can unscrew the starter. The bottom bolt is fairly easily accessible from below. I unscrewed it with a small ratchet. I unscrewed the remaining two bolts from above. This is what the starter looks like from above. Here I already used a spanner.
The key part of the key is slightly bent, otherwise it would be impossible to get to these bolts. The middle bolt is also more or less accessible.
The power wires that are connected can be cleaned; perhaps the reason that the engine starts unstably lies in poor contact. After it has been removed, you can carry out diagnostics and subsequent repairs. How to make repairs yourself. When the starter is removed, you can try to make repairs yourself or take it to a specialized service center.
If you have experience and an idea of how everything works and you, for example, are sure that the cause of the breakdown, for example, lies in a malfunction of the solenoid relay, then you can start repairing it yourself. Before dismantling the starter, it must be removed completely or, by unscrewing the lower mounting bolt, moved to the side. The starter mount consists of three bolts, by unscrewing which you can remove the Chevrolet Niva starter from the bottom of the engine.
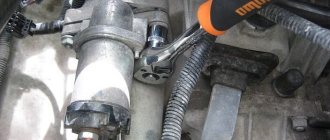
The lower fastening bolt is unscrewed from below using a ratchet wrench. Access to it is simple and does not require much effort.
The remaining two bolts are unscrewed from above using spanners with a bent head or heads with an extension with a cardan. The most problematic is the top bolt, which requires a special approach with a curved key. The key fits onto it quite easily, but to unscrew it the lever travel is small, so you have to turn it for quite a long time.
After unscrewing all three fastening nuts, it is necessary to dismantle or bend its thermal protection. From the side of the box, it will be enough to simply bend the tin, and from the bottom you will need to unscrew the bolt securing it. However, you won’t be able to see it, since it is covered with a heat-protective casing on top. It is also impossible to see it from below, since the crankcase protection covers it there.
How to remove the starter of a VAZ-21213 car
Disconnect the negative cable from the battery. We dismantle the air filter housing (see Removing the air filter housing).
Remove the front support bracket securing the intake pipe to the engine support bracket, disconnect the starter heat shield from the exhaust manifold and from the engine support bracket (see Replacing the gasket of the intake pipe and exhaust manifold of an injection engine).
1. Using a 13mm wrench, unscrew the bolt of the upper fastening of the starter to the clutch housing (this bolt also secures the rear support bracket of the intake pipe to the clutch housing). Similarly, unscrew the bolts of the middle and lower fastenings of the starter and move the starter forward.
2. Disconnect the traction relay control wire.
3. Using a 13mm socket, unscrew the nut of the positive wire of the starter.
4. Remove the wire. In photo 1, for clarity, the receiver is removed, and in photos 2, 3, 4 - the inlet pipe and exhaust manifold.
5. Move the starter back along the cylinder block
6. Remove the starter.
Removing the starter from a carburetor engine is easier due to the lack of intake pipe support brackets. Install the starter in reverse order
What original or analogue can I supply?
If the starter does not turn, you can simply replace it. Typically, in a store, the buyer has a choice between two options:
- original;
- analogue
They differ not only in their quality, but also in their durability. The easiest way to study visual differences is in the photo. Original starter:
| Model | Manufacturer | Catalog number | vendor code | Price, rubles |
| 21213 | KATEK | 21213-3708010-00 | 5722.3708 | From 3 300 |
But the cost of the original starter is usually at least 3.5 thousand rubles. That’s why many people opt for analogues. There are many other manufacturers on the Russian market that are not certified by AvtoVAZ. If possible, you should choose well-established brands. The optimal solution would be:
| Model | Manufacturer | Catalog number | Price, rubles |
| 21213 | TRACKMAN | 21013708 | 2900 |
| GANZ | GRP14005 65 (Similar to 5722.3708) | From 2,000 | |
| FENOX | AN 5722.3708 NM 1.55 KW | From 4 3000 |
It is important to remember: all starters have different resources and may differ in size. It is advisable to arm yourself with a ruler and tape measure before going to the store. This will allow you to avoid purchasing a device that is not suitable in size. Some manufacturers produce equipment that can be installed on various vehicle models. The price depends significantly on the manufacturer.
Before purchasing an analogue, you need to familiarize yourself with the brand. For example, Bosch has proven itself to be good. The equipment he produces is durable and does not cause difficulties in repair. There is a list of manufacturing companies recommended by AvtoVAZ itself. It is advisable to familiarize yourself with all the nuances and subtleties of installation in advance. This will allow you to select it at the start and install it later yourself.
Removing and installing the starter
The starter on a Niva rarely has to be changed, but if you have a need for this, the instructions below will be very useful. First, it’s worth considering the necessary list of tools with which doing all this will be very simple and will not take much time.
- Key for 13
- Ratchet with small extension
- Head for 10
Detailed guide to replacing the starter on Niva VAZ 2121
- First of all, open the hood of the car and disconnect all the power wires from the starter structure. To do this, you will need to unscrew the nuts that secure the terminals with a 10mm head. It is impossible to get there with a regular wrench, so a ratchet with a head and an extension would be an ideal option. We feel for the terminal nuts with our hands and, using the ratchet handle, unscrew them one by one.
- To show everything clearly, look at the photo below; the key is inserted just under the Niva’s exhaust manifold:
- And after that, you can freely disconnect the power wires, which are not attached to anything else:
- Next, take a 13mm wrench, it’s more convenient to use a spanner, and unscrew the 2 bolts securing the starter housing to the engine. But there may be three of them; personally, in my example there were only 2.
- And then you can shoot it to the right, as clearly shown in the photo below:
- And turning it a little to the side, we take it out without any problems:
As you have seen for yourself, there is nothing complicated in this repair, the main thing is that you have all the necessary tools at hand and then any work on your Niva will be done quickly and without unnecessary nerves.
We install the VAZ 2121 starter in the reverse order of removal. If necessary, we replace it with a new part.
Broken bendix teeth or flywheel ring
This problem usually appears on cars with high mileage, especially after a recent flywheel replacement or repair of the starting mechanism. When you turn the key, the starter makes strenuous attempts to start the engine: it clicks, buzzes (sometimes with a squeal), but the internal combustion engine does not start. The problem here is the engagement.
Broken bendix teeth
The flywheel teeth (on most cars) are beveled to help the Bendix gear engage more smoothly. If there is significant wear, jamming of the traction relay fork, wedging or wear of the gear itself, it does not reach the point of reliable contact and does not fit along the relief of the teeth. Slipping leads to more wear and, since the part is not repaired, to unscheduled replacement.
If, when starting the internal combustion engine of a car, any extraneous sounds arise from the starter, this is a reason to check it as soon as possible. Otherwise, he will “remind himself” on the road.
Dismantling and connecting the generator on Niva 2121: step-by-step instructions
On Niva 21214 cars there is a generator of type 9412.3701, on VAZ 21213 - type 371.3701, on Niva Chevrolet there is a generator 2123.
All of them are alternating current electric machines with electromagnetic excitation, having a built-in rectifier unit with silicon diodes and an electronic voltage regulator.
The maximum current produced by the generator unit type 9412.3701 is 80 A, voltage - 13.2 - 14.7 V, rotation - right.
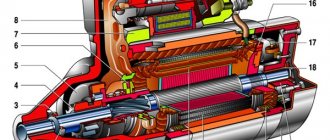
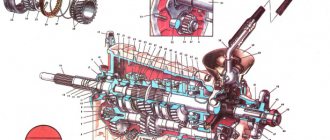
Design of unit 21214
The unit covers are attached to the stator using 4 bolts. The covers have bearings installed. They rotate the rotor shaft. In the front bearing, the inner race is clamped with a nut along with a thrust ring and washer. The 2nd bearing is also pressed into the back cover.
The stator has a 3-phase winding, one of the ends of which is connected to a rectifier unit consisting of 6 diodes. Of these, 3 diodes are negative, 3 are positive. According to the polarity, they are pressed into the plates. The entire structure consists of a rectifier unit, which is located on the back cover of the generator unit covered with a protective casing.
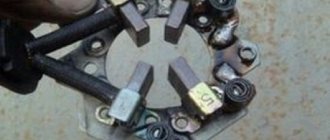
The design of the unit also includes contact rings and brushes. On the back side of the back cover there is a brush holder, which is structurally connected to the voltage regulator. The rectifier contains a capacitor that protects the electrical network from power surges.
Basic malfunctions and ways to eliminate them
Checking the health of the unit is done using a multimeter. After the engine is started, the voltage at the battery terminals should be 13.6 V. If the value is higher or lower, this indicates a break or short circuit of the windings, oxidation of the slip rings, a malfunction in the brush assembly, or voltage regulator.
The generator unit may not work well due to weak belt tension or its breakage. In this case, you need to adjust the tension or replace the belt. Faulty voltage regulator, needs to be replaced.
If a breakdown, short circuit, or damage to the rotor windings is detected, it should be replaced. If there is a break or short circuit in the stator windings, it requires replacement. If the diodes are damaged, the rectifier unit is replaced.
Nuances of moving a generator
The disadvantage of domestic Niva SUVs is the location of the generator unit - at the bottom of the engine compartment. It constantly gets contaminated when driving off-road, and coolant constantly drips. The problem is solved by moving the generator upstairs (the author of the video is SARTANETS).
To transfer, you will need a set of keys, a bracket, mounting bolts, and a V-belt. You can make a generator transfer bracket with your own hands according to the drawing below.
Drawing of a homemade bracket
Sequence of actions during transfer:
- We dismantle the propeller, pump and remove the belt.
- By unscrewing the standard bracket, you can remove the generator.
- We cut off the bead around the side of the cylinder head and on the cylinder block.
- Then you should unscrew the two bolts and two studs.
- Next, the assembly is installed on a new bracket and final assembly is performed.
1. Schematic illustration of unscrewing the fastening material2. Car with belt removed3. The unit is in a new location
Thus, moving the generator unit upstairs is not difficult.
Guide to removing and connecting the generator
To remove the unit, you need to prepare a set of tools: keys “10” and “19”, ratchets with heads, a hammer and a small extension.
The process consists of the following steps:
- First of all, remove the negative terminal from the battery.
- Next, you need to remove the engine protection and the right mudguard.
- Then, using a hammer, carefully knock out the mounting bolt and remove it.
- At the next stage, you need to disconnect all the wires going to the generator: the plug and the wires secured with a nut.
- Then the fastening on which the belt tensioner is located is unscrewed.
- By removing the belt, the assembly can be dismantled through the hole that was formed after removing the protection.
- After replacement or repair, install the unit in reverse order.
Electrical connection diagram
Price issue
The VAZ 21214 generator has good repairability, which allows you to significantly save money if worn or broken parts are replaced in a timely manner.
If you change the complete unit, the cost of replacement will be as follows:
- generator 21214 – 3125 rub.;
- lower mount – 133 RUR;
- fastening bolt - 53 rub.;
- tension bar - 55 rub.;
- relay RS-527 – 57 rub.
Required Tools
In order to remove or install the starter on a VAZ 2121, you need tools, the list of which is presented in the table below. Table - Tools required to replace the front strut
| Name | Note |
| open-end wrench | "at 13" |
| Head | "at 15" |
| Ratchet | With extension |
| Penetrating lubricant | For example, WD-40 |
| Metal brush and rags | For cleaning fasteners |