The starter solenoid relay is responsible for successfully starting the engine . The situation when there is no response to turning the key in the ignition switch is familiar to many car enthusiasts. Under the hood you can hear the buzz of an electric motor, dry clicks, or even complete silence. The result is the same - the car will not start.
- Starter solenoid relay. Device and principle of operation. Video:
- Checking the starter solenoid relay. Video:
- How to disassemble the starter solenoid relay?
This may indicate that a single part is faulty, which simultaneously performs two functions:
- It closes the circuit of the main electric motor of the starter, causing its rotor to rotate.
- Creates a force on the fork that moves the Bendix rotor along the shaft. The Bendix gear meshes with the ring gear of the internal combustion engine flywheel and transmits torque from the electric motor to the crankshaft.
On a long journey, it is not always possible to use the services of a repair shop or call a visiting team of specialists for help. You have to cope on your own. In order not to be completely helpless, it is necessary to study the principle of operation of the starter and retractor relay and their structure. Let's start in order.
There is a similar article on this topic - Do-it-yourself repair of car starters and generators.
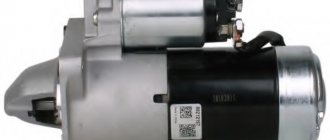
Starter design
The unit used to start a car engine is essentially a compact and powerful electric motor, the design of which is supplemented with several specific details:
- A bendix (overrunning clutch) located on the armature shaft, necessary to transmit torque from the electric motor to the crankshaft of the internal combustion engine.
- A fork that longitudinally moves the coupling along the armature shaft. It is installed in the front cover (mask) of the starter.
- A retractor relay that drives the plug and closes the electrical circuit through which current is supplied to the windings of the electric motor. It, like the fork, is installed on the front cover.
The transmission of torque to the bendix can be done directly or through a torque-increasing planetary gearbox, which is mounted in the main body of the unit, its front or rear cover.
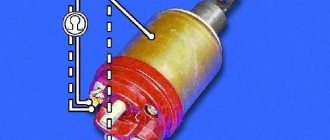
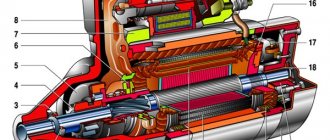
Starter solenoid relay diagram
Starter retractor relay device
The design of the unit is quite simple. Inside the metal case are:
- The core, also called the armature or rotor. The core is made of a magnetic or magnetizable alloy, or is made in the form of a steel rod with a winding.
- Drive rod fixed to the core.
- Armature return spring.
- Closing rod with a contact plate located on it.
- Contact plate compression and return springs.
- Pull-in winding.
- Holding winding.
- The back cover of the relay is made of dielectric material, most often plastic.
- Bolts passing through the cover with contact plates located at their inner ends. From one of these bolts, current is supplied to the pull-in and holding windings.
- In some cases, there are one or two additional terminals to supply voltage to the windings.
The assembly is secured with screws or bolts to the front cover (mask) of the starter.
How does it all work?
The car starter is a traction motor, which spins the crankshaft to further start the power plant.
Unwinding is carried out by means of a gear mounted on the starter rotor, which at the time of starting has a gear engagement with the flywheel ring.
But the engagement between the starter gear and the flywheel is only necessary until the power plant starts.
If the engagement were constant, the starter would fail very quickly.
Therefore, the design of the latter includes a solenoid relay, through which the starter gear is brought into engagement with the flywheel during engine starting and disengaged after starting.
The retractor relay is combined with the starter relay, and the design of this device is not complicated, which ensures its operational reliability.
But nothing is eternal, therefore, and it can also fail, although this happens infrequently.
There are not so many malfunctions that can arise with this element, but if they do occur, it is often either impossible or very difficult to start the engine.
Malfunctions that may occur with the solenoid relay are:
- Wear of its elements;
- Burnout of contact plates installed in the housing cover;
- Break or burnout of the relay coil winding;
- Anchor jamming.
The occurrence of these malfunctions may result in:
- The starter fails to operate when starting;
- Weak starter speeds, which are unable to sufficiently spin the flywheel;
- It continues to work even after the engine starts.
Operating principle of the starter and retractor relay
From the description of the device, let's move on to the principles of its operation. The moment you turn the key in the ignition, the following happens:
- The terminals of the contact group are closed. Current is supplied to the bolts of the contact plates, and through them to the windings.
- The electromagnetic field formed on the windings moves the core in the direction of the back cover.
- The core pulls the end of the fork fixed in the starter mask. The fork moves the bendix (overrunning clutch), located on the shaft of the main starter motor.
- The Bendix engages the ring gear of the crankshaft.
- The closing rod, under pressure from the core, moves back and bridges the contact plates.
- The current flows to the windings of the main electric motor. The armature rotates and drives the crankshaft of the internal combustion engine.
- After the power supply is stopped, the parts of the assembly return to their original position under the influence of return springs.
If the unit fails, the starter stops functioning normally and problems arise with starting the car engine. Possible malfunctions include:
- Mechanical damage.
- Break in the winding.
- Burning or destruction of the end plates.
It is not enough to study the device and understand how the mechanism works. It is advisable to learn how to identify and repair breakdowns.
Starter solenoid relay. Device and principle of operation. Video:
Checking the starter using the battery
Before contacting a car service center, buying a new unit or spare parts for it, you should try to check its performance yourself. With the right approach, it is possible to independently identify problems.
First of all, if you suspect a malfunction of the starting device, you need to check the contacts on the battery and starter terminals, their tightness and the presence of oxidation, the battery charge, since in many cases the problem in starting the internal combustion engine is the above factors.
A simple way to check that the electrical network is working is to close the terminal bolts of the electric motor with a screwdriver; before this procedure, you need to put the car in neutral speed (or move the selector lever to park or neutral mode).
If the starter starts the engine, you should look for a fault in the electrical circuit. Otherwise, remove the unit by disconnecting all fasteners from the engine and removing terminals and other wires.
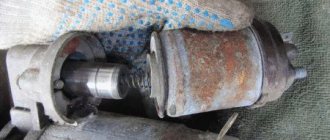
How to check Bendix
After removing the electric motor, it is necessary to inspect the bendix (the gear at the very end); if there is increased wear of the teeth or cracks in it, it should be replaced.
The Bendix should only turn in one direction, otherwise it will have to be replaced. By connecting the unit to the battery, it is unlikely to be able to diagnose the serviceability of the Bendix, since it can spin, but with insufficient force to start the internal combustion engine.
How to check Solenoid relay
When you turn the ignition key, you should hear a click, indicating that the armature is retracted and the bendix is engaged.
Before checking the serviceability of the starter, it is necessary to firmly secure it (either in a vice, having previously wrapped it with a thick layer of fabric, or with the help of a strong assistant who will hold the unit), since a very strong jerk may occur when starting it.
It is necessary to connect the positive from the battery to the positive on the starter, and the negative from the battery to the body of the unit. If the unit is working properly, then there should be a quick and sharp click and the bendix will extend and begin to spin.
If there is no click or movement of the overrunning clutch, it is necessary to replace the solenoid relay. When the power from the battery is disconnected, the bendix should retract.
How to check the Anchor and Brushes
To check the brushes and armature, you will need a multimeter or a 12-volt light bulb. Checking with a light bulb involves connecting its contacts to ground and the brush holder with the starter connected to the battery. When the light comes on, it indicates high brush wear.
When checking with a multimeter, the contacts are connected identically, only the results of measuring the resistance should tend to infinity, otherwise there is a short to ground.
The armature can only be checked by disassembling the electric motor. In addition to carrying out a visual inspection for the presence of oxidation, traces of short circuits, and increased wear, to check the armature you will need a special device PPYA (armature testing device) to check the interturn closure.
The difficulty of diagnosing armature malfunctions, as well as its repair, will require contacting specialized specialists, but in order to avoid unnecessary costs, it is necessary to check all other parts of the unit.
How to check the starter winding
To check the motor winding you will need a multimeter or a light bulb. The wires of the control lamp are connected to the winding terminal and the starter housing. If the light comes on, then there is a breakdown in the winding.
Using the same connection, the winding resistance is checked, for which the multimeter must be switched to the appropriate mode. The average reading of a serviceable winding will be 10 kOhm.
The starter is the most important element of the car, and its malfunction will immediately make itself felt either by the inability to start the car or by difficulties with it.
This unit is very reliable, but problems do occur with it. Some of them are easy to determine on your own, but to identify others you will need special equipment, which is available only to highly specialized specialists.
Signs of a faulty starter solenoid relay
Diagnosis and repair should begin when the first alarming symptoms appear. This will significantly reduce repair costs and avoid serious troubles. We list the main symptoms:
- The starter turns idle, the crankshaft does not rotate.
- There are clicks in the relay area, but the electric motor does not work.
- The engine starts, but the bendix does not disengage from the crankshaft flywheel ring gear.
- There is no response at all to turning the key in the ignition or pressing the “Start” button.
There are a number of primary reasons why the starter solenoid relay does not operate.
Before moving on, you should make sure that the electrical wiring is in good condition, check the fuses and the ignition switch contact group.
It is quite possible that they are the source of the problems that have arisen.
Signs and causes of relay failure
Two signs indicate a breakdown in the solenoid relay:
- when you turn on the ignition, you hear a click of the relay being activated, but the starter does not work, sometimes it can turn on, but only after several attempts;
- The starter turns on at high speed, but the bendix does not engage with the flywheel.
There can be several reasons for a relay malfunction:
- One of the windings has burned out, an interturn short circuit or breakdown to ground has occurred;
- the contact plates are stuck or their surface is burnt and does not provide reliable contact;
- the return spring is weakened or deformed;
- The plug has slipped out of place or is deformed.
If any of the above breakdowns occur, the relay must be repaired or replaced with a new one.
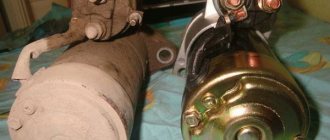
How to remove the solenoid relay?
You should not try to find and fix the problem directly on the car. It is much easier to do this by completely dismantling the starter. To do this you will have to:
- Disconnect the battery by removing its terminals. Otherwise, a short circuit may occur during the work, as a result of which the battery and other electrical components will fail.
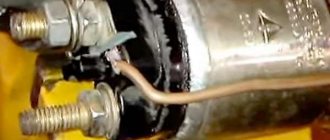
- Disconnect the electrical wiring from the solenoid relay.
- Unscrew the bolts that secure the starter to the car engine and remove the part.
Only after this can we proceed to diagnostics, removal, repair or replacement of the unit of interest to us. The first check is performed without preliminary disassembly. To do it:
- Current is supplied from the positive terminal of the battery to the contacts of the solenoid relay.
- Using a wire, the body of the part (ground) is bridged with the negative terminal of the battery.
When everything is in order, the electric motor will begin to rotate and the bendix will move forward. When the voltage supply is interrupted, the electric motor stops working and the clutch returns to its original position. But there may be other options:
- The electric motor works, the bendix extends, but does not return back.
- The Bendix extends, but the electric motor does not turn on.
- The relay clicks or does not work at all. Bendix is motionless. The starter doesn't turn over.
But these are all symptoms, and it is necessary to identify the causes of the malfunction. To find them, you need to dismantle the relay by unscrewing the bolts securing it to the cover and carefully disconnecting the rod from the plug.
In some cases, this can be done only by removing the entire front cover.
Checking the starter solenoid relay. Video:
Removing the starter (step by step instructions)
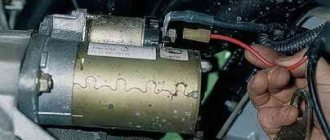
The starter can only be removed from the engine from below, using a lift, overpass or pit. To do this you need:
- disconnect the wires;
- if the car has a crankcase protection, then it will need to be removed;
- Unscrew the bracket using a hexagon;
- Using a spanner wrench with an extension and a 13mm socket, unscrew the two fastening bolts;
- remove the starter.
How to check the starter solenoid relay?
The reason that the clutch does not return to its original position is mechanical failure - damage to the rod, core, return springs. The part definitely needs to be replaced. In other cases, you can continue checking and try to restore the node to its lost functionality. Checking the starter retractor relay is carried out in several stages:
1. Connect the terminals of the windings and contact plates to the positive of the battery, and touch the negative with the relay body. Does the rod move? Let's move on to the next stage of diagnostics.
2. Using a multimeter, measure the resistance between the contacts of the windings. There are many videos posted online showing how such measurements are made. Their authors do everything, in principle, correctly. They just forget to say that the resistance parameters are different depending on the starter model.
In search of accurate indicators, you have to study technical documentation.
If there is no access to reliable data, you will have to assume that there should be no open circuit or resistance exceeding 10 ohms.
It will not be possible to restore the windings on your own, especially in the field. This will probably require a new spare part. But if the resistance indicators are normal, we check further.
3. Connect the multimeter probes to the power terminals of the relay. We insert and recess the core completely. The indicators should not differ significantly from those obtained by measuring the resistance on the holding winding. The difference in readings indicates damage to the contact plates.
In the latter case, you can try to disassemble the assembly and clean the contact plates. To do this, at a minimum, the design of the part must provide for the possibility of disassembly.
Collapsible and non-dismountable VRS
The VRS adjustment is carried out if there is no doubt about its malfunction. However, in most cases it is easier to replace the VRS with a new relay than to repair it. You should also know that most modern HRS cannot be repaired due to their non-demountable design.
Non-separable VRS are created for the purpose of unit reliability. As you know, a housing closed on all sides is less susceptible to various influences. However, if it fails, you have to replace the relay with a new one.
Another thing is collapsible VRS. Despite the fact that they fail much more often, they look much better compared to non-removable structures, at least for our motorists. After all, such VRS make it possible to repair, and there is no need to buy new parts every time.
Solenoid relay repair
So, frequent causes of failure of a collapsible type VRS are the mechanical drive, which wears out over time, short circuiting and combustion of the contact group that occurs due to getting inside the windings.
The exact fault can only be determined after disassembly. However, this does not apply to a fault associated with a shorted winding. This problem can be diagnosed using an ohmmeter. When measuring resistance, you need to build on standard values - the indicator should be at least 10 kOhm. If not, then this indicates a short circuit in the windings, which will force you to buy a new VRS.
Do-it-yourself starter retractor relay repair
Self-repair requires certain skills. It’s not worth getting down to business without having either experience or the necessary tools. Strictly speaking, installing a new part is always preferable to repairing a broken one.
But sometimes there is simply no other choice. For example, if the breakdown occurred on the road, far from spare parts stores.
If you decide to take an important step, you will first have to remove dirt from the surface of the assembly using a stiff brush and a rag soaked in kerosene, white spirit, etc. After this, an external inspection is carried out to familiarize yourself with the structure of the relay housing.
Do-it-yourself repair and replacement of the catalyst. - there is more useful information here.
How to disassemble the starter solenoid relay?
There is no point in opening a rolled case. This is a complex procedure with unpredictable results. But, if the manufacturer has provided for the possibility of opening the solenoid relay by securing its back cover with separate screws or nuts on the power terminals, then access to the contact plates will not become a serious problem. Simply unscrew the fasteners and pry up the cover using a knife or screwdriver.
You will be interested in this article - Do-it-yourself repair of car starters and generators.
Cleaning contacts and replacing individual parts
After removing the cover, you can assess the condition of the contact plates. Carbon deposits or oxidation should be removed using sandpaper. You can try to replace damaged springs, if any, by selecting ones that are suitable in size and characteristics. Selecting springs is a very complicated matter. It is necessary to measure not only the dimensions, but also the force developed. It will not be possible to do this without having special equipment at your disposal.
Having completed the repair, we place the cover in place, lubricate the joint with sealant, secure it and recheck it. After making sure that all parameters are normal, we install the relay on the starter and perform final assembly.
To be honest, such repairs will not last long. Over time, the plates fade, become thinner and are no longer able to provide reliable contact. We note once again that it is advisable to carry out such work only in situations where there is no access to spare parts. In other cases, the correct solution is to replace the starter solenoid relay with a new and known good part.
Device Features
Before you think about how to disassemble the starter solenoid relay, you need to become familiar with the operating principle of this system. To begin with, it is worth understanding that the device runs on battery power. On the other hand, the device is capable of creating a parallel magnetic field, which affects the armature. The return spring is then compressed, which drives the bendix. At the end it connects to the splines that are on the flywheel.
The principle of operation of the element is based on the subsequent closure of the corresponding contacts. At the same time, due to the action of the magnetic field, the armature of the coil is constantly located inside.
When the engine is started, access to power is limited. At the same time, the spring begins to return to its original position, and the bendix disengages. If you are interested in more detail about the operation of the starter solenoid relay, the video on our page will help you figure it all out.
Where to look for the reason?
Knowing the operating principle of the entire circuit, you can easily identify those elements of the circuit with which problems may arise. These include:
- battery;
- wires and their connections;
- egnition lock;
- solenoid relay;
- power electric motor;
It is in this order that the circuit should be checked when looking for the cause.
Battery
Let's start with the battery. One of the reasons for the starter not turning on is a low battery. As a result, its energy is simply not enough to make the electric motor work, although there is enough of it to operate the relay (hence the clicks). An indirect sign of a discharged battery is a strong dimming of the control lamps on the dashboard when trying to turn on the starter.
The second problem with the battery is unreliable fixation of the terminals or their severe oxidation. Because of this, the contact is insufficient and strong resistance occurs, so the required amount of energy does not flow to the starter.
If everything is in order with the battery, we move on to the wires. First of all, you should check the reliability of fastening and the integrity of the “positive” wire to the battery and the relay terminal, as well as the engine ground. It is noteworthy that for some reason many car enthusiasts ignore checking the ground connection, so they cannot find the reason for a long time.
Video: Maxus LDV Maxus starter clicks, does not turn
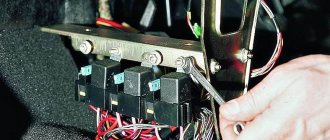
Wiring, ignition switch
Let's move on to the power wires of the solenoid relay going to the lock. Here, by the way, you can do it easier by checking the entire circuit at once in one simple operation:
- We put the car in “neutral” gear and tighten the handbrake.
- Open the hood and provide access to the solenoid relay terminals.
- We take a screwdriver or a small key and use them to connect the power supply terminals of the electric motor.
If, as a result of shorting the terminals, the starter starts to turn, most likely there is a voltage loss in the power circuit or in the relay itself. In this case, first check the ignition switch. By the way, there is little point in checking the wiring of this circuit, since if the relay is triggered, then voltage is still supplied.
The main reason for the lock is burnt contacts. Because of this, the voltage sufficient to hold the anchor is not enough, although it is enough to retract. Typically, burning manifests itself in the form of repeated clicks without turning on the electric motor.