A starter is an element of a vehicle - an electric motor that has 4 poles. He starts the engine in the car. As for the principle of its operation, it is based on the fact that it transmits the initial stroke to the engine crankshaft. Thanks to the 4 brushes of this device, the level of power and torque increases. Of course, if the starter is faulty, the engine cannot be started.
Also on the website read everything about tuning the interior of the VAZ 2106
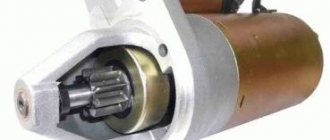
Starter circuit for VAZ 2101, 2102, 2103, 2104, 2105, 2106, 2107
First, let's take a closer look at the VAZ 2101, 2102, 2103, 2104, 2105, 2106, 2107 starter circuit.
VAZ "classics" starter circuit
Deciphering the starter circuit for VAZ 2101, 2102, 2103, 2104, 2105, 2106, 2107:
- — drive side cover;
- — retaining ring;
- — restrictive ring;
- — drive gear;
- — overrunning clutch;
- - drive ring;
- — rubber plug;
- — drive lever;
- — relay anchor;
- — holding winding of the traction relay;
- — pull-in winding of the traction relay;
- — relay coupling bolt;
- — contact plate;
- — relay cover;
- — contact bolts;
- — collector;
- - brush;
- - armature shaft bushing;
- - cover on the collector side;
- — casing;
- — shunt coil of the stator winding;
- - frame;
- — stator pole fastening screw;
- - anchor;
- — armature winding;
- - intermediate ring.
Starter connection diagram for VAZ 2101, 2102, 2103, 2104, 2105, 2106, 2107
Deciphering the starter connection diagram for VAZ 2101, 2102, 2103, 2104, 2105, 2106, 2107:
- — generator;
- - accumulator battery;
- — starter;
- ignition switch;
P1 - pull-in winding of the traction relay;
P2 - holding winding of the traction relay.
The starter of VAZ 2101, 2102, 2103, 2104, 2105, 2106, 2107 does not start
What signs indicate that the starter needs to be repaired or is time to be replaced? Why does the starter sometimes not start?
These questions have their own answers:
- The relay functions without problems. However, the anchor does not respond or makes slow rotational movements. Solution ! As a rule, this is due to burning of the collector. It is also necessary to pay attention to the winding. It must be complete. It is also possible that the relay fastening elements are loose, there is a short circuit in the commutator, the brushes are stuck or have become completely unsuitable for further use. However, the reason may lie in a discharged battery.
- The starter responds, but the armature relays do not function. Solution ! Often the whole point is that the anchor is stuck. In this case, it is worth checking how the tips are fixed. Is there a short to ground and what is the condition of the wiring?
- The armature rotates, but problems arise with the crankshaft. Solution ! It's worth checking the buffer spring. Most likely it's broken. Some components of the coupling may be damaged.
- Powerful noises are heard. This is often the result of damaged bushings and gears.
- In turn, the starter turns, but does not start. You need to take a closer look at the return spring. The device may also be skewed. It is also possible that the relay and drive handle are jammed.
Causes of starter failure and main types of malfunctions
All causes of malfunctions can be divided into two groups:
- Mechanical. These include breakdowns caused by wear and tear of parts. They wear out over prolonged use or when operating rules are violated. Mechanical damage is also possible due to electrical problems.
- Electrical. Such breakdowns include problems with power supply. To detect electrical problems, you need to check all the wiring, diagnose contacts and turn-to-turn short circuits. You should also check for burning of the closing plates and working surfaces, which are possible due to the passage of excess current through the contacts.
Diagnostics using the battery
Generally speaking, the following breakdowns of the engine starting device are possible:
- When you try to start the starter, the armature does not rotate and the traction relay does not operate. The main reason is insufficient power supply. This can be caused by a discharged battery, oxidation on the positive terminal or poor contact, loose terminals on the battery, electrical breakage, turn-to-turn short circuit and armature sticking.
- When the retractor relay is working properly, the armature rotates heavily when the starter is started. A possible reason is a short circuit between the commutator plates or its burning, freezing, brush wear, poor battery charging, wear of the armature bushings, displacement of the armature plates, winding breakage, interturn short circuit of the starter and armature.
- When the starter is running, the armature rotates, but the crankshaft does not rotate. The reason may be a breakdown of the buffer spring or clutch drive ring, slipping of the clutch's free play, poor movement of the armature, or a malfunction of the lever that disengages the clutch.
- The starter does not turn off after the engine starts - the solenoid relay or lever drive is stuck, the ignition switch return spring is faulty, the relay return springs are broken, the clutch is broken. In any of these cases, you need to turn off the ignition and disconnect the wire going to the relay.
- The appearance of extraneous noise indicates loosening of the device, wear of the bearing bushings, weakening of the starter buffer spring, damage to the flywheel ring or nicks in the drive teeth, and improper adjustment of the gear travel of the device.
Before starting repairs, you need to check the starter. You can do it yourself or using a stand for testing generators.
Generator diagnostic stand
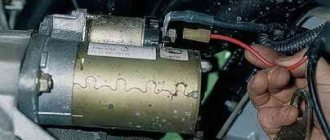
Replacing the VAZ “classics” starter
The most common reason why the starter on a “classic” becomes faulty is the inoperability of the retractor relay with which it is equipped. That is why, when turning the key, the driver will hear a characteristic click. Consequently, the engine will not start in this case.
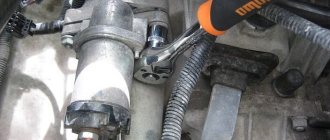
True, sometimes it is necessary to completely replace the starter. But first you need to dismantle the old starter. To do this, use the key to “thirteen”.
Replacing the starter consists of the following steps:
- We remove the battery.
- Then you need to find the fasteners.
- Then you need to unscrew the 2 bolts.
We unscrew the bolts.
Then you should pull the starter and move it towards the right. So it will move away from its previous position and shift to the right side. - Next, you need to lift the left side of the starter and turn it upside down. It is pulled up all the way.
- This element of the vehicle should be lifted until the wiring located at the rear of the starter becomes accessible and the wires can be removed.
- There are 2 wires at the back. One of them is fixed using a standard nut, which initially needs to be unscrewed.
Unscrew the power cable nut - A simple plug serves as the second nut. It needs to be moved to the side. It can be dismantled without much effort.
- Once the starter is free, it can be easily removed.
As for installing a new starter, it is carried out in the reverse order. This procedure will not take much time. It is recommended that you perform these steps in a specific sequence.
In other words, you first need to connect the wires to the starter, and only then install it in its original place. At the same time, the price of a new starter for a six ranges from 2 to 4 thousand rubles. It all depends on the manufacturer and modification of the device itself.
Preliminary work
We install wheel chocks
Performing a few simple steps related to preparing the VAZ 2107 for repair work will significantly save your time, improve the quality of maintenance and will guarantee the safety of your health.
- The place where the machine will be serviced must have good and uniform lighting. In some cases, this can only be achieved through the use of additional lighting.
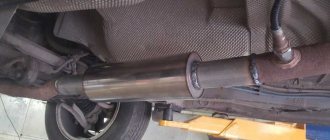
- Due to the fact that the starter in the VAZ 2107 is located in the lower part of the engine, work on its dismantling should be carried out on an overpass or inspection hole. It is not possible to remove the starter from the top.
Starter repair VAZ 2101, 2102, 2103, 2104, 2105, 2106, 2107
Repairing such a vehicle element as the VAZ 2101, 2102, 2103, 2104, 2105, 2106, 2107 starter is a rather painstaking process. The driver must have good self-control and strictly follow certain instructions. Then repairing the starter yourself will go smoothly.
So, it is necessary to repair the starter in the following sequence:
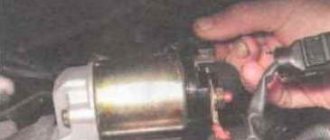
- Remove the old starter from the engine.
- Using a key set to “thirteen”, loosen the nut securing the wiring, which contains the traction relay.
- Disconnect the cable end.
- Apply a voltage equivalent to twelve volts to the relay output.
We supply 12 volts to the starter - Change the housing pole to a negative value. As for the ohmmeter, this device should be connected to contact-type bolts. At the same time, if the solenoid relay is repaired, the armature pulls the so-called “overrunning clutch” into the window of a special cover, which is located in front. But the contact type bolts must be closed.
- Taking a Phillips screwdriver, you need to unscrew the 3 screws.
Unscrew the bolts of the retractor relay - We dismantle the traction relay.
- We free the relay body from the rod, which is equipped with a spring.
- We install a new traction type relay using the reverse sequence.
- To continue further disassembly of the starter using a Phillips screwdriver, unscrew 2 screws.
- It's time to remove the cover.
- In order to check the current condition of the brushes, we use a slotted screwdriver. It unscrews the fastening screw that secures the contact wire.
- When the spring is released, you need to remove the brush. The same method is used to remove the 3 remaining brushes. If the latter have wear of up to 12 mm or less, then they need to be replaced.
- Next, you need to connect the ohmmeter one by one to the terminals of the stator windings. They are checked for short circuits. You should also make sure that the separately located winding terminals do not come into contact with the housing.
Checking the short to body - Use a screwdriver to pry up the retaining ring and remove it.
- We remove the washer from the axle.
- Using a ten key, remove the 2 coupling nuts.
- Then we remove them.
- We disconnect the starter body and remove it from the insulating tubes of the tension type bolts.
- We take a quick look at the commutator and windings. You should never leave charred windings. If the collector has been slightly burned, it is necessary to clean the existing plates with abrasive sandpaper. When severe burning has occurred and serious wear has occurred, it is recommended that the anchors be replaced. As for scuffing and enveloping of bronze relating to the bearings on the special neck of the armature shaft, they are removed using fine-grained sandpaper and are subsequently polished.
- Next, we take the ohmmeter again and check the armature winding to ensure there is no short circuit. A damaged anchor must be replaced.
Checking the armature windings - We release the drive cover from the rubber seal.
- Remove the adjustment washer from the armature axis. During the assembly process it must be returned to its original place.
- The lever axis is being uncoiled.
- You need to use a special bit to select the axis.
- We remove both the anchor and the drive.
- We pry it up with a screwdriver and remove the overrunning clutch drive lever.
- As for the gear, it must make rapid rotational movements in one direction and not move in the opposite direction. Also, it should not be accompanied by chips or nicks that may appear in the leading area of the teeth. When the gears are worn out or the clutch is faulty, the assembly requires replacement.
- Having placed the anchor axis, using a block of wood for these purposes, using a key set to “thirteen” we knock the limiter off the locking type ring.
- We pry it up with a screwdriver and remove the retaining ring.
- We free the axle from the limiter and the overrunning clutch assembly. The drive gear is also dismantled.
- Having replaced the coupling assembly, we return the locking ring to its original place and attach the limiter with part of the conical groove to the winding part of the armature.
- The limiter must be pressed onto a locking ring. To do this, use a hammer to strike. We also use the key for “thirteen”.
- Using compressed air, we remove the coal dust that has accumulated in the body and brush holder. As for the wiring ring and the plastic surfaces in contact with it, they must be treated with Litol-24. Lubricant number 158 is also suitable. In this case, we use engine oil, which is necessary for processing the rotor bushing, screw splines of the armature shaft and hubs touching the overrunning clutch.
- Further assembly is carried out in the opposite order to disassembly.
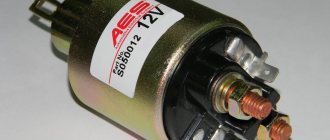
Starter relay VAZ 2101, 2102, 2103, 2104, 2105, 2106, 2107
The structural structure, which has a VAZ 2106 starter solenoid relay, has a complex structure. At the same time, many drivers who more or less understand the details of the “six” can disassemble it with their own hands.
As for subsequent assembly, not every motorist can cope with this task. In this case, it is best to trust the professionals.
If you think the relay needs to be replaced but are not sure, it needs to be thoroughly inspected. It is noteworthy that the relay in the six functions similarly to other elements installed in various vehicle models. That is, it performs the functions of an electromagnet.
To check its condition, it is closed with a metal object. For example, you can use a screwdriver. If the starter begins to make rotational movements, then the starter relay will indeed need to be repaired. When clicks are heard from the retractor-type relay, but the starter rotates, then it is the latter that is broken.
Why does the starter relay stop working? There are several answers to this question. The problem may be due to outdated parts (the material deteriorates over time). The winding also . In this case, the reason may lie in the combustion of nickels , which are located in the internal part of the relay itself.
However, for a novice driver who has not previously done repairs, it is necessary to find out where the VAZ starter relay is located. If he does not want to waste his time and think about how to disassemble this part (by the way, there is a visual diagram of the relay, and you can buy all the spare parts yourself), then he can turn to professionals. They will not only disassemble this part, but will also connect the relay. In this case the price will be minimal.
Starter solenoid relay
If the starter is safely removed from under the hood, it must be cleaned. Contaminants are removed from it. As for oxidized contacts, they are processed using sandpaper.
Diagnostics of the starter solenoid relay:
- The starter is located near the battery. In this case, 2 electrical wires are prepared, which must be of sufficient length. Wires intended for “lighting” are ideal. They are equipped with so-called “crocodiles”.
- Initially, the positive terminal is connected to the battery (the corresponding output of the solenoid relay) via one electrical wire.
- Then the other wire is connected to the battery terminal, which has a negative value.
- Finally, you need to touch the free unoccupied end of the electrical wire with a negative value. This contact must take place with the starter housing. Further actions will depend on the results obtained.
If during the connection process the solenoid relay makes a quick and distinct click, then it is operating normally. When the part does not show any signs of “life,” the solenoid relay must be repaired or completely replaced.
Payment via Yandex Cashier
After selecting payment via Yandex, the Yandex Cashier payment system will launch, where you need to select a convenient payment method (bank card, QIWI, Yandex Money account, etc.)
After specifying payment details and confirming payment, payment for the goods will occur.
If you have a bank card in a currency other than the ruble, then the money will be debited from the card at the rate of the Central Bank of Russia at the time of the purchase.
This payment method is optimal for residents of Russia, Kazakhstan and Belarus.
Official website of the Yandex Kassa payment system https://kassa.yandex.ru