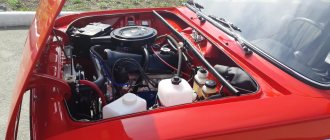
Great guys, I decided to share my creativity from the BZ. Peculiar hehe)
Once I decided to change the half rings, but there is not a lot of concrete and understandable information on the internet, so I described in detail what kind of rings they are, where they are and why they are needed)
Where and why?
The thrust half-rings are located on the sides of the support cover of the third main bearing, i.e. Simply put, half rings are installed between the block support and the crankshaft cheeks. The half rings keep the crankshaft from axial movement and play.
Why do they need to be changed?
Over time, the half rings become thinner and the play increases, but this is not the most dangerous thing; over time, the rings can wear out to such an extent that they stop holding on and one or both fall out into the oil pan... What happens in this case? When there is nothing between the crankshaft and the block cover, the crankshaft begins to grind the support cover.
The whole unpleasantness of the situation that has arisen is that the block bearing support cover is cast together with the block to increase accuracy. Simply put, if you don’t notice crankshaft play in time, you may end up having to replace the block and the crankshaft itself... In addition, increased crankshaft play leads to constant squeezing out of the crankshaft rear oil seal and oil leaks, the rear oil seal is located behind the flywheel, and to replace it you will have to do a huge amount of work . How to determine?
Yes, very simple.
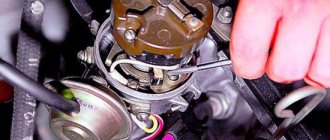
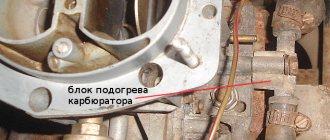
We take the mounting tool in our hands, press it into the body on one side, and with the other press on the generator pulley on the crankshaft; the axial clearance of the crankshaft should not exceed the maximum permissible - 0.35 mm. Also, have someone press the clutch while you watch the crankshaft. If you notice severe play, you must urgently replace the half rings, because if the half ring falls out, the crankshaft will grind off the groove on the bearing cover and the new half ring simply will not hold. I recommend checking the play after 120,000 miles. How to replace?
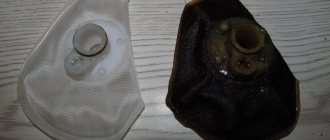
Quite simple. First you need to buy: the half rings themselves, the oil pan gasket, sealant. Since it will be necessary to drain the oil from the engine, the work of replacing the half rings can be combined with changing the oil; you can also clean the pan and oil receiver. Half rings are available in three sizes: standard 2.31; first repair 2,437; the second repair 2.56, produced by ZMZ. It is noteworthy that at the factory the half rings are installed differently - a steel-aluminum half ring is installed on the front side of the bearing (On the timing drive side), and a metal-ceramic (yellow) half ring is installed on the rear side.
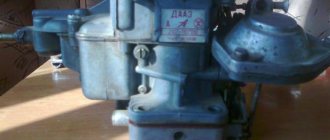
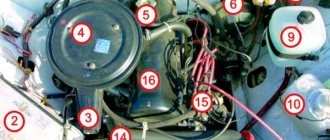
Remove the hood (see Replacing the hood) and the battery. Drain the oil (see Changing the oil). Drain the coolant (see Replacing the coolant). We remove the radiator together with the thermostat (see Replacing the radiator and Replacing the thermostat). Remove the carburetor (see Replacing the carburetor). Remove the fuel pump (see Replacing the fuel pump). Remove the ignition distributor (see Replacing the ignition distributor). Having sketched the connection order, we disconnect the hoses and wires from the engine, lighten the cylinder block, for which we remove the cylinder head (see Replacing the cylinder head gasket). We remove the generator (see Removing the generator). Remove the starter (see Replacing the starter). Remove the coolant pump (see Replacing the coolant pump). We unscrew the upper or lower nuts securing the engine support cushion (see Replacing the engine support cushion). We unscrew the bolts securing the clutch housing to the engine.
We install the cylinder block on the stand. Remove the clutch (see Replacing the pressure plate assembly and clutch release bearing). Remove the pulley, camshaft drive cover, oil pump drive chain and gear (see Replacing the camshaft drive chain). Remove the auxiliary drive shaft (see Replacing the auxiliary drive roller). Remove the flywheel and the rear crankshaft cuff holder (see Replacing the rear crankshaft cuff).
Remove the oil pump (see Removing and disassembling the oil pump).
Similarly, remove the remaining three pistons.
We disassemble the crankshaft (see Disassembling the crankshaft). We take out the old main bearing shells. We wash the cylinder block and crankshaft in diesel fuel or kerosene. We blow out their internal cavities and oil channels with compressed air. We wipe the seats of the main bearings with a napkin and install new liners of the appropriate category (nominal or repair). Lubricate the main and connecting rod journals of the crankshaft with engine or transmission oil and install the shaft into the block.
Checking the rotation of the crankshaft. It should be light and smooth, without jamming or play. We install new steel-aluminum liners into the lower heads and connecting rod caps (see Replacing the piston).
We put on the connecting rod cover and tighten the bolts with a torque wrench (see Appendix). Further assembly of the engine is carried out in the reverse order of disassembly.
A similar operation as replacing connecting rod bearings
, is quite often in demand and therefore we will consider it in more detail. It’s worth noting right away that this work is not particularly difficult and can be performed by any car enthusiast who is familiar with wrenches. There may be several reasons why there may be a need to replace connecting rod bearings. For example, this can be caused by scuffing or rotation of the liner, its melting, cracking, natural wear of the working layer, etc.
Let's consider the option of replacing connecting rod bearings when removing the cylinder head is not required and grinding the crankpins of the crankshaft is not required.
After removing the connecting rod caps on the crankshaft (if the engine has previously been repaired), you need to push one of the connecting rods up using a wooden hammer handle
And then remove the top liner. This must be done in order to find out if there is a drilling in the central part of the connecting rod bed, which serves to supply oil to the piston skirt and cylinder wall.
Features of connecting rods and bearings
When the engine is disassembled for the first time, for example, performing repairs on a VAZ 2106
, then the liner will either have a drilling in the middle part, or without it, if there is no hole in the connecting rod for oil release. Let's look at the issue of drilling using the example of connecting rods of VAZ cars. So, until 1990, there was an oil supply hole in the lower head of the connecting rods of VAZ engines, and factory testers and athletes noticed that the connecting rod bearings were subject to intense wear. This was actually understandable, since at the competitions the athletes squeezed the maximum out of their engines in the fight for the qualifying seconds.
In real conditions, the following happened in the engines. There is a hole in the connecting rod journal of the crankshaft for supplying oil to the liner, and when, when turning the shaft, this hole coincided with the hole in the connecting rod liner and connecting rod, oil was released into the cylinder. In this case, there was a short-term drop in pressure in the neck-liner pair, which led to intensive wear, especially wear of the liner.
The athletes went on an experiment and began to plug the holes in the connecting rods with a lead pellet before the competition, and then weld them in order to avoid a release of pressure. After the race, the engines were sorted out, and the result was in favor of the athletes - the liners were in excellent condition, and no oil starvation was noticed in the area of the pair - skirt / cylinder wall. The plant took into account all the modifications made by the athletes, and since 1990, VAZ connecting rods began to be produced without drilling, as well as connecting rod bearings for them.
However, here you need to take into account the fact that if there is a hole on the connecting rods before 1990, then the hole must also be made in the connecting rod bearings. Otherwise, there will be a micro void under the liner in the area of drilling in the connecting rod, and over time, microcracks may appear on the liner, which will begin to destroy the liner.
In the connecting rod without drilling, you can install both liners with a hole and a new type without a hole. In this case, the following conditions must be observed. The connecting rod caps are processed together with the connecting rod and therefore are “native” and are not interchangeable. On most engines, the locks on the liners should face each other (on the same side) when installing the covers.
If the pressure in the lubrication system decreases or dull noises appear during operation of the 2106, the reason may be a faulty crankshaft. The article discusses the causes of malfunctions, as well as how to change the crankshaft of a VAZ 2106. In addition, a video is attached that demonstrates the partial assembly of a VAZ engine with the installation of the crankshaft.
Symptoms of a problem
If you repair the crankshaft yourself, you can save a lot on car service costs. Therefore, it is worth understanding its diagnosis, repair and installation. If repairs are not carried out in a timely manner, the engine may seize, and this can lead to more serious repairs. The following are signs that serve to identify malfunctions:
- when the engine is running, the oil level control light does not go out, which indicates a decrease in oil pressure in the system;
- at medium and high speeds a metallic knock is heard in the engine, which increases with increasing speed;
- engine jams.
Crankshaft installation process
Before installing the crankshaft on the VAZ 2106, you need to wash, clean and dry the cylinder block. And only after that read the process.
Tools
To complete the installation you will need the following tools:
- a set of keys;
- Screwdriver Set;
- micrometer;
- consumables (liners, seals, half rings);
- torque wrench.
Set of repair tools
If defects in the form of scratches, burrs, or signs of wear are found on the surface of the liners, they must be replaced. The earbuds cannot be adjusted. When using the removed bearings further, you need to check the gap between them and the main and connecting rod journals of the crankshaft. For main shafts, the permissible size is 0.15 mm, for connecting rods - 0.10 mm. If the dimensions exceed the permissible limits, the liners are changed to a greater thickness after boring the necks. If the journals are properly ground and the appropriate bearings are selected, the crankshaft should rotate freely.
The oil seals that ensure the tightness of the crankshaft are replaced regardless of how long they have been standing. Half rings, like liners, cannot be adjusted. If burrs and scratches are found, the half rings are replaced. They are also changed if the axial clearance of the crankshaft is greater than the maximum permissible, which is 0.35 mm. The selection of new rings is carried out according to the nominal thickness or with a thickness increased by 0.127 so that the axial clearance is in the range of 0.06-0.26 mm.
Stages
Installation of the crankshaft on the VAZ 2106 is carried out in the following sequence:
- First, the support bearing of the input shaft is pressed in.
- Next you need to install new liners. The main liners are installed to the required repair size. The connecting rods are the same size, so they are interchangeable. When installing, you need to be careful not to mix up the bearings. The connecting rod bearings are smaller in diameter than the main bearings and do not have annular grooves.
- Then you need to install the thrust half rings into the bed of the 5th main bearing. In this case, the grooves should be directed towards the crankshaft. Half rings are selected according to tolerances.
Replacing worn parts
- The main and connecting rod journals must be lubricated with engine oil.
- Now the crankshaft should be placed in the block.
- The bearing caps are installed according to the marks. The surface of the bearings and journals should be wiped well with a clean rag. When installing the covers, you need to ensure that the arrows marked on them are directed forward along the power unit. The fastening bolts must be lubricated with engine oil and tightened to a torque of 68-84 Nm.
- Next, the connecting rod bearings are mounted and the connecting rods are attached. The tightening torque should not exceed 54 Nm.
- We check the rotation of the crankshaft; it should rotate freely, easily, without play or jamming.
- Next you need to install the rear crankshaft oil seal.
- Next, the engine sump is installed on the block.
- When grinding, in any case, it is necessary to replace the front oil seal. It must be installed on the block along with the cover.
- After tightening the front cover, you can install the crankshaft pulley.
- Then the intermediate shaft, timing parts and cylinder head are installed on the power unit.
- Then you need to adjust the chain tension.
- Next, marks are installed on the camshaft and crankshaft.
- Then the remaining engine parts and components are installed.
- After installing the alternator belt, it is necessary to adjust its tension.
- At the last stage, the ignition is installed and adjusted.
When installing gaskets, you should use a sealant to ensure reliable sealing and prevent leakage of working fluids during further operation of the vehicle.
After final assembly, you need to start the engine and check its performance.
Thus, even a driver with little experience in repair work can perform crankshaft repairs on a VAZ 2106, and you can significantly save on car service costs.
Crankshaft pulley
The generator and water pump on the VAZ 2106 are driven by a belt from the crankshaft pulley. When carrying out repair work on the engine, attention should also be paid to the condition of the pulley: is there any visible damage (cracks, scuffs, dents). If defects are found, the part should be replaced.
During the installation process, the pulley should sit smoothly on the crankshaft, without distortion. Despite the fact that the pulley fits quite tightly on the shaft, a key is used to prevent rotation, which can also be damaged. A defective part must be replaced.
Neck sizes
The main and connecting rod journals wear out as the engine operates, which leads to disruption of the proper operation of the power unit. In addition, wear can be associated with various types of engine problems. These include:
- low pressure in the lubrication system;
- low oil level in the crankcase;
- overheating of the engine, which leads to oil dilution;
- low quality lubricant;
- severely clogged oil filter.
The listed nuances lead to damage to the surface of the shaft journals, which indicates the need for repair or replacement of the unit. To assess the wear of the journals, you need to know their dimensions, which are shown in the table.
Crankshaft selection
The need to select a crankshaft for a VAZ 2106
, like any other car, occurs in case of engine repair or to improve engine performance. Regardless of the task at hand, it must be remembered that the crankshaft must be heavy, with large counterweights. If the part is selected correctly, mechanical losses will be significantly reduced, as well as other loads on the mechanisms.
In the process of selecting a unit, even if it is new, close attention is paid to its surface: there should be no visible flaws, such as scratches, chips, or burrs. In addition, attention is paid to a number of crankshaft characteristics, namely coaxiality, ovality, taper and journal diameter. During engine assembly, the crankshaft is balanced to balance all rotating elements. A special stand is used for this procedure. Once balancing is completed, secure the flywheel and continue the process again. Afterwards, the clutch basket and other elements (pulleys) are mounted. There is no need for balancing with the clutch driven disc.
What to do when necks wear out
What are the steps to take if the crankshaft journals are worn out on a VAZ 2106? First, the defectiveness is carried out, measurements are taken using a micrometer, after which the crankshaft journals are polished using special equipment to the repair size. This procedure cannot be done in a garage environment. The necks are ground to the closest size (based on the tables provided). After processing, thickened liners (repair) are installed in accordance with the new size of the necks.
If a major overhaul of the engine is being carried out, it would not be superfluous to inspect the oil pump, blow out the oil passages of the cylinder block, as well as the crankshaft itself. Attention should be paid to the cooling system. If there are signs of wear or damage on the engine elements or its systems, the parts and mechanisms need to be repaired or replaced.
Symptoms of a problem
If you repair the crankshaft yourself, you can save a lot on car service costs. Therefore, it is worth understanding its diagnosis, repair and installation. If repairs are not carried out in a timely manner, the engine may seize, and this can lead to more serious repairs. The following are signs that serve to identify malfunctions:
Crankshaft installation process
Before installing the crankshaft on the VAZ 2106, you need to wash, clean and dry the cylinder block. And only after that read the process.
Tools
To complete the installation you will need the following tools:
- a set of keys;
- Screwdriver Set;
- micrometer;
- consumables (liners, seals, half rings);
- torque wrench.
If defects in the form of scratches, burrs, or signs of wear are found on the surface of the liners, they must be replaced. The earbuds cannot be adjusted. When using the removed bearings further, you need to check the gap between them and the main and connecting rod journals of the crankshaft. For main shafts, the permissible size is 0.15 mm, for connecting rods - 0.10 mm. If the dimensions exceed the permissible limits, the liners are changed to a greater thickness after boring the necks. If the journals are properly ground and the appropriate bearings are selected, the crankshaft should rotate freely.
The oil seals that ensure the tightness of the crankshaft are replaced regardless of how long they have been standing. Half rings, like liners, cannot be adjusted. If burrs and scratches are found, the half rings are replaced. They are also changed if the axial clearance of the crankshaft is greater than the maximum permissible, which is 0.35 mm. The selection of new rings is carried out according to the nominal thickness or with a thickness increased by 0.127 so that the axial clearance is in the range of 0.06-0.26 mm.
Stages
Installation of the crankshaft on the VAZ 2106 is carried out in the following sequence:
- First, the support bearing of the input shaft is pressed in.
- Next you need to install new liners. The main liners are installed to the required repair size. The connecting rods are the same size, so they are interchangeable. When installing, you need to be careful not to mix up the bearings. The connecting rod bearings are smaller in diameter than the main bearings and do not have annular grooves.
- Then you need to install the thrust half rings into the bed of the 5th main bearing. In this case, the grooves should be directed towards the crankshaft. Half rings are selected according to tolerances.
When installing gaskets, you should use a sealant to ensure reliable sealing and prevent leakage of working fluids during further operation of the vehicle.
After final assembly, you need to start the engine and check its performance.
Thus, even a driver with little experience in repair work can perform crankshaft repairs on a VAZ 2106, and you can significantly save on car service costs.
VAZ engine. Crankshaft
The crankshaft is cast from high-strength cast iron and has five support (main) journals and four connecting rods. The surfaces of the necks are hardened by high frequency currents to a depth of 2-3 mm. At the rear end of the crankshaft there is a socket for installing the gearbox drive shaft bearing.
The connecting rod and main journals of the crankshaft are connected by channels through which oil is supplied to lubricate the connecting rod bearings. The technological outlets of the channels are closed with cap plugs, which are pressed in and caulked at three points for reliability.
The axial movement of the crankshaft is limited by two thrust half-rings installed in the cylinder block on either side of the rear main bearing. half-ring is placed on the front side of the bearing
, and from the back. metal-ceramic (yellow). Both types of half rings have the same dimensions and are made with a thickness of 2.31-2.36 mm and 2.437-2.487 mm (repair). When assembling the engine, the half rings are selected in thickness so that the axial free play (play) of the crankshaft is within 0.06-0.26 mm.
To extend the service life of the crankshaft, it is possible to regrind the crankshaft journals when their surfaces are worn or damaged. By grinding, the diameters of the main journals are reduced by 0.25; 0.5; 0.75 and 1.00 mm. In this case, the diameters of the main journals after grinding should be respectively equal to 50.545-0.02; 50.295-o,og; 50.045-o.02; 49.795-0.02 mm, and the diameters of the connecting rod journals. 47.584-0.02; 47.334-0.02; 47.084-o,o2; 46.834-o.02 mm.
The crankshafts of engines 2103 and 2106 differ from the crankshafts of engines 2101 and 21011 in the crank radius increased by 7 mm. Therefore, the crankshafts of engines 2103 and 2106 are marked “2103” on one of the cheeks of the middle main journal to distinguish them.
The crankshaft is balanced separately from the flywheel, making these parts individually interchangeable.
Main and connecting rod bearing shells.
Thin-walled, bimetallic, steel-aluminum liners. The shells of the 1st, 2nd, 4th and 5th main bearings have a groove on the inner surface (since 1987, the lower shells of these bearings are installed without a groove). The shells of the central (3rd) main bearing differ from the other shells by being wider and lacking a groove on the inner surface. All connecting rod bearing shells are without grooves, identical and interchangeable.
Each bearing shell consists of two identical halves. They are kept from turning by protrusions that fit into the corresponding grooves of the connecting rod or main bearing.
The nominal thickness of the main bearing shells is 1.831-0.007 mm, and the connecting rod bearings are 1.730-0.007 mm. Inserts of repair sizes are supplied under the crankshaft journals, reduced in diameter by 0.25; 0.50; 0.75; 1.00 mm. The thickness of the repair liners for connecting rod bearings is 1.855-о.оо7; 1.980-0.007; 2.105-o,oo7; 2.230-о.оо7 mm, and radicals 1.956-о.оо7; 2.081-o,oo7; 2.206-o,oo7; 2.331-о,оо7 mm.
Flywheel. Cast from cast iron and equipped with a steel ring gear for starting the engine with a starter. The crown is pressed onto the flywheel while hot. To increase wear resistance and strength, the teeth of the crown are hardened with high frequency currents.
The flywheel is attached to the crankshaft flange with six self-locking bolts, under which one common washer is placed. It is unacceptable to replace these bolts with any others. The bolt arrangement is such that the flywheel can only be attached to the shaft in two positions. It must be installed so that the mark. cone-shaped hole. was located against the connecting rod journal of the 4th cylinder. The mark is used to determine the TDC in the 1st and 4th cylinders. The flywheel is centered with the crankshaft by the front bearing of the transmission drive shaft.
Video “Assembling the engine of a classic VAZ car”
This video demonstrates the procedure for assembling an engine on a VAZ classic, including installing the crankshaft.
The crankshaft is the most important part of internal combustion engines with a crank mechanism. The health of the entire engine directly depends on its condition. A power unit with a worn crankshaft does not develop full power, and the oil pressure in such an engine is low even at rated speed, not to mention idle.
The VAZ 2106 crankshaft, the wear of which exceeds the permissible level, will not be able to operate reliably. Therefore, in order to prevent the engine from jamming, this part is removed and repaired.
Why do you need to replace half rings and when is it necessary?
Half rings are consumables and are subject to wear. When they wear out, the crankshaft begins to move horizontally, which accelerates the wear of the half rings. Ultimately, the half rings become completely unusable (erased) and the crankshaft loses all fixation, creating a threat, first of all, to the entire piston group. In addition, the crankshaft can grind the cover that covers it and render the support bearings unusable. These parts are cast together with the block, which indicates a high probability of replacing the latter. To prevent this, it is necessary to carry out timely diagnostics of faults and, if necessary, change the half rings.
Diagnostics are performed after 120 thousand kilometers and begin with an external inspection of the engine. The presence of an oil leak is the first, but not the main sign. The fact is that when play appears, the crankshaft can squeeze out the oil seal, which will very quickly lead to a leak of engine oil. However, oil leaks do not always occur precisely for this reason. It is quite possible that the oil seal simply became unusable due to natural wear and tear.
Signs of a bad crankshaft
There are several signs that can directly or indirectly indicate a crankshaft malfunction:
- when the engine is running at low speeds, the oil pressure indicator light comes on;
- when operating at medium and high speeds, a metallic knock can be clearly heard, the frequency of which increases with increasing speed;
- engine jamming.
In the first two cases, the cause of the malfunction is the wear of the connecting rod or main journals of the crank. The increased gap between the surface of the journal and the liner is what causes a drop in oil pressure. With a critically large gap, the shaft may run out, which causes knocking (the engine “knocks”). The third case is the most difficult. Only a small portion of crankshafts from seized engines can be repaired. In most cases, the crankshaft will need to be replaced.
Crankshaft repair
The crankshaft removed from the vehicle is thoroughly cleaned and inspected. The presence of cracks on the main and connecting rod journals, as well as on the cheeks, is not allowed. If they are found, the crankshaft can be submitted for welding, but it would be better to replace it. Typically, restored crankshafts do not last more than 50 thousand km. They also check for the presence of deep grooves, burrs, scratches and nicks at the contact point of the VAZ 2106 crankshaft oil seal.
To determine the runout, as well as the displacement of the axes of the connecting rod journals, the crank is mounted on prisms. The values of radial runout, axial displacement and non-perpendicularity of the flange end to the crankshaft axis are measured. If the permissible parameters are exceeded, a decision is made to replace the part or edit it using a hydraulic press. Let us immediately note that the VAZ 2106 crankshafts are made of cast iron, so attempts to correct its geometry with a press often end in part failure.
Crankshaft assembly
Next in line in the engine work section is a page with material describing the assembly of the crankshaft. I think there is no need to once again focus on the seriousness of this work. The crankshaft is assembled according to the sequence described below.
Install the upper main bearing shells so that the installation lug of the liner is aligned with the recess in the cylinder block bed. Install bushings that do not have a groove and are larger in width into the bed and cover of the middle bearing.
Immediately after installing the liners in place, they should be lubricated with clean engine oil. Install the crankshaft into the cylinder block, install the lower bearings that do not have grooves into the main bearing caps. Lubricate the crankshaft journals with clean engine oil.
Install the main bearing caps, except the rear cover, in their places in accordance with the marks, since they were installed before disassembly.
Read also: Adjusting Fiat Ducato headlights
Lubricate the thrust half-rings with clean engine oil. Install front steel-aluminum and rear metal-ceramic thrust half-rings on the rear crankshaft support.
In the image, the arrows show the recesses on the thrust half-rings. The thrust half-rings should be installed using notches
to the bearing surfaces of the crankshaft.
Install the cover on the rear main bearing and, using a torque wrench, tighten the cover bolts to the appropriate torque.
Using a flat feeler gauge, measure the axial clearance of the crankshaft; to do this, use a mounting blade to move the crankshaft until it stops. The axial clearance should be from 0.06 to 0.26 mm, the maximum allowed clearance is 0.35 mm. If the gap exceeds the values, the above thrust half-rings must be replaced with new ones, increased by 0.127 mm.
Turn the crankshaft a certain number of revolutions, if the shaft rotates smoothly without getting stuck, the shaft is assembled correctly. Having aligned the installation tab of the liner with the notch on the connecting rod, insert the liners and connecting rods, connecting rod bolts.
ONCE AGAIN ABOUT THE THRUST HALF RINGS
ONCE AGAIN ABOUT THE THRUST HALF RINGS
The article “Don't mix up the details” in the September issue of the magazine aroused great interest among readers. In addition to what was published, its author A. NIKOLAEV from Ufa clarifies information about the interchangeability of crankshaft thrust half-rings of VAZ engines.
There are six half rings in the photo. Of these: a and b - 2101–1005183, steel-aluminium, nominal size, shown from the working and non-working sides, respectively; c — repair half-ring 2101-1005183-20 of the old model (the marking “0.127” is stamped on the non-working surface - the size of the repair thickening); d - the modern repair half-ring 2101-1005183-20 differs from the half-ring “c” in that the marking has become shorter (“P” - “repair”); d and f - metal-ceramic (bronze-graphite) half-ring 2106–1005183, shown from the working and non-working sides, respectively. The repair cermet half-ring 2106-1005183-20 looks exactly the same and has no additional markings. It can be distinguished from the nominal one only by measuring the thickness with a caliper - it should be 2.437–2.487 mm (0.127 mm more).
By the way, in recent years, a yellow bronze-graphite ring has been installed in the engines of all VAZ cars, including Samara, 2110 and Oka - it secures the crankshaft from the flywheel side.
If the pressure in the lubrication system decreases or dull noises appear when the VAZ 2106 engine is running, the reason may be a faulty crankshaft. The article discusses the causes of malfunctions, as well as how to change the crankshaft of a VAZ 2106. In addition, a video is attached that demonstrates the partial assembly of a VAZ engine with the installation of the crankshaft.
Installing the crankshaft
The crankshaft is installed on a pre-washed, dry and clean block. Assembly is carried out in the following sequence:
- Press in the support bearing of the input shaft.
- Install new crankshaft main bearings.
- Crankshaft half rings are selected according to the tolerance parameters.
- The connecting rod and main journals are lubricated with engine oil, after which the crankshaft is placed in the block.
- Place the bearing caps according to the marks and tighten the fastening bolts with a force of 68-84 Nm.
- Next, the connecting rod bearings are installed and the connecting rods are secured. The bolts must be tightened to a force of no more than 54 Nm.
- Install the rear crankshaft oil seal.
- The unit's oil pan is attached to the block.
- The front oil seal is installed on the block together with the cover (replacing the crankshaft oil seal is necessary after grinding in any case).
- The crankshaft pulley is installed after tightening the front cover.
- Next, the intermediate shaft is mounted on the engine, the cylinder head and gas distribution mechanism parts are installed.
- Adjust the chain tension.
- Place marks on the crankshaft and marks on the camshaft.
- The remaining parts and components are installed.
- Adjust the tension of the generator belt.
- Install and regulate the ignition.
During assembly, all gaskets must be sealed with automotive sealant. This way you can avoid oil leakage during operation of the unit.
You can't decide whether to repair or change the crankshaft? The price for a new one is currently at least 3,000 rubles. If you grind and repair an old VAZ 2106 crankshaft, the price of the work will be 5 times less than this amount, so the benefit is obvious.
The crankshaft and photos of the stages of its repair, reading specialized literature - all this will help you approach the work with confidence, breathe new life into the engine with your own hands, and grow in the eyes of friends and acquaintances.
The VAZ 2106 crankshaft is a part of the crank mechanism that plays a very significant role in the car. In order to install the crankshaft as efficiently as possible, you will need a wide variety of tools, most of which are sold at any specialized automotive store. Please note that when assembling the piston of VAZ 2106 connecting rod engines there are some peculiarities.
Why is a crankshaft needed in a VAZ 2106 engine?
The crankshaft (crankshaft) is an important part of the crank mechanism of any engine. The operation of the unit is aimed at converting the energy of combustion gases into mechanical energy.
READ Fiat Chrysler accuses Martinrea of breach of contract
Half rings
Thrust half rings (crescents) prevent axial displacement of the crankshaft. Similar to liners, they should not be adjusted. If there are visible defects in the half rings, the part must be replaced. In addition, they must be replaced if the axial clearance of the crankshaft exceeds the permissible value (0.35 mm). New crescents are selected in accordance with the nominal thickness. The axial clearance should be 0.06–0.26 mm.
Half rings are installed on the “six” on the fifth main bearing (the first from the flywheel). The material used to make the elements may vary:
- on the flywheel side - bronze, metal-ceramic, copper;
- on the front side - bronze, steel-aluminium.
Which of the listed parts to choose depends on the preferences of the car owner. Experienced craftsmen advise installing bronze products. In addition to the material, attention should be paid to the fact that the half rings have slots for lubricant. The front crescent is installed with the slots towards the shaft, the rear one - outwards.
Description of the VAZ 2106 crankshaft
The crankshaft has a rather complex design, with connecting rod journals located on the same axis, which are connected through special cheeks. Number of connecting rod journals on a VAZ engine 2106
equals four, which corresponds to the number of cylinders. Connecting rods provide connection between the journals on the shaft and the pistons, resulting in reciprocating movements.
Let's look at the main elements of the crankshaft:
- Main journals are the supporting part of the shaft and are installed on main bearings (located in the engine crankcase).
- Crankpins. This part is designed to connect the crankshaft to the connecting rods. The connecting rod journals, unlike the main ones, have a constant displacement to the sides.
- Cheeks are a part that provides connection between two types of shaft journals.
- Counterweights are an element that balances the weight of connecting rods and pistons.
- The front part of the shaft is the part on which the pulley and timing gear are mounted.
- Rear end. The flywheel is attached to it.
Seals are installed in front and behind the crankshaft - oil seals, which prevent oil from escaping out. The entire crankshaft mechanism rotates thanks to special plain bearings (liners). This part is a thin steel plate that is coated with a low-friction material. To prevent the shaft from moving along the axis, a thrust bearing is used. The material used in the manufacture of the crankshaft is carbon or alloy steel, as well as modified cast iron, and the production process itself is carried out by casting or stamping.
Crankshaft
The power unit has a complex structure, but the principle of its operation is quite simple. In the engine cylinders, the fuel-air mixture ignites and burns, resulting in the release of gases. During expansion, the gases exert an impact on the pistons, which leads to translational movements. Mechanical energy from the piston elements is transferred to the connecting rods, which are connected to them through the bushing and piston pin.
An element such as a connecting rod is connected to the crankshaft journal using a liner. As a result, the translational movement of the piston is converted into rotation of the crankshaft. When the shaft makes a half revolution (turns 180˚), the connecting rod journal moves back, thereby ensuring the return of the piston. Subsequently, the cycles are repeated.
how to install crankshaft half rings
No less important in the operation of the crankshaft is the process of lubrication of rubbing surfaces, which include the connecting rod and main journals. It is important to know and remember that lubricant is supplied to the shaft under pressure created by the oil pump. Oil is supplied to each main journal separately from the general lubrication system. Lubricant is supplied to the connecting rod journals through special channels located in the main journals.
Replacing the crankshaft oil seal
In particular, a signal that an urgent replacement of the front oil seal liners is necessary is the direct contact of oil on the pulley and its further splashing in the front part of the engine. If oil leaks in the rear oil seal, splashing occurs on the flywheel in the clutch housing. Reasons for replacement:
You can replace crankshaft oil seals yourself; this will not only significantly save time and money spent on repairs in the workshop, but also gain invaluable experience. Replacing the crankshaft oil seal is a standard procedure to ensure optimal engine performance.
According to statistics, the installation of a new oil seal should be done at least once every 3 years. However, oil seal bearings may need to be replaced much sooner. It all depends on the general condition of the parts and the conditions under which the car is used.
Preparation for replacing bearings and direct installation of the crankshaft
In addition, disconnect parts such as the generator, starter, coolant pump, upper nuts that secure the engine mount, and bolts that secure the clutch housing to the engine. The order in which disconnection is made must be strictly observed. During operation, the lifting device cables must be secured to the block and carefully lifted.
Using a 10mm wrench, you need to unscrew all the bolts that secure the oil pan to the cylinder block and remove it along with the seal gasket. Disconnect the oil pump. Using a 14mm socket, unscrew the nuts that secure the connecting rod cover, and then remove it. Then take a hammer, press the handle against the connecting rod, and push the pistons out of the cylinders. Next, take a 17mm socket and unscrew the bolts that attach the crankshaft to the cover. Counting from the crankshaft toe, according to the number marks, we disconnect all subsequent covers. Keep in mind that on cover 5 there are two marks on both sides.
Engine VAZ-2106
After disassembling the engine, we thoroughly wash the parts in kerosene, clean them of carbon and tar deposits and check their technical condition. Piston rings and pins, skirts, ring grooves and piston bosses must not have cracks, chips, scuffs or burns. Cracks are not allowed on the cylinder bore, main and connecting rod journals of the crankshaft. Damaged parts must be replaced. We remove burrs on the crankshaft journals by grinding, and on the cylinder bore by honing (at a service station). The wear of parts that do not have noticeable defects is determined using a measuring tool.
The diameter of the piston skirt is measured with a micrometer with a division value of 0.01 mm in a plane perpendicular to the piston pin axis, at a distance of 52.4 mm from the piston bottom.
We measure the internal diameter of the cylinder with a bore gauge with a division value of 0.01 mm.
We carry out measurements in four zones (at a distance of 5, 15, 50 and 90 mm from the plane of the block connector and the cylinder head) and in two directions - along the axis of the crankshaft and perpendicular to the axis.
The installation gap between the piston and the cylinder mirror (the difference between the measured diameters of the cylinder and piston) should be 0.05-0.07 mm. If the maximum gap value is more than 0.15 mm (wear limit), the cylinders should be bored and honed to the repair dimensions of the pistons.
We check the height gap between the piston groove and the piston ring by inserting the ring into the corresponding groove and inserting a flat feeler gauge between the end of the ring and the surface of the groove.
The maximum gap for each ring is 0.15 mm.
We measure the gap in the piston ring lock with a flat feeler gauge, installing the ring in the cylinder in which it worked, at a distance of 20-30 mm from the lower edge of the cylinder. The gap size for each of the rings is 0.25-0.40 mm.
We measure the main and connecting rod journals of the crankshaft with a micrometer. If the wear or out-of-roundness of the journals is greater than 0.03 mm, the journals should be ground to the nearest repair size.
After grinding the crankshaft journals, it is necessary to flush the oil channels in the connecting rod journals of the shaft, and for this.
We recommend that you carry out grinding of the crankshaft journals, removal and installation of new plugs at a service station.
We wash and clean the oil passages of the engine cylinder block from carbon deposits, remove the remnants of old gaskets and sealant and blow out the block with compressed air.
We assemble the engine in reverse order. We install new main bearing shells of nominal or repair size in the bed of the cylinder block: in the first, second, fourth and fifth. liners with grooves on internal surfaces.
and to the third bed. liner without groove.
Lubricate the working surfaces of the liners with engine oil and place the crankshaft in the bed of the cylinder block.
We insert thrust half-rings, lubricated with engine oil, into the grooves of the fifth bed: from the front side. steel-aluminum, with rear. metal-ceramic (yellow).
The surfaces of the half rings with antifriction coating (these surfaces have grooves for supplying lubricant) must face the surfaces of the crankshaft. The main bearing caps are not interchangeable, since they are processed at the same time as the engine cylinder block beds. The markings of the covers corresponding to the numbers of the main bearings are applied to the outer surfaces of the covers, as shown in Fig. 4.
We install the lower bearings (all without grooves) into the main bearing caps and lubricate them with engine oil. We install the main bearing caps in their places in accordance with the marks. In this case, the locks of the upper and lower liners should be on one (right) side of the cylinder block (looking at the direction of the car). We tighten the nuts securing the main bearing caps to the prescribed torque (see “Appendices”).
Pistons are matched to cylinders by class.
We install the crankshaft of the VAZ 2106.
The cylinder diameter class, indicated by a letter, is stamped on the lower mating plane of the cylinder block.
The piston skirt diameter class (letter) and the piston pin hole diameter category (number) are stamped) on the piston bottom.
In this case, the letter designations on the piston and cylinder must match.
All pistons installed on the engine must be of the same weight group (the difference in the mass of the pistons should not exceed 5 g).
A piston pin, correctly matched in diameter to the piston (by category and lubricated with engine oil), must enter the piston bosses under the force of the thumb and not fall out of the bosses in a vertical position.
READ How to Remove a VAZ 2106 Generator Without a Pit
When assembling the connecting rod with the piston, heat the upper head of the connecting rod at a temperature of 240 °C for 15 minutes. We clamp the heated connecting rod in a vice, put the piston on the connecting rod, ensuring that the hole in the upper head of the connecting rod coincides with the holes in the piston bosses.
The piston pin placed on the mandrel is quickly inserted into the holes of the upper head of the connecting rod and the piston bosses.
Operations for pressing the piston pin should be carried out as quickly as possible, since after the connecting rod has cooled, it will no longer be possible to change the position of the pin in its head.
Lubricate the ring grooves on the piston with engine oil and install the piston rings. Wherein.
The groove (“scraper”) of the lower compression ring should face down.
and the chamfers on the outer surface of the oil scraper ring should face upwards.
If the ring near the lock is marked “TOP” or “TOP”, install the ring on the piston with the mark facing up.
The rings installed on the piston must rotate freely in their grooves, without jamming.
We place the piston rings on the piston so that the ring locks are at an angle of 120° around the circumference relative to each other.
We place new connecting rod bearing shells of nominal or repair sizes in the lower heads and connecting rod caps and lubricate the shells with engine oil. We also lubricate the cylinder mirrors, pistons and piston rings. We compress the piston rings onto the piston using a mandrel to install the piston with the rings into the cylinder and insert the lower connecting rod head and the piston skirt into the cylinder. We place the piston in the cylinder like this.
so that the “P” mark near the boss is directed forward.
Resting against the bottom of the piston with the handle of a hammer, we push the piston deep into the cylinder.
We install the cover with the liner on the bolts of the corresponding connecting rod.
There are marks on the side surfaces of the connecting rod and the cover, which must coincide and be located on the same side.
Tighten the nuts of the connecting rod cover bolts evenly to the prescribed torque (see “Appendices”). We install the pistons with connecting rods of other cylinders in the same way.
We perform further engine assembly in the reverse order of assembly, replacing the gaskets and seals with new ones.
Preparation for replacing bearings and direct installation of the crankshaft
After the VAZ 2106
The hood and battery will be removed, you need to carefully drain the oil and coolant. Then remove parts such as the radiator, thermostat, carburetor, fuel pump and ignition distributor. Be sure to note for yourself the order in which they are removed. Next, you need to remove all adjacent hoses and wires from the engine along with the cylinder head.
In addition, disconnect parts such as the generator, starter, coolant pump, upper nuts that secure the engine mount, and bolts that secure the clutch housing to the engine. The order in which disconnection is made must be strictly observed. During operation, the lifting device cables must be secured to the block and carefully lifted.
Then, placing a jack under the gearbox, begin to carefully rock the unit in order to gradually disconnect it from the clutch housing. It will be necessary to remove the cylinder block, clutch, pulley, camshaft wire cover, oil pump parts, accessory drive shaft, flywheel and rear crankshaft seal holder.
Using a 10mm wrench, you need to unscrew all the bolts that secure the oil pan to the cylinder block and remove it along with the seal gasket. Disconnect the oil pump. Using a 14mm socket, unscrew the nuts that secure the connecting rod cover, and then remove it. Then take a hammer, press the handle against the connecting rod, and push the pistons out of the cylinders. Next, take a 17mm socket and unscrew the bolts holding the crankshaft
attached to the lid. Counting from the crankshaft toe, according to the number marks, we disconnect all subsequent covers. Keep in mind that on cover 5 there are two marks on both sides.
Only now can you remove the crankshaft itself and remove the two half rings of the crankshaft thrust bearing. When working, you need to remember that the metal liners installed on the beds of all bearings, with the exception of the 3rd, are equipped with a groove.
Power reduction
The drop in power on classic Zhiguli cars is a phenomenon caused by wear of the camshaft and rockers. With proper engine operation (timely oil changes, monitoring its level and pressure), the problem only appears over long vehicle runs. When the cams wear out, the required phase width and valve lift at the intake are no longer ensured.
Deformation
The RV can become deformed under extreme heat, which is caused by problems in the cooling and lubrication systems. At first, the problem may manifest itself as a knocking sound. Therefore, if there is a suspicion of this breakdown, for example, the motor has overheated, then it is recommended to diagnose the shaft in order to avoid more serious troubles with the engine timing belt.
Table: main parameters of “sports” camshafts for “classics”
Installation by marks
Upon completion of the replacement, it is necessary to align the camshaft and crankshaft
by tags. Only after such a procedure will the ignition timing be correct and engine operation stable. An additional tool you will need is a wrench to rotate the crankshaft, and the work itself consists of the following steps:
- We put the RV sprocket in place and tighten it, but not completely.
- We tighten the chain. To do this, unscrew the tensioner nut, turn the crankshaft
, and then tighten the nut back. - We turn the crankshaft
with a wrench until the mark on the pulley is aligned with the length of the mark on the timing cover.
How to correctly install the crankshaft main bearings and thrust half rings.
When reinstalling the valve cover, I always pay attention to the condition of the gasket, even if it has recently been changed. There should be no tears, strong pressing or other damage. In addition, the seal should not be “oak”, but elastic. If the condition of the gasket leaves much to be desired, I always replace it with a new one, thereby eliminating possible oil leakage in the future.
The final stage
To secure, apply light blows with the handle of a hammer to the bottom of the piston, thereby pushing it into the cylinder. Screw on the second to fifth main bearing caps so as not to create a significant tightening. After this, purchase an odorless sealant from the store and apply a thin layer of it to the surface of the cylinder block in the place where it will come into contact with the first bearing cap.
After this, install a new sealing ring on the crankshaft and, after checking the location of the chain on the crankshaft sprocket, install the oil pump and pan. Also screw the removed cylinder head back into place, because only after this the structure can be completely assembled and the crankshaft considered replaced.