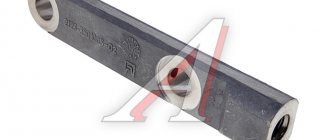
Replacing the master brake cylinder
It often happens that the brake fluid begins to leak, although all the brake cylinders are normal, and the hoses and tubes are also in order.
In this case, it is necessary to check the seat of the reservoir and the brake master cylinder itself. If a leak occurs, it will most likely have to be replaced with a new one, and in this article we will look at a detailed description of how to perform this repair. The first thing you need to do is decide on the tool you will need for this job:
- ratchet handle;
- socket head 17;
- special split wrench for unscrewing brake pipes by 10 mm.
Checking the brake master cylinder
A full check of the gas turbine engine for operability is carried out using a special high-pressure pressure gauge (0–250 atm). Using connecting fittings of the appropriate diameter, they are connected to the outlets of the master cylinder instead of tubes. A working turbocharger should create a pressure of up to 180–200 atm when the pedal is pressed. (bar). If the measurement results are lower, the cylinder is worn out and requires replacement or repair.
Brake Pressure Measuring Kit
The cost of a set of pressure gauges with adapters is about 15,000 rubles, so not every service station has it. Without a pressure gauge, you need to check the gas turbine engine using indirect signs. For diagnostics you may need the following materials and tools:
- brake union wrench (split or clamp), usually 10, 11, 12 or 13;
- a bottle of brake fluid (if there are leaks, the level is below normal);
- bolts with threads similar to the threads of the GTZ tube fittings.
For a full check, you will also need an assistant who will press the brake pedal during the diagnostic process.
How to understand that the brake cylinder is not working: technique
- Inspect the wheel brakes and lines . Make sure that the problem is on the GTZ side and that the actuators are in order.
- Inspect the brake master cylinder . Insufficient fluid level in the expansion tank and the presence of brake fluid leaks on the GTZ or VUT housing are an obvious sign of depressurization. If there is not enough fluid, but no signs of leakage are visible, add fuel fluid and check the operation of the brakes. Perhaps the GTZ is working properly and the culprit is a leak somewhere in the line.
- If there are GTZ leaks, look where they occur. To search, you need to clean the cylinder body of the fluid (for example, with gasoline, solvent or alcohol), ask an assistant to pump the pedal, and in the meantime, look where the fluid leaks appear.
Determining a GTZ malfunction using the example of a Hyundai Accent: video
- Start the engine and pass the VUT hose . If, after squeezing the hose, the engine speed changes, the problem is not in the GTZ, but in the vacuum booster.
- Start the engine (on old cars without VUT you can not start it) and press the brake pedal firmly . If it stays in one position, the GTZ is normal and maintains pressure properly, and if it sags smoothly, the cylinder is probably releasing the fuel fluid into the tank.
- Look at the behavior of the liquid in the tank during operation . On a working turbocharger, when you press the pedal there should be no extraneous sounds, and the fluid level should drop slightly. If it remains unchanged, gurgling is heard, bubbles are visible - the piston cannot create the required pressure and the cylinder releases the fuel fluid back into the tank, which means it is not working. When you press the pedal, the level should drop and remain at that level until released. If it increases when the pedal is pressed, the GTZ does not hold pressure and bypasses fluid.
- Plug the outlets of the turbocharger and check whether it holds pressure . To do this, you need to unscrew the brake pipes from the cylinder, and in their place screw in bolts with similar threads. After this, add fluid to the reservoir to the normal level and press the pedal. If the foot feels resistance and the pedal does not move further, the cylinder is properly holding pressure. If the pedal is pressed smoothly or fails altogether, the piston bypasses fluid, the turbocharger is faulty.
If after carrying out the manipulations it becomes clear that the brake cylinder is not working properly, you need to remove the turbocharger and disassemble it for troubleshooting, which will allow you to determine the true cause of the malfunction.
How to check a removed brake master cylinder
To dismantle and diagnose the GTZ you will need:
- split or clamp wrench for brake pipes;
- a large (from 10 cubic meters) syringe for pumping out fuel fluid and an empty container for draining brake fluid;
- a key for disconnecting the turbocharger from the VUT (most often at 13, 14 or 17) and keys for disassembling the turbocharger;
To disassemble the brake master cylinder for diagnostics, you need to:
Disassembling the brake cylinder to determine the breakdown: video
- Pump out or drain the brake fluid from the expansion tank.
- Disconnect the brake pipes from the GTZ outlets.
- Unscrew the brake cylinder from the VUT.
- Remove the GTZ from the car.
- Unscrew the bolt plug (if any) in the front part of the GTZ and/or remove the stopper in the rear part (from the VUT side).
- Inspect the inside of the VUT for leaks; if there are traces of fuel fluid there, the cylinder is clearly faulty.
- Remove the pistons from the turbocharger, having previously disconnected their retainers - bolts or pins.
- Wipe the pistons with a dry cloth, inspect them for wear, and assess the condition of the seals.
- Wipe the inside of the cylinder body, inspect its mirror for burrs, holes, traces of corrosion and other defects.
- Measure the gaps between the pistons and the cylinder walls, compare them with factory tolerances.
- Inspect bypass windows, openings and outlets for blockages.
Based on the results of inspection of the GTZ parts, conclusions can be drawn about further repairs. If there are signs of wear on the rubber sealing cuffs, you can limit yourself to a small repair kit. If there is wear on the pistons, you need to buy a repair kit consisting of pistons and rubber bands. If the GTZ body itself has burrs, cavities, traces of corrosion and other defects inside, the assembly will have to be replaced.
After diagnosing the GTZ and rebuilding or replacing it, after installing it on the car, you should add brake fluid to the reservoir to the maximum mark and bleed the brakes.
Procedure for replacing the master brake cylinder of VAZ 2110-2112 - photo report
The first step is to open the hood of the car and unscrew the brake reservoir cap:
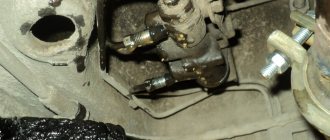
Then you can use a syringe to pump out the brake fluid so that it does not spill when removing the cylinder. After this, use a split wrench to unscrew all the tubes, as shown in the photo below:
After this, it is necessary to move the tubes to the side so that they do not interfere with further work:
Now all that remains is to unscrew the two nuts securing the main brake cylinder of the VAZ 2110-2112, as will be clearly shown on one side in the photograph below:
And remove it from the studs when everything is unscrewed.
At the end of the work, you can buy a new cylinder, the price of which is about 1000 rubles, and we install it in its original place. We fill the brake fluid into the reservoir and bleed it, that is, we expel the air from the system. More on this in future articles.
Source
Procedure for replacing the front brake cylinder on a VAZ 2110-2112
To show the entire repair process more clearly, watch the video I recorded for this topic:
Video instruction
The video was made using the example of a VAZ 2110 car and is equally suitable for both 2111 and 2112. The only way the car parts may differ externally is the brake discs: ventilated or not, as well as their sizes.
Photo report
First of all, we will need to remove the front wheel of the car, after first lifting the car with a jack. After this, using a hexagon, you need to unscrew the two bolts securing the caliper bracket.
Now you can remove the bracket and remove the pads:
Then you can rip off the brake hose with a wrench, but you don’t have to unscrew it completely.
Next, we unscrew two more bolts securing the cylinder to the caliper, having previously bent the two locking plates under them using a screwdriver.
And we move the cylinder to the side, since nothing else holds it.
The hose can now be unscrewed completely by turning the brake cylinder itself several times counterclockwise.
A new front one costs about 500 rubles, so this price is quite acceptable. But the assembled caliper already costs about 2,000 rubles, which is already significant if you suddenly have to change the entire assembly. Installation of this part occurs in the reverse order.
Source
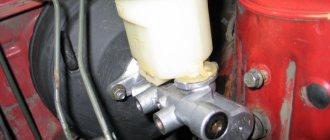
Main brake cylinder VAZ 2110
The GTZ is the main part of the brake system; when you press the brake pedal, it distributes the brake fluid through the lines to the calipers and creates the necessary pressure to compress the brake pads.
Below are signs that indicate the need to replace the brake master cylinder.
Signs of a malfunction of the GTZ:
- Traces of brake fluid leaking through the O-rings are noticeable;
- The force on the brake pedal disappears and when you press the pedal, the car does not brake;
- The pedal does not engage due to the jamming of the GTZ rod;
With these signs, it is not recommended to delay replacing the gas turbine engine.
How to understand that the GTZ is bypassing brake fluid?
Vehicles use a system with two separate hydraulic circuits. You can read in detail about its task and work separately. The general principle is that when the brake pedal is pressed, the vacuum booster rod acts on the first piston of the GTZ, which, by compressing the brake fluid supplied from the reservoir, creates excess pressure in circuit 1 directly, and in circuit 2 indirectly by moving the second piston.
If the piston seals are severely worn, the GTZ bypasses: the liquid passes between the walls of the housing of the first, second or both pistons in the opposite direction and returns to the expansion tank. As a result, necessary to act on the brake cylinders is not created
There are two simple ways to check the operation of the brake master cylinder for bypass of brake fluid:
Method number 1 (performed with an assistant)
- Unscrew the cap of the expansion tank in the engine compartment.
- Have an assistant press the brake pedal while observing the condition of the fluid.
- If, when pressed, the level decreases and remains until the pedal is released, the cylinder is in good condition.
- If the fluid level begins to increase when the pedal is pressed or bubbles appear and gurgling is heard, the GTZ is bypassing.
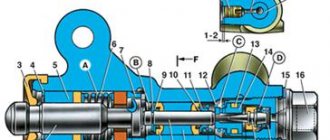
Designation of GTZ terminals
Method number 2 (you can do it yourself)
- Disconnect the brake pipes from the GTZ terminals.
- Plug the fittings with bolts with suitable threads.
- Depress the brake pedal.
- If, after pressing the pedal, it sags a little, but does not go further and resistance is felt, the cylinder is properly maintaining high pressure.
- If, when pressed, the pedal smoothly sinks to the end, this indicates a slight bypass, and if it quickly fails, the wear of the turbocharger is critical.
On cars where the braking system is equipped with pressure sensors, problems with the turbocharger can be indicated by glowing indicators on the dashboard and errors in the ECU memory. For example, P0557 - low signal level of the brake pressure sensor or C1301 - the pressure does not correspond to the position of the brake pedal limit switch.
Error 01435 and its interpretation on the VW Golf dashboard
Most manufacturers use their own problem numbering. In particular, for VAG cars, the following codes indicate problems with the GTZ:
- 01435 – problems with pressure sensor 1;
- 00813 – problems with pressure sensor 2;
- 02847 – front left wheel pressure sensor;
- 02848 – front right wheel pressure sensor;
- 18108 – incorrect signal from the brake pressure sensor.
These errors can occur both in case of problems with the gas turbine unit that cause a drop in pressure, and in the event of failure of the sensors themselves.
It is possible to determine 100% that the master brake cylinder is bypassing only by measuring the pressure at each outlet of the turbocharger.
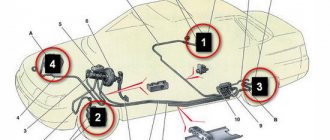
Consequences of brake fluid leakage from the GTZ
When brake fluid leaks from the master cylinder, brake fluid can get onto various parts of the car. As you know, TZ is quite chemically active and often damages other parts of the car.
For example, when liquid leaks, it can fall on the vacuum booster membrane, which will soon lead to its rupture and, as a result, air leakage from the receiver, and of course, replacement of the vacuum booster itself.
VUT membrane rupture
Also, when brake fluid leaks, it gets into part of the engine compartment, behind the steering rack, and causes great damage to the paintwork.
Replacement without bleeding the brake system
Below are instructions that allow you to replace the GTZ without bleeding the brake system and without a large loss of brake fluid. To carry out repairs, you need to prepare the necessary tools and DOT-4 brake fluid.
When replacing, it is necessary to dismantle the brake fluid reservoir from the old GTZ; when dismantling it, breakdowns of the tank occur; it is recommended that when replacing the GTZ, you also purchase a new TJ reservoir.
Required tool:
Step-by-step instruction
- We unscrew the cap of the brake fluid reservoir and use a syringe to pump out the brake fluid into a previously prepared container;
- Using a ratchet with a 17mm head, unscrew the 2 nuts securing the GTZ to the vacuum booster and pull the GTZ towards you;
- We remove the tank from the GTZ (if you haven’t bought a new one). We install the reservoir on the new GTZ, lubricating the rubber seals with brake fluid;
- We install the new GTZ on the vacuum booster and fix it;
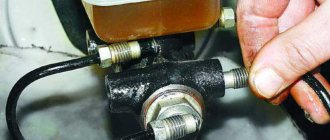
- We insert the brake fluid fittings into the GTZ, but do not tighten them;
- Fill the TJ tank up to half;
- We wait for brake fluid to flow out of the holes into which the brake pipe fittings are screwed;
- Then we twist and tighten the fittings of the TJ tubes;
- Add brake fluid between the MIN and MAX marks and close the cap;
The replacement process is complete. With this replacement, bleeding the brake system is not required.
Source
Which master brake cylinder is better for the VAZ-2110
The main brake cylinder of the VAZ-2110 can be repaired, but not always.
Currently, many companies produce analogues of the VAZ-2110 GTZ. Most of them are a higher quality product than recommended by the manufacturer.
Products from Fenox or Kraft are in great demand.
For aesthetes, we can recommend a product from Bosch, which costs three times more. In addition, many manufacturers produce parts with or without a tank.
Determination of breakdowns of the GTZ VAZ-2110
You can determine the faulty part yourself; to do this, you just need to know what to look for:
- Leaks in the brake fluid on the vacuum booster at the junction with the main brake cylinder indicate that the cuff in the cylinder is worn out.
Leaks on the vacuum booster indicate wear on the seal in the cylinder.
In any case, you need to determine for yourself whether it’s worth bothering with disassembling the GTZ and repairing it or immediately installing a new part.
Is it worth buying a repair kit and is it profitable?
Buying a repair kit can save the money spent several times, but it will increase the time costs.
Based on the cost of the GTZ at 1,000 rubles, you need to think carefully about whether it is worth disassembling the brake cylinder for such a sum. Repair kits can be incomplete or complete . In any case, you need to purchase a complete one, since no one will measure the forces on the return springs.
You can also repair the brake master cylinder yourself.
An attempt to save money will result in a long procedure of disassembling, washing and drying all parts. When washing, you need to make sure that no gasoline or oil gets on the rubber parts, as this can damage them.
Therefore, the use of a repair kit can only be justified in the following cases:
- The assembled part is not available for sale.
- Inability to allocate 1,000 rubles for a purchase.
- The desire to understand the brake system with your own hands from beginning to end.
In other cases, it is better to immediately install the assembled part.
Tools that will be needed during the replacement process
To replace the brake cylinder you will need a tool.
Before starting any repair work, you should prepare thoroughly. Replacing the brake master cylinder is no exception. To replace this part you will need:
- Set of keys. Having a variety of sockets and socket wrenches will be a huge advantage.
- Screwdriver Set.
- Round nose pliers will help when changing cuffs.
- Special “brake” wrench for 10.
In addition, during the replacement process, brake fluid will spill out, which is generally advisable to replace with new one. DOT-4 brake fluid is suitable for the VAZ-2110.
The process of removing the old part
In order to remove the brake master cylinder, you need to open the hood and do the following:
- To get to the part, you will first have to remove the sound insulation. You should not try to tear it off, as it is secured with bolts. Therefore, you should arm yourself with a screwdriver and unscrew all the fasteners. If the sound insulation is not removed after this, it means that not all fasteners have been unscrewed. If you pull the element, it can be damaged. After this, you can start replacing.
Replacing the front brake cylinder
The main malfunction of the front wheel brake cylinders on the VAZ 2110-2112 can be considered their jamming, as a result of which, even when the brake pedal is released, the cylinder does not immediately return to its original position. Also, problems with the passage of brake fluid from under the rubber are possible, which is also not normal.
To replace this part yourself, you will need the following tool:
- 13 mm socket head;
- ratchet handle and knob;
- hexagon or similar bit for 10;
- socket wrench 13;
- special split wrench for brake pipes and hoses.
Bleeding the brakes after replacement, should I do it or not?
After the procedure for replacing the brake master cylinder, some inexperienced car owners do not consider it necessary to pump the brakes. If you neglect this procedure, the brakes may fail at the most crucial moment.
It is necessary to bleed the brake system . This procedure is simple, although two people must be involved. The pumping procedure is as follows:
- We need to pump up the brakes. To do this, the pedal is pressed several times, after which it is held down.
- At this time, you need to partially unscrew the brake pipe fitting on one wheel.
- This should remove air from the system. Periodically, an assistant should pump the brakes by pressing the pedal. This procedure must be repeated until fluid sprays out of the tube when you press the brake pedal.
We pump the brakes on each wheel one by one.
This procedure is repeated on each of the four wheels of the car . Before bleeding the brakes on each wheel, you need to add brake fluid to the reservoir. Only after bleeding the brakes can you go out on the road without fear that the brakes will fail at the most inopportune moment.
Signs of a faulty master cylinder
Among the symptoms indicating a malfunction of the master brake cylinder, the main signs can be identified:
Checking the GTZ in 5 minutes without removing it from the car: video
- pulling the car to the side when braking;
- overheating of the pads on one wheel;
- squeaks when pressing the brake pedal;
- pedal travel is too soft or hard;
- shortened pedal travel;
- brake pedal failures;
- holding the wheels with blocks after releasing the pedal;
- fluid leaks on the GTZ housing.
Most signs of a brake system malfunction appear when the brake pedal is pressed and are similar to other problems with the brake system. In particular, the failure of the pedal may indicate congestion or depressurization of the lines. Therefore, before checking the serviceability of the master brake cylinder, it is necessary to at least check the level of brake fluid in the reservoir, as well as the condition of the pads, discs and hoses .
How to Diagnose a Malfunctioning Master Cylinder
| Symptom of malfunction | Why is this happening? | Alternative reasons |
| Slow braking |
|
|
| Great force when pressing the pedal |
|
|
| Short brake pedal travel | ||
| The pedal gets stuck while driving |
| |
| Pedal failure near the end of the stroke |
|
|
| The pads continue to hold the discs |
|
|
| The pads and disc/drum on one wheel get hot |
| |
| The car pulls to the side when braking | ||
| Squeaking/creaking noise when braking |
|
|
| Slow return or stuck pedal when released |
|
|