Comments: no Published: 02/12/2016
Rating:
Tags:Philips ledVAZ 2170Daytime running lightsLED backlightLED running lights
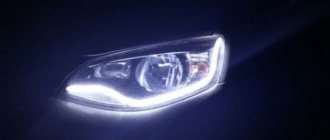
The function of daylight, which must be turned on on every car according to the new traffic regulations, can be performed by fog lights, side lights, low beams, or special daytime running lights. The latter have been installed since 2011 on all models produced in EU countries, but the bulk of the cars on our roads were produced earlier and therefore you need to take care of installing DRLs yourself. Thus, if your Lada Priora is not equipped with running lights, you should eliminate this deficiency, which you can do yourself.
Priora daytime running lights - economical and stylish
Do daytime running lights need to be registered?
According to recent changes in legislation, all vehicles in 2022 are required to drive during the day with their running lights on.
If daytime running lights are not installed in the vehicle, the driver must turn on the low beam or fog lights. The adoption of such a law caused a lot of confusion among motorists. In this regard, the issue of including DRLs began to be actively discussed.
There is an exit!
But we didn’t give up, looking at everything described above, and came up with this. Installing DRLs does not necessarily mean beautiful LED headlights. This can be any legal light source. What is legal? These are the headlights that are installed at the car manufacturer or installed by the car owner independently, but with the tolerances provided for by the design.
For example, fog lights (FTL). They are found on almost all cars, and their installation by owners does not require permission for conversion. And most importantly, PTF, according to traffic regulations, can be used as daylight. In other words, the only thing left to do is to make sure that conventional fog lights turn on automatically and turn off themselves when the low beam is on or the engine is turned off. But at the same time, we will retain the function of the fog light, getting a two-in-one effect.
Before installing headlights or converting existing ones into DRLs, check that your headlights are positioned correctly. It’s unlikely that they will check on the roads, but if they do, it will be done right away correctly
To install DRLs, we took the editorial Niva. We bought the necessary components at the auto store, namely: two relays (one five-pin, the other four-pin), electrical wiring, a 25 A fuse block and electrical tape - for a total of 2,000 tenge. We looked for some tools in the garage and got to work. The fog lights on our car were installed directly on the bumper when we purchased it. Except that later they were changed to others.
Requirements for DRL according to GOST
Two standards regulate the operation of DRLs on motor vehicles in the Russian Federation - 41.87-99 and 41.48-2004. Detailed parameters for installing daytime running gear in a car are described:
- The lower edge of the headlights should be at a distance of 25 cm to 1.5 m from the ground surface (the vehicle's ground clearance is not taken into account);
- The distance between the “inner” edges of the two headlights can be strictly from 60 cm;
- The distance from the “outer” edge of the headlight to the edge of the bumper should be a maximum of 40 cm;
- The area that the light from daytime running lights must cover must be between 25 and 200 square centimeters;
- The maximum permissible brightness of the lights is 800 Cd, the minimum is 400 Cd.
The essence of modernization
The technology of connecting DRLs from a car generator did not arise by chance. After all, the main GOST requirements for the functioning of DRL are as follows:
- powerful light-emitting diodes must be turned off when the head light is activated, which is the “near”, “far” or luminous flux from the PTF;
- DRLs should automatically start when the body that controls the engine operating modes moves to the “on” position;
- it must be possible to turn off the running lights without the help of an external tool, i.e. button.
Driving in the dark
One of the following lighting fixtures must be used:
- low beam headlights;
- high beam headlights.
In this case, the main beam cannot be used:
- in populated areas on illuminated roads;
- when oncoming vehicles pass;
- when blinding drivers of passing or oncoming cars.
Additionally you can use:
- fog lights;
- fog lamp (only in case of poor visibility);
- parking lights.
Replacing lamps in the Kalina 2 headlight unit
| Replacement of lamps in car headlights is carried out in case of their burnout or to replace them with more efficient ones. Do you know how to replace the bulbs in the headlights of Kalina 2? |
Replacing the low beam lamp (H7)
It is recommended to replace the lamp with cotton gloves. Procedure:
- remove the protective rubber cover 3;
- disconnect the block with wires from the lamp;
- press the spring clamp 4 and tilt it to the side;
- pull out lamp 5 by the base.
Install the new lamp without touching the lamp bulb. Make sure that the protective rubber cover 3 fits tightly to the headlight unit body.
Replacing the high beam lamp (h2)
It is recommended to replace the lamp with cotton gloves. Procedure:
- remove the protective rubber cover 1;
- disconnect the block with the wire from the lamp;
- press the spring clamp 4 and tilt it to the side;
- pull the lamp out by the base.
Install the new lamp without touching the lamp bulb. Make sure that the protective rubber cover 1 fits tightly to the headlight unit housing.
Replacing the daytime running and side light bulb (W21/5W)
- turn lamp socket 2 counterclockwise until it stops;
- remove the lamp socket from the headlight housing;
- remove the lamp from the socket.
Installing a new lamp is carried out in the reverse order.
Replacing the turn signal lamp (PY21W)
- turn lamp socket 4 towards you until it stops;
- remove the lamp socket from the headlight housing;
- press and turn the lamp counterclockwise until it stops;
- remove the lamp from the socket.
Installing a new lamp is carried out in the reverse order. By the way, do you know that the mode of operation of the low and high beam headlights may differ depending on the configuration of the Kalina 2?
Keywords:
Other solutions for daytime lights on the Lada Priora
According to traffic regulations, the installation of additional equipment is not required, and instead of DRLs, you can use low beams, side lights or connected Priora fog lights. However, such solutions in practice are not the most effective for increasing vehicle visibility.
Disadvantages of neglecting special running lights:
- The side lights, which have a power of 5 W, are clearly visible in the dark. During the day they become almost completely discolored and are almost invisible.
- The low beam headlights make it possible to clearly identify the car on the road; it becomes truly distinguishable. But this option, when driving frequently with the headlights on during the daytime, leads to their rapid wear and excessive fuel consumption. It is necessary to ensure the simultaneous consumption of electricity for the dashboard and side lights. More than 0.4 liters of gasoline are required to travel 100 km in a Lada Priora car.
- It is not recommended to use high beam headlights as daytime running lights, both for the reasons stated for low beam and because of the risk of dazzling the drivers of cars moving opposite.
- Fog lights do not provide a good range of light and vehicle visibility is insufficient.
Fog lights can replace running lights on a Lada Priora.
There will be no problems installing purchased ready-made kits; the kit contains all the necessary elements for mounting. But if the lights are made independently, then you will need to pay more attention.
Connection diagrams for daytime running lights
Requirements for DRLs and according to GOST, the connection is carried out in such a way that when ignited, the lights turn on automatically, and when the main headlights are turned on, they turn off.
Using a generator, it is possible to connect according to three schemes:
- Using motor and RT:
- With an additional resistance resistor that will automatically turn off the source when the main lights are turned on:
- The on-board circuit automatically deactivates the source when the handbrake is lifted and the engine starts:
Installation locations
To ensure that traffic police officers do not have any questions and that the car undergoes successful maintenance, you need to know the correct placement of the DRLs:
- bottom of the radiator grille;
- main optical system;
- in places intended for fog lights.
The latter option is less in demand, since the owner usually prefers to install PTF.
There are also cars with installed running lights (LED strip) around the perimeter of the radiator grille, on top of it. Such options do not comply with safety rules, but are more considered an element of tuning.
Installation of control
- The control unit is installed in the engine compartment. It is best to mount the control unit near the battery, as far away from the engine as possible. Excessive heat in the vicinity of the engine can lead to subsequent operational problems with the running light system. The unit is reliably protected by the housing from moisture or contamination, therefore there are no special restrictions on the choice of its installation location.
- The unit should be connected according to the usual diagram. The “plus” terminal has a red wire, and the “minus” terminal has a black wire.
- The orange wire is designed to automatically turn off the running lights when low beam is on or switch the DRL to the sidebar mode . If you neglect the functions of the orange wire and do not connect it. Daytime running lights will continue to shine even when the headlights are on, which can lead to dazzling of oncoming drivers and is a violation of the rules. The orange wire connects to the side lights or headlights.
- The headlights are connected to the unit using a special connector that is supplied with the kit initially . The wires are inserted into the connector and snapped there. Turn on the engine and check how the lights work - when the engine starts, if installed correctly, they turn on automatically, when it stops, they turn off.
- If the system passes the test, you can attach the control unit . After this, the lights themselves are fixed.
Connecting the DRL control unit on Lada Priora in accordance with GOST R 41.48-2004
What are the requirements for daytime running lights on the Priora VAZ 2170?
Almost all European-made cars are equipped with external lighting devices (DRL) for better visibility during daylight hours. However, not all domestic models have this option. Some motorists believe that they can get by with side lights, but their brightness is clearly not enough to indicate the car while driving. Thus, car owners will have to worry about light tuning of their vehicle.
DRL standards
According to technical standards, daytime running lights on the Lada Priora provide a glow angle of 30°, of which ten degrees are above the horizontal line, and 20° below. The light from DRL headlights should be visible from a distance of 150-200 m even in sunny weather, with a light spot area of at least 40 cm².
Some car enthusiasts, after installing DRLs, test the visibility of the car from 5 meters, and often in the dark, forgetting the true purpose of such lighting. The efficiency of the flashlights must be determined on a sunny day from a distance of 150-180 meters. Their functions do not include lighting the route - only indicating the presence of a vehicle on the road.
Functional tasks of DRL and GOST standards
Non-standard daytime running lights on Priora must be operated in a certain mode:
- The DRL switches on and off automatically simultaneously with the ignition key being moved to a certain position.
- The DRL should be turned off automatically after the headlights are turned on, with the exception of its immediate activation to signal other road users.
- It is necessary to provide the ability to turn off and activate the running lights using a separate control unit.
The order of placement of car daytime lighting elements is regulated by GOST 41.48-2004 standards:
- The outer edges of the optical device must be no further than 400 mm from the corresponding overall width of the vehicle.
- The distance between the inner edges of the lighting fixtures should be no more than 600 mm; this parameter can be reduced provided that the vehicle width is less than 1,300 mm.
- The height of the DRL is set no lower than 250 mm and no higher than 1,500 mm from the level of the road surface.
The installation of additional lighting system devices is individual in each case and depends on many factors. However, you should always comply with the requirements outlined above.
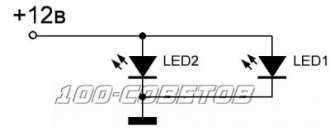
Connection via 5-pin relay
Now it's time to learn how to connect running lights via a five-pin relay. The scheme is the most universal, and was assembled to eliminate the disadvantages of previous options. First, about connecting the relay for DRLs:
- 30 – to the positive terminals of LED modules;
- 85 – to the positive wire of the side lamp;
- 86 – on the car body;
- 87a – to “+” from the ignition switch;
- 87 – do not connect (isolate).
The circuit with a five-contact relay works as follows. When you turn the key, +12 V is supplied to the DRLs, thereby turning them on. If you turn on the side lights or headlights, the relay will open contact 87a and close inactive contact 87. As a result, the DRLs will go out and the side lights will turn on. The circuit fully complies with the requirements of GOST and traffic regulations and can work with side lights even based on LEDs.
However, the circuit still has one negative point - the DRLs will turn on immediately after turning the ignition switch. That is, if you turn the key in the ignition but do not start the car, the DRLs will light up.
Despite the existing drawback, the circuit is quite successful, but in order to correctly connect the DRL via a five-pin relay, you will need to supplement the circuit with a voltage stabilizer.
This switching option is interesting because the path of current flow through the running lights is independent. This allows you to install light sources of any type and power in headlights and DRLs.
What kind of daytime running lights can be installed on the Lada Priora: popular solutions
There are no standard places for the location of DRL on the VAZ 2170, but it is possible to install them instead of fog lights. The technology is simple and won’t take much time, but there are a few more options to consider:
Beacon DRL-UNE
This device is suitable for organizing daytime running lights on a Lada Priora car, and there is also a function for duplicating turns. The device is equipped with electronic overvoltage protection. White LEDs are used as a light source, which demonstrate the following characteristics:
- The glow temperature range is 6,000-6,500 K.
- Luminous flux is 5-6 lm for one LED.
- Power – 0.02 W per chip.
In addition to two headlights, the kit includes two metal mounting plates, wires and fasteners. Car enthusiasts practice installing such DRLs in the holes in the lower part of the bumper. The connection is made by three wires, of which the yellow one is responsible for the operation of the turn signal; whether to use this option or not is a matter of taste.
The red wire from the lamps is connected to “+”, and the black wire to “-”; the circuit can be based on a five-pin relay when the DRL is connected from the car’s generator. It is advisable to lay the connecting wires in a corrugated section.
Tuned angel eyes headlights
Based on the standard VAZ 2170 headlight masks, some manufacturers offer Liserlight products assembled like “angel eyes”. The design includes an LED-DRL and an LED turn signal module. To implement this type of daytime running lights on the Priora sedan, you will have to disassemble the headlights yourself and change the masks. The cost of one frame can range from 10 to 12 thousand rubles, depending on its coating options (black or chrome).
For motorists who do not want to bother with disassembly and assembly, domestic studios offer ready-made lensed headlights assembled with frames. Various configuration options are possible; if xenon is available, it is necessary to install and connect the ignition unit, fuse and relay. In any case, the load on the electrical network is reduced to such an extent that you will forget for a long time about how long it takes to change your car’s battery.
Eagle Eye LEDs
Due to its low cost, it is a fairly popular way to organize DRLs; moreover, such LEDs do not have a clearly defined scope of application. For good visibility, two sets of 3 LEDs are usually used. The total power of the devices will be in the range of 12-15 W.
Installation and connection does not cause any difficulties. The installation process involves drilling holes with a diameter of 10 mm in the bumper or its grille. Connecting the electrical part does not require too deep knowledge, the most basic diagram is:
- The black wire connects to the "-" on the steering column.
- The red “+” wire is connected to the ignition switch.
But you need to take into account that this option does not comply with GOST standards, which are described above. Therefore, the method is acceptable only as a temporary solution.
Chinese LEDs "Eagle Eye"
This is a fairly common way to install running lights on cars. It is often used on Lada Priora models. Since such LEDs do not have a clearly defined purpose, their equipment is not sufficient to be used for a complete DRL installation. Simple tips will help you get rid of problems that may arise during the installation process. You can do all this yourself:
- Plates are cut out of plexiglass and holes are made in them.
- On separately purchased eyelashes, the places where the plates will be installed are cut out.
- The plate in the eyelashes is fixed with hot glue, and epoxy is poured onto the joints.
- After the resin has dried, the eyelashes need to be puttied, trying to do it with your own hands as carefully as possible.
- Final work: filing, degreasing, priming and painting with varnish.
Chinese LEDs "eagle eye" for Lada Priora
- The excess length of the LEDs can be sawed off so that the threads do not rest against the headlights.
- Further installation can be carried out similarly to installing DRLs in standard places on a Lada Priora car.
How to install daytime running lights on a Lada Priora - step-by-step instructions
- First of all, remove the bumper and clean it.
- Next we make the markings - this is perhaps the most difficult and crucial moment. It is important to understand here that a mistake can ruin everything and instead of installing additional. elements, you will have to solder extra holes and paint the bumper. Before marking, we cover the area with masking tape, after which we remember our geometry and drawing lessons. In this case, 10 holes are needed, 5 on each side.
- After marking, take a drill and start drilling. If you are not confident in your abilities or are not comfortable with the ruler, take DRLs in one housing, so there will be less chance of missing.
- In order to prevent the DRL contacts from oxidizing, it was decided to put a sufficient amount of lubricant for electrical contacts in their housings in order to prevent possible oxides in the future.
- We lay the wiring from the inside of the bumper and secure it with sealant or hot glue.
- We install the bumper in place and start connecting.
- We connect daytime running lights. There are a lot of options here, as you like, you can make them light up constantly when the engine is running or turn on separately. You can attach it to the PTF or choose your own option. If difficulties arise, contact an electrician.
The end result is in front of you. Some may think that it is not bright enough, although such lights will be quite enough to make your car visible on the road.
addelectronics › Blog › DRL (long-range incandescent) - do it yourself!
Greetings to all blog readers. Congratulations to everyone on the new year 2020, and since it’s a new year, we need to do something new, so I decided to quietly post developments on devices so that people can repeat, share thoughts on improvements, and so on. There are a lot of devices to describe, but I’ll start with the most “running” one - full-heat DRLs with auto mode.
The idea of this device began its journey back in my 2109, and this is already more than 6 years ago, and each time the device was gradually refined, something changed, something was upgraded. It all started with a simple 555 timer, then it all evolved into a device based on attiny13, but turning it on and off was forced (+12V appeared from the generator, turn on the DRL), then it all evolved to setting the thresholds for turning on/off the DRL by voltage (we manually set the thresholds )
Well, in the end, it all evolved to the automatic calculation of the threshold for turning on the DRL based on the voltage in the on-board network (it doesn’t matter what the voltage on the battery is - fully charged, or extremely discharged)
As I wrote above, it all started with Attini13, but time and technology do not stand still, and that’s why I recently switched to STM8S003F3P6 processors.
The advantages are obvious - the cost is half the price (I always buy from 100 pieces, the price tag is generally minimal) - 8 times more FLASH memory. Yes, yes, it’s been a long time since you have to sit and masturbate with assembler if something doesn’t fit into your flash volume. -5 channels 10 bit ADC -much more advanced timers Well, now, yes, someone will definitely say - but to do this you don’t need anything at all. But firstly, I always make devices that are intended for my car and actually for myself. Do I want to make for myself some kind of wretched blinker on 1 transistor? - definitely not! And you can do it, good luck!)
Actually speaking about programming. I write programs for STM8S in IAR Embedded Workbench with a license (for training with a code limit of 8 kb). I don’t need more than 8kb, because for toys and larger devices I already use STM32 :) and there are no restrictions.
Pros of using DRL
The advantages of using DRLs can be considered using two examples:
- Most cars in use have fairly high power and torque. All this allows them to quickly accelerate to high speeds and perform various maneuvers. If, while one car is performing a dangerous maneuver, the other driver does not notice the vehicle coming towards you, an accident may occur.
- It seems that during the day in the sunshine the car is clearly visible. But the glare from the windows and mirrors of cars coming towards you dulls visibility. In this case, DRL can protect you from an accident.
Difficulties with replacement
The most convenient thing is to replace the turn indicators. In other cases, you have to twist very tightly and stand in this uncomfortable position for a couple of minutes until the job is done. This is not very convenient, because the light bulb is a consumable, but the engineers could make sure that replacing it was as easy as the plastic steering wheel insert on the “ten”.
Another inconvenience is that you have to remove the battery. Nobody argues that it is better to turn off everything before starting work. But the battery is removed for reasons of rationality - the battery takes up a lot of space and interferes with working with your hands while you stand in an awkward position.
Daytime running lights (DRL)
Is installing daytime running lights (DRLs) yourself a retrofit of the car and how does it affect the deterioration of road safety?
Daytime running lights (DRL)
What are DRLs ? These are additional light sources installed in front of the car and serve to increase its visibility on the road during the day.
The main advantage of DRLs is that they are much more economical than low beam headlights due to the fact that they are based on LEDs, and therefore consume less fuel. From 2011 all new cars will be equipped with such lights.
Daytime running lights (DRL)
The Technical Regulations on the safety of wheeled vehicles, together with UNECE Regulation No. 87, determine the requirements for DRLs. Firstly, they must occupy an area of 25 to 200 sq. cm and emit light with an intensity of 400 to 800 cd . Secondly, DRLs must be installed no lower than 250 and no higher than 1500 mm . The minimum distance between a pair of lights is 600 mm, and from the edge no further than 400 mm . Third, the DRLs must be turned on when the engine is started, and turned off when the headlights are turned on, except in cases where the flashing of the headlights is used to provide short-term warning lights.
And by the way, they don’t need adjustment, like high beams, so as not to blind oncoming cars.
How to install Daytime Running Lights (DRL) with your own hands (DRL)
We also note that in Kazakhstan, independent installation of DRLs refers to re-equipment that must be legalized by the police.
The procedure for making a note about the installation of DRLs is as follows: come to the technical supervision department of the UAP, submit an application for re-equipment, install the lighting devices at a specialized service station, receive a certificate from the service station (act, conclusion) about the work, come to the technical supervision department of the UAP for inspection and obtain permission to enter a mark in the SRTS (registration passport). Afterwards, you can go to the REP at your place of residence or a special service center to replace the SRTS.
Daytime running lights (DRL)
Daytime running lights (DRL)
According to ST RK 1418-2005, re-equipment of motor vehicles is the introduction of changes to their design by eliminating the provided or installing unspecified components and pieces of equipment, as a result of which their properties, parameters and technical characteristics specified by the manufacturer change: - body type, engine; — availability of special non-removable equipment; — number and placement of passenger seats, fuel tanks; — dimensions and weight parameters; — engine model, its weight and power; — fuel supply system, brake system; — quantity, installation locations, viewing angles, light and color characteristics of lighting and light signaling devices; — chassis, steering, as well as structural components that provide visibility, visibility, passive and post-accident safety.
vote
Article rating
Lada Kalina Hatchback Led › Logbook › DRLs in plugs PTF Kalina 1
Hi all. This idea arose a long time ago, but no matter how much I look for ready-made solutions, there are none for Viburnum 1 and there never will be. I wanted to do something unusual, like no one has done before. For viburnum 2 these plugs with DRL are complete, just like for other cars.
There is such a solution, but it seemed to me too expensive, I agree with a ruble, but not two. Well, I haven’t seen it on anyone yet, and there is no photo of such a grille on a viburnum on the Internet.
Begin. We use 21mm eagle eye diodes
The eagle eye diodes themselves have two designs. Some come on a board, others on a resistor. Both work well, but each one needs to be additionally sealed, as they are very afraid of moisture. I don’t know about others, but I’ve been using them for about 4 years and I can say that if they fail, they stop lighting altogether and don’t flicker like the others.
First of all, we create a layout
We’re doing a fitting, I wanted to install 3 diodes first, but 4 can fit, but with a little modification.
On two diodes we cut the leg, they will be on the top and the third from the top - this is necessary so that the plug becomes like its own and does not rest against the wall. The leg is aluminum, can be sharpened with a file.
We disassemble and seal the lens with sealant.
Next, we assemble the finished solution and additionally seal the wire output with sealant. Make the wires with a reserve so that if you replace the diode, you have access to them. 20 cm is quite enough.
All connections must be made through a driver and stabilizer for longer LED service. But I found a different solution for myself. This is an LED dimmer. Specifically, in my case, its use is relatively irrelevant, since the DRL is turned on from a button in the cabin.
These diodes are according to GOST, I checked it personally, if you doubt it, take a tape measure and measure
I have them together with the upper module, which according to GOST do not belong to DRLs, but I like it better. The dimmer allows you to turn the power to a minimum, and at night you can continue to drive them without creating a glare on oncoming traffic, although they are not blinding anyway. The placement of the diodes in the plugs at an angle does not affect visibility in the daytime, and at night it does not blind oncoming people.
READ How to connect fog lights directly
Actually examples
Do not take into account the UPPER MODULE (this is a separate post earlier) At the same time, fog lights. we have it in its place and the light is the same, the DRLs do not interfere at all
The diodes have been working for the second year now - no burnouts
We have it in its place and the light is the same, the DRLs do not interfere at all. The diodes have been working for the second year now - there are no burnouts.
Source