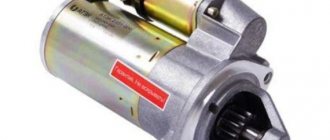
Starting a modern car engine is ensured using a starter. It is an electromechanical device, which is based on an ordinary electric motor powered by a battery. Its design is quite simple and relatively reliable, but it also requires timely maintenance and repair.
One of the most common malfunctions of the starter is wear of the electric brushes, as a result of which it loses the ability to work fully, and over time it stops functioning altogether. Fortunately for car owners, this breakdown is not critical, if, of course, it is diagnosed and repaired in time. In this article we will look at how to replace starter brushes with your own hands in VAZ-2109, 2110 cars.
The principle of operation of the VAZ starter
First, let's look at the principle of operation of the starting device. As already mentioned, the starter is an electric motor that draws direct current from the battery. VAZ-2109 and 2110 cars are equipped with four-pole brush starting devices with solenoid relays. Externally, they differ in size and type of fastening. In everything regarding the principle of operation, the “nines” and “ten” starters are identical.
The device is switched on as follows: when the ignition key is turned, voltage is supplied to the windings of the solenoid relay and brush, as a result of which its drive engages with the flywheel crown. At the same time, the electric motor starts. Its shaft begins to rotate the flywheel through a bendix - a specially designed gear that ensures reliable engagement. When the crankshaft speed begins to exceed the number of rotations of the starter armature, the latter is disconnected using a return spring.
Purpose and role of brushes
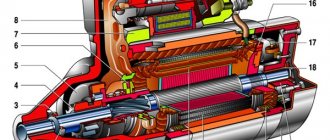
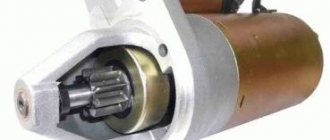
In most modern cars equipped with internal combustion engines, the starter is responsible for starting the engine. This electric-type unit has not changed fundamentally over half a century of use. Its main part is the DC electric motor, reinforced by a relay and a drive unit. The starting unit consists of the following components:
- anchors;
- brush assembly;
- prefabricated housing with multi-turn winding.
Let's take a closer look at the nodes.
- The stator is the stationary part of the starter. More often, ELM stators are used, in which the magnetic field is created by field windings. However, starting devices based on standard magnets are known.
- The anchor is the moving part of the device. The coils, commutator, and gears are located here. The movement of the electric motor occurs due to the magnetic field formed around the coils.
- The brush assembly is a part of the PU, consisting of a holder and graphite elements. The latter are connected to the rotor, which ensures a constant supply of current to the armature coils.
All elements are structurally and fundamentally the same. Each typical brush consists of two main parts: the brush itself and the conductor part.
Brushes and brush holder
Structurally, the VAZ starter brush is a graphite or copper-graphite parallelepiped measuring 14.5x13x6.2 mm. A stranded copper wire with an aluminum fastener at the end is connected to it and pressed into place.
Considering that the VAZ-2109 and 2110 starters are four-pole, four brushes are needed to ensure their operation. Two of them are connected to the ground of the device, and two are connected to the positive wire coming from the battery.
Each starter brush is fixed in a separate cell of a special block - a brush holder. It is made of dielectric material and is designed not only for reliable fixation, but also for pressing them against the working surface of the armature, providing the so-called sliding contact.
How to check visually, using a light bulb or multimeter
The simplest and most effective way to check generator brushes is visual.
To do this, dismantle the brush system. In this case, it is not necessary to completely dismantle the generator from the car. In many cases, the brushes can be removed without removing the alternator from the vehicle. To do this, it is enough to free access to the rear panel of the generator, then dismantle the brush system or the electronic voltage regulator, if it is structurally combined with the brushes.
We recommend: Review of aviline parking sensors (aviline) 4 sensors: description, model range, installation and connection
Next, measure the remaining length of the brushes (size A in the example) extending beyond the fastening area. It should be at least 5 - 7 millimeters.
In the case of a combined design with a small residual length of the brushes, it is necessary to determine the nature of the repair:
- You can replace the brushes separately from the relay regulator. To do this, it is necessary to disassemble the structure. Sometimes this is technically impossible. In any case, the repair will cost about 600 rubles, plus about 400 rubles for the cost of two brushes. Brushes should be replaced in pairs;
- The cost of a voltage regulator starts from 1,200 rubles, so in most cases it is more profitable to change the entire design. This will leave a spare regulator, which may be useful later. It can be repaired slowly, independently.
You can check the generator relay with brushes using a load light.
You can use any salon light bulb as a lamp.
Separately, the generator brush can be checked using a multimeter by measuring the resistance between the copper terminal and the working surface of the brush. The resistance should be less than 1 ohm, and should not change when the copper lead moves.
Main fault
The starter brush most often fails due to wear. It simply wears off and stops contacting the collector plates. At first, wear may not affect the operation of the starter, but over time it will definitely make itself known. It also happens that the VAZ-2109, 2110 starter brushes are destroyed due to mechanical damage, for example, due to a faulty commutator, manufacturing defects, faulty bearings, shaft support sleeve, etc. As for normal wear, this malfunction is inevitable, but it can be easily removed with your own hands.
Diagnostics
How can we determine that the cause of the problem was the worn starter brushes of the 2109, 2110 VAZ model? First, you should make sure that there is no break in the electrical circuit of the device. Check if the connection of the wires to ground is secure. If everything is fine with them, take an insulated wire and connect the positive terminal of the starter to the positive terminal of the battery. Don't forget to turn the ignition into neutral before doing this. If there is a problem with the wiring, the starter will operate and start the engine.
If this does not happen, the starter will have to be dismantled for further diagnostics.
Removing the starter
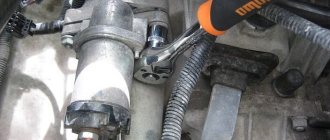
We begin dismantling the starting device by disconnecting the ground wire from the battery. For greater convenience, it is better to place the car on the inspection hole and remove the engine protection. It is easier to remove the device from below.
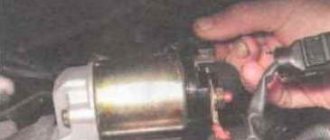
Next, we find the starter and disconnect the traction relay power wire from it. After this, unscrew the nut securing the positive wire (key set to “13”). Using a “15” wrench, unscrew two (for “nines” three) bolts securing the starter to the clutch housing. We dismantle the starting device. As you can see, the process is quite simple and does not require any special skills.
additional verification
Before you start disassembling the starter, you can check it again. To do this, the device must be connected to ground with the appropriate terminal and to the positive terminal of the battery. If it shows no signs of life, try turning it over. Usually, if one starter brush or several of them are worn out, they sink and lose contact with the commutator, and when turned over, everything falls into place, and the electric motor can work as if nothing had happened.
Soldering
How to prepare starter brushes for soldering without welding equipment, at home:
- clean off the mastic;
- cut off the old brushes and tin the copper on the “tails” to increase the contact area;
- heat the “tails” with a soldering iron and remove the brushes;
- Solder new parts into the vacant spaces.
If the brushes do not fit well, they must first be carefully ground on all sides. The hole for the brush wire can also be widened with an awl. How to start soldering:
- Place the brush on the winding.
- Fasten with wire.
- Cover tightly with solder - flux or rosin.
- Weld copper. This is done under constant voltage.
It is recommended to use a current of 40 A from graphite electrodes. What you will need for work:
- fully charged battery;
- cables with contacts on clothespins;
- graphite brush;
- acid;
- refractory solder, flux;
- strong soldering iron 42 V minimum;
- dark glasses or welding helmet.
We disassemble the starting device
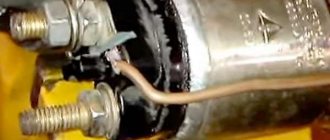
At the initial stage, you need to unscrew the two screws securing the shaft cover on the back of the starter with a screwdriver. Remove the cover, O-ring and gasket. After this, loosen the two tie rod nuts and dismantle the brush holder assembly. In this case, under the action of springs, the brushes will fall out of their seats, but will be held on the contact wires.
Next, you should inspect the brush holder itself. If it shows signs of mechanical damage, it needs to be replaced. Maybe this is where the cause of the malfunction lies. Pay attention to the manifold of the device. All of its copper plates must be in place. If they show signs of wear (chips, cracks, traces of the effects of a short circuit), the anchor will also have to be replaced.
Varieties
There are several types of brushes:
- artificial graphite - obtained by pressing and firing from coke;
- composite material.
Universal and combined brushes are widely used. Due to the inclusion of copper, such elements hold better and wear out more slowly. True, they also have disadvantages. So, the main thing is the increased abrasive effect, leading to accelerated wear of the anchor collector.
A classic starter has a different number of brushes. The usual number is four, six or eight. One half of the parts is connected to ground, and the second to the coils.
Replacing VAZ starter brushes
The process of replacing brushes will not take more than 20 minutes. All you need to do is unscrew the contact wires of each of the elements on the brush holder, and connect new ones in the same way.
Next, each starter brush 2110 or 2109 is placed in its seat on top of the pressure spring. When this is done, the brush assembly must be mounted on the commutator. To do this, the brushes are alternately recessed inside the cell, and the armature is rotated in one direction. After this, we assemble the starter using the reverse algorithm. Before installing the starting device, we check it as described above. If the starter works, it means you did everything right.
How to replace parts and assemble a starter
- It is necessary to make a visual inspection and, if necessary, replace the brushes or brush holder assembly. Immediately before assembling the starter, it is recommended to carry out its maintenance, that is, cleaning all elements.
- The plates of the elements to be replaced are installed on the commutator, and they must be centered by putting on the springs and brush holder.
- The assembly is mounted on the commutator armature, the sealing sleeve is inserted into the section of the housing.
- A manifold cover and a seal ring with a gasket are put on the armature; The collector cover is mounted and the fixing bolts are inserted.
- Gaskets, ring clamps, and sealing rings are installed in their places; A shaft cover is placed on the manifold cover and tightened with bolts.
- At the final stage, the power cable is connected to the electromagnetic starter, and the nuts are tightened.
Any malfunction of the VAZ 2110 car can be repaired in a car repair shop, but why overpay if with the help of videos and photos you can do everything yourself. If you repeatedly replace brushes, you will not need detailed instructions, since the actions are already performed automatically. In such a situation, you can save a lot by buying only consumables, the price of which cannot but surprise. You can also find out about replacing the Bendix starter on our website.
Which brushes to choose
A few words about the brushes themselves. If you decide to replace them, then you should change not one or two, but all four. Otherwise, after some time you will have to return to this procedure again, and uneven wear will not bring anything good.
For convenience when choosing, use these catalog numbers:
- 3708000 – set of brushes;
- 2101-3708340 – brush assembly assembly.
By indicating them to the seller, you definitely can’t go wrong.
Some useful tips
To keep your starter brushes working as long as possible, follow these tips:
- When replacing, you do not need to buy them in the first tray you come across at the car market. It is better to contact a specialized store and buy certified spare parts. You should also not adjust brushes from another make or model of car, grinding them to the desired size.
- When starting the engine, do not force the starting device to operate for more than 5-7 seconds. This way you can burn not only the brushes and commutator, but also the winding of the electric motor, as well as the wiring that supplies it with power. In addition, there is no need to try to start the engine with a obviously discharged battery.
- Do not allow the starter to operate while the car engine is running, and if such situations arise involuntarily, immediately contact a car service center.
- Keep the device body clean. Dirt and oily deposits can cause a short circuit.
- Pay attention to the operation of the starter. If you know that the battery is charged, and the starting device does not provide the required number of crankshaft revolutions for starting, most likely there is a short to the housing, a clogged brush assembly, or a break in one of the windings. In this case, it is also better to immediately contact a service station.
- Rapid wear of the brushes can also cause a malfunction of the bearing or shaft support sleeve. In this case, the anchor warps and “eats” them on one side. It is quite difficult to detect such a malfunction without disassembling the starter, so pay attention to the sound the device makes during operation.
Generator brushes - element information
The brushes we are interested in are made of graphite, which is why they are often called carbon. They are used not only on cars with an internal combustion engine, but also on a wide variety of mechanisms and machines equipped with an electric motor (machine tools, lifting devices, urban public transport, and so on). The most common are EG-4 brushes.
This brand is suitable for installation on many cars of different years of production, as it has standard operating parameters. Less commonly used are other products (for example, EG-61), which are characterized by a high margin of safety due to their impregnation with special compositions.
On domestic cars, the generator and brushes for it are located under the right front headlight of your “iron horse”. They are not difficult to find. It is enough to open the hood to see the generator - its winding and two lids, which look like tin cans, come to the surface.
When do you need to change generator brushes?
During scheduled maintenance, no one pays attention to the small elements of the generator, of course. It is for this reason that the breakdown of its brushes always comes as a surprise to the driver.
Experts advise that after 50 thousand kilometers (or once every four years) you must check their serviceability and functionality, and then no problems will arise with the operation of the generator.
It is noteworthy that you can check the brushes (and, if necessary, change them) without dismantling the rather bulky generator. In addition, the following symptoms may indicate the need to look under the hood of your car and check the graphite brushes:
- unpredictable shutdown of electronic devices in a vehicle, occurring for unknown reasons;
- reducing illumination of the car interior and external light sources;
- voltage reduction;
- a car battery that discharges unreasonably quickly, which, moreover, is then very difficult (and sometimes impossible) to charge.
Any of these symptoms tells the motorist that he most likely needs to remove the old brushes and install new ones instead. You can check old products for functionality very simply.
We should remove the negative from the battery, remove the voltage regulator and visually evaluate to what height the graphite parts we are interested in protrude from their “shelter”.
Brushes need to be changed urgently if their height is less than five millimeters.
Replacing generator brushes - from A to Z
Let’s say right away that this operation is very simple and does not require any special skills from the driver. First, as already mentioned, you need to remove the negative from the battery, then remove the regulator (it is located on the opposite side of the generator), and then perform the following steps:
How to remove the headlight on a viburnum
- Thoroughly clean the holder seat, as well as the pressure springs and slip ring, from soot and dust. This operation is performed using a soft bristle brush. Sometimes it may be necessary to grind the graphite brushes into the commutator using fine glass sandpaper (its grain size should be about 100).
- Install new products and make sure that they move freely in the brush holder.
- Reassemble the assembly in reverse order, and then connect the previously connected wire to the battery.
If you bought a prefabricated structure (regulator plus brushes), its installation also does not cause any problems.
Turn off the “minus” wire, remove the cap made of rubber from the “positive” wire, and then dismantle the block by unscrewing the fastening nut.
Then you will need to remove the plastic casing and remove the three spring clips located around the perimeter of the block.
Using a Phillips screwdriver, unscrew the brushes along with the voltage regulator, and disconnect all the wires leading to it. Mount the purchased prefabricated structure in the vacant space. Operation completed!
During a relatively recent repair of the cylinder head, the generator was simultaneously serviced, where the voltage regulator relay was replaced. Half a year passed and the generator began to remind itself. I began to notice that at idle (when you stop at a traffic light or just at the end of a trip), the arrows of the fuel level and voltage sensors tremble. They trembled something like this:
At the same time, the voltage on the voltmeter rose to 14.7, and sometimes up to 15 Volts, which is already unnecessary. But, interestingly, if you literally let the engine throttle before the cutoff for a second, the voltage returned back to 14.0 -14.1 V.
In general, I drove around like this for about a week, hoping to find new brushes for the old relay-regulator, but I didn’t find anything. In the end, I decided to resolder the brushes from the already installed relay to the old one, which is native to the generator. Along the way, the mileage for changing the engine oil came up.
I bought Mobil ESSO Ultra 10W-40 and an “SCT” oil filter in bulk. While the oil was draining, I began to make my way to the generator.
I really didn’t want to remove the generator, and before that the engine protection and splash guard, so I climbed over the top.
Source: https://litezona.ru/kak-pripajat-shhetki-generatora/