Before we look at the main topic - how to remove the cigarette lighter of a VAZ 2114, you should first find out - what is a cigarette lighter, where is it located and how to use it?
A car cigarette lighter is a special electrical device, usually located on the front panel of the car and used for lighting cigarettes (hence, as you might guess, the name), as well as connecting various electrical appliances and tools (more precisely, they are connected to the cigarette lighter socket, and not into the cigarette lighter itself, which is only a removable part. However, in most cases, both parts of this device are called the same...)
Cigarette lighter VAZ 2114
Inside the connector of this device there are two contacts, which, in turn, are connected by wires to the on-board network.
The removable part, which serves for lighting the cigarette, is also designed quite simply - it contains bimetallic contacts and a conductive spiral, which heats up when connected to the network (the vast majority of cigarette lighters also have a button that turns the heating process on and off, which protects the device from quickly burning out (in case the heating was constant...)
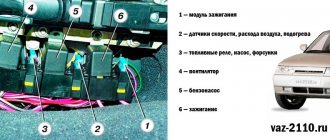
It should be noted right away that in addition to its main purpose, a huge number of different equipment can be connected to the cigarette lighter socket (for this it must have a suitable connector).
Among them:
- chargers for mobile phones;
- compressors for tire inflation;
- car vacuum cleaners;
- mini refrigerators;
- audio recorders;
- measuring instruments, and much more.
Thus, the cigarette lighter is a fairly universal and necessary device inside the car, which is why it is so important that it is in good condition.
Replacing the cigarette lighter yourself
The most common and minor breakdown in a car occurs due to the cigarette lighter. Many car enthusiasts who don’t even smoke face this problem, because modern devices used in the car are all charged from the cigarette lighter. This includes a telephone, a navigator, a recorder, an electric pump, refrigeration equipment and much more that is needed on the road.
With so many necessary things, the cigarette lighter often fails, so it must be handled with special attention. But if it does break, then how to solve this problem? Let's take a closer look at this.
Video instruction
The connection is carried out in the same way for all models of the VAZ family: 2110, 2111, 2112 or 21124. If the cigarette lighter does not work, then before removing it and proceeding with dismantling, you need to buy a new part.
There are many options on the market. The main factor when choosing a cigarette lighter is the cost of the element. A price that is too low indicates that low-quality materials were used in production. When heated, they may be damaged, and the cigarette lighter itself may not work correctly. Short elements are sold according to European standards. This part will not be suitable for older models - you will have to change the socket itself, additionally purchasing a Europanel.
The video will tell you how to choose a device for a VAZ 2112.
How to replace the cigarette lighter fuse
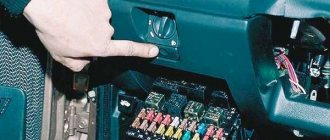
If your device does not receive the required voltage, then first check the fuse. To do this, we find the fuse box in our car; the location is different in different cars, most often on the left side of the steering column. We open the cover carefully so as not to break anything or tear off the wiring.
Two rows of fuses will appear before our eyes, each responsible for a specific device. The numbers of each fuse are located on the roof of the box, so it will be easier to find the one we need. A table with a breakdown of each CIG of your model will help you find it. Here is an example, but not all:
| № | Protected Circuits | Denomination |
| F1 | Rear wiper | 15 A |
| F9 | Cigarette lighter | 30 A |
| F15 | Central locking, internal door handle locking | 30 A |
After determining the location, take it and carefully change it with a special key (tweezers, fingers) to a working one.
The interior light does not come on - how to find the problem
If you notice that the light in the interior of the VAZ 2114 has stopped turning on, then troubleshooting should start with the fuse. This is very easy to do for the reason that the ceiling fuse located in the common block is also the brake light fuse. If the light in the cabin stops lighting, and the brake light along with it, then the fuse should be replaced. If the brake light works, then the search should continue.
The next thing you should pay attention to is the condition of the incandescent light bulb. To check it, simply remove the cover and check whether the hair has burned out. In case of malfunction, the lamp simply needs to be replaced with a similar one.
Many experienced motorists advise immediately changing the interior lighting from conventional to LED. This will help you forget about the problem of burnt out light bulbs for good.
If, after examining the light bulb, it turns out that its filament is intact (or after replacing the light bulb the light still does not light up), then you should carefully inspect its socket and, if necessary, clean all its contacts with fine sandpaper.
If, even after removing the oxides, the light in the interior of the VAZ 2114 does not light, then you should check the presence of voltage at the contacts of the lamp using a voltmeter (or tester). If there is no current, then you will have to ring the entire circuit one by one and, if a break is detected, replace the wiring. This operation is not difficult, but can take a fair amount of time.
It is for this reason that the continuity test of the chain can begin not from the lampshade, but from checking the limit switches. As many 2114 owners report, very often the problem lies with them. If the limit switches turn out to be faulty, they will have to be replaced, since this part is practically beyond repair.
Before throwing away the old limit switch, you can try to adjust it. Very often, the cause of the malfunction may be insufficient pressing force or poor contact, as a result of which the switch simply does not operate.
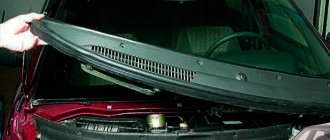
How to remove the cigarette lighter
The next step in repairing the cigarette lighter may be to illuminate it, but for this you need to remove the cigarette lighter. Therefore, first we disconnect the terminals from the battery. Then we get down to business. There are several ways to remove it from the panel.
The first method is to remove the central tunnel lining, but this takes longer. Remove the protective panel from both sides of the passenger and driver's seats. Then use a screwdriver to unscrew the screws that secure the dashboard on the back side. To make it more comfortable, you can move the seats forward.
Afterwards, you need to remove the gearshift knob lock and, lifting the upper area of the dashboard, remove it. This must be done very carefully so that the cigarette lighter wires remain in place. Find the connector and disconnect it from the bottom of the cigarette lighter. But there is another option. In this case, you need to be more careful so as not to break the clamps.
Now let's look more specifically at the second method. First, let's look at the inside of the cigarette lighter; there should be rectangular holes there. Then we pick up a special puller for the socket. If it is not there, then you can use a thin screwdriver, pressing it on the latch while simultaneously turning the metal bottom of the cigarette lighter. Then the clamp will not interfere with pulling the nest out of the cladding.
When is replacement not needed?
In some situations, the cigarette lighter may not please the owner due to its lack of functionality. For now, this is not a reason to be inclined to replace it. First, it is advisable to check the serviceability of the fuse. It would also be a good idea to make sure there is stable contact with the ignition switch. The indicated “bottlenecks” should be carefully checked, and then a verdict about a malfunction of the cigarette lighter socket should be made. In most cases, the problem can be solved by correcting the specified defects. And then you won’t have to figure out how to remove the cigarette lighter.
Common cigarette lighter malfunctions
Among the most common cigarette lighter malfunctions you can see the following breakdowns and defects:
- Blown fuse element. Let us remind you that the mounting block with inserts is located under the panel in the cabin. We are interested in the component labeled “F20”.
- Broken filament of the power element.
- Progressive corrosion on the socket contacts, as a result of which they do not “show” sufficient electrical conductivity.
How to replace a light bulb in a cigarette lighter
Having completed the previous description of removing the cigarette lighter, you can begin replacing the light bulb. On the metal cup there is a plastic socket (green, red or other color), which contains a light bulb, which you will immediately see.
Change it to a new one. They are sold in a car store; there are a lot of such little things in different colors. You can even create your own tuning by buying a light bulb of a different color. Now we perform all the procedures in reverse order to assemble the cigarette lighter to its permanent place.
Problems with the cigarette lighter and their elimination
Very often, especially in cases of constant operation or increased loads on the connector, the device fails. In some of these cases, the only solution will be to replace the VAZ 2114 cigarette lighter, while in others, you can try to fix this problem by repairing it.
Before you begin dismantling the cigarette lighter or starting to repair it, you should check the reliability of the connection of the wiring harness suitable for it. This can be done by checking the tightness of the fasteners in the block (it is designated as X1).
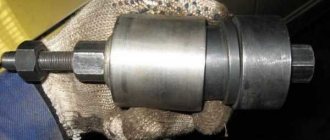
Cigarette lighter disassembled
Among the main breakdowns that occur with a device such as a cigarette lighter are the following:
- poor contact in the connector;
- oxidation of connector contacts;
- fuse blown;
- burning or melting of connector contacts;
- backlight bulb burnout;
- a short circuit in the system that occurs when third-party devices are connected;
- mechanical destruction of the connector.
In the first three cases, you can still try to correct the situation, in the rest you will have to dismantle the device and, except in the case of a burnt-out light bulb, purchase and install a new one in its place (it should be immediately recalled that before changing the cigarette lighter on a VAZ 2114, you should disconnect the battery ).
As for poor contact inside the connector or the presence of oxides, you can try to solve this problem by slightly bending the contacts themselves and cleaning them. If a fuse blows, you just need to replace it with a new, similar one (the fuse you are looking for is designated in the row of fuses as F4 and is designed for a maximum current of 20 amperes).
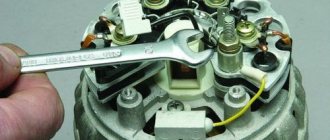
How to replace the cigarette lighter socket
For this operation, first remove the cigarette lighter itself, as described in this article above. Then use a screwdriver on the socket latch to push it out of the housing with the light guide. After checking how long it takes for the coil to heat up, it takes twenty seconds.
It should then return to its original position and make a clicking sound. Sometimes the cartridge is delayed in time or, on the contrary, finishes heating up faster, in these cases it is necessary to adjust it. Use clamps to straighten or compress the contacts on the metal cup. But if the socket is not working, then simply disconnect it from the wires and insert a new working cigarette lighter.
Installing an additional cigarette lighter
VAZ 2110 how to connect the cigarette lighter
For some people, one cigarette lighter is not enough, so they need another one - an additional one. It can be installed under the cover of the on-board control system connector, as there is enough space there. Of course, you can do this in another convenient place.
VAZ 2110 does not work from the cigarette lighter
Instructions:
Make a small hole under the connector cover.
Note: It is important that you have access to the factory cigarette lighter wires. It will be much less hassle if you combine the additional one with the standard one
If it is located far away, then a long wire can be used to connect them.
Connect the wires of the additional cigarette lighter with the wires of the standard one. The colors must match each other.
VAZ 2110 no cigarette lighter light
Note: it is imperative to put it through a fuse, which will protect against spontaneous combustion. In principle, a 10 A fuse is enough. Even this will prevent a short circuit.
Place the additional cigarette lighter in the hole already made and secure it.
How to connect a device to a cigarette lighter without a plug
VAZ 2110 connecting the cigarette lighter
It is not always possible to have a plug at hand that will allow you to connect an electrical device to the car’s cigarette lighter. However, you can make a plug yourself:
Remove the case from the phone.
Note: the case must be leather.
Take two wires and insert them inside the case.
Note: There are usually small holes in the corners of the case. If they don’t exist, then you need to make them yourself. The wires need to be inserted exactly there.
- The plus is located in the center of the case, so the positive wire must be twisted towards the center.
- In this case, the negative wire should be clamped in the opposite direction (when the cover is completely screwed in).
- Insert the resulting plug into the cigarette lighter.
Why doesn't the cigarette lighter work?
Perhaps the fuse was blown due to too much load from the compressor, charger or cigarette lighter splitter. This is one of the most common and easily fixed problems in Lada Kalina. You will need to open the fuse compartment cover to the left of the steering wheel and replace the blown one. Typically used before. 15 or 20A regular flag.
Another common reason for the cigarette lighter not to work is the unbending of the metal contacts inside it. For example, you often use a charger or power strip. Because of this, the contacts inside the cigarette lighter are unbent. In order for it to work again, you just need to bend them. This must be done carefully using a thin flat-head screwdriver without shorting the contacts, otherwise the fuse will be blown out.
If you decide to completely replace the cigarette lighter, you will need to dismantle the console from the handbrake to the instrument panel with the gearbox cover, only then can you remove the device.
Design and purpose of the VAZ 2107 cigarette lighter
In recent years, the functions of the cigarette lighter have expanded significantly. Therefore, the owner of 2107 must know the algorithm for diagnosing its malfunction and repairing it.
Main functions and operating principle of the cigarette lighter
The cigarette lighter of a modern car is a multifunctional device. In addition to its intended use, the following can be connected to its socket:
- phone, smartphone or tablet for charging;
- DVR;
- navigator;
- fan;
- compressor for inflating tires.
The cigarette lighter consists of a socket (socket) and a head (cartridge).
The cartridge is a metal body with a plastic handle in the form of a button. There is a metal rod in the center of the socket that acts as a positive contact. The negative contact in the cigarette lighter is the housing. To prevent short circuits, the body and the rod are separated from each other by a layer of insulator. The contacts are connected by a nichrome spiral, which is a heating element and is located inside the cartridge. When current is applied to the coil, it heats up to a high temperature. When the temperature reaches a certain value, the thermal relay is triggered and the current supply is stopped.
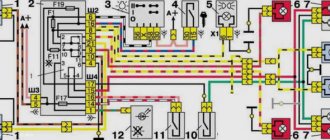
Electrical diagram of VAZ 2115 - 20 cars (left half):
1 – headlights; 2 – fog lights; 3 – air temperature sensor; 4 – electric motor of the engine cooling system fan; 5 – blocks connected to the wiring harness of the ignition system; 6 – engine compartment lamp switch; 7 – block for connection to a single-wire type audio signal; 8 – sound signal; 9 – washer fluid level sensor; 10 – front brake pad wear sensors; 11 – oil level sensor; 12 – generator; 13 – engine compartment lamp; 14 – coolant temperature indicator sensor; 15 – starter; 16 – battery; 17 – relay for turning on fog lights; 18 – coolant level sensor; 19 – brake fluid level sensor; 20 – reverse light switch; 21 – windshield wiper gearmotor; 22 – oil pressure warning lamp sensor; 23 – block for connecting to the rear window washer electric motor; 24 – windshield washer electric motor; 25 – instrument cluster; 26 – mounting block. Conventional numbering of plugs in blocks: A - block headlights; B — electric fuel pump block; C — blocks of the mounting block, ignition switch, windshield wiper gearmotor; D — interior lamp