03/04/2022 24,972 VAZ 2114
Author: Ivan Baranov
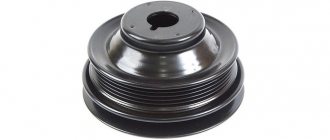
Often, when repairing a car, it is necessary to remove the crankshaft pulley of a VAZ 2114. An experienced motorist completes this operation in a quarter of an hour, but a beginner sometimes encounters many problems during removal. The article provides detailed instructions on how to remove the crankshaft pulley of a VAZ 2114, as well as a video in which you can see the removal process.
[Hide]
What problems might you encounter?
There is a possibility that you may not immediately notice the characteristic disc part under the hood of your car. It may also be difficult to access. It will be difficult to fix the shaft. Over a long period of time, the joints of fasteners will “stick” and you will have to use special liquids.
Related article: How to replace a timing chain in a garage
To perform all the necessary steps step by step, you will need the following tools:
- impact wrench;
- puller set;
- jack;
- a set of wrenches or other tools for removing bolts;
- presence of an inspection hole.
Functionality check
If you decide to check the serviceability of the sensor yourself, treat this procedure responsibly and carry it out correctly. On a VAZ 2114 car, the crankshaft sensor is checked in several ways.
- Using a multimeter. The serviceability of the induction sensor can be assessed by the resistance of its coil. In a working product it is 500-700 Ohms.
- On the multimeter, set the measurement limit to 200 millivolts, connect the probes to the terminals (where the standard wires are connected). Pass a steel object several times in front of the core. The working sensor will “see” the metal and there will be voltage spikes on the multimeter display. If there are none, replace the part.
- But the most accurate results when checking are provided by an oscilloscope. When using this device, one hundred percent results can be guaranteed; it reads all the information from the sensor while the engine is running. It can be observed on the device screen. The engine, during tests, should operate at different speeds. They start with eight hundred revolutions, then two thousand, and raise it to six thousand. If the lines (on the device screen) are of different lengths, you need to look for the cause of the malfunction. Remove dirt, check the pulley for defects, and so on.
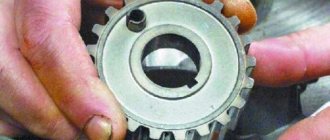
What is needed to remove the crankshaft pulley?
If you open the manual for the technical operation of the machine, the repair procedure is described briefly, and the algorithm itself is simple and easy to implement. But this is at first glance. In practice, the work takes a lot of time. There are a number of difficulties worth highlighting here.
The pulley is located in the engine compartment, where not every element has access. As a rule, the necessary part is “hidden” behind the generator and body parts. To gain access to the assembly, it is often necessary to loosen the tension bolts, as well as dismantle the power steering and generator belts. But even after this, removing the crankshaft pulley takes a lot of time.
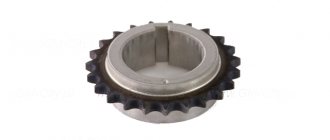
The part of interest is fixed (at the factory) using a nut or bolt. In this case, broaching occurs with maximum torque (to ensure tight fixation). During subsequent operation, the nut is tightened even more.
In addition, the influence of environmental factors and elevated temperatures lead to the appearance of rust and coking of the oil. As a result, the bolt or retaining nut literally “sticks” to the pulley housing. At the same time, it is not always possible to “rip off” a part the first time.
Before unscrewing the crankshaft pulley bolt, it is worth understanding the fixation of the pulley itself on the crankshaft. Otherwise, you will not be able to unscrew the nut. Special devices are used in the service, but in a garage it is enough to put supports under the wheels and move the gearshift lever to the fourth speed position. Another option is to fix the flywheel by resting on its holes or the toothed part of the mount.
Method 3
The stuck crankshaft pulley of the VAZ 2114 can be removed with some effort. Even an additional lever in the form of a pipe does not always help to remove the nut. In such a situation, you can resort to a rather tricky option for removing the spare part - using a starter. Because a working starter drives the flywheel and the pulley itself - its force can be useful for sharply unscrewing the fastener. Step-by-step instructions for removing a part in this way are simple:
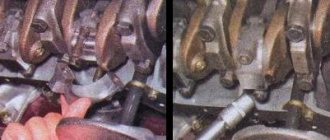
- After dismantling the generator and timing belts, proceed to securely fix the nut with a wrench without blocking the pulley;
- The photo below shows one type of reliable fixation;
- Move the gearbox to neutral;
- For safety, remove the high-voltage wires from the spark plugs;
- Move into the car interior and sharply turn the key in the ignition a couple of times;
- Cranking the starter will cause the nut to loosen.
Before carrying out work, we also recommend treating the contact surface of the nut with a special lubricant. After this procedure, all fasteners can be unscrewed with ease.
Having torn off the nut, remove the part and carry out the necessary manipulations. When reinstalling the spare part, it is not necessary to tighten the nut with great force.
The only difficulty that arises when carrying out such a procedure: souring of the thread. Treatment with chemical lubricants only partially solves the problem, so when dismantling, use great force to successfully unscrew it.
How to remove the crankshaft pulley?
Once you have dealt with the potential difficulties of dismantling, you can get to work. As a rule, the pulley is secured using a nut (on rear-wheel drive vehicles) or a bolt. The biggest problems arise with the first fastening option.
The crankshaft pulley is secured with a nut. The mounting nuts are often designed with lifts to allow them to engage the “ratchet.” In service conditions, craftsmen use “thirty-eight” or “thirty-six” socket wrenches. To speed up the twisting process, an elongated handle and a special fixing device are used, which is placed on the pulley. But how to unscrew the crankshaft pulley when there is no access to a special tool?
In such a situation, proceed as follows:
- Drive the car to a suitable place (this could be an overpass or a pit).
- Move the gearshift knob to the fourth speed position (provides fixation of the crankshaft).
- Raise the handbrake to its extreme position (to avoid accidental movement of the car).
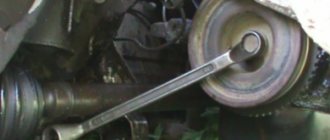
- Take a socket wrench (matching the size of the fastening nut), install an additional “elbow” (a metal pipe will do), and then try to tear off the bolt. Many people ask the question in which direction to unscrew the crankshaft pulley bolt. Here the answer is clear - only counterclockwise.
Video “Replacing the crankshaft oil seal on a VAZ car”
In this video you can see how to unscrew the fastening nut and dismantle the crankshaft pulley.
› Logbook › Replacing the crankshaft damper pulley (torsional vibration damper)
It started with the fact that I couldn’t squeeze more than three thousand revolutions in any gear. The car started to jerk, I had to let go of the pedal and press less, the check came out, and the BC showed a DPV error. Because there was a bit of a strain on finances, I kept putting off the diagnosis. But then the apocalypse came and she finally didn’t give more than two thousand. Having spat on everything and reading everyone on the web, I came to the conclusion that it was most likely a damper.
I couldn’t get the crankshaft pulley off, what should I do?
If you succeed in breaking the fastening, unscrewing the nut completely is not difficult. But this doesn't always happen. In case of negative circumstances, use a different technique:
- Put the car in neutral.
- Remove the caps (installed on the spark plugs). This is done to avoid accidental starting of the motor.
- Throw the wrench onto the pulley nut, then press the edge of the lever into the spar (ground). The main goal in this case is to prevent the pulley from spinning.
- Turn the starter briefly to give the required impulse. Typically, one or two turns is enough to remove the nut. Then you can continue working using the key.
As noted above, on many front-wheel drive vehicles, the pulley is secured using a bolt. In this case, the algorithm should be as follows:
1. Raise the vehicle from the right side, and then place some kind of stand under the body (for reliability). It could be a piece of log.
2. Remove the air filter, housing, and then loosen and remove the drive belt of the electric generator. Remove any components that restrict pulley access.
3. To fix the crankshaft, remove the plug in the clutch housing and install something metal, such as a mounting bracket, into the opening. With the other side, rest the tool against the teeth.
4. Place the head of the wrench on the bolt, and then use the extension to make several jerks to the left. This is necessary to at least rip the bolt from its original position.
Most attempts are successful. If this does not help, use the method described a little above (with starting the starter).
To help you unscrew the nut (bolt), treat it with WD-40. In this case, it will be easier to tighten the bolt (nut). After completing the work, all that remains is to remove the pulley using a special puller or pry bar.
Symptoms of a problem
Signs of a malfunction of the DPKV can be different. Often, dirt adheres to the end of the sensor itself, which can interfere with reading. Also, symptoms of a faulty crankshaft sensor may be as follows:
- The idle mode is unstable;
- Engine speed rises or falls spontaneously;
- Power drops;
- During acceleration, a “failure” is felt;
- The car doesn't start well.
In these cases, for the most part, the VAZ 2114 crankshaft position sensor is replaced.
In addition, the VAZ 2114 crankshaft sensor may well be in good working order. And on the “tidy” the DPKV error will appear (0335 or 0336). The reason for this may be a broken wire near the connector. This is easily determined visually; then it is enough to replace the connector without replacing the sensor itself.
If the owner notices signs of a malfunction of the crankshaft sensor on his car, then this is a “signal” about the need for diagnostics.
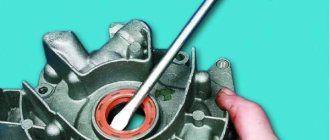
It is not difficult to guess where the crankshaft sensor is located on a VAZ 2114. Like many other VAZ models, it is attached to the engine, and more specifically to the oil pump, near the generator drive pulley, on its cover. The sensor is attached with one bolt, which is typical for many models of this family.
Here is the crankshaft sensor on the VAZ 2114
Typical causes of failure:
- Physical damage to the case;
- The interturn closure of the winding turns entails a change in the generation frequency transmitted to the control unit (frequency type sensors);
- Emergency wear or loss of pulley teeth.
Rotated liners: what does this mean and why do they rotate?
Rotating the engine bearings is a change in their position relative to the crankshaft journal or block. As mentioned above, this is caused by the colossal loads to which the parts are subjected. Shifting the bearings from their place immediately negatively affects the flow of oil. His pressure worsens, starvation begins and the power unit is destroyed. And all because the half rings are equipped with holes that must clearly coincide with the channels for the passage of lubricant.
The main reasons for cranking
There are several known reasons that cause elements to rotate:
- banal wear - the end parts of the sliding bearings wear out (support collars, stops, antennae), which are no longer able to hold the parts in one place;
- weak, incorrect fixation of the covers - the half-rings must be tightened with a certain torque specified in the passport data.
And of course, this arises due to a violation of the design operating conditions of the plain bearings themselves. In other words, due to a large and uneven load. This happens especially often with half rings with weak tension.
Rotating sliding parts can cause big troubles and therefore requires urgent intervention. The most dangerous is the shift of the main bearings. In this case, the power unit will definitely need an expensive overhaul.
It is noteworthy that when the connecting rod half ring rotates, it is simply updated. However, it is wrong to do so - because the resource of the mating connecting rod-pin pair in this case is reduced by almost 70%. Therefore, it is necessary to replace the connecting rod itself, in which a broken lock can often be found. And the most optimal method of repair is considered to be boring the crankshaft and replacing the complete liners, along with the connecting rods.
Installation of the VAZ 2114 flywheel
When installing the part, special attention must be paid to where the mark on the VAZ 2114 flywheel will be directed. The mark determines the position of the crankshaft and is used to guide when setting the valve timing when replacing the timing belt. If you install the flywheel with the mark offset, subsequent work on replacing the timing belt will be very difficult.
Therefore, the part should be placed so that the mark is located exactly opposite the connecting rod journal of the fourth cylinder. To prevent the bolts holding the flywheel from unscrewing during operation, thread lock should be applied to their surface and only then tightened. The sequence of operations when installing a flywheel on a car is the reverse of the procedure for dismantling this part.
vote
Article rating
Purpose, where they are located
Half rings or crescents, washers - they are called differently, they have a special purpose. They keep the crankshaft from axial displacement or longitudinal play. Essentially, these are special type bearings that establish the required clearance.
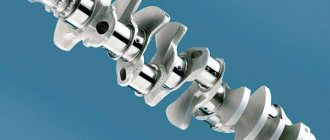
In a classic 4-cylinder engine, the crankshaft has a minimum of 5 bearing points or journals. Their contact area is quite large. This increases the friction force, which becomes even greater when the cheeks touch the supports. To minimize structural imbalance, the necks are made wider than the supports. But such a solution causes longitudinal play, which is a priori unacceptable, since the crankshaft parts begin to fail prematurely as a result.
Metal stoppers in the shape of a crescent are precisely the most effective solution that allows you to maintain the classic design, while eliminating axial displacement. This bearing differs from the standard liner in the presence of side stops or shoulders. The surfaces of the areas where the crankshaft comes into contact with them are also modified. In particular, they are made to fit a ring.
To reduce longitudinal play, washers are also suitable - one-piece rings that are installed strictly in a place specially designed for them. However, such locking elements are rarely used, since lock bearings adhere more tightly to surfaces, wear out more evenly, and are easier to install and remove. And the most important thing is that the washer is installed only on the rear main journal, and the crescents can be placed on any journal.
Structurally, the locking element is very simple. The base is made of solid bronze or steel material, on which, in some cases, an anti-friction protective layer is applied. There must be grooves or recesses for free passage of lubricant, as well as special pins that enhance fixation.
Thrust half rings are placed between the block support and the crankshaft brushes. Here they keep it from axial movement and play to the maximum extent possible. Installed on various necks. For example, in the VAZ-2106 - on the 5th main bearing, which is the first on the flywheel side. In general, according to this scheme:
- anterior - on the third or one of the central necks;
- posterior - on the back neck.
Either 2 or 4 half rings are used. If two are used, then they are placed in the recesses of the lower yoke cover. And if there are four - an upper support and a removable yoke (like on tractor engines). There are also power units with one crankshaft locking crescent or just a washer.