Jabot is the name given to the special cladding on the VAZ 2110 for the windshield. It can be of several types, new and old. After some time, the attachment points may burst, so there is a need to replace the frill 2110. Today, the frill of the old model is very difficult to find and many people wonder whether it is possible to install a frill on a new model VAZ 2110?
Is it possible to make a replacement?
Content
The old model of the VAZ 2110 cladding has a big drawback: the wiper arms wear out. This can be eliminated by filing the friction point or simply replacing the frill with a new VAZ 2110 model.
That is, from here we can conclude that the old and new type of frill are easily interchangeable with each other. And all the fastenings do not need to be redone, but when installing a new model, it happens that gaps appear between the windshield and the rubber. But all this can be easily removed with a file.
But there are several reasons for this:
- The frill is of poor quality.
- Discrepancy in body geometry.
But before installation, you need to purchase special plugs for attaching the wipers and a hose for the washer.
Now it’s worth considering the processes for replacing both the old and new frill models.
Installing frill from Priora on VAZ 2110
Hello! I described some topics (mesh, injectors), now all that remains is to put everything together. 1.
Preparation and installation of the VAZ 2170 wind window frame trim (21700-8212730-00) on the VAZ 2110: a) I glue it with 3M double-sided tape (Factory technology...), since my plastic is not reinforced, but ordinary.
I don’t really believe that it will help, but let it be better.
b) Without removing the protective film, apply it to the glass and center it.
We fasten the existing fasteners (it’s easier not to miss, after marking, remove), make a couple of new holes (in the iron, there are not enough of them in ten). We bore it to a square, process it (paint it, move it) and insert a plastic sleeve.
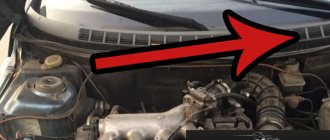
I would like to note that during the work the old brackets (indicated by the red arrow) will get in the way. In some cases they are simply cut off; I left and modified the plastic of the lining. This is not visible visually and will not functionally affect further operation. c) Necessary fittings to continue assembly.
d) Overlay. Everything is ready, we hook it up =) At this stage the adhesive tape is already glued to the windshield. We follow the tightening sequence to avoid the formation of wrinkles on the elastic band that is adjacent to the glass.
2.Thermal insulation.
The insulation had to be combined. Two parts are special for the stove with air conditioning (with all the necessary holes and cutouts). Plus the leftmost piece from the Priora. (has the necessary shape for the expansion tank). The first set is sold without it.
The remaining one to one as a decimal:
3. Leashes for Chevrolet Niva wipers on VAZ 2110.
I mentioned them in the post with injectors (link at the very top).
| All owners of LADA Priora have noticed that in hot weather the frill (wind lining) of the car swells from the sun. Soon this case was recognized as a warranty case and they offered to replace the frill with a new one. However, after replacement, the problem repeats again, and the pad becomes a consumable. Let's look at all the ways to combat this disease. |
Mar 01, 2017
WE INSTALL JABO WITH PRIORY ON A VAZ 2110 2111 2112. WE CHECK THE CABIN FILTER AFTER TWO WEEKS OF OPERATION. ———————————————————————————————————— ★ SUBSCRIBE TO THE CHANNEL➠ www.youtube.com/c/GARA. ★ SUBSCRIBE TO VK GROUP➠ vk.com/garage_expert ★ SUBSCRIBE TO INSTAGRAM➠ www.instagram.com/GARAGE__EXP. ★ PARTNER➠ youpartnerwsp.com/join?108947 ———————————————————————————————————— YOU CAN HELP THE CHANNEL FINALLY! ALL FUNDS WILL GO EXCLUSIVELY TO IMPROVING THE QUALITY OF CONTENT!
➤ YANDEX MONEY - 410015322026938
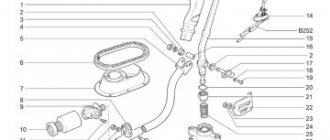
Replacing the old type frill
- In order to replace the frill with a VAZ 2110, you should prepare the following tools: a wrench with a size 10 head and a flat and Phillips screwdriver.
- Next, you can remove the cladding; to do this, unscrew the nuts on it from the edges, using a wrench with a head.
- Then take a Phillips screwdriver and unscrew all the screws on the surface of the frill.
- Also, use a screwdriver to remove the latches on the back.
- After this, carefully disconnect the tubes from the windshield washers and you can remove the upper part of the lining.
- Then remove the leads on the wipers and unscrew them with a key.
- It is also worth checking all the places under the installed plugs; screws are usually located there.
- The windshield cover has a lock in the center; it can be removed carefully.
- And to gain full access, you need to unscrew another part of the frill, the sound insulation and the casing itself.
- Then you can install the frill back on the VAZ 2110, but only the procedure is carried out in the reverse order.
Jabot 2110 old model
It was a free weekend, and I decided to modernize the cladding of the wind window frame (popularly “JABO”) according to the priora principle. I didn’t want to install the Priorovskaya one, its plastic quality is low. There is information on cutting on the Internet, and this was taken as a basis.
Of course, before upgrading, you need to remove the JABO. I'll describe the process.
Remove the caps from the wiper arms and unscrew the nuts with a 10mm head. We take off the leashes.
Unscrew the nut to “10” from the studs on the edges of the JABO.
Use something sharp to remove the plugs.
Now unscrew the screws securing the JABO. Four under the plugs, seven on the engine compartment protection.
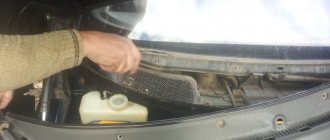
Now remove the JABO from the studs and move it to the side. We get access to the cabin filter. Unscrew the four self-tapping screws securing the filter grille.
Remove the grille and take out the old filter. Unfortunately, I didn't buy a filter, so I cleaned the old one and put it back in place. I'll replace it soon.
If you are not going to upgrade the JABO, simply put everything back in place in reverse order. Otherwise, remove the hose supplying windshield cleaning fluid to the nozzles.
Frill with mesh in body color for VAZ 2110-12
Closed frill in body color for VAZ 2110-12
Old-style Galant frill with mesh, unpainted for VAZ 2110—2112
Factory overlay (jabot) of the wind window frame for VAZ 2110—2112
Old-style Galant frill, solid, unpainted, for VAZ 2110—2112
Old style unpainted windshield frill for VAZ 2110-12
AKS windshield frill unpainted for VAZ 2110—2112
Jabot AKS with mesh, unpainted for VAZ 2110-12
Marco windshield frill unpainted for VAZ 2110-12
Replacing a new type of frill on a VAZ 2110
Before starting replacement work, it is worth preparing the same set of tools as in the first case.
- The frill of the new type consists of several parts and is removed in parts.
- Along the edges of the cladding there are two nuts, which are also unscrewed using a socket wrench. After this, several self-tapping screws are unscrewed; they are closed with plugs.
- And they immediately remove the sound insulation, having first unscrewed the screws. All this will be located at the top of the windshield, and at the bottom there is another part of the frill. It is secured with 12 self-tapping screws; they are unscrewed using a Phillips screwdriver.
- Also, do not forget about the drainage flap, which is carefully moved to the side and the hose is removed from the washer.
- Then this shield is removed and then the lower part of the frill is removed.
Jabot from Priors on VAZ 2110
Of course, you can install a frill from a Priora on a VAZ 2110. But it is worth remembering that the Priora is significantly different from the tenth generation, and some difficulties may arise when replacing such a lining.
It will not depend on what type of frill is installed, but still, if the VAZ 2110 was produced before 2003, then you will have to trim the studs a little. All this is necessary in order to install frills from the Priora on the VAZ 2110, since the Priora does not have them. It is also worth remembering that the windshield washers on the Prior are located a little differently, unlike the tenth generation. That is why it is necessary to make additional holes in the frill or change the injectors and install them from a Niva Chevrolet car. Priora's frill has its advantages and disadvantages. And first of all, it is worth considering the advantages:
- When installing such a frill, it will be possible to easily replace the air filter.
- Low cost of overlay.
But even with such significant advantages, there are also disadvantages:
- Since the cost is not high, the quality of the plastic will be too low.
- When replacing, it is necessary to replace the washer nozzles or move them.
Modification of frill grille for VAZ 2110, 2111, 2112
Today I will tell you about a small but very useful improvement that can save you some time. Ten-drivers could observe that periodically, when the heater is turned on, an unpleasant odor appears in the car interior, and when it rains, the windows begin to fog up. This is especially noticeable in the fall. It's all because of the debris that gets through the frill grille into the heater air intake, blocks the air flow and begins to decompose and rot there.
0:825
1:1330
The debris that has accumulated over a couple of months is visible through the grate.
1:1435
2:1940
The talented development engineers at AvtoVAZ did not foresee that we would park cars under trees. The holes in the frill lattice are so large that even large leaves can fall through entirely.
2:2324
3:504
The most unpleasant thing is that in order to completely get rid of debris in the air intake, you will need to remove the frill, wipers, engine shield noise, and in my case, also the decorative trim on the frill. Assembly and disassembly takes about an hour, and in the fall it is enough to leave the car overnight under a tree and everything will have to be done again. But in order to get rid of this problem, it is enough just to make the frill mesh a little smaller.
3:1282
First you need to clean out the debris that has accumulated there. This time I didn’t waste time and remove the frill completely, I unscrewed it only on one side, bent it a little and stuck my hand into the resulting gap and cleaned out the debris.
3:1688
4:2193
Now it's clean
4:34
In order not to return to this problem again, I found the remains of a mesh for bumpers in the garage and adapted it to the place by bending the edges into the slots of the frill grille. It holds quite tightly, but just in case, I attached it with a couple more screws.
4:469
5:974
6:1479
7:1984
8:2489
9:504
10:1009
11:1514
I didn’t have enough mesh and had to make it from several small pieces, because of this it looks a little collective farm, but I think if you take it with a reserve, it will look much more aesthetically pleasing. In my case, everything will be hidden by a decorative overlay on the frill.
11:1988
12:2493
13:504
Large garbage will no longer slip into such a network, and I think I will not return to this problem soon.
13:665
14:1170
15:1675
16:2180
https://www.drive2.ru/l/4094895/
16:35 next article:
Installing a lip on the front bumper EZ-LIP on a VAZ 2110, 2111, 2112
Finally, a package with a bumper lip arrived from the states.
I ordered it on Ebay, cost about $20. You need to search by request
17:895
Rating 5.00 [1 Vote]
20057