Comments: no Published: 07/18/2016
Rating:
Tags:VAZ 2110/2111/2112Bumper repair
The VAZ 2110 bumper is replaced if there is significant damage to this component due to corrosion or being involved in an accident. Another reason is bumper tuning, the desire to replace it with a unique or newer one.
Removing the front bumper on models 2110, 2111 and 2112 is identical due to the absence of fender liners and protection. And there are dozens of instructions and videos on how to remove the front bumper, how to replace the bumper of a VAZ 2110, on the Internet.
Removing the front bumper on a VAZ 2110 model
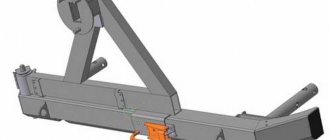
To carry out work on dismantling the rear bumper of a VAZ 2112 or 2110, you will need the following tools:
- socket and open-end wrenches for 8 and 10;
- double-sided screwdriver.
If the front bumper on your VAZ is cracked and you want to fix it yourself, look for something to use to glue the bumper on your car. The search engine will give you results with car bumper plastic adhesive such as NOVOL.
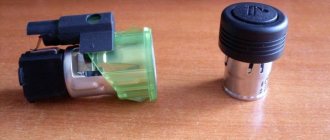
Socket wrench 10
Replacing the front bumper of VAZ 2110, 2111 and 2112
You will need : disconnect the negative terminal from the battery and the wires from the fog lights (if they are installed), prepare a socket wrench “10”, a socket “8” and “10”, a Phillips screwdriver,
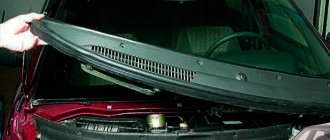
remove the radiator grille
- Unscrew the two self-tapping screws of the upper radiator grille mounting using a 10mm wrench.
- Release the lower radiator grille mounting clips by pulling upwards. Remove the grille.
- The photo shows the clamps for the lower grille mounting.
Engine oil LADA VESTA - logbook Lada 2107 Creation of a miracle of thought 2010 on DRIVE2
What kind of engine oil should be poured into the engine of a LADAVESTA car? This question can be easily answered by looking at the help information on the car or the user manual. In official sources of OJSC AVTOVAZ to
The specified motor oil for use is ROSNEST 5W30. But he can't be found now. Yes and
This oil does not have such a strict certification weight as imported oils, i.e. it was made according to specifications or according to a quality certificate, but did not pass it, but has the approval of AVTOVAZ OJSC. Essentially, this is advice on what to fill and everyone fills it at their own discretion. And now I’ll tell you about imported oils that are certified, so in LADA VESTA I will advise you to pour only original oil from trusted suppliers: CASTROL EDGE 5w-30 (VW504/507) CASTROLMagnatec 5w-30 (A3/B4) CASTROL Magnatec 5w- 30 (A5)DIVINOLSyntholight HC-FE 5w-30 API SN, ACEA C3, MB 229.51, BMW LL-04Kixx G1A3/B4 5W-30 4L p/sKixx G1SN/CF 5W-30Kixx PAOSN/CF/C3 5W-30MOBIL Super3000 X1 Formula FE 5W-30SHELL HelixHX8 Synthetic 5w-30SHELL HelixUltra ECT 5w-30 C3TOTAL QUARTZ INEOECS 5w-30TOTAL QUARTZ Future NFC 9000 5w-30
Stories from our readers
“Fucking basin. "
Hi all! My name is Mikhail, now I’ll tell you a story about how I managed to exchange my two-wheeler for a 2010 Camry. It all started with the fact that I began to be wildly irritated by the breakdowns of the two-wheeler, it seemed like nothing serious was broken, but damn it, there were so many little things that really started to irritate me. This is where the idea arose that it was time to change the car to a foreign car. The choice fell on the melting Camry of the tenth years.
Yes, I had matured morally, but financially I just couldn’t handle it. I’ll say right away that I am against loans and taking a car, especially not a new one, on credit is unreasonable. My salary is 24k a month, so collecting 600-700 thousand is almost impossible for me. I started looking for different ways to make money on the Internet. You can’t imagine how many scams there are, what I haven’t tried: sports betting, network marketing, and even the volcano casino, where I successfully lost about 10 thousand ((The only direction in which it seemed to me that I could make money was currency trading on the stock exchange, they call it Forex. But when I started delving into it, I realized that it was very difficult for me. I continued to dig further and came across binary options. The essence is the same as in Forex, but it’s much easier to understand. I started reading forums, studying trading strategies. I tried it on a demo account, then opened a real account. To be honest, I didn’t manage to start earning money right away, until I understood all the mechanics of options, I lost about 3,000 rubles, but as it turned out, it was a precious experience. Now I earn 5-7 thousand rubles a day. I managed to get the car buy after half a year, but in my opinion this is a good result, and it’s not about the car, my life has changed, I naturally quit my job, I have more free time for myself and my family. You’ll laugh, but I work directly on the phone)) If If you want to change your life like me, then here’s what I advise you to do right now: 1. Register on the site 2. Practice on a Demo account (it’s free). 3. As soon as you get something on the Demo account, top up your REAL ACCOUNT and go to REAL MONEY! I also advise you to download the application to your phone, it’s much more convenient to work from your phone. Download here.
- Loosen the five engine protection nuts using a 10mm socket wrench.
- Unscrew the two screws (one on each side) of the lower fastening of the fender liners to the bumper using a Phillips screwdriver.
- Unscrew the two self-tapping screws of the upper fender liner mounting.
Appearance
Most of the upgrades associated with tuning the “tens” were reflected in its appearance. The main objects for tuning are the following parts of the car:
- doors, trunk and other body parts;
- wheels;
- machine optics.
Wheels
The most often chosen as modernization objects are car wheels. Drivers are replacing factory stamped steel wheels with cast or forged ones. The combination of such accessories with low-profile tires gives the VAZ a sporty look.
Some car enthusiasts install 16- and 17-inch wheels on the VAZ 2110, the diameter of which is significantly larger than the factory ones. However, most drivers prefer wheels with a diameter of 13 or 14 inches, equal to the diameter of their original wheels.
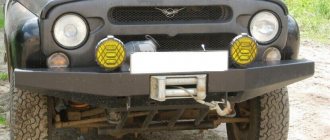
Fans of off-road driving can increase the vehicle's track by installing wheels with a reduced offset. These wheels with deep tread tires improve vehicle stability and reduce the risk of rollover.
Before installing wheels on a car, you need to make sure that they are suitable for installation on the “ten” and related models. The list of wheels approved for installation on the VAZ 2110, VAZ 2111 and VAZ 2112 can be found in the operating manual for these vehicles.
Overlays
When performing tuning on the VAZ 2110, overlays are often used. Installing such an accessory is a stylish and inexpensive option for upgrading the “tens” with your own hands. The products are installed on the following parts of the car body:
- hood;
- glass;
- fairings;
- bumpers;
- front and rear lights, on which eyelashes are installed;
- air intake.
The cost of one decorative overlay is from 300 to 1000 rubles. They are attached using self-tapping screws or bolts. Sometimes double-sided tape is used to install the overlays.
Optics
Often, owners of “ten” prefer to upgrade their original headlights to purchasing front optics from a third-party manufacturer. The reasons for such actions are the price and the small number of ready-made front lighting devices on the market.
To upgrade the headlights, you need to remove them and disassemble them. The most commonly used modifications of the front optics of the “tens” after disassembly:
- The interior of the device is painted black to achieve a characteristic darkening effect. This is the simplest and most common homemade modification of VAZ headlights.
- A xenon unit is installed in the headlight. The cost of one such block is 3000 - 4000 rubles.
- More powerful halogen lamps are mounted in the headlight.
- Improved lenses are being installed.
- LEDs are installed to achieve the “angel eyes” effect.
The most common modifications to taillights are modifications related to their relatively dim light:
- Installing more powerful light bulbs.
- Installation of new lenses.
- Improving the light output of the flashlight by applying chrome paint to it.
Body
To improve the appearance, the “tens” buy kits of body kits. Typically, such kits include new bumpers, door sills, trunk, hood, and standard factory bumpers. Such body kits are made of plastic. The minimum price of kits for tuning the body of a VAZ 2110 is 7,000 rubles, however, there are kits priced at 20,000 rubles.
Spoiler
Those who want to give their car a sporty look often install spoilers on the trunk. The cost of such an accessory starts at 1,500 rubles. The price of aluminum spoilers is 6,000 rubles, and an AVR spoiler for the trunk lid will cost a tuning enthusiast 1,500 rubles.
Replacing the rear bumper of VAZ 2110, 2111 and 2112
Required : 10mm head.
The process of removing the rear bumper of a VAZ 2112:
- Unscrew the two nuts of the lower bumper mounting using a 10mm socket.
- Remove the two top mounting bolts using the same tool.
- We move the bumper slightly away from the body so as not to damage the wiring of the license plate lights.
- Remove the rubber plug (3) in the rear part of the body (1), pull out the block with wires (2) and disconnect them.
Removing the rear bumper of a VAZ 2110 is no different; it has the same attachment points. And the VAZ 2111 bumper is secured at the top with four screws (in the opening of the tailgate), and there are no license plate lights installed on it.
Installing the rear bumper is done in the reverse order. Make sure that the two tabs on both sides of the bumper fit into the brackets on the body.
What is needed for disassembly
To remove body kits from a car, you will need the following tools:
- socket wrench or socket wrench size 8 mm;
- the same, size 10 mm;
- Phillips screwdriver;
- WD-40 aerosol lubricant, which facilitates the rotation of rusted threaded connections.
Minimum set of tools
Additionally, you should prepare the usual set of plumbing tools. They are useful for unscrewing the lower fastening of the front bumper, consisting of nuts and studs. The problem stems from the unfortunate design of this unit, where it is stipulated that the studs stick out 2-3 cm under the front overhang of the car. As soon as the driver slightly catches a curb or drives into an ice snowdrift, the ends of the studs bend or even break off completely. You'll probably have to tinker with them when disassembling them.
Advice. A bent stud can be straightened by screwing a second nut onto the end of the stud to grasp with a tube wrench, and then bending the threaded portion by hand. Another way is to gently tap the screwed nut with a hammer.
For the same reasons, removing the front one will require an inspection ditch. It is extremely inconvenient to twist rusted lower and side fasteners while lying under the car.
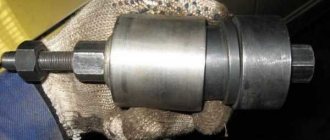
Very useful lubricant for rusty bolts and nuts
To replace the stock body kits that were on your car from the factory with beautiful styling products, you also do not need any special tools or equipment. Elements of a different shape, but intended for installation on the “ten”, are mounted on existing mounts. It’s another matter when you want to install the body kit you like from another car, for example, from a Lada Priora. In this case, the fasteners will need to be modified.
Where to buy a bumper
You can buy front or rear bumpers in online stores. Approximate prices for bumpers are 2400 - 4200 rubles. Catalog numbers are presented below.
Front bumper VAZ 2110, 2111 or 2112:
- 2110-2803012
- 2111-2803012
- 2110-2803015
- 21104-2803012
- 21104-2803010
Rear bumper VAZ 2110:
- 2110-2804012
- 2110-2804015
- 21104-2804010
- 21104-2804012
Rear bumper VAZ 2111:
- 2111-2804012
- 2111-2804012
- 2111-2804015
Rear bumper VAZ 2112:
- 2112-2804012
- 2112-2804015
By the way, do you know what kind of tuning can be done with a body kit?
Replace the front and rear bumpers of your car with your own hands.
Rear bumper 1 pic. 9-5 is installed with its lower part on two studs welded to body panel 4, and screwed with nuts and washers. In the upper part, the bumper is fastened with bolts and nuts at two points, and the fastening bolt is vulcanized in the buffer 2, which ensures soft closing of the tailgate 3.
How to remove scratches
Let's figure out how to get rid of damage to the bumper using improvised means.
1. Walk the sandpaper over the surface of the scratched bumper in the area of damage, but do not overdo it - do not sand it to the hole. Your task is to make the surface smooth.
2. Cover the area that you sanded with two thin layers of primer. Each layer should dry for about half an hour.
3. When the primer has dried, go over the bumper with fine-grained sandpaper. Then you need to remove the dust with a damp cloth.
4. The next stage is applying paint of the desired color. You will need to apply three to four layers of automotive paint. Here it’s the same as with a primer - each layer dries for half an hour.
5. The final stage is two layers of varnish. Leave to dry for a day.
Work progress
- Since the wiring (license plate light) is connected to the rear bumper, it would be better to disconnect the negative terminal of the battery to avoid a short circuit;
- Open the trunk and fold back the rear trunk trim, then fold back the edge of the side trim on the left side to expose the wiring harness that goes to the license plate light. Disconnect the wire block;
- Unscrew the nut and disconnect the license plate light wire going to ground;
- After this, unscrew 1 bolt of the upper fastening of the bumper mount on both sides;
- Next, unscrew 1 bolt of the lower bumper mounting on both sides;
- Now we remove the bumper , pushing it back and passing the wires through the hole in the rear panel of the body;
When do you have to remove body kits?
How to remove the bumper on a Lada Priora yourself
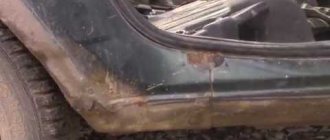
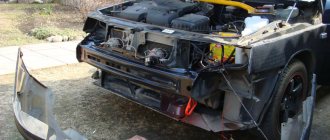
Most often, motorists have to dismantle the front bumper of the VAZ 2110-2112, since it is the first to reflect impacts from stones, unsuccessful runs onto curbs and other obstacles. The element is especially often damaged in winter due to unremoved snow, which turns into an icy mess. In the best case, the paint is scratched from contact with ice; in the worst case, the bumper simply breaks, because the plastic becomes brittle at low temperatures.
For repairs, it is better to remove such a body kit from the car.
Reference. The rear and front body kits of the VAZ 2110, 2111 and 2112 models differ little in shape and are attached to the body almost identically. At the same time, the rear one from the tens cannot be replaced with a part from the VAZ 2112, but the front one can.
As a rule, such problems plague inexperienced drivers who have little sense of the dimensions of their “ten”. The paintwork of the rear bumpers does not suffer as much; cracks usually appear on them due to collisions with various obstacles when reversing. An extreme case is damage as a result of an accident.
It is very difficult to repair such a crack.
Removal of the rear and front body kits on VAZ cars of the “tenth” family is carried out for the following reasons:
- When you need to get to the main body parts covered by a plastic bumper.
- For complete painting or polishing of a car.
- You can remove small chips and scratches on the coating of elements directly on the car, but for more serious repairs and repainting it is better to remove them.
- In case of replacing standard parts with more attractive styling body kits, giving the car an original appearance.
- For mounting and connecting fog lights.
This is what the Brooklyn styling rear element looks like
Note. The rear element of the VAZ 2110 has a license plate illumination lamp built into it. Sometimes the bumper has to be dismantled to deal with the wiring or other problems with this light.
Replacing the rear bumper on a VAZ 2111 station wagon
For the work you will need: 10 and 13 socket wrenches, a Phillips screwdriver.
- Unscrew the 2 screws of the upper fastening of the rear bumper to the body on the left and right sides;
- After this, remove the tailgate stops from the bolts of the upper mounting of the bumper to the body on the left and right sides;
Now you can remove the bumper by sliding it back and removing the bumper tabs from the bracket on the body.
Install in the reverse order, making sure that the tabs on the bumper on both sides fit into the brackets on the body.
I hope this article was useful to you, stay tuned :)
Recent Entries
BMW 530e Hybrid revised for 2022
The BMW 530e PHEV has been updated with a new battery, improved efficiency, lower emissions and increased electric power range. The hybrid BMW 530e was
Watch a plane crash land on a public road, caught on police dash cam
Starman Adventures Is a Big Hit Among Teslas - SpaceX Fans
New deal offers drivers a free car - life-saving brakes for drivers up to £1,600
Categories
Test Drive
Installation process
After body repair and painting, the bumper is reinstalled in the reverse order. If the owner plans to replace the bumper on his VAZ 2110, then certain difficulties may arise with the new buffer. Mismatch of fasteners with seats is the most common problem with purchased elements. Moreover, some parts may not fit as they are defective. You should exchange the defective buffer in the store or make adjustments before painting to avoid damage to the paintwork.
As described above, attaching the front bumper to a VAZ 2110 is easy. But it is better to do the installation with a partner. It is very difficult for one person to insert the side fasteners into the seats and exert a certain force on the buffer. As a rule, its central part is difficult to fit onto the channel and the side parts will jump out of the brackets.
Upon completion of installation, you should check whether the bumper fits into the seats everywhere. It happens that the owner screws the front part, but the side guides remain free. In this case, you have to unscrew the fasteners, remove the part and reinstall it.
If the inspection gives a positive result, then the fastening sequence looks like this:
- screw the two upper bolts into the steel channel;
- then, install the lower part of the buffer on the five lower studs;
- We press the buffer with the crankcase protection and secure it with nuts;
- screw 2 fasteners to the side members (head 13 mm);
- screw the bolts into the side internal mounts (under the wings).
- connect the fog lights.
- fasten the fender liners in place;
- Installation completed.
On a note!
If you have autoplasticine available, it is recommended to apply it to the surfaces of the fasteners. Thus, studs, nuts and screws are perfectly preserved, and the processed edges are not destroyed during the next dismantling. Summarizing the material of the article, it becomes clear that removing the front bumper of a VAZ 2110 is not a difficult task. It is worth adding one point: it is advisable to carry out work in a warm room. Cold plastic is difficult to bend and the fragility of the material increases.
Welcome! The front bumper - it basically constantly suffers on the road, then I wanted to park but it didn’t work out well, then the brakes didn’t work very well and thereby caught up with the car in front, etc. Therefore, you have to change the front bumper many times while you are using the car, but not everyone knows how to do this, so we wrote this article especially for such people, in which we tried to detail the process of replacing the front bumper on cars of the tenth family.
Note! To replace the bumper, you will need to stock up on: Various types of wrenches, you may also need sockets with an extension, or a wrench, and you will also need to take a screwdriver with you!
Summary:
Tuning of domestic cars
VAZ car owners often prefer to tune their cars. Parts manufacturers take advantage of this. An important factor in this process is the price of the bumper. VAZ tuning is quite common among car enthusiasts. If you decide to change your bumper, expect to pay around $100-$300, depending on the model. If you have a VAZ 2107, the cost will be about $50-70. For example, a tuned bumper on a VAZ-2172 costs about 170-200 dollars. “Priora,” which is often tuned by its owners, becomes unrecognizable after these changes.
The legendary Volga took second place. Prices here range from $150 to $500. The high cost is due to the fact that the cavity of the part is larger, and, accordingly, more material and time are required for manufacturing.
Of course, bumper prices for domestic cars are very different. VAZ tuning therefore also has a different cost, which includes the price of the part itself and the services of the specialist.
Content
How to remove the front and rear bumpers on VAZ 2110 and 2112? This question usually comes to car enthusiasts when it is necessary to replace or repair this structure. The most common reasons are the following:
- The bumper is damaged
. If scratches and chips appear, it makes sense to carry out restoration work or replace it with a new one; - Tuning
. Many car owners change their bumpers to more beautiful ones. Replacing the body kit, the most common modification;
- Installation of non-original optics.
In all these cases, the bumper will have to be removed from the car. Some restoration work can be done directly on the car, but this is not always convenient.