Types of lamps
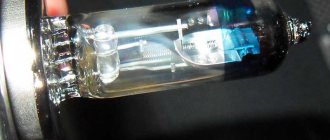
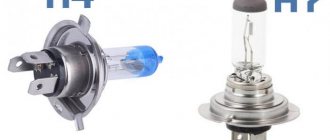
Renault Duster cars assembled in both 2012 and 2017 use 55 W low beam lamps equipped with an H7 standard socket. The flask is filled with bromine or iodine vapor, which increases the service life of the tungsten filament. The design of the headlight is not designed for the use of xenon lamps, which can destroy the plastic lens. In addition, for xenon to work, it is necessary to connect the ignition unit to the on-board network. Connecting accessories not approved by the factory may cause the vehicle to catch fire.
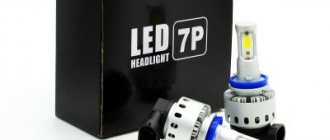
There are LED lamps with an H7 connector, which theoretically can be installed in Duster headlights without additional modifications to the electrical circuits. But such a modification (as well as the use of xenon) is regarded by traffic police officers as interference in the design of the car, which entails the deprivation of a driver’s license.
The advantage of LED lamps is the ability to achieve preservation of rights during legal proceedings (unlike situations using gas-discharge light sources).
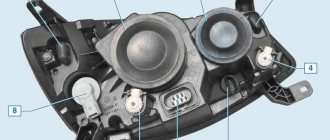
The design of the headlights of the Renault Duster car uses bulbs with sockets H1 (for high beam), PY21W and W5W (for the direction indicator and side lights, respectively). The connecting terminals comply with international ECE standards, which allows the use of parts from vehicles from other manufacturers. Installing products with increased power (more than 55 W) or altering the bases is strictly prohibited.
2278-22-9-12
Remove the lamp from the headlight housing.
Disconnect the wire block from the lamp. We attach the wire block to the new H7 lamp and, having inserted the lamp into the headlight housing, press the wire block until the spring clips snap into place.
To replace the side light lamp, remove the protective rubber cover of the low beam and side beam lamps.
How to choose a low beam lamp
Before replacing a failed part, you need to find out which lamp is installed in the opposite headlight. It is not recommended to use lamps produced by different factories, as they may differ in brightness and color temperature. When selecting a part, you should take into account the power and design of the base.
Products must have a special coating on the bulb in accordance with the UV55W standard that does not transmit ultraviolet radiation (to prevent damage to the plastic glass on the headlights).
The most common halogen lamps for Renault Duster:
- Osram Original Line, with input power up to 58 W. The product provides a luminous flux of 1500 lm, and the service life declared by the manufacturer is 550 hours.
- Philips Vision, featuring improved luminous flux. The developer claims a 30% increase in visibility (due to an extended beam of light) compared to standard products. The radiation power is 1500 lm, the service life reaches 550 hours.
- Philips X-treme with 1.3 times increased illumination range. The lamp emits white light with a color temperature of 3500 K. The disadvantage is the reduced resource, not exceeding 450 hours.
- General Electric Megalight Plus 50, which provide a beam of light with a standard color temperature. GE offers modifications to the Megalight Ultra +120% and Megalight Ultra +150% products, which are characterized by an increased illumination range. Lamps must be changed in pairs, which provides improved illumination of the roadway at night.
- Narva Standard with a standard light of a yellowish tint. There is a modification of Range Power White, which has a color temperature increased to 4500 K (white-blue color simulating xenon). The Long Life version differs from standard lamps in its increased resource (light temperature 3000 K). The manufacturer also produces Range Power +50% and +110% products, which have an increased road illumination range.
Is it necessary to change light bulbs in pairs?
Salespeople in automobile markets, having heard that a client is about to replace headlights, strongly advise taking two parts at once. Even if only one burned out. Many drivers consider this a marketing ploy. The reason is ignorance or unwillingness to understand the principle of operation. Halogen elements are common. The filament ignites in gas vapor. Such elements last longer than others. Both bulbs have the same lifespan, and if one burns out, it means the second one is on the way. And it can go out at any moment. The worst thing is if this happens on the road at night. Therefore, they change both at once.
Even until this happens, nothing good will come from such savings: the old headlight shines worse and worse, as opposed to the new one. This misalignment impairs visibility and, as a result, safety. These problems can be eliminated if you spend a little more money and time and replace both bulbs with new ones, the main thing is to make sure that your fingers do not come into contact with the bulb.
It's the same with xenon headlights. They last longer, their reserve is up to 3 thousand hours. In old light bulbs, the gas takes on a purple tint - this is a sign that it is time to change them soon. And also in pairs, since the resource is the same.
As it becomes clear, in the matter of Renault Duster optics, of any year of manufacture, even 2013, even 2022, and indeed any car, there are and cannot be trifles. We are talking about the safety of everyone on the road, which is directly related to how well the driver sees what is happening. Therefore, you should not skimp and it is better to buy branded lamps, and replacing them is not difficult even for a beginner.
Element change process
Before changing the lamps, you must open the hood and disconnect the wiring from the negative terminal of the battery (to prevent the radiator fan from accidentally starting). When the power is turned off, the radio is locked (anti-theft), so you need to find the code in advance. The digital password is recorded by the dealer in the service book when selling the car.
The Renault Duster crossover is equipped with headlights with a unified design; there is no need to dismantle additional parts to replace lighting sources.
Removing the old lamp
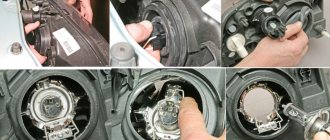
To remove a part on a car manufactured in 2013, you must:
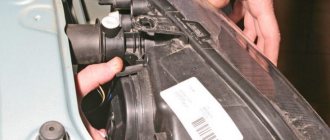
Remove the rubber protective cap located on the back of the headlight housing. The plug has a rectangular protrusion for finger grip. The part is held in a special slot located on the body.
If the driver's hand does not fit into the gap between the headlight and the parts in the engine compartment, then the cable of the mechanical light beam corrector should be disconnected. To access the connector, you need to remove the rubber cover, which is pulled together by hand. Then it is necessary to remove the cable tip from engagement with the regulator pusher. After installing the new lamp, the corrector cable and cover are installed in their original places.
Assembling a new element
Before carrying out installation work, it is necessary to remove the new parts from the original packaging, and then attach the power supply plug to the light bulb. The light source is held by hand and a protective glove is put on the hand.
The block is pushed onto the contacts until it stops, polarity is not taken into account. It is not recommended to twist the wires going to the plug.
Installation on a car
To install a lamp in a headlight you must:
- Insert the light source into the mounting hole. At the top of the socket there is a cutout for a guide, which is located on the base. During installation, do not touch the glass bulb with your fingers, as grease marks will cause dark spots to appear on the transparent surface. To remove grease deposits, use a rag or lint-free cloth moistened with alcohol.
- Lift the lamp with the base installed upward, overcoming the force of the spring elements.
- After the latches engage, replace the rubber cover. The plug is evenly distributed over the mounting ring by hand.
- Connect the battery to the vehicle's on-board power supply and check that the light bulb is located correctly inside the lens and that the headlights are working properly.
Renault Duster: replacing the license plate light bulb
As with any Renault Duster car, the license plate light bulb may also need to be replaced. If there are no lamps or if they are faulty, there is a risk of getting a fine. There is a certain algorithm of actions when replacing the license plate lamp on a Renault Duster.
- The lantern is picked up with a plastic mounting spatula, then it is removed from the door trim.
- The baseless burnt out part is removed from the cartridge.
- A new one is put in its place.
- The lantern is returned to its place in a mirror order.
Replacement nuances for cars of different years
Renault Duster cars are equipped with plastic headlights with mirror reflectors, which have changed little during the modernization. The algorithm for replacing headlight bulbs is standard for crossovers released in 2011 or 2016. The work is carried out by the owner independently, but if difficulties arise, you must contact the nearest service center.
Possible difficulties
Some car owners have problems installing new parts on the left side. To increase the working area, it is necessary to disconnect the cable from the positive terminal of the battery, which is then removed from the machine. The maintenance procedure is shown in a video filmed by crossover owners in the process of self-repair. When performing work, it is prohibited to use excessive force that could destroy the bulb bulb. You can remove glass shards from the headlight only after removing the device from the car.
If after replacement the headlights do not work, then you need to check the fuse (the part fails due to a short circuit or a sharp jump in current in the circuit). The Renault Duster design includes 2 protective elements rated for a current of 10 A, which serve the headlights on the left and right sides of the car. The parts are located in a mounting box mounted on the side of the instrument panel (driver's side). The fuses are removed with tweezers (installed on the cover), and after replacement the headlights are turned on.
Source: www. dusterok.ru
Categories of products that may be of interest to you based on the article “Replacing low beam lamps on a Duster”:
Lamps used in Renault Duster lighting fixtures
Each article has its own place, which is clear from the table (the data is correct for models of the pre-restyling period):
| Bulb | Where is it used? | Price |
| WY5W | turn signals (fenders) | from 150 rubles |
| PY21W | front turn signals | from 150 rubles |
| P21/5w | feet, rear dimensions | from 50 rubles |
| H11 | fog lights | from 1000 rubles |
| W5W | license plate illumination, interior, glove compartment, side lights | from 50 rubles |
| H7 | low beam headlights | from 400 rubles |
| H1 | driving lights | from 400 rubles |
When planning to buy a suitable part, tell the seller the part number or the car body number. By the body number you can determine which one is needed. The dusters have halogen elements with a power of 55 watts.
Spare parts, maintenance
Products from the Dustershop77 range that may be of interest to you:
| Name | Manufacturer | Price | Availability | Add to cart |
| BR-001-GARD-URDP | Mud flaps enlarged (widened) Duster-GARD front | Duster-Guard | 1500 / 1200 rub. Discount: 1000 rub. | >10 |
| DC495 | Discount card (Dusterclubs.ru, Dustershop77.ru) | 700 / 500 rub. Discount: 500 rub. | >10 | |
| DC218 | Air deflector “Warm feet” for Duster, Logan, Sandero, Largus | 900 / 350 rub. Discount: 250 rub. | >10 | |
| DC654 | Frill with fastening without 3M tape (Duster/Terrano) (ArtForm) | ArtForm (Yuago) | 3000 / 2000 rub. Discount: 1600 rub. | >10 |
| PT014-RDU112901 | Trunk sill trim PTGroup | Pt GROUP | 1200 / 1000 rub. Discount: 900 rub. | >10 |
| 005-008502 | Trunk sill protection | Russian Artel | 1400 / 1100 rub. Discount: 1000 rub. | >10 |
| DG-006-GARD-RDSHCH | Front diffusers - aerodynamic flaps Renault Duster (set of 2 pieces) | Duster-Guard | 700 / 600 rub. Discount: 500 rub. | >10 |
| DC1024-V117 | Windshield and roof edge seal | Duster-Guard | 700 / 500 rub. Discount: 300 rub. | >10 |
| R12711 | Wind deflectors (window deflectors) COBRA/Autoplex | COBRA/Autoplex | 2000 / 1600 rub. Discount: 1500 rub. | >10 |
| NRD-009102 | Frill under the windshield (RA) | Russian Artel | 2500 / 2100 rub. Discount: 1800 rub. | 5 |
Tail lights
To change the bulbs in the rear lights, you need to open the trunk and unscrew the bolts. These wings secure the rear light. By unscrewing these fasteners, you can remove the flashlight itself. Next comes replacing the lamps.
It is worth noting that only the shape of the rear lights differs between different generations of the car. Thus, the process of replacing lamps is practically the same.
Rear fog lights
To replace the rear fog lights, you must either lift the car or hang it on the desired side. For example, drive onto a high pavement. This is necessary in order to gain more convenient access to the lamp.
Having gained access to the rear PTF, unscrew the cartridge counterclockwise. Now you can start replacing. Next, assembly occurs in reverse order. It is worth noting that the wire is of sufficient length.
Replacing an additional brake light
To change the brake light bulb, you must first open the housing. It opens by pressing buttons located on the sides of the case. Next, remove the cover and replace the lamp itself.
It is worth noting that the second generation Duster does not have an additional brake light. Therefore, lamp replacement is not required.