Car roof replacement
Welcome to the kuzov.info blog!
Today we will look at the procedure for replacing a car roof.
The roof panel is one of the largest areas of the body. The roof assembly with reinforcements is part of the load-bearing structure of the body. According to safety standards, the roof must be able to withstand a load of 1.5 to 2.5 times the weight of the car on which it is located.
Different roof designs require different repair procedures.
Roofs have mainly the following designs:
- The roof is separated from the body pillars by a “gutter”, on which a molding is installed that covers the place where they are connected.
- The roof and body pillars form one panel. They also have a connection point, but it is sealed at the factory with copper solder and is invisible under the primer and paint.
To replace the first type of roof, it is necessary to drill out the roof sheet at the factory resistance welding points. In the second case, it is necessary to cut off the roof along the pillars and, after preliminary marking, weld the new roof to the remains of the body pillars.
What materials are needed
To install sound insulation, we will need a minimum of tools and materials: - vibration isolator (manufacturer does not matter, thickness up to 2 mm); - sound insulator (manufacturer - any, thickness from 4 to 8 mm); — universal degreaser (ordinary alcohol can be used); - hair dryer; - wallpaper knife; - car screwdrivers.
ATTENTION! Now you can buy a completely new Pioneer MVH X580BT processor radio for only 2990 rubles! Don't believe me? Then follow the link and see for yourself! Read more"
Calculate the amount of noise-insulating and vibration-insulating material depending on the area of the car roof, assuming that the materials will be laid in one layer.
Before replacing your car roof
- Remove interior parts that may interfere with access when dismantling and installing the roof.
- Cover the interior with material that protects against sparks. Protect the remaining glass on your car.
- Before dismantling the roof, you need to check all the geometric parameters of the car body. If necessary, correct distortions. After dismantling and before installing a new roof panel, you need to again measure the distances of the control points related to the roof and only then begin the fitting and installation procedure.
- Before cutting off the roof, make sure that the car is level and there are no body distortions. The roof affects the rigidity of the body and receives a certain load when the car is uneven, so when replacing it should not be under load. You can put the machine on a slipway, if possible, to completely remove the load. Before welding, you need to measure all distances and attach a new roof. All edges must match exactly. If necessary, you need to “tighten” the desired area using hydraulic or mechanical stretching.
- If the roof that will be replaced was taken from disassembly, then it is necessary to prepare it by drilling out the sheet.
- You can stick masking tape along the edges of the roof so that when drilling out welding points you won’t accidentally scratch the paint.
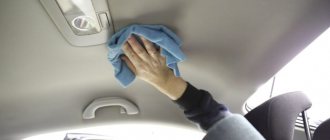
Second phase. We install sound insulation.
First we glue the vibration-isolating layer. The vibration isolator is already supplied with an applied adhesive layer (you just need to remove the protective film). The roof is divided into three tin rectangles by stiffening ribs. Measure and cut three pieces of vibration to cover the maximum area of the roof. Then, having removed the film, carefully glue the layer, smoothing it from the middle to the edges so that there are no air bubbles left. You can use a wallpaper roller for these purposes.
After the vibration isolator comes the turn of the sound-absorbing layer. The material also has an adhesive layer on one side, which simplifies the work. We try to cover the entire roof area with a sound insulator, including the stiffeners. We do not allow the formation of air bubbles. Sound insulation installed. By the way, to improve adhesion, you can preheat the soundproofing materials with a hairdryer.
The procedure for replacing a car roof panel
- Check all joints with adjacent panels.
- Cover the inside of your car with protection from welding and grinding sparks.
- Remove the roof trim and plastic interior parts that interfere with removal of the trim.
- Disconnect all plugs.
- Remove the windshield and rear glass. You can read the article about replacing the windshield.
- Drill out all the weld points securing the old roof sheet.
- Remove the sealant.
- Remove the roof sheet.
- Clean the roof installation area.
- Align all the flanges that the new roof will rest on.
- Try on a new roof.
- If the roof fits properly and all edges match, try on the windshield and rear glass. They should fit easily into openings and have even gaps from the edges of the opening around the perimeter.
- Install and weld the new roof.
- Install the windshield and rear windows.
- Assemble the salon.
Third stage. Installation of the casing in its original place.
We install the casing in the reverse order of dismantling. It should be noted that you should not overuse the amount of sound insulation on the roof, as there may be a problem with fastening the roof sheathing - the screws are not long enough.
In addition to reducing noise, installing additional layers helps improve thermoregulation in the car interior in the summer, and will also eliminate the formation of condensation in the winter.
Radio with monitor Pioneer AVH-3100DVD for 2990 rubles!
- Touch or button control of your choice;
- Support MP3/WMA audio formats, support MPEG4/DivX/AVI video formats;
- USB input, 3.5 mm input, and several RCA inputs;
- Screen with a resolution of 800×480;
- The stylish red backlight of the radio makes it easy to control it in the dark.
Find out details
The procedure for replacing a car roof by pillars
- When replacing a roof along the pillars, you need to determine where the joint will be. According to the technology, for better strength, the new roof with the body pillars needs to be butt welded with an offset (ladder). To do this, a spot weld is drilled into the sides of the racks, and the front and inner parts of the racks are cut off. It is necessary that the cuts are at different heights (at least 5–10 cm). If there is reinforcement inside the racks, then it must be cut off and welded also on a different plane than the front and inner parts. To do this, you may need to cut out a segment of the outer part of the rack (“window” measuring 5 cm), which is then welded back.
- The butt welding method with placing an additional plate inside the rack for reinforcement is also used. With this method it is easier to correctly align the roof in place.
- It is necessary to correctly mark the new roof and the old one before cutting. To do this, you need to find some marks on the body from which you could measure. It is better to leave a small margin and, trying it on locally, cut the racks to the desired size.
What influences the replacement
There are two main factors that force motorists to replace airbags.
- Natural wear and tear. Each pillow has its own service life, exceeding which is very rare. Often they don’t work it out for the second reason.
- Mechanical impacts leading to breakdowns. These are our roads, potholes, accidents, collisions with manholes, etc.
When replacement is required
There are several factors you should know about replacing engine components.
Situation
Peculiarities
If you feel vibration in the body, you should definitely check the condition of the supports. This effect can be caused by various reasons, but pillows are one of the main
Replacing the timing belt
When replacing a belt, removing its cover can be very difficult, since the engine is almost tightly pressed to the right mudguard of the front wheel. You have to remove the pillow in order to fully carry out repairs.
The engine sags, loads the CV joints
Due to the impact of the engine weight on CV joints, their geometry changes, which leads to a significant reduction in the service life of the elements. The resource is reduced, it is necessary to carry out replacements ahead of schedule
There is a knocking noise in the backstage area
It may be barely noticeable. But its presence indicates that the engine has sagged. Consequently, the supports do not work properly and need to be replaced
If you do not replace the supports in a timely manner, this will lead to more serious consequences and expensive repair of the breakdown. Therefore, it is better to replace the pillows when primary signs of wear are detected. To do this, we additionally recommend periodic inspection of the unit.
Modernization of VAZ 2115: ceiling features banner
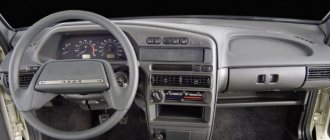
Cars produced by the Volzhsky Automobile Plant have rather inexpressive interior trim, and there are many complaints about the quality of materials. The plastic used to make the parts, even though it looks inexpensive, is also hard. When driving a VAZ 2115, the ceiling may creak due to poor fit and, moreover, has a tendency to quickly lose its appearance. It is clear that the low price of the car is largely decisive when purchasing, but many owners do not want to put up with the shortcomings of the car and carry out tuning. There are many opportunities to make the interior of your car more attractive and improve it accordingly. This can be organized in different ways: do it all yourself or contact a specialized service.
Product delivery options
Note! Below are the shipping methods available specifically for this product. Payment options may vary depending on the delivery method.
Detailed information can be found on the delivery and payment page.
Transport companies
Available payment methods:
- Using cards Sberbank, VTB, Post Bank, Tinkoff
- Yandex money
- QIWI
- ROBOKASSA
Delivery is possible to any locality where there is a representative office of the transport company. Delivery time is from 2 to 10 days. Sending large parcels is approximately 50% more profitable than by Russian Post.
Courier delivery in Togliatti
Available payment methods:
- Cash upon receipt
- Using cards Sberbank, VTB, Post Bank, Tinkoff
- Yandex money
- QIWI
- ROBOKASSA
Delivery time from 1 to 12 hours.
Pickup from our warehouse
Available payment methods:
- Cash upon receipt
- Credit
- Using cards Sberbank, VTB, Post Bank, Tinkoff
- Yandex money
- QIWI
- ROBOKASSA
Pickup times must coincide with store opening hours.
Evgeny Nikulin from the Volgograd region:
After buying the car, a lot was redone, as they say, for the soul and for yourself. And now it’s time for the salon:
- seats reupholstered;
- Euro door trim;
- rugs;
- interior sound insulation,
But the ceiling remained untouched. No matter how I washed it, no matter how I cleaned it, this dirty white ceiling spoiled the whole look. There weren't many options to transform it:
- I didn’t want to tighten it - it was long and tedious;
- painting with a spray can - well, that’s not the same at all.
The only option left is to replace it with a finished one in black.
Having visited all the markets, I found nothing and then on the drive I read a positive review from a satisfied owner of this ceiling. After weighing all the pros and cons, it was decided to buy this miracle plus visors in color. Where to order, I took the link from his article. So I left a request and made an order on the website motorring.ru.
Delivered by transport company to the address, everything safe and sound. I started installation right away. Removing the old trim was not difficult. Well, the installation didn't take much time. All the holes fit perfectly, I removed the ring from the fish eye of the lantern from the old one, the visors fit perfectly (by the way, with a mirror, my wife will be satisfied). The ceiling material is pleasant to the touch, not a rag, but black pile like a factory.
Ways to improve interior quality
It is difficult to reconcile with a situation where the ceiling of a VAZ 2115 sag is simply not aesthetically pleasing on the one hand, and on the other hand does little to improve the level of traffic safety. Upholstery that moves up and down distracts the driver's attention and irritates passengers. Among other things, practice shows that the car's developers poorly chose the material and color of the upholstery, which gets very dirty in places of contact with the heads of passengers and the driver. This state of affairs is due not only to the low quality of materials, but also to the unsuccessful way of fixing this element to the car body. Thus, tuning the interior of a VAZ 2115 can pursue two goals: eliminating sagging parts of the upholstery and reducing the tendency for dirty spots to appear on the material. There are several ways to eliminate the identified deficiencies. The most inexpensive method is to reupholster the VAZ 2115 ceiling with high-quality fabric over a standard upholstery element. If the work is carried out carefully, the result is simply excellent, despite the fact that the cost of such an operation is relatively low. In fact, it will be equal to the amount spent on purchasing materials, provided that all the work is carried out independently. However, this technology does not solve the problem of eliminating extraneous noise and sagging of the ceiling trim element. Here you will need completely different means and the use of a non-standard finishing element. Currently, you can purchase such parts in retail stores both as a set and as a separate part. If you need something original, you can order what you need from specialized enterprises.
How to cover the ceiling on a VAZ 2114 with your own hands
Without a doubt, a beautifully designed ceiling plays a big role in comfort in the car interior. A correctly selected ceiling color that matches the color scheme of the entire car interior, high-quality work done and beautiful interior lighting will make the interior of your car pleasant . how to properly re-stretch the ceiling in this article. It is best to cover the ceiling together with the reupholstery of the entire car interior. Then the overall appearance of the interior will look more comfortable when you only reupholster one ceiling.
- Which glue to choose for reupholstering a car ceiling?
- What material should I use for covering the ceiling?
- How to reupholster a ceiling with your own hands?
I will try to answer all these questions in order.
Hello! On the Internet I am known as Jerome Holden and I make money by testing the algorithms of the well-known Vulcan casino: I look for vulnerabilities in games, place bets and win the jackpot.
Now I'm gathering a community for a more global project, so I'm sharing the schemes for free. I tell you everything in as much detail as possible, there is nothing complicated, you can work directly from your phone, even girls can handle it)). You can test the algorithms, earn money and decide whether to join my team or not. Details here.
In three months I earned 973,000 rubles from my schemes:
In order not to be unfounded, I am posting 3 of my favorite schemes. It's time to rob the casino!
It all starts with choosing the color of the ceiling . The most popular ceiling color is black. I don’t know why so many people choose it, but it really is. In my opinion, the black ceiling is pressing. I don’t know, but I feel somehow uncomfortable in such a car. On the contrary, many people like the black ceiling the most. In general, the color scheme of the entire interior should match. You understand that a light interior and a black ceiling will not look good, or a black interior and a red ceiling, etc.