Any car cigarette lighter, including the VAZ-2110, was initially designed only for use for its intended purpose. However, over time, “necessary” car gadgets began to appear that needed to be connected somewhere. Since the factory did not provide for the installation of a 12-volt outlet in the car, the cigarette lighter is the power source for vacuum cleaners, refrigerators, televisions, video recorders, compressors and phone chargers. This does not benefit him and quite often he breaks down at best.
At worst, a connected gadget left unattended can lead to a fire.
What is a cigarette lighter
Structurally, the cigarette lighter consists of two main parts: a glass and an insert. The first element is made of metal and has a cylindrical shape. In its lower part there is a contact to which voltage is supplied from the positive terminal of the battery. The body of the glass is connected to the “ground” of the car.
The insert is also made of metal and has a cylindrical shape. There is a special spiral placed inside it, which heats up when current passes through it. The upper part of the insert is equipped with a plastic cap.
To ensure that the cigarette lighter can be easily found at night, the glass is equipped with a transparent plastic rim, under which there is a backlight. It lights up when the side lights are turned on.
Connecting an additional cigarette lighter
Some car owners install another socket. You will need:
- drill or screwdriver with a set of metal drills;
- a crown for cutting out a hole, the diameter must match the diameter of the car cigarette lighter;
- file;
- soldering iron with solder;
- wire cutters;
- screwdrivers;
- multitester;
- heat-shrink tubing;
- wire of suitable cross-section;
- fuse that can withstand the current recommended by the manufacturer - 25 amperes.
Procedure.
- We turn off the power to the car and choose a place to connect an additional cigarette lighter. It is desirable that it be a flat surface.
- We drill a hole of a suitable diameter and clean the edges with a file.
- We connect to the wiring, observing the polarity and passing them through the fuse.
- We check the functionality of the model and carry out assembly.
How does a cigarette lighter work?
The principle of operation of the cigarette lighter is quite simple. When we press on the insert, it goes deeper into the glass and is fixed inside it using specially provided bimetallic plates. An electric current begins to flow through the coil, heating it. When the temperature reaches a certain value, the plates expand under the influence of heat and the insert returns to its original position. Taking it out of the glass, we have the opportunity to light a cigarette from a red-hot spiral. But this is for those who smoke. And for those who use the device as a power outlet, simply plug the plug of any of the additional electrical appliances into the glass, and while it is working, it will be powered by a battery (generator).
Checking the cigarette lighter wiring
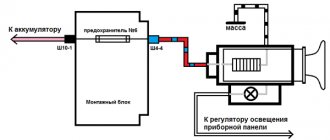
It is necessary to check the integrity of the cigarette lighter wiring. First of all, pay attention to the connectors located near the passenger’s left leg; they should be inserted tightly. Then make sure that the connector on the cigarette lighter itself is not disconnected.
Also make sure that the mounting block is in good condition. Based on the results of the check, the wiring to the cigarette lighter can be connected from Ш5-3 mounting block to the +12V connector of the cigarette lighter.
If the wiring is intact, and the fault lies in the cigarette lighter itself (for example, it shorts out), then only replacing it with a new one will help.
Fuse
In a situation where the VAZ-2110 cigarette lighter does not work, the first thing you need to do is check the fuse. It is this device that most often fails. The VAZ-2110 cigarette lighter fuse is located in the main mounting block, which is located in the engine compartment. It is designated F-18 on the electrical diagram and is typically rated at 25 amps.
By the way, it is not at all necessary to immediately climb under the hood. If the VAZ-2110 cigarette lighter does not work, the serviceability of the fuse can be checked by turning on the heater fan. Just press the launch key in any mode. If it works - the VAZ-2110 cigarette lighter fuse is working, if it doesn’t work - open the hood.
You ask: “What does the fan have to do with it?” The fact is that the F-18 fuse is also responsible for protecting its electrical circuit, and also for illuminating the glove box. To make sure, turn on the lights and open the glove compartment. The light doesn't come on - let's go look for the fuse!
You can check the F-18 fuse link using a multimeter turned on in tester mode. Remove the fuse from its socket and ring it. If a malfunction is detected, replace the insert, observing the rating.
Device
The car cigarette lighter is connected to the battery through a mounting block. When the cigarette lighter starts working, a large current passes through it. If the cigarette lighter in a VAZ 2110 car does not work, then the problem may be in the electrical fuse.
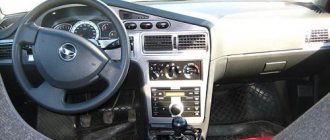
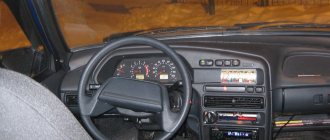
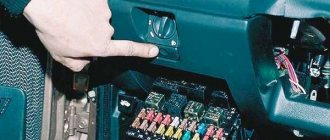
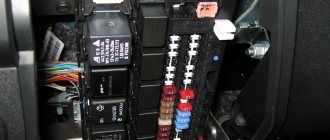
The instructions for the car contain a wiring diagram where the required fuse is indicated under the F18 marking. It is located in the mounting block, on the front panel, to the left of the steering wheel. The marking is the same as in the diagram, that is, F18. The permissible current passing through the fuse should not exceed 25 amperes.
Fuses in the mounting block. F18 - cigarette lighter
Disassembling the center console
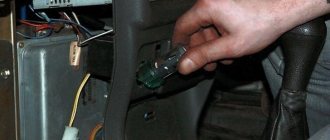
Further diagnostics of the device requires its removal. But how to remove the cigarette lighter of a VAZ-2110? Some specialists manage to remove it from the facing panel without dismantling it by picking it out with a screwdriver, but why deform the plastic if it takes no more than five minutes to remove it? Yes, and for this you only need a Phillips screwdriver.
The work order is as follows:
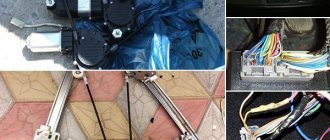
- Unscrew the screws securing the left and right trims of the center console.
- We disconnect the connecting blocks of the cigarette lighter wires and its backlight (it is recommended to disconnect the negative terminal from the battery in advance).
- Push up the front trim (under the handbrake lever). Remove the cover.
- We remove the gear shift knob, and then its cover.
- Unscrew the central screw securing the tunnel lining.
- Move the front seats all the way forward.
- We unscrew the screws for the rear fastening of the upper cladding and dismantle it.
Let's summarize
Obviously, the procedure for replacing the cigarette lighter is quite simple, even a beginner can do it. But you need to understand that the cigarette lighter will have to be changed often if the current consumption increases above 25 amperes. Once this value is reached, the entire procedure described above will have to be performed again, since the node will inevitably fail. The most common reason for this is connecting multiple devices at the same time. You should not use tees, and you should always know exactly how much the device you want to connect to the cigarette lighter consumes. This will extend the life of both the unit itself and the fuses.
Checking the condition of the wiring and contacts
Having removed the center console panel, the first thing you need to do is inspect the contacts of the blocks connecting the power wires of the cigarette lighter and its backlight. If everything is in order with them, put the terminal on the battery, turn on the ignition and check if there is voltage on them. Its absence may indicate an open circuit in the cigarette lighter circuit. In this case, you will have to check the wiring from the blocks to the mounting block. This can be done by ringing the conductors.
If you find that the contacts in the pads are oxidized or burnt, clean them with fine sandpaper, and then check the functionality of the cigarette lighter. If everything is fine with them, inspect the connectors on the device itself. It has three contacts: two “pluses” (for the lamp and glass) and one common “minus”. If necessary, clean the contacts with sandpaper.
Cigarette lighter not from ignition
There is a way to connect directly to the car battery. This scheme has advantages: if you connect the cigarette lighter directly to the battery, you can avoid interfering with the wiring itself and the fuse. The work will take less time; the positive cables should be led directly to the battery, and the negative cables should be attached to the car body.
It is also important to remember that you need to select the right spare parts. Initially, this concerns the wires. Each square millimeter of cross-section is designed for 5-10 amperes of current. Should be taken with reserve. A cross-section of 3–5 mm is quite sufficient to transmit the required voltage. Otherwise, the wires may burn and the fuse will trip. This will result in a risk of short circuit. The circuit should be routed through an additional fuse with a rating specified by the manufacturer.
Spiral
If the VAZ-2110 cigarette lighter does not work, the reason may lie in the spiral of the insert. Its burnout is most often caused by a malfunction of the bimetallic plates. Over time, they lose their properties (bending and unbending under the influence of temperatures), which leads to the fact that the insert does not “jump” out of the glass in a timely manner. Naturally, this leads to overheating of the coil and its burnout.
It is quite difficult to check the serviceability of this element, since a broken thread can short to ground. Trying to restore the spiral is also a thankless task. It's better to buy a new cigarette lighter. Moreover, it costs around 300 rubles.
Repairing a broken cigarette lighter
Sometimes replacement is not necessary. In some situations, you can carry out repairs yourself. Inside the car cigarette lighter itself is a small mica plate. This is a semiconductor that often fails. It needs to be removed. After this, it is worth assembling the device and then checking that it is working correctly.
Often you just need to treat oxidized contacts or solder fallen wires.
Instructions for replacing the backlight lamp
If you need to carry out this procedure, then you should act according to a certain scheme.
- Turn off the ignition, and then remove the wires from the battery.
- To get to the lamp, we dismantle the plastic lining inside the cabin.
- Disconnect the gearbox and parking brake housing.
- We take out the car cigarette lighter along with the backlight.
- Squeeze the screen to remove the metal tendrils.
- We rotate them 90 degrees, and then remove the lamp from its seat.
- We install the new element, and then carry out the assembly. When connecting, you should use A 12-4 lamps.
A detailed video on how to remove a VAZ 2110 model device with your own hands is presented above.
Replacing the cigarette lighter VAZ-2110
If you decide to replace the cigarette lighter, you will have to perform the steps described above to dismantle the top panel of the central tunnel lining. Before connecting the cigarette lighter to the VAZ-2110 and installing it in place of the old one, you should make sure that it is working. To do this, simply connect the connectors of the power cables of the device and the backlight to their contacts, turn on the ignition and carefully press the insert into the glass. Wait a little while the coil heats up. If the insert “jumped out”, then the device is working.
Replacing the VAZ-2110 cigarette lighter must be carried out with the negative terminal of the battery disconnected! To do this, disconnect the non-working device from the power cords. Next, use a screwdriver to press the latch of the cigarette lighter socket on the back side of the facing panel and push the glass forward. Install the new cigarette lighter in the reverse order.
DIY cigarette lighter repair
The windshield wiper does not work: possible causes and solutions to the problem
One of the most popular car
, is a failure
of the cigarette lighter
.
To repair the cigarette lighter,
I think you shouldn’t call
an auto electrician
, but you can do it yourself
.
Even those who don't smoke still use it.
The most common device plugged into the cigarette lighter
is a mobile phone charger.
Usually the battery runs out at the most inopportune moment, during a very necessary conversation, and what disappointment comes when the phone plugged into the cigarette lighter
says “no charging.”
To prevent this from happening and for the cigarette lighter
to work properly, you must follow some rules.
1.
Do not put compressors for inflating tires into the cigarette lighter socket. They are best connected directly to the battery. And other devices that consume a lot of energy.
2.
There’s no need to forcefully tamp down devices that don’t fit there.
3.
do not put metal objects into the cigarette lighter socket, and try not to buy devices that have metal rings on the body (they can come off and short the contacts inside the socket)
If, nevertheless, the cigarette lighter socket does not produce the desired voltage, then first of all you need to check the fuses, it is called CIG. If it burned out, and after replacing it the energy source began to function, you are lucky, don’t do that again.
If the energy flow is not restored, you will have to disassemble the cigarette lighter itself. If you have not yet believed me, and doubts gnaw at you, you can check the veracity of my words. Reach to the back of the cigarette lighter socket, remove the connector from the socket and connect the light bulb there, and turn the key to the ACC position. If it burns, then a showdown cannot be avoided, and in vain they didn’t believe me.
Repairs will require small pliers, hands, and a small file. We see the back of the cigarette lighter, and are in no hurry to unscrew the nut! Before unscrewing the nut and disassembling the structure, it is advisable to remember in what position the contacts are located and what is positioned. So as not to disassemble again when connecting the connector. After unscrewing the nut, we separate the metal parts from the plastic and disconnect the pieces of iron. And we see an incomprehensible semiconductor-mica plate that ruins our life. We tear it out, throw it away, and try to put everything back together. But we can’t put it back together, so we take a file in our hands and grind off the excess metal that is in our way. After removing it, put everything back together in reverse order, it should work. We put the cigarette lighter back in place and enjoy the fact that we were able to fix our car ourselves.
Step by step replacement
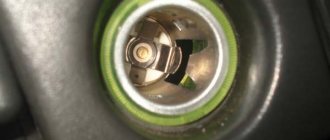
1. Remove the cigarette lighter cylinder.
2. The cigarette lighter core is held in place by a metal retainer. The latch is marked in the photo below.
3. Using tweezers, bend the core clamp inward.
4. We pick up the edge of the core with a flat screwdriver and pull it up.
5. Disconnect the cigarette lighter power connector.
6. Now there are two ways. If your cigarette lighter rim was illuminated, then you don’t have to change it. Simply connect the new core and install it in place.
If the backlight did not work for you, then pry up the bezel using a flat-head screwdriver and pull it up.
A backlight lamp should be attached to the rim, but it happens that during dismantling it disappears.
7. Find the socket with the light bulb. We change the light bulb in the socket and attach the socket to the rim as shown in the photo below.
There are metal brackets on the cartridge, and mating grooves on the rim.
When purchasing a new cigarette lighter, you usually come with a socket with a lamp, as well as a wire with a plug for connection. If you have this, then simply disconnect the old one at the connector and connect the new one.
8. Pass the cigarette lighter wire through the rim and connect the power supply.
9. Insert the bezel until it clicks.
When installing, first start the lamp and then snap the bezel itself. There are grooves there to latch the rim into the floor tunnel.
After installation, the backlight should face towards the passenger door.
10. Insert the cigarette lighter until it clicks.
When installing, the cigarette lighter latch must be facing the engine.
11. Insert the cigarette lighter cylinder.