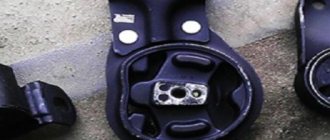
On the VAZ-2114, the generator is an electrical three-phase device that operates with alternating current. This device is equipped with a whole block of rectifiers used to convert alternating current into direct current. The main parts of this installation are:
- Aluminum covers (back and front), which have specially designated areas for bearings. On the back cover you can find a terminal designed to connect the generator to the battery. There is also a connector there that is used to supply voltage to the winding. On the same back cover you can find a capacitor used to overcome any radio interference.
- Stator core cylinder. On the above car, it is made of special iron called “transformer”. Inside there are grooves into which, in fact, the winding is placed. There are also leads for its further connection to the rectifier unit.
- The field winding is located on the rotor shaft. It connects to special slip rings made of copper. In front of this shaft there is a keyway on which the drive pulley is mounted.
- The brushes in this generator are made of a single unit, which is combined with an electronic relay. It, in turn, is hidden under a fairly durable metal casing and is attached to the brush holder.
- The diode block is attached to the back cover. It consists of 9 parts, 3 of which are optional. The diodes are installed on special metal plates shaped like a semicircle. Due to this, semiconductors receive better cooling.
Mechanical breakdowns
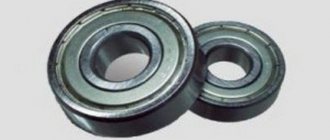
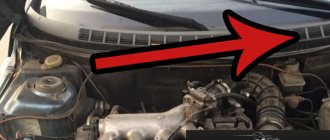
If there is a mechanical breakdown of the generator, loud noise appears during its operation. But it also happens that this equipment begins to make unusual noise due to the fact that the bearings are worn out too much. Most often, the bearing located on the front cover requires replacement. It is he who takes on the highest radial loads, and therefore his service life is significantly shorter than the others.
By the way, if the drive belt is tightened too much, the load increases, which means the bearing will last much less.
Repair and replacement of the stator of the VAZ 2110 generator.
The generator stator has three windings. These windings are connected together on one side and to a diode bridge on the other. They are wound on a plate-type metal core.
First of all, we visually inspect the stator windings for damage. Damage can be different, for example, chipped insulation, burnt windings, visible breakage of windings. If such causes are identified, it is advisable to replace the stator.
But if everything seems to be in order, we proceed to check it with a multimeter.
You need to set the device mode switch to a sound signal and connect the probes to the windings one by one and take measurements.
Since the ends of the windings are connected to one point, all three outer wires must ring each other. Above in the photo, I indicated the alternate connection of the device in different colors.
If, when checking one of the windings, no sound signal is heard, it means there is a break somewhere and the stator needs to be replaced. You can, of course, rewind the winding, but more experience is needed here, so it is better to replace the entire stator.
In the same way, we check whether the windings are shorting to the stator housing. Replacing valve stem seals for VAZ 2110 | car enthusiasts. To do this, we connect one probe to each winding terminal in turn, and the other probe to the stator housing.
We can finish this with the stator and move on.
Electrical breakdowns
You can understand that an electrical breakdown has occurred in the generator by the following indicators:
- the charge voltage has decreased;
- the charge voltage has increased;
- The generator stopped charging altogether.
If you don’t have a multimeter at hand, you can determine the malfunction using the following parameters:
- The battery sensor blinks or is constantly on;
- the headlights began to shine quite dimly, even when the engine was running;
- wipers work much slower than before;
- The electrolyte in the battery is boiling, while the headlights are shining very brightly.
It should be understood that you can superficially check the operation of the generator without removing it. But if such a check does not bring the necessary results, then dismantling the generator simply cannot be done.
How to replace slip rings on an old-style generator rotor.
Generator repair
engine ZMZ-409 UAZ Bukhanka 2009 mileage 140 thousand km, for only 220 rubles (bearing 50 rubles and cont.
We fill new contact rings carefully so that they do not become distorted, otherwise during operation of the generator the brushes will fall apart or they will wear out quickly. It is better to stuff through a wooden container.
Having installed new rings, we secure the wires going to the excitation coil. It’s better, of course, to solder them, it will be more reliable.
Don't forget to install a new protective washer.
This is where we finish with the armature and move on to the stator.
Self-removal of the generator on a VAZ-2114
The generator is supported by a special bracket located on the engine block. In order to dismantle this device, you will need the following tools:
- head at 15;
- open-end wrench 17×19;
- wrenches, sizes 10 and 13;
- the most common mount.
To remove the generator, perform the following steps:
- Disconnect the terminals from the battery.
- First we loosen and then remove the belt.
- We dismantle the tensioning mechanism.
- We disconnect all the wires from the generator that are hidden in the case.
- We disconnect the wire responsible for supplying voltage to the winding.
- The generator is secured with a nut and a long bolt, which is quite difficult to pull out. To do this, you must first unscrew all the bolts holding the bracket to the block and turn this device clockwise.
- Unscrew the nut and pull it out with the bushing.
Replacing rings
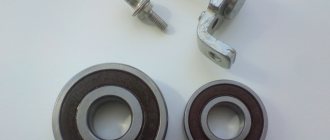
Such partial disassembly of the generating device is sufficient to replace the slip rings and the bearing on the shaft (armature bearing).
Attention. Even if the armature bearing is new, it is recommended to replace it after pressing.
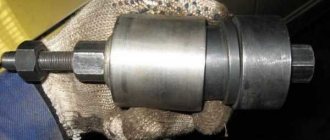
Method for replacing ring block 1
- the anchor is clamped in a vice;
- the bearing is pressed out;
- then use a knife to remove the plastic contact protection, which is located directly under the bearing;
- after this, you need to open the bracket of the contact block and tear out the soldered wires so that you can remove the old slip rings (again, you can use a knife).
Attention. If it is not possible to open the bracket due to oxidation, etc., then you can use the old-fashioned method - press out the block with the contacts using a chisel and any long tool, directing the force of the lever upward.
- a new block with rings is put on the shaft (a spacer and light blows from above on the block with a hammer - the main thing is that the tails of the block accurately hit the seats);
- the wires are tucked into the proper places and sealed.
Problems with the brush assembly
The performance of the brush assembly directly depends on the electronic controller and the brushes themselves. By the way, it is possible to replace the brushes without dismantling the generator, however, this is quite inconvenient.
In order to check whether the brush assembly is working, you need to take a 12-volt light bulb and an regulated power source. Connect the light bulb to the brush, and the power regulators “+” and “-”. Thanks to this action, the light bulb should light up immediately. If the input voltage is increased to 15 Volts, the light should go out. But if it continues to burn at 16 Volts, the electronic regulator should be replaced.
The wear of the brushes themselves can be determined by the following parameters:
- complete lack of battery charge;
- The charging voltage constantly fluctuates;
- The on-board network voltage is lower than specified.
Slip ring block
ATTENTION! A completely simple way to reduce fuel consumption has been found! Don't believe me? An auto mechanic with 15 years of experience also didn’t believe it until he tried it. And now he saves 35,000 rubles a year on gasoline! Read more"
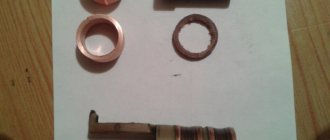
Disassembling the generator is the first thing to do. In order to see the rings, it is enough to remove the back cover of the gene from the side of the diode bridge. However, to replace it you will need to disassemble the entire device.
A block of rings is like this.
The rings, as you can see, come assembled. Factory rings have a decent thickness - 1-2 mm. Purchased analogues may be thinner. Blocks of rings “run” on generators, depending on operating conditions, for approximately 300 thousand vehicle kilometers. If the generating device did not fall into the area of primary concern of the car owner, and “lived out its life,” so to speak, in oil, the service life of the slip rings will decrease significantly.
The block is inexpensive. If you replace it along with the bearings and the tablet, you get an almost brand new generator.
However, a block with rings is not always available for sale. Here you should proceed like this: first find a new block with rings, and only after that remove the old one. In some cases, worn rings on an old block can be restored by sanding them down.
You can do this if you can’t find a block on sale: buy a new regulator and put a couple of washers under it. But this should be done so that the brushes move with the worked part of the rings. Even on some regulators, the brushes are initially offset from the standard. By doing this, you can extend the life of the rings for some time.
Problems with the diode post
Checking the serviceability of the diode bridge is quite simple. The fact that it is faulty is indicated by either increased voltage or lack of charge. You should not delay repairs, as this may result in serious problems in the vehicle's electrical network.
But the diode bridge can fail only in the event of a breakdown of the power diodes. They can be replaced if necessary. True, sometimes some problems arise with this. The fact is that finding power diodes is quite difficult. You may have to make an exciting journey through the disassembly of a VAZ-2114, but it is much faster and easier to replace the old diode bridge with a new one.
Replacing the rotor with rings
Replacement on the VAZ 2110 generator
Sometimes it is not possible to replace the rings separately. The rotor also has to be replaced. This situation occurs when the rings reliably “stick” to the rotor. But you can try to restore the rings by placing them in a sulfuric acid solution. They cannot be kept in solution for a long time, as whole particles may disintegrate. To replace the rotor and rings, you must:
- Place markings on the covers of the generator (to make it easier to assemble them later, otherwise you can confuse their location).
- Remove the plastic casing. This is easier to do after the three latches securing it are bent away.
Note: you need to bend them very carefully, as they are quite delicate. Moving too quickly can cause them to break.
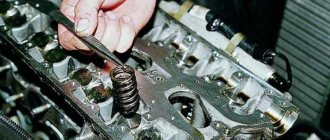
- Remove the two screws that secure the electronic voltage regulator.
- After this, you will have access to the generator relay. It must be removed, otherwise it will interfere with the work process.
- Remove all fastenings of the unit and condenser.
- Then unhook the three winding tips coming from the stator.
- Remove the block and capacitor. If you need to replace the capacitor, you need to unscrew the nut that secures it. Then remove the washer along with the bushing. Now it’s the turn of the wires that attach the capacitor to the contact bolt. After this, you can remove and replace the capacitor itself.
- Unscrew the generator coupling bolts. There are four of them in total. There are usually flat washers and spring washers underneath the screw heads. They are very small, but perform an important function. You can’t lose them, otherwise you’ll have to buy new ones, but finding them on sale is not easy.
- Remove the generator cover from the side where the slip rings are located. In this case, you can help slightly with a screwdriver, as if pulling the lid towards you.
↑ Description of generator design 94.3701
The generator is a synchronous AC electrical machine with electromagnetic excitation and a built-in rectifier using silicon diodes. The generator rotor is driven into rotation from the engine crankshaft pulley (damper) by a poly-V belt.
The stator and generator covers are secured with four screws. The rotor shaft rotates in bearings installed in the covers. The lubricant placed in the bearings at the factory is designed to last the entire service life of the generator. The rear bearing is pressed onto the rotor shaft and is pressed by the rear cover through a plastic sleeve.
The front bearing is pressed and rolled into the front cover and can only be replaced together with it. Its inner race, together with the spacer ring and washer, is clamped by a nut between the pulley and the step on the rotor shaft. The back of the generator is closed with a plastic casing with latches.
The generator stator contains a three-phase winding made in a star configuration (the terminals of the phase windings have a common point). The second ends of the phase windings are connected to a rectifier bridge consisting of six silicon diodes (valves) - three “positive” and three “negative”.
The valves are pressed into two horseshoe-shaped aluminum holder plates in accordance with the polarity (positive and negative - on different plates); one of the plates also contains three additional diodes, through which the excitation winding of the generator is powered after starting the engine. The plates are combined into a rectifier unit mounted on the back cover of the generator (under a plastic casing).
The excitation winding is located on the generator rotor, its leads are soldered to two copper slip rings on the rotor shaft. Power is supplied to the field winding through two carbon brushes. The brush holder is structurally combined with the voltage regulator and is mounted on the back cover of the generator.
The voltage regulator is non-separable; if it fails, it is replaced.
To protect the on-board network from voltage surges during operation of the ignition system and reduce interference with radio reception, a capacitor with a capacity of 2.2 μF (±20%) is connected between the terminals of the “positive” and “negative” valves (between the “+” and “ground” of the generator) on the rectifier block.
Generator stator
The stator windings can only be examined by disconnecting or unsoldering the leads from the diode bridge. The resistance between the terminals of the windings should be approximately 0.2 Ohm. And between the terminal of any winding and 0 (common terminal) there is about 0.3 Ohm. If the stator windings or diode bridge are shorted, the generator makes a loud noise during operation.
Also carefully inspect the condition of the internal parts of the stator and the outer part of the rotor. They should not touch each other during operation. As they say, “shoes.” During such operation, the generator makes increased noise, which indicates wear of the bearings or bushings.
Video, testing on a homemade stand: