Installation of pistons and connecting rods
The next step is to install the pistons on the connecting rods. Pistons and connecting rods have a certain direction in relation to the engine. The arrow on the pistons indicates the forward direction, that is, they should be directed from the flywheel towards the front cover.
There are numbers on the connecting rods; they should face forward in the same way.
Taking this direction into account, we connect the piston and connecting rod using a piston pin. Before installing the pin, the piston must be heated; just place it in hot water for a few minutes. In the piston, the pin is locked on both sides by retaining rings.
Symptoms of a problem
If you have a multimeter and a regular screwdriver at your disposal, you can independently check the operation of the device without any problems.
Unscrew the nut
Signs of a faulty crankshaft sensor include:
- A warning light comes on on the dashboard, recommending that you check the engine;
- When idling, the engine behaves unstable;
- Thrust drops;
- Engine speed drops and rises;
- Detonation occurs, that is, shots from the intake or exhaust manifold;
- The engine cannot be started.
Installing piston rings
Now you need to install the piston rings on the piston. As a rule, three rings are installed on one piston. The upper and middle compression and lower oil rings are removable. The rings have an engraving, the inscription should be facing up,
if it is not there, then you can navigate by the chamfer, which is located either along the inner or outer diameter of the piston rings. This chamfer acts as a stiffening rib, which creates resistance to the loads that arise when gases expand in the combustion chamber. If there is a chamfer along the inner diameter, then the ring is placed with the chamfer up, if along the outer diameter, then with the chamfer down. The oil slip rings also have an engraving that should face up; if it is not there, then the direction of the ring does not matter.
The rings on the pistons must be placed in such a way that the ring connectors are not located under each other and do not fall into the groove under the pin. Since, for example, the middle ring connector is located on one side of the piston, the upper and lower ring connectors must be on the other side of the piston, and must be spaced apart from each other, but not fall into the piston pin recess
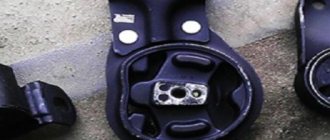
Choosing engine crankcase protection for a VAZ 2110
Nowadays, you can purchase sump and crankcase protection for a VAZ 2110 at any domestic auto parts store. It costs up to 2,500 thousand rubles. But you need to think about which one to choose.
| Type of protection | Peculiarities |
| Aluminum alloy guard | You can buy aluminum protection for the VAZ 2110. Its advantage is its light weight. It usually fits on standard tens of mounts and installing it is not difficult. It is simple and reliable. |
| Steel protection with powder paint | You can purchase and install steel protection. According to technical characteristics, it is more reliable, but it has more weight. For example, Kamaz makes protection four millimeters thick. Of course, it is very reliable, but when braking, the car begins to “nod off” even more and sags more when driving on a dirt road. Accordingly, the grinding of the bottom of the car on the ground is heard more often. Therefore, it is better to take steel protection with a thickness of 2 mm, and make sure that it has stiffening ribs. This is the optimal combination of weight and strength. |
Consequences of a bottom impact
An impact with the bottom can damage the oil pan. The problem is that there is a breather in the pan of the car, which has an oil intake pipe. And this tube is located a few centimeters from the bottom of the crankcase, not far from the drain hole. When you hit a hard surface, the crankcase will immediately dent. It all depends on how deep it is. If the dent is deep, then there is a very high probability of damage to the suction tube. If it breaks above the oil level, lubricant will stop flowing into the engine. You understand what consequences this will lead to. In this case, it is better to turn off the engine immediately.
If the dent is large
To check the serviceability of the breather, start the engine. At the same time, if the oil pressure check does not go out, then the engine must be turned off immediately. Then add a little oil and start the engine again. If after starting the pressure light does not go out and you see leaking oil under the car, most likely you will have to change the breather. In this case, we turn off the unit and call a friend or acquaintance so that he can tow the car to a car service center or home. You can use a tow truck service.
We find out whether the breather is damaged or not
If the light goes out during startup, then you can slowly drive home or to a car service center. In this case, it is better not to give the car high speeds, since the breather tube may be damaged. In this case, there may not be enough oil to lubricate the engine. By the way, the old system, when the instrument panel showed the oil pressure in the system, was more advanced.
By looking at the oil pressure, it was possible to more clearly determine the damage to the breather. The modern system is structured differently. If the control light on the instrument panel is on, it means no oil is entering the engine at all, and if it doesn’t light up, then everything is fine. This is where the catch lies. Oil may enter the engine, but not in sufficient quantities and we will never know about it. There will be increased wear on the piston group. In this case, after arriving home or at a car service center, you need to remove the engine pan and inspect the breather.
If the breather is not damaged, then we correct the dent on the pallet and put it back. If the breather is damaged, replace it with a new one. When installing the crankcase, you need to buy a new gasket, since the old one is most likely unusable. Complete sealing is required. This is a very important point. If the gasket sucks in air, the pressure in the engine will be insufficient, which can lead to failure of the components and mechanisms of the machine.
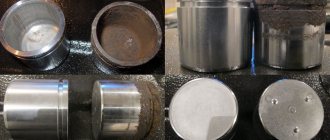
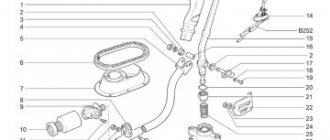
Installing pistons into liners
Once the rings are installed, the pistons can be inserted into the cylinder liners. To do this, tighten the piston rings with a clamp. We install the liner into the lower head of the connecting rod. In such a way that the lock on the liner fits into the recess of the connecting rod head bed. We insert the connecting rods with the piston into the sleeve until the clamp stops. Taking into account the direction of the piston, and with light blows, preferably using a wooden block, we force the piston into the sleeve. By guiding the lower end of the connecting rod into the crankpin of the crankshaft. After the connecting rod rests against the crankshaft with its liner. We install the connecting rod bearing into the connecting rod cover, and put the cover on the studs. In this case, it is imperative to take into account that the liners on the connecting rod and the cover are located in relation to each other, lock to lock.
We tighten the cover with nuts in two stages. The final tightening must be done using a torque wrench with a force of 42.32-53.51 N*m . Install the remaining pistons in the same way. Always be mindful of their direction in relation to the engine.
Replacing bearings without removing the engine
Sometimes a car requires very minor repairs, just replacing the liners, but is it really necessary to remove the engine, look for a hoist or several assistants for such a simple procedure?
When it comes to such a need, replacing the liners without removing the engine will help. This simple type of repair does not require a large number of tools, but it does require some skill, so you should immediately evaluate your skills. Inside the engine on the crankshaft, the liners are attached to a tendril, which is responsible for fixing the bearing in the engine bed when it is running. And lubricant is supplied to them through a special groove; a lack of lubrication always leads to the appearance of snags and jamming. Due to such liners, the wear time of the part is reduced, so they must always work at one hundred percent, otherwise major repairs cannot be avoided in the near future. However, during the trip you may find:
- Rotating the liners. If the fastening tendril has jumped out of its place (sometimes due to lack of lubrication), then it begins to rotate. Due to its rotation, scuff marks will appear on the journal, leading to the need to grind the crankshaft.
- Backlash. This breakdown can be easily heard by the knocking sound of the crankshaft. As soon as you hear suspicious knocking noises, repairs should be made immediately, without the need to remove the motor from the mount.
Installing the back cover
and the rear one after changing the seals in them.
Installing the oil pick-up
We install an oil intake and an emergency oil level sensor.
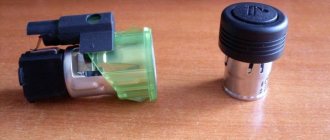
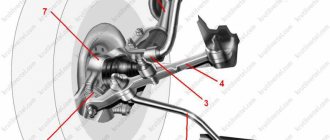
Examination
Before you can check it, you first need to get to it. And the device is located in a not very convenient place on the engine. So be prepared to spend some time on this.
Now to the question of how to check it. Let's look at the two most common situations, but first, let's remove the element.
- The sensor is removed with a 10 mm wrench;
- Be sure to make special marks on the crankcase and sensor before removing. This will allow you to return it to its original place, or install a new regulator in the correct position;
- If there is no external, visible damage to the crankshaft sensor, then you need to use a multimeter;
- Don't forget to measure the distance between the sensor and the timing disk. In the normal position, the gap ranges from 0.6 to 1.5 millimeters.
First way to check
In this case, you will need an ohmmeter , which you will use to replace the resistance on the winding. According to the manufacturer's standards, the indicator ranges from 550 to 750 Ohms.
It's okay if your numbers are slightly different from the norm. If the deviations are serious, you will definitely have to replace the sensor.
It should be noted in fairness that the crankshaft position sensor on VAZ 2110 models rarely breaks down. Among the main reasons for its failure to function normally is the accumulation of dirt, mechanical damage, as well as banal factory defects.
Second method
Here you will need a voltmeter, a transformer and an inductance meter. It is advisable to measure resistance under compact temperature conditions.
Once the ohmmeter readings are obtained, arm yourself with an inductance measuring device. Normally, the device should show from 200 to 4000 units (millihenry).
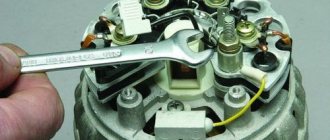
Installing the clutch disc and basket
We install the clutch disc and basket on the flywheel. The clutch disc must be centered in relation to the internal bearing of the shaft cranks using a special shaft. On which there are two surfaces, one corresponds to the inner diameter of the bearing, the other corresponds to the inner diameter of the splined part of the clutch disc. The clutch disc is located with its protruding part towards the basket. After centering, install and tighten the clutch basket.
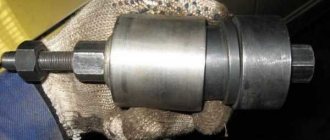
Instructions for removing the bearing from the crankshaft
In every car service, in order to remove any of the several dozen bearings that are in the car, there is always a pressing tool, a puller or any other special device. But in our case, when everything is done in an ordinary garage with your own hands, the car enthusiast has to make devices with his own hands or use improvised means. There are 2 ways to remove the ball bearing from the crankshaft seat in a garage.
Method No. 1
If the bearing is not seated in the rear wall all the way, then it can be removed from the inner race using an inertial hook made by yourself. In order to make it you will need:
- a piece of reinforcement or rod (D = 6-8 mm, L = 300-400 mm);
- a metal cylinder with a through hole, d larger than the selected rod (a hub, a massive sprocket or any other similar object may be suitable).
Making the device:
- One of the ends of the reinforcement is bent at an angle of 900, and the length of the bend should be about 10 mm.
- A metal cylinder is placed on one side of the rod.
- On the other hand, a section is welded and a T-shaped tip is made on it.
In order to remove the bearing with such a homemade device, the rod is inserted into the inner race of the bearing and secured with a bend. When the load moves with acceleration, the T-shaped tip is struck. In order to remove evenly, with each blow the rod must rotate around its axis.
On video: How to press a bearing out of a blind crankcase in 3 minutes?
Method number 2
This method can be used to remove the crankshaft bearing; this can be done using a metal cylinder or bolt (with an approximate diameter of 14.5 mm) so that it fits into the hole in the inner race with minimal clearance. An entry that is too loose or too tight will not work. Removing the crankshaft bearing:
- Lubricant (such as “Solidol”) is placed into the cavity behind the bearing through the hole.
- A rod is inserted into the inner cage and hammered in until the rod is completely immersed.
- Add more grease, and under the influence of its pressure, the bearing is squeezed out of the crankshaft seat.
A crankshaft is a part (or assembly of parts) of complex shape that has journals for attaching connecting rods, from which it receives forces and converts them into torque. An integral part of the crank mechanism.
Tightening torque for cylinder head VAZ 2112 16 valves
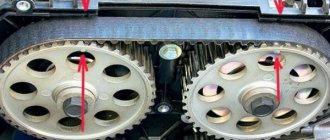
On the side of the front cover, install the timing belt drive toothed pulley. Then we install the cylinder head.
First install the cylinder head gasket. We check that all the holes in the gasket match the holes in the engine block. We tighten the cylinder head with coupling bolts in four stages.
The procedure for tightening the cylinder head of a VAZ 2112 16 valves
Tightening is carried out according to the tightening diagram
The first stage with a force of 20 N*m. the second stage with a force of 69.4-85.7 N*m. the third step is to tighten the bolt 90 degrees; The fourth step is to tighten the bolt again by 90 degrees. I wrote a description of the installation of timing mechanisms in another article, which you can read at this link: Replacing the timing belt. The repair of the VAZ 2110 engine has come to an end. Now it needs to be installed on the car.
Front SC
We recommend starting with the front one, since this oil seal is the easiest to replace. Even a car owner without much experience can handle it. Once you learn how to change it, you will most likely be able to replace the rear crankshaft oil seal yourself. But it is better to act according to the circumstances.
Retrieving an element
The steps for replacing the front oil seal are as follows:
- Remove the protective cover located on the timing belt;
- Remove your engine protection. You will have to get under the bottom and unscrew the corresponding fasteners;
- Set the piston of the first cylinder to top dead center on the compression stroke;
- Slightly loosen the timing belt tension, after which it can be easily removed;
- Remove the front right wheel;
- Remove the generator drive belt, and also do not forget to remove the pulley;
- Now we dismantle the fasteners of the crankshaft pulley and take it out. Here you will need to first remove the key;
Motor 126 and 127: working life, differences
These engines on Priora had a displacement of 1.6 liters (or 1596 cm3). Optimal for city sedans, the engine size of the Lada Priora gave a good combination of dynamics and consumption: along with very decent acceleration, fuel consumption does not exceed sky-high numbers. Both engines received good marks, because the car behaved perfectly in the city and on the highway.
In fact, the 126 Priora engine became the first sixteen-valve engine for this model, and the 127 is a modified version, “overclocked” by AvtoVAZ designers. In addition to the same engine displacement, they have other identical characteristics. The in-line type of arrangement of four cylinders provides a simplified design that can be repaired on your own.
The distributed multipoint injection system is involved in creating a good, rich fuel-air mixture (a lean mixture can lead to breakdowns). The cylinder diameter is 82 mm, the piston stroke is 75.6 mm, the compression ratio is 11. The “engines” fall under the Euro 4 standard, they are powered by gasoline with an octane rating of 95.
The 126 engine for the Priora received the following characteristics: 98 hp. (72 kW at 5600 rpm), acceleration to 100 km/h in 11.5 seconds (with manual transmission), city consumption 9.1 l - 100 km (manual transmission), maximum torque - 145 Nm.
The 127 engine for the Priora was upgraded to the following figures: 106 hp. (78 kW at 5800 rpm), acceleration to 100 km/h in 11.5 seconds (with manual transmission), city consumption 8.9 liters per 100 km (with manual transmission), maximum torque – 148 Nm.
The difference may not seem so noticeable, but this is a very small but strong step in design on the part of AvtoVAZ (this is where the change to sixteen-valve “engines” with a volume of 1.6 liters ended). For a car of the Lada Priora class, the engine power was sufficient.
In the same block it is necessary to say about the operating temperature. An absolutely normal operating temperature is considered to be between 90 and 95 degrees Celsius. Further, when the car is being pushed in a traffic jam, is basking in the sun, or for some other reason, but can still work - from 97 to 110 degrees. The engine is slow in places and wears out a lot, but you can still get to your destination. A temperature below 90 degrees is a direct sign indicating that the car has not yet warmed up, and it is better to wait in place until the arrow points to the coveted 80-90 mark.
In general, the service life of the Lada Priora engine with a normal driving style and careful treatment is 200,000 km - after this mark the time comes when the “engine” requires major repairs. AvtoVAZ mentioned the timing belt separately as a recommendation, saying that it needs to be checked every 100,000 km (many car enthusiasts talk about the figure of 50,000 km).
All Lada engines have a problem, and it is related to the valves, which will be discussed further.