The Hall sensor of the VAZ 2107 is one of the most necessary components in the car’s ignition system. If it fails, then interruptions in the operation of the power plant may begin and it is quite possible that the car will stop completely.
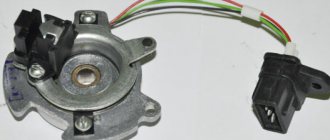
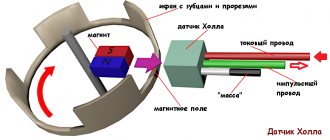
The Hall sensor on the VAZ 2107 is a control device that is a camshaft controller, which is installed near the distributor and guarantees its correct operation. The breaker-distributor shaft has a special plate in the shape of a crown. This plate has special slots, and there is a magnet on the camshaft controller. As the camshaft rotates, metal vanes enter the controller space. As a result, a pulse voltage is generated that goes to the ignition coil, and it is converted into an increased voltage. The ultimate goal is the spark plugs.
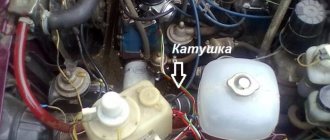
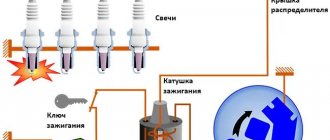
Ignition operation diagram
It should be noted that the VAZ 2107 camshaft controller has only 3 terminals. One is connected to the minus, and the other supplies a voltage of six volts, the 3rd one transmits the impulse directly to the switch.
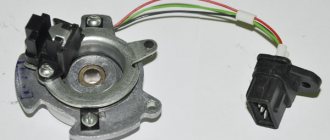
VAZ Hall sensor
How to recognize the problem
If you suspect that the Hall controller on a VAZ has begun to malfunction, before replacing it you need to make sure that it is the problem. This is determined by the following criteria:
- the power unit starts with difficulty or does not start at all;
- the engine runs jerkily, the speed is uneven;
Power point
- jerking when driving at high speeds;
- unpredictable engine operation - it can stop at any time.
Principle of operation
The sequence of action of the Hall sensors on the VAZ 2107–21099 is formed according to the Hall effect. In the resulting magnetic field, the sensor reads pulses from a full revolution of the distributor shaft. Signals are generated thanks to slots, of which there are exactly the same number as cylinders. The sensor itself is placed on the distributor support panel along with a magnet.
Energy comes to the sensor from the switch. There are also wires on the DC - mass and output pulses. The reverse voltage changes taking into account changes in the magnetic field. When receiving impulses, the commutator will supply electric current to the coil, which increases it and sends it directly to the spark plugs.
For reference. The transition of automakers and classic owners to electronic ignition systems has contributed to the emergence of 2 main advantages. Firstly, the lack of a contact group, which burned out from time to time. There is no such problem with hall sensors. Secondly, a higher spark plug voltage (30 kV versus 15 kV). All this improves engine performance.
Verification method
Experts recommend the following methods for checking the Hall sensor of a VAZ family car before replacing it:
- The easiest and most reliable is to borrow a proven or new sensor from someone and install it to replace your own. If the engine operation has returned to normal, then you need to go to the store and buy a new one.
- The second method is to measure the output voltage using a tester. A working sensor produces a voltage of 0.4-11 Volts.
- The next option can be called an imitation of the work of the Hall controller. It is not difficult to master; you need to pull out the block with 3 plugs from the controller itself. Next, turn on the ignition and connect the 3rd and 6th outputs. If there is a spark, then most likely the cause of interruptions in the system should be looked for in another unit, but not in the sensor.
Symptoms of a problem
Even a high-quality Hall sensor on a VAZ 2101–2107 (carburetor or injector) can sooner or later fail. The malfunction can be determined by the non-standard behavior of the engine. Here are the 6 main symptoms of DH disorder:
- The engine stalls.
- Power is lost.
- Jerks (dips) are felt in movement.
- Idle speed floats or disappears.
- The engine starts with difficulty or does not start at all.
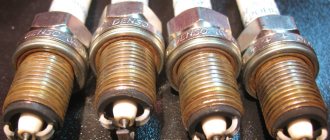
- 3 spark plugs are working and popping noises are heard in the exhaust system.
The listed signs most often indicate a defect in the Hall sensor, but sometimes other factors can cause unstable operation.
How to check
If your car has an electronic control unit (ECU), then you can do diagnostics through an application on a smartphone (for example, ELM327 VAZ for Android). The program will show whether there is a misfire or not. In other cases, it is recommended to go to a car repair shop, where the system will be checked with a multimeter (tester). Sometimes you just need to move the connector and the problem goes away.
Replacement
If you are convinced that the problem is with the Hall sensor, then you can replace it yourself. This is not difficult and any motorist can handle it if desired. There is no point in overpaying the service station technicians; you can check it yourself and handle the replacement yourself.
Tools
You will need this screwdriver
Stages
It is advisable to carry out work in a well-lit room.
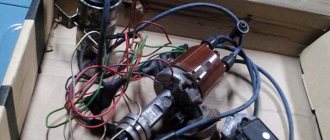
Correct connection of the block
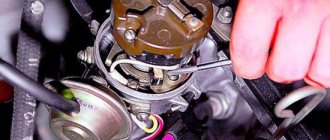
- First of all, it is necessary to remove the distributor itself from the car and then unscrew the cover.
- Next, pull up a little and remove the slider.
- Remove the plastic cover.
- The plug is secured with a bolt and needs to be unscrewed.
- Let's take him out.
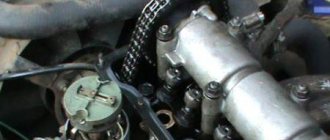
- The sensor plate is held on by bolts that need to be unscrewed.
- The vacuum corrector is fixed with bolts, we also unscrew them.
- Remove the retaining ring.
- We remove the traction and the corrector itself.
- To get the wires you need to move the clamps apart.
- Remove the support plate.
- Now all that remains is to unscrew a couple of bolts and remove the Hall sensor.
- We install a new one.
- Assembly work is performed in reverse order.
Important! If any signs of breakdown occur, do not delay repairs. Check the Hall controller immediately and replace it if necessary.
As you can see, everything is very, very simple. It is worth spending just an hour of your time to save several thousand rubles, which you will have to pay to the service station.
Summary
The Hall sensor reads the pulses and sends a signal to the switch. Contactless ignition is much more efficient than cam ignition. Engine performance has noticeably improved, and there is no carbon deposits on the contact group. If the hall sensor on your VAZ 2107 (carburetor or injector) is malfunctioning, then the malfunction can be determined by the symptoms of defective engine operation or through simple diagnostics. Replacing the DH is easy to do yourself. To do this, it is recommended to prepare a well-lit garage with a workbench and a simple set of tools.
Self-check video
This video shows how to properly check the Hall sensor of a VAZ car.
How to check and replace sensor on a VAZ 2107
?
Sensor
Hall VAZ
2107
is one of the most necessary components in the car ignition system. If it fails, then interruptions in the operation of the power plant may begin and it is quite possible that the car will stop completely.
Sensor
Hall on the VAZ
2107 is a control device, which is a camshaft controller, which is installed near the distributor and guarantees its correct operation.
The breaker-distributor shaft has a special plate in the shape of a crown. This plate has special slots, and there is a magnet on the camshaft controller. As the camshaft rotates, metal vanes enter the controller space. As a result, a pulse voltage is generated that goes to the ignition coil, and it is converted into an increased voltage. The ultimate goal is the spark plugs. Ignition operation diagram
2107 camshaft controller has only 3 terminals. One is connected to the minus, and the other supplies a voltage of six volts, the 3rd one transmits the impulse directly to the switch.
VAZ sensor
Hall
KEY-DOP
Functions and location
On carburetor VAZ 2109, the Hall sensor (HL) is responsible for opening and closing the contact group. When the screen with windows is rotated, a signal is sent to the device, which transforms into an electrical one. Through the switch, the signal goes to the ignition coil, and there it turns into an electric charge - a spark.
The DH is located at number nine on the ignition distributor. You need to look for the device under the dust shield. The sensor is secured to the base plate using rivets or a pair of screws. This already depends on the type of distributor used.
On injection VAZ 2109 there is no Hall sensor. Its functions are performed by the crankshaft position sensor.
Verification method
Experts recommend the following methods for checking the Hall sensor of a VAZ family car before replacing it:
- sensor
from someone and install it to replace your own. If the engine operation has returned to normal, then you need to go to the store and buy a new one. - The second method is to measure the output voltage using a tester. working sensor
produces a voltage of 0.4-11 Volts. - The next option can be called an imitation of the work of the Hall controller. It is not difficult to master; you need to pull out the block with 3 plugs from the controller itself. Next, turn on the ignition and connect the 3rd and 6th outputs. If there is a spark, then most likely the cause of interruptions in the system should be looked for in another unit, but not in the sensor.
KEY-DOP
Stages
It is advisable to carry out work in a well-lit room.
Correct connection of the block
- First of all, it is necessary to remove the distributor itself from the car and then unscrew the cover.
- Next, pull up a little and remove the slider.
- Remove the plastic cover.
- The plug is secured with a bolt and needs to be unscrewed.
- Let's take him out.
- The sensor plate is held on by bolts that need to be unscrewed.
- The vacuum corrector is fixed with bolts, we also unscrew them.
- Remove the retaining ring.
- We remove the traction and the corrector itself.
- To get the wires you need to move the clamps apart.
- Remove the support plate.
- Now all that remains is to unscrew a couple of bolts and remove sensor
. - We install a new one.
- Assembly work is performed in reverse order.
Self-check video
This video shows how to properly check sensor of a VAZ car.
When the Hall sensor on a VAZ 2107 breaks down, this makes it impossible to continue driving. The Hall sensor belongs to the category of key parts of a contactless ignition system, and if this part begins to fail, the switch will stop sending impulses to produce a spark. To troubleshoot the problem, you need to understand in detail the purpose and operation of the device.
Pros and cons of contactless ignition
At the moment, 100% of manufactured cars using gasoline or liquefied gas as fuel are equipped with an electronically controlled spark generation system. Mechanical ignition is outdated and a thing of the past. The reason is its unreliability during operation, frequent malfunctions and low spark power. Compared to the BSZ contact system, it has the following advantages:
- There are no contacts whose surfaces constantly burn from high voltage, causing the sparking power to drop sharply.
- The distributor of the electronic system has no wearing parts, which had to be changed every 15-20 thousand kilometers.
- Thanks to the contactless circuit and the new coil design, the voltage supplied to the electrodes of the spark plugs was raised from 18 to 24 kV. This had a beneficial effect on the ignition and combustion of the air-fuel mixture in the cylinders.
- Reliable operation and durability.
Powerful spark from contactless ignition
Reference . In past times, the owners of the VAZ “classic” quite often had to remove a protrusion that had burned on the surface of one of the contacts, which required a flat needle file. But a depression formed on the second contact, which was quite difficult to clean out, so manufacturers began to make contact groups with through holes.
Among the significant disadvantages of the BSZ, one can be noted - the non-repairability of the Hall sensor. If the mechanical contacts are cleaned, then the faulty sensor only needs to be replaced, so it is advisable to carry it with you. On the other hand, this device is very reliable in operation and lasts 40-50 thousand km without problems.
This is what a Hall sensor looks like, replacing the contacts
Reference . Owners of VAZ 2107 cars equipped with the first BSZ sets, in addition to the Hall sensor, also had to carry a spare switch. But after 2 years, its design underwent modernization, which is why the electronic units no longer fail.
Why is a Hall sensor needed and how does it work?
The device of the contactless ignition system of the VAZ 2107 car has such an element called a Hall sensor. Its fundamental purpose is the ability to detect the angle of the crankshaft and camshaft of the power unit. The Hall sensor is not installed on injection models of sevens, it is installed only on carburetor ones.
According to the value of this device, voltage pulses are supplied to the spark plugs. The functioning of this element is based on increasing the voltage in the cross-section of a wire placed in a magnetic field. The element is connected by three terminals, two of which provide power supply (plus and minus), and the third contact is intended directly for supplying a signal. The device received this name due to a special effect that was identified by scientist Hall. In the distributor on the shaft there is a plate that is part of the control of the device controller.
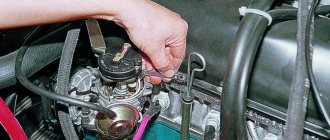
When the motor operates, the metal in the slots alternately changes, and the magnet, which is located inside the controller, begins to be excited by oscillations of the magnetic field. In this case, the controller generates voltage pulses issued by the switch and supplied to the coil. The coil, in turn, raises the voltage to a high value and transports it one by one through armored wires to the spark plugs. Knowing the operating features, you need to deal with the malfunctions, but before that it is important to note that the Hall sensor on the VAZ 2107 is located in the distributor under the cover. To replace it, you will need to disassemble the distributor.
Basic sensor malfunctions
Any part on a car sooner or later begins to malfunction, and the Hall sensor is no exception, even though it has the simplest design. Its breakdown is detected by detecting the following defects:
- Inability to start the engine.
- Unstable and unstable operation of the motor.
- The occurrence of jerks.
- The engine begins to stall.
- The appearance of the detonation effect.
If the above symptoms appear, then there is no need to rush to change the Hall sensor, since similar phenomena can also occur due to other breakdowns of the ignition and fuel supply system. To verify that the device is faulty, you will need to perform a suitability test.
Check Features
The BSZ contactless ignition on the VAZ 2107 has a Hall sensor, the serviceability of which determines the normal operation of the internal combustion engine. If you suspect that it is faulty, then you need to check the Hall sensor. To do this, there are different ways on the basis of which one can draw a conclusion about the suitability of the element.
The following two methods are used to check an element:
- The simplest test method is to install a known-good element. If the signs of malfunctions immediately disappear, it means that the breakdown was detected correctly and successfully repaired. The disadvantage of this method is that you must first purchase a working element.
- Use a multimeter to check the voltage at the sensor output. The device switches on the voltage measurement mode, after which the value at the device output is measured. The value should be between 0.4 and 11 Volts, and if this is not the case, the element should be replaced.
- Simulation of device operation. The test diagram is as follows - the element terminal should be removed from the connector, and then turn on the ignition. Now we begin to simulate the operation of the Hall sensor, for which contacts 3 and 6 of the switch output are connected. If sparking occurs, the element must be replaced.
Instructions for installing a contactless system
The procedure for replacing a mechanical ignition with an electronic one is divided into the following stages:
- selection and purchase of BSZ;
- preparation of tools;
- removing the old system and installing a new one;
- ignition setting.
If you have not previously had to deal with sparking problems in classic Zhiguli models on your own, then you will have to allocate about 3-4 hours for all the work.
Recommendations for selection
The BSZ factory kit for the VAZ 2107, available for sale, includes the following parts:
- switch with catalog number 36.3734 (also available 3620.3734);
- main ignition distributor, marking - 38.37061;
- high-voltage coil, catalog number - 27.3705;
- wiring harnesses with connectors.
BSZ parts from SOATE company
Note. The marking of the distributor is indicated for cars with engines of 1.5 and 1.6 liters. In modifications of the “Seven” with a 1.3 liter engine, the cylinder block is smaller in height and the ignition distributor shaft is shorter. Its catalog number is 38.3706–01.
There is a similar contactless kit on sale, designed for the Russian SUV VAZ 2121 Niva. In it, the distributor is marked as follows: 3810.3706 or 38.3706–10. You should not buy it for the “classics”, since the element differs in technical parameters, although it looks the same in appearance.
Among the manufacturers producing ready-made electronic ignition kits for older VAZ models, the one that has proven itself to be the best is VAZ, whose production is located in Stary Oskol, Russian Federation. Feedback from owners of “classics” about the company’s products is purely positive.
It is recommended to change the spark plugs and wires along with the ignition.
Advice. When planning to set the BSZ to "seven", at the same time replace the spark plugs (brand - A17DVR) and the high-voltage wires to them. They are not included in the delivery package, but they are very useful for stable and economical operation of the engine with the new spark generation system.
What tools will you need?
To install the electronic unit and other elements of the UPS, you will need simple tools available in the garage of any skilled motorist:
- flathead and Phillips head screwdrivers;
- open-end wrenches sizes 8, 10 and 13 mm;
- ordinary pliers;
- a spark plug wrench equipped with a cardan for convenience;
- hand or electric drill with a drill with a diameter of 3-3.5 mm.
From this set you will need keys, screwdrivers and pliers
Note. Using keys, you unscrew the terminals, distributor fastenings and coils. A drill will be needed to make 2 holes for mounting the switch. In some cars you can find ready-made holes designed for mounting electronics; they are located on the left side member (in the direction of travel of the car).
With a 30 mm wrench you can easily turn the crankshaft
It’s good if you manage to find and borrow a special wrench designed to turn the crankshaft of a VAZ 2107 by grabbing the ratchet nut. Another option is to rotate the crankshaft with a regular 30 mm open-end wrench or by turning the suspended rear wheel with 4th gear engaged.
Work on installing and configuring contactless ignition can be carried out in any convenient place, as long as weather conditions permit. Since you don’t need an inspection hole, a flat and well-lit area will do.
Installation of BSZ on a car
Before installing the electronic ignition, you need to remove the old system from the car, proceeding in this order:
- Lift the hood cover of the "Seven", disconnect the battery from the on-board network and remove the high voltage wires from the spark plugs.
- Remove the spark plugs and turn the crankshaft to bring the piston of cylinder 1 to top dead center (TDC). A long screwdriver inserted into the spark plug well will help you with this. Make sure that the notch on the crankshaft pulley is opposite the first mark on the cylinder block (it is the longest of the three).
- Unlock the metal latches of the ignition distributor cover and remove it along with the wires. To be sure, place a mark on the engine valve cover opposite the moving contact of the slider.
- Disconnect all wires from the distributor and the thin tube that connects it to the fitting on the carburetor. Loosen the nut holding the distributor skirt to the cylinder block and unscrew it. Remove the old distributor, making sure that the gasket is not lost (it is located between it and the block).
- Disconnect the wires from the contacts of the high-voltage coil and remember where they were connected. Unscrew the coil bracket and remove it from the body.
Disconnecting the negative terminal of the battery
Start installing the BSZ by installing an electronic unit equipped with an aluminum mounting plate with holes (it serves as a cooling element for the device). If there are ready-made holes on the left side member, screw the commutator to them with two self-tapping screws. Otherwise, find a free space near the coil, drill holes and secure the control unit.
Spark plug placement
Advice. Do not place the switch under the windshield washer fluid reservoir. If it leaks, it will flood the delicate electronics and the ignition will stop functioning.
To replace the coil, you need to disconnect the wires and remember their pinout
Install the elements of the contactless system in the following sequence:
- Take a new distributor, remove the cover from it and put on the gasket. Install it into the socket on the cylinder block so that the movable contact is opposite the chalk mark drawn on the engine valve cover. Lightly press the distributor skirt with the mounting nut to prevent it from accidentally turning.
- Screw the high voltage coil into the old place (the fastenings are the same). Connect the wires from the ignition switch relay, tachometer and switch to its terminals. The wire coming from contact “1” of the electronic unit is connected to the terminal marked “K” of the coil, and the wire from contact “4” is connected to terminal “B”.
- Having established a gap of 0.8-0.9 mm between the electrodes of the spark plugs, screw them into the holes of the cylinders. Place the cap on the distributor and connect all the high voltage wires, including the central one leading to the coil. Connect the vacuum tube, after which you can start starting the engine and adjusting the timely spark formation.
The notch is placed opposite the long score
Advice. When installing a high-voltage coil, the terminals are swapped, which causes some inconvenience. The issue is solved by loosening the nut of the mounting clamp and turning the coil body 180°, after which it can be put in place.
Stages of ignition installation in photographs
Position of the slider when the marks are aligned
Before setting the marks, you need to remove the distributor cap
Unscrewing the wires of the old distributor
Removing the central high-voltage wire from the coil
When all the wires are removed and the fastening nut is unscrewed, the distributor is removed from the block
After installing the new coil, the wires are connected to the same terminals
High-voltage wires must be connected using the numbers on the cover as a guide.
The switch is attached to the spar with 2 self-tapping screws