Print this article Font size 16
Cars are constantly evolving, so the emergence of new devices is not a surprise. An example of the development of domestic automobile production was the appearance of a Hall sensor on carburetor versions of the VAZ 2109.
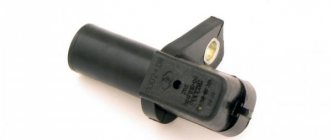
Design and principle of operation
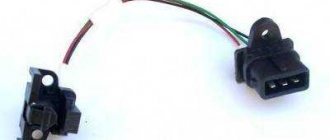
The controller design consists of the following parts:
- magnet;
- rotor;
- chip;
- plastic housing;
- conclusions;
- magnetic circuits.
The sensor operates based on the Hall effect. The principle of operation of the element is as follows:
- The rotor has four teeth that rotate while the engine is running.
- Pulses are constantly read.
- The received information in the form of a signal is sent to the switch.
- The pulse arrives at the installed coil.
- An increased voltage of 22–25 kV is supplied to the spark plugs.
The type of functioning is not complicated.
Another diagnostic method
Before checking the Hall sensor on the VAZ-2109, you will need to make preparations.
But at the same time you will certainly determine the integrity of the device. Execution procedure:
- Connect the central terminal of the ignition coil to the spark plug.
- Connect the spark plug body to the power supply negative (ground).
- Remove the Hall sensor.
- Turn on the ignition. The block with wires must be connected to the sensor.
- Use a screwdriver or any metal (magnetic) object near the active part of the device. If a spark appears, then the sensor is working. If not, it needs to be replaced.
However, if the operation of the sensor is unstable, this method may not help - try installing a known good one.
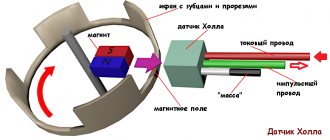
Connection diagram
The figure shows a basic electrical drawing for the VAZ 2108 and 2109 with pinout of contacts.
The ignition system operates as follows:
- The wire transmits voltage to the sensor from the switch through the red wire.
- A magnet creates a field.
- An impulse is supplied to the switch through the green wire.
Using a Hall element, the voltage directed to the high-voltage coil is regulated.
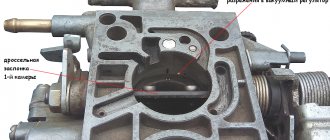
Where is?
You may be interested in: Fellowes PrivaScreen: a cure for curiosity
On VAZ-2109 cars with a carburetor, the Hall sensor is mounted in the ignition distributor housing. It works due to the fact that the distributor has a half-cylinder-shaped screen in its design. Its side surface has windows - slots. When the metal part of this half-cylinder passes near the active part of the sensor, an impulse is sent to the electronic switch. As soon as a window appears on the device, the pulse is interrupted.
The Hall sensor of the VAZ-2109 is supplied with a voltage of 12 V, but the current consumption is extremely low. It is only enough to open the semiconductor located in the switch. The latter amplifies the signal and feeds it to a coil, which is a step-up transformer. As a result, more than 20 kV is obtained from 12 Volts. True, the current decreases significantly. Therefore, a spark does not pose a danger to human life. But if you get such an electric shock, then it’s still not very pleasant.
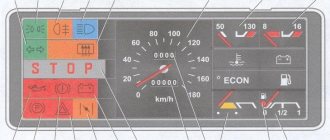
Symptoms of a problem
Over time, the device becomes unusable. This can be recognized by the following signs:
- the engine runs poorly or stalls;
- the engine does not idle;
- car detonation is observed;
- While driving, the engine turns itself off.
Problems are not always serious. Sometimes the cause is simple oxidation of the contacts. It is enough to move them to restore engine operation. Such symptoms appear due to weakening of the sensor fasteners. To do this, it needs to be tightened. It happens that the reason lies in a short circuit in the wiring.
Hall sensor VAZ 2109 - replacement without the help of specialists
VAZ 2109 cars equipped with carburetor engines have a contactless ignition system with a Hall sensor. The main task of the VAZ 2109 Hall sensor is to supply control pulses to the switch, which converts the received pulses and directs them to the primary winding of the ignition coil. This microelectronic sensor is located in the housing of the ignition distributor sensor under the dust shield. Depending on the type of distributor, it is secured to the base plate using 2 screws or rivets. The operation of replacing the Hall sensor of a VAZ 2109 is not difficult. The replacement can be done within half an hour by any car enthusiast without the help of specialists.
Sensor check
It is not always the case that if the Hall sensor malfunctions, the car’s power unit does not start. There may be problems with ignition, such as interruptions in engine operation in any mode, absent or unstable idling, as well as loss of power. There are two ways to check the Hall sensor. The first is suitable for those who do not have special knowledge in the field of auto electrics and electronics.
With this method, you need to purchase a new and known-good sensor from an auto parts store and install it correctly in place of the old one. If the engine starts after this operation, then the problem is solved. If not, then the problem is in the resistor, switch, coil, ignition switch, wires, spark plugs or other parts of the distributor.
https://youtube.com/watch?v=DiWtCGGKN6s
The second method of checking the VAZ 2109 Hall sensor requires special knowledge in electrical engineering. In addition, to carry out self-diagnosis, you must prepare the following instruments and devices:
- a voltmeter or multimeter with a measurement limit of at least 15 V and an internal resistance of at least 100 kOhm;
- 3-pin block from the distributor with low-voltage wires;
- resistor with a resistance of 2 ohms.
The check must be carried out as follows.
- First you need to remove the distributor from the car.
- Then you need to connect a block with wires, a resistor and a voltmeter to the connector of the low-voltage wires according to a certain circuit.
- After this, you need to apply voltage from the battery (9-14 V) to the positive contact and slowly turn the distributor shaft.
- During this operation, you need to record the minimum and maximum voltmeter readings.
Normally, the minimum voltage should be less than or equal to 0.4 V, and the maximum should not differ from the voltage supplied from the battery by more than 3 V. If, when turning the distributor shaft, there is no sharp voltage jump or the minimum and maximum values differ from the norm , this means that the sensor is broken and should be replaced.
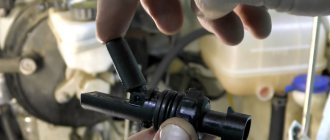
Replacing the device
Replacing the Hall sensor
In order to replace the Hall sensor, you first need to remove the distributor from the drive of the auxiliary units. The dismantling algorithm is as follows.
- First of all, you need to disconnect the terminals from the battery.
- Then you need to remove the armored wire from the cover of the breaker-distributor and unhook the hose from the vacuum corrector.
- Then you need to remove the throttle cable from the holder so that it does not interfere, unscrew the nut securing the bracket on which the wires are held, remove the bracket from the stud and move it to the side.
- Next, you need to scratch with a screwdriver or draw a straight line with a marker, passing from the distributor body to the drive housing of the auxiliary units. This mark will allow you to maintain the same ignition timing during installation of the distributor.
- After this, you need to unhook the block with wiring from the breaker-distributor.
- Then you need to remove the dirt plug from the clutch housing hatch and use a screwdriver to turn the flywheel until the piston of the first cylinder is in the top position.
- Now you need to unscrew the 2 remaining nuts and remove the distributor.
After dismantling the unit, you can begin replacing the sensor; to do this, you need to follow a sequence of actions.
- Unscrew the screws and remove the distributor cover.
- Pull the slider up and remove it, then remove the dust shield.
- Remove the low-voltage wire connector by unscrewing the screw.
- Unscrew the screws securing the support plate and remove the ring from its pin.
- Unscrew the screws of the vacuum corrector, remove its rod from the plate pin and remove it from the body.
- Lift the plate with a screwdriver and also pull it out of the case.
- Unscrew the screws securing the sensor and replace it with a new one.
If the sensor is attached to the plate with rivets, then they need to be replaced as an assembly. Installation of the device should be carried out in reverse order. Before installing the distributor, you need to turn the outer contact of the slider to the terminal of the first cylinder.
How to check
If you suspect a sensor malfunction, you can diagnose it as follows:
- Using a working element. The power is disconnected from the main sensor and connected to a new device. Then the central ignition wire is removed and placed on a metal surface. This is done to visually record the spark. The ignition turns on. To simulate the operation of the screen, a thin metal object is moved near the magnet. If a spark appears noticeably, it means that the original sensor was faulty.
- Using a multimeter. First, it is switched to voltmeter operating mode. The meter wires are connected to the element. When you move a metal object inside the sensor, the operation of the screen will be simulated. If the device shows a voltage change ranging from 0.4 V to 11 V, then the element is working.
- By creating a simulation of a new sensor. Power is disconnected from the element. The central wire of the distributor is removed and placed on ground to observe the spark. At the next stage, contacts “3” and “6” are closed and a spark is observed. A sensor malfunction is confirmed if it slips.
If such a check indicates a breakdown, then the element must be discarded and a new one installed.
How can you tell if the sensor is broken?
Before checking the Hall sensor on the VAZ-2109, you need to determine whether it is to blame for all the troubles? The problem is that many of the symptoms of ignition system failures are similar to those that occur when the carburetor or timing drive malfunctions. Here are the main symptoms of a Hall sensor malfunction on the VAZ-2109:
- The engine refuses to start.
- There are interruptions in engine operation. Moreover, they occur in all modes. The smoothness of the ride is disrupted and jerking is felt.
- The idle speed is broken - the speed is unstable or the engine simply stops.
- Unexpected engine stops.
- Significant reduction in power.
If you notice one or more symptoms, you should check the ignition system. It is much easier to disassemble than a carburetor. Therefore, when troubleshooting, it is worth moving from the lesser “evil” to the greater.
Replacement
When the check shows a malfunction of the sensor, then for removal you need to prepare a 10 mm wrench and a screwdriver. Procedure steps:
- Power is turned off from the device.
- The distributor is removed from the car.
- The device is placed on a workbench and the cover is removed.
- Carefully remove the boot with the slider.
- The plug screw is unscrewed.
- Remove the support plate screws.
- The vacuum corrector is dismantled. To do this, unscrew 2 screws.
- All wires are available.
- The sensor is removed along with the support plate.
- A new element is installed and installation is carried out in the reverse order.
During the replacement process, the entire internal space of the distributor must be thoroughly cleaned of dirt. As with flushing the carburetor, acetone is used for this.
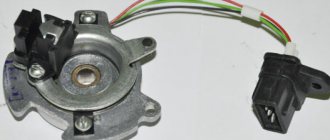
Functions and location
On carburetor VAZ 2109, the Hall sensor (HL) is responsible for opening and closing the contact group. When the screen with windows is rotated, a signal is sent to the device, which transforms into an electrical one. Through the switch, the signal goes to the ignition coil, and there it turns into an electric charge - a spark.
The DH is located at number nine on the ignition distributor. You need to look for the device under the dust shield. The sensor is secured to the base plate using rivets or a pair of screws. This already depends on the type of distributor used.
On injection VAZ 2109 there is no Hall sensor. Its functions are performed by the crankshaft position sensor.
Prices
For VAZ 2108–2109, the original number of the Hall device is product with article number 21080-3706800-00. If it is not available, pay attention to analogues. Possible options are presented in the table.
| vendor code | Manufacturer organization | Price in rubles |
| 21080-3706800-00 (original) | LADA | 590 |
| 21080370680082 (analog) | AVTOVAZ | 240 |
| GLSS133 (analog) | GALLANT | 230 |
| 21080370680000 (analog) | AUTO ELECTRONICS | 195 |
| 21080370680001 (analog) | AVTOVAZ | 190 |
| RK02008 (analog) | REMCOM | 150 |
The presented analogues are high-quality products that can be installed on a car.
How to replace the hall sensor on a VAZ 2108-VAZ 21099?
Note! The sensor is not difficult to remove, but when installing it, be careful with it, especially with its wiring, because there were cases due to an incorrectly installed sensor, the curtains that rotate in a circle and which are in the distributor broke off all its wiring. You can check it out in one of the videos at the end of the article and by the way, don’t be especially afraid to change this sensor, there’s nothing complicated there, you just need to remember some little things and be sure to remember how to assemble the distributor in reverse order, if you succeed, then you’ll replace the sensor without difficulty on your distributor!
Disassembly: 1) First, remove the distributor from the car (For information on how to remove it from the nine, read the article: “Replacing the ignition distributor on a VAZ”), when it is removed, you can proceed to disassembly, first unscrew the two side screws that secure the cover to ignition distributor and then remove it, when you have it in your hands, remove the slider that stood behind it (see small photo), it can be removed using your hand, that is, just pull it and thereby it will be removed from the shaft and by the way, inspect there should be no cracks, burn marks, or corrosion on the slider, otherwise it must be replaced.
2) Now remove the dust shield with a screwdriver (by prying it up) as shown in the photo, inspect it too, it can crack and therefore, through cracks are formed due to which dirt will sooner or later get into the inside of the distributor itself, which is very will reflect badly on him.
3) Then unscrew the screw with a Phillips screwdriver, thanks to which the connector to which the block of wires is connected holds and does not fall (see large photo below), after unscrewing, remove the connector from the distributor body and then open the claws on the holder that secures the sensor wire to the distributor body hall (see small photo) and remove the sensor wire.
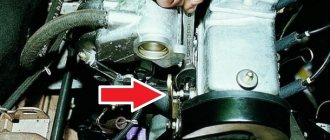
4) Next, carefully use a screwdriver to pry up the retaining ring that holds the vacuum corrector rod on the pin (You can see the rod located on the pin in the small photo below, it is indicated by a red arrow) and then remove this rod from this pin, then unscrew the two screws that secure the vacuum corrector itself and remove it (see the main photo, it shows the removal of one screw securing the vacuum corrector).
5) And finally, unscrew the two screws indicated by the arrows and, lifting the support plate (see small photo), remove it from the voltage regulator and, by the way, this very sensor that you need will be on it.
Note! When the support plate is removed, unscrew two more screws securing the sensor and disconnect it from this plate (On some distributors the sensor may still be attached with rivets, if this is the case with you, then replace the sensor assembly with the plate with a new one), replace it with a new one and be sure to install it correctly and as it should be (remember how it was previously, so install it, if you don’t remember, then open the videos at the end and review them, they showed in detail how to remove this sensor, how to check it and how to install it back)!
Assembly: Everything is assembled in the reverse order, during assembly it is recommended to lubricate all the bushings and the shaft on which the runner is installed a little with engine oil and during assembly, make sure that there are no cracks or signs of heavy wear on the parts, otherwise replace them for new ones.
Additional video: You can clearly see an example of an incorrectly installed hall sensor in the video below; in addition, it also describes how you can check its functionality.
It will be useful: How to remove the starter from a Chevrolet Niva
Note! In addition to the top video, there is another one, which shows the whole process, as they say, “from and to” of disassembling and assembling the ignition distributor, also known as the distributor, be sure to study and review it in order to carry out the work correctly without jambs!
How to choose quality hood shock absorbers
Most car owners apply the word “shock absorber” only to the chassis of the vehicle...
Further
Author of the article
- Igor Yurievich Publications: 938
Categories
Opel Crossland review
Genesis GV70 review
Review of Audi A4 2021-2022
How to choose quality hood shock absorbers
Recent publications
- 01.03.2022
Opel Crossland review - 17.02.2022
Genesis GV70 review - 17.02.2022
Review of Audi A4 2021-2022 - 17.02.2022
How to choose quality hood shock absorbers - 17.02.2022
Advantages of outdoor advertising and car branding - 12.02.2022
Why you should choose an apartment from a developer - 11.02.2022
What to consider when transporting cargo from Belarus - 10.02.2022
What are linear ball bearings - 04.02.2022
Window lifters for VAZ 2109 - replacement, repair, installation - 04.02.2022
VAZ 2109 windshield replacement and repair
Featured Category