The need to replace the front struts arises after dull knocks alternating with clicks begin to be heard from under the wheel arches while the car is driving over uneven surfaces. Typically, this was not observed at high speeds, but when overcoming speed bumps, they appeared again.
After self-diagnosis of your Lada Priora, it is not always possible to find the cause of the knocking, the suspension is normal, but the noise is still there. After digging a little on the net, I came across several similar topics in which people discussed my problem, and it was there that I learned that the front struts were to blame and that now I had serious work to do called: replacing the front struts with my own hands. After I went to the service station, my verdict was confirmed, it was possible to fix everything right there, but I decided to do everything myself. Read more about knocking in the front suspension here.
After several hours of searching, I found front struts that suited me in all respects; these were Acomi struts model “Comfort CLASSIC A170.2905.002/003-05”.
I chose the front struts with the expectation that they would be softer and, as they say, the price would be adequate, comfort while driving is perhaps the most important thing in a car. The original hard SAAZs are no good, so I didn’t repeat the manufacturer’s mistake.
The front struts I bought are hydraulic, collapsible, which is very convenient; if necessary, you can simply go buy cartridges and replace them yourself, which you will never do with your own SAAZ ones.
It’s not the most complicated procedure I’ve ever done, but it’s complicated by the fact that it requires special tools in the form of special ties for springs and a special puller for steering tips.
In addition, you will need the following set of keys to work:
- End caps on “13”, “17”, “19” as well as caps on “17”, “19”, “22”;
- Hexagon at "6";
- Steering wheel end remover;
- Pliers;
- And, of course, a hammer.
Before you start replacing the struts with your own hands, I recommend treating all connections, nuts and fasteners that need to be disassembled with WD40 liquid; this can be done the day before or the evening before.
Nus, let's go!
Replacing the front struts of a Lada Priora with your own hands
1. Place the jack under the side from which you will be making repairs, in my case - the right.
2. Remove the wheel.
3. Disconnect the brake hoses and remove them from the holder bracket on the rack.
4. Using pliers, carefully straighten the locking cotter pin on the steering end pin, then remove it and unscrew the nut with a 17mm wrench.
5. Take the steering tip remover and press it out of the seat.
6. Next, turn the support and begin unscrewing the nuts fastening to the steering knuckle; fortunately, the bolts and nuts treated the day before with WD40 will make this procedure easy and pleasant.
7. If necessary, you can use a hammer to knock out the bolts, just be careful not to damage the threads.
8. The eccentric top bolt is needed to adjust the camber, so do not lose the washer from it, it often sticks to the strut. This bolt must then be put in its place, so do not mix it up. Wheel alignment will have to be done in any case, so remembering the rotation of the eccentric along the axis is pointless.
9. The next step is to unscrew the fastening nuts under the hood, which secure the A-pillars to the body with a key, for this purpose on “13”.
10. Now remove the front strut assembly from the wheel well.
The basis of the operation of the gas distribution mechanism
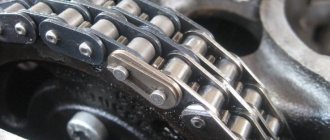
When the mixture is compressed, a spark enters the working cylinder and the mixture explodes, pushing the piston. He pushes the connecting rod, the connecting rod pushes the crankshaft. Everything is known. The valves, by timely opening and closing, ensure tightness in the cylinder at the right moment and free inlet and outlet in other cycles. The camshaft controls these devices by pressing the valve mechanism with its cams. The Priora engine has 16 valves. They are controlled by two camshafts. And the camshafts are driven by the crankshaft via a timing belt.
To ensure that the valve timing matches and the drive is installed correctly, special marks are applied.
Timing timing marking points
They are applied by the manufacturer in several places and are divided into movable and stationary:
- On the body of the Priora engine
- On camshaft gears.
- On the crankshaft gear.
- On the engine flywheel.
Now in more detail about these tags.
On the engine body of a VAZ 2170
Here the mating marks are installed in three places. They are immovable:
- On the lip of the oil pump housing.
- On the flywheel housing.
- Marks on the plastic protection of the Priora timing belt
The first two types of marks are intended for mating the crankshaft.
That is, the risks on the gear and on the flywheel must coincide with them. The crankshaft drive gear is located in the oil pressure pump housing. This is a slot in the metal skirt that half-encircles the gear from above. It is clearly visible in normal lighting. Sometimes it can be “bombarded” with oil and dust. Then you need to wipe this place with a rag, and everything will be visible.
There is a special arrow installed on the flywheel housing, in the viewing window in the starter area. It must be taken into account that the top dead center is determined only by the average of the three marks.
Disassembly of the structure
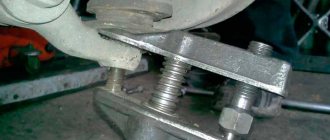
1. Take the spring tie prepared earlier and install it on the second coil of the spring from above and below as shown in the photo. The second screed is installed on the other side symmetrically to the first. The process of bringing the spring together is carried out as follows - tighten the bolts of the first tie until you feel that the second one begins to move freely on the coils, then tighten it until you remove the load from the previous one. That is, in turn on each side.
2. Take the “22” socket and hexagon and unscrew the fastening nut that secures the strut rod to the support.
3. Remove the limiter (bump stop), support bearing, support, and compression limiter.
4. Replace the old rebound limiter washers with those that came with the Acomi struts. Please note that the bottom one is smaller than the top one.
5. Next, remove the spring cup with rubber damper, compression buffer, spring and boot.
Now it is necessary to carry out a visual inspection of the dismantled rack.
The first test of swinging the rod to the top point demonstrated the cause of the malfunction. The resistance in the upper part of the working area quickly disappeared, after which the piston hit the upper part of the cylinder. As you understand, this was the source of the dull knocks.
Engine valves on Priora
Lada Priora is a restyling of the VAZ 2110. These cars were equipped with 8-valve engines with a displacement of 1.5 liters, later modifications with 1.6 liters appeared. On them, when the timing belt breaks, the valves do not meet the pistons and do not bend. One and a half liter engines with 16 valves began to be installed on the VAZ 2112, and they also migrated to the Priora. For the first time, owners of such cars were faced with the issue of valve bending when the timing belt broke. It's all about the design features. The cylinder head is now equipped with 16 valves, power increases to 92 hp. pp., but at the same time bending the valves leads to a major overhaul.
On a 16-valve engine, the pistons do not have special grooves; as a result, if the valve timing is disrupted, they will bend the valves. Later models of Lada Priora were equipped with a 16-valve 1.6-liter engine. Here the pistons had recesses. Such a power unit is installed on Priora today. Contrary to the statement of the valve manufacturer, it still bends, but much less often. This probability is observed only at high speeds. A belt break that is twice as wide as a standard 1st family belt is uncommon. If you use a low-quality belt, the likelihood of bending increases sharply, and repairs will be priced an order of magnitude higher than similar work on an 8-valve engine.
Return to contents
How to pump up a rack?
In order to bring the front struts into working condition, they need to be bled. This must be done as follows:
- Place the front pillar vertically;
- Smoothly pull the rod to the top point;
- After that, gently press it back.
Do 3-4 such repetitions, and there should be no failures or falls while moving the rod. After pumping the racks, try to keep them in an upright position.
pros
- High engine efficiency;
- Consistently high power at both low and medium speeds.
- Increasing the number of valves had a positive effect on the efficiency of the system.
- Improved environmental friendliness due to complete combustion of waste fuel, minimizing carbon monoxide emissions into the atmosphere.
- Compliance with Euro4 requirements, which allows you to drive a car abroad.
- Increasing the car's mileage before the first engine failure.
Assembling a new shock absorber
1. Set the rack rod to the upper position.
2. Place the boot and compression buffer on the new front strut.
3. Install the spring, spring cup and damper. Pay attention to the lower shank, it should fall into place.
4. Install the small washer from the new Acomi kit, the large washer and the support with the bearing installed.
5. Install the rod mounting nut.
6. The nut is tightened using a hexagon to “6”, hold the rod with it. It is better to do the final tightening after installing the front struts in place.
7. Remove the spring clamps.
8. Turn the support so that the indicator on it looks forward and slightly inside the car body.
9. After this, install the rack assembly in its place of further service.
10. Tighten the support bolts from above, then put the stand on the steering knuckle, install the eccentric bolt with a washer in the upper hole, and a simple bolt down and tighten.
11. Install the steering tip pin into the rod on the rack and tighten the nut.
12. After this, pin the finger, spreading the antennae.
13. Thread the brake hoses into the holder bracket on the rack.
Done, now we can say that the front strut has been replaced. Install the wheel and lower the jack. When the car is on wheels, go through all the fastenings and tighten them. It would be a good idea to rock the body on the side where the strut was changed for additional pumping.
Now all that remains is to repeat the same thing on the left side. The second time things will be “more fun”, since you will already know what is what and why...
After replacing the front struts, be sure to do a wheel alignment; don’t rush on the way to the service station - the wheels are not adjusted and the car will “drive” a little on the road, so be vigilant and careful.
The result of the work done:
After several weeks of using the new racks, I can note the following:
- The knocking has disappeared;
- The suspension has become more elastic;
- The laxity and swaying have disappeared;
- The car began to take turns better, the roll decreased;
- It has become more comfortable to drive off-road;
- The steering wheel began to return noticeably faster after a turn - the result of increased castor;
- Improved handling at high speeds;
- Speed bumps are less painful to overcome.
In short, I am very pleased, the impressions are only positive, if I had known that such a result would be achieved, I would have changed the front struts even before they failed, immediately after the purchase.