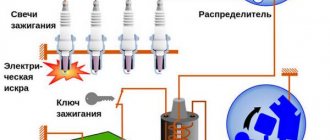
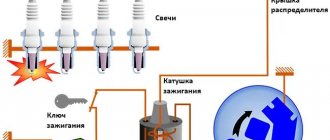
The ignition system of the injection engine (2111) of VAZ 2108, 2109, 21099 cars consists of an ignition module, high-voltage wires, spark plugs and a wiring harness from the ignition module to the ECM control unit (ECU).
Features of the ignition system circuit
— “Plus” is supplied to terminal “D” of the ignition module block from the positive terminal of the battery, through the ignition switch, main relay and fuse.
— “Minus” to terminal “C” of the ignition module block, from the end of the engine valve cover.
— The control unit supplies a spark signal to the spark plug of the 1st and 4th cylinders through terminal “B”.
— Spark signal to the spark plugs of the 2nd and 3rd cylinders at terminal “A”.
Notes and additions
— The ignition systems of VAZ 2108, 2109, 21099 cars with other control units will differ in the color of the wires in the harness from the ECU to the ignition module and in other markings of the terminals in the ECU connecting block. The device and operating principle are similar for all types of ECUs.
More articles on the ignition system of the injection engine of VAZ 2108, 2109, 21099 cars
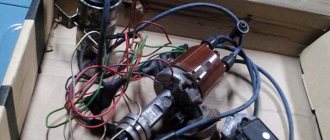
Electronic ignition design
To install a contactless system on a “classic” VAZ 2107 with a carburetor, it is advisable to study how it works. This will help you correctly assemble the circuit and successfully put it into operation. BSZ for old carburetor Zhiguli models consists of the following elements:
- distributor, also known as the distributor of the ignition system;
- high-voltage coil of a new design (different from the old one, which works with mechanical contacts);
- switch responsible for system management;
- high-voltage and ordinary wires with connectors and terminals connecting the listed elements;
- spark plug.
Reference. Since the new ignition system does not have a contact group, and its operation is controlled by an electronic unit, the names “contactless” and “electronic” are equally suitable for it.
Elements of the electronic ignition system of the VAZ 2107
The new high-voltage coil has 2 windings. The primary one is made of a large cross-section conductor and is connected to the vehicle's electrical network through the ignition switch relay. The secondary winding is wound with a large number of turns of thin wire and connected by a high-voltage wire to a distributor consisting of the following parts:
- a housing with a centrally mounted shaft;
- a movable contact (the so-called slider) is fixed at the end of the shaft;
- A cover is placed on top of the body, where high-voltage large-section wires leading to the spark plugs are connected;
- there is a protrusion (cam) on the shaft, opposite which there is a Hall sensor;
- a vacuum diaphragm is attached to the side, providing ignition advance.
The switch is connected by small cross-section conductors to the distributor and coil; its task is to control the timely supply of sparks to the spark plugs.
Reference. In newer modifications of the VAZ 2107, where there is an injector instead of a carburetor, there is no separate switch. There is no need for it, since the on-board computer controller is in charge of spark generation and fuel supply.
Connection diagram of contactless system elements
What can be put on the classics from the existing MPSZ
Among the most well-known microprocessor systems, Maya, Secu 3 or Mikas MPSZ are most often used.
Assembling any of them is not difficult, if you have the skills to correctly see and read the instructions with the diagram, and follow the sequence of installation actions. When choosing a microprocessor system, you should not be intimidated by the fancy circuitry that product sellers like to show off, offering the services of a familiar electrician for “guaranteed high-quality installation for pennies.” All components can be installed on the classic with your own hands.
When choosing, pay attention to the quality of the block itself. It is considered good form if there is no warping of the plastic parts, burrs or microcracks
The second indicator is the presence of a large scattering surface in the form of an aluminum base. The microprocessor remains the most capricious part and the choice of place under the hood or in the cabin must be taken very seriously.
The ignition coils can be separated into a separate unit; alternatively, they can be mounted directly next to the spark plugs on the head cover.
Operating principle of BSZ
Electronically controlled spark generation operates according to a fairly simple algorithm, which determines the reliability of such a circuit. When the driver turns the key in the ignition switch, a constant voltage from the on-board network is applied to the primary winding of the coil, causing a magnetic field to form around it.
Then the system works like this:
- The starter turns the crankshaft and drives the distributor shaft along with the slider.
- The Hall sensor, which reacts to the passage of a metal mass nearby, registers the rotation of the shaft along the protrusion on it and sends a signal to the switch.
- The electronic unit, based on a signal from the sensor, turns off the voltage supply to the primary winding of the coil.
- At the moment the circuit breaks, a high voltage pulse (up to 24 kV) is formed in the secondary winding of the coil. It is directed along a thick wire to the moving contact of the distributor.
- The slider redirects the impulse to one of the fixed contacts built into the cover. From there, the voltage goes to the spark plug of the cylinder where the piston is at top dead center.
- At this moment, the fuel is already in a compressed state in the combustion chamber. When a spark jumps across the electrodes of the spark plug, it ignites.
- The runner rotates and transmits a spark to all cylinders according to the 1-3-4-2 scheme, after which the car engine starts and starts working.
Note. In old VAZ 2107 cars there was no switch, and the electrical circuit was broken mechanically - the shaft cam opened the contact group.
Outdated circuit with contact breaker
How does it work
The car's on-board computer combines all control functions that combine microprocessor ignition.
Various universal sensors perform the functions of input signals. A quartz resonator, which has a microprocessor control unit, interrupts the low voltage circuit, depending on the position of the advance angle, for each cylinder. While the car’s engine is running, the main control unit receives information about load, temperature, detonation, battery voltage, information about the position of the throttle valve, as well as the position of the crankshaft and its speed. All information supplied from the sensors goes to the converter, which in turn converts it into electrical signals. The converter must only transmit signals in digital form, since the microprocessor control unit only processes numbers.
But, some signals do not need conversion, since they arrive in the form of pulses (signals about the position and speed of the crankshaft). After the control unit receives data from the converter, the microprocessor determines the OZ relative to the angle map, which is stored in memory.
Microprocessor ignition has a huge advantage, since its operation ensures correct ignition control depending on the position and speed of the crankshaft, throttle valve, engine temperature, etc. Since the microprocessor ignition system does not have a mechanical distributor (distributor), it is therefore possible to provide high spark energy.
Pros and cons of contactless ignition
At the moment, 100% of manufactured cars using gasoline or liquefied gas as fuel are equipped with an electronically controlled spark generation system. Mechanical ignition is outdated and a thing of the past. The reason is its unreliability during operation, frequent malfunctions and low spark power. Compared to the BSZ contact system, it has the following advantages:
- There are no contacts whose surfaces constantly burn from high voltage, causing the sparking power to drop sharply.
- The distributor of the electronic system has no wearing parts, which had to be changed every 15-20 thousand kilometers.
- Thanks to the contactless circuit and the new coil design, the voltage supplied to the electrodes of the spark plugs was raised from 18 to 24 kV. This had a beneficial effect on the ignition and combustion of the air-fuel mixture in the cylinders.
- Reliable operation and durability.
Powerful spark from contactless ignition
Reference . In past times, the owners of the VAZ “classic” quite often had to remove a protrusion that had burned on the surface of one of the contacts, which required a flat needle file. But a depression formed on the second contact, which was quite difficult to clean out, so manufacturers began to make contact groups with through holes.
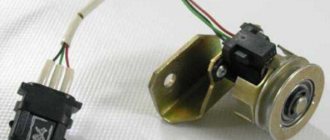
Among the significant disadvantages of the BSZ, one can be noted - the non-repairability of the Hall sensor. If the mechanical contacts are cleaned, then the faulty sensor only needs to be replaced, so it is advisable to carry it with you. On the other hand, this device is very reliable in operation and lasts 40-50 thousand km without problems.
This is what a Hall sensor looks like, replacing the contacts
Reference . Owners of VAZ 2107 cars equipped with the first BSZ sets, in addition to the Hall sensor, also had to carry a spare switch. But after 2 years, its design underwent modernization, which is why the electronic units no longer fail.
What have manufacturers done to help car owners?
Initially, microprocessor ignition options went on sale, where a modified distributor was installed, configured to work together with a hall sensor and control a classic brand car. And everything seemed to be going well, except that for the classics the work of the distributor still remained problematic.
Among other things, at the very beginning it was clear that for the electronic system, the characteristics of the UOS for a heated or unheated motor are clearly different. Because when setting the UOS to cold and then warming up the engine, inevitable detonations occur.
Due to all the inconvenient moments, system manufacturers decided to make the following modification. They had to make the microprocessor ignition for classic cars almost identical to the injection version, leaving only the injection system control unchanged.
Instructions for installing a contactless system
The procedure for replacing a mechanical ignition with an electronic one is divided into the following stages:
- selection and purchase of BSZ;
- preparation of tools;
- removing the old system and installing a new one;
- ignition setting.
If you have not previously had to deal with sparking problems in classic Zhiguli models on your own, then you will have to allocate about 3-4 hours for all the work.
Recommendations for selection
The BSZ factory kit for the VAZ 2107, available for sale, includes the following parts:
- switch with catalog number 36.3734 (also available 3620.3734);
- main ignition distributor, marking - 38.37061;
- high-voltage coil, catalog number - 27.3705;
- wiring harnesses with connectors.
BSZ parts from SOATE company
Note : The marking of the distributor is indicated for cars with engines of 1.5 and 1.6 liters. In modifications of the “Seven” with a 1.3 liter engine, the cylinder block is smaller in height and the ignition distributor shaft is shorter. Its catalog number is 38.3706–01.
There is a similar contactless kit on sale, designed for the Russian SUV VAZ 2121 Niva. In it, the distributor is marked as follows: 3810.3706 or 38.3706–10. You should not buy it for the “classics”, since the element differs in technical parameters, although it looks the same in appearance.
Among the manufacturers producing ready-made electronic ignition kits for older VAZ models, the one that has proven itself to be the best is VAZ, whose production is located in Stary Oskol, Russian Federation. Feedback from owners of “classics” about the company’s products is purely positive.
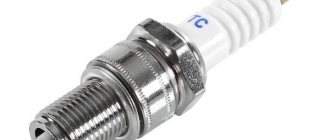
It is recommended to change the spark plugs and wires along with the ignition.
Advice . When planning to set the BSZ to "seven", at the same time replace the spark plugs (brand - A17DVR) and the high-voltage wires to them. They are not included in the delivery package, but they are very useful for stable and economical operation of the engine with the new spark generation system.
What tools will you need?
To install the electronic unit and other elements of the UPS, you will need simple tools available in the garage of any skilled motorist:
- flathead and Phillips head screwdrivers;
- open-end wrenches sizes 8, 10 and 13 mm;
- ordinary pliers;
- a spark plug wrench equipped with a cardan for convenience;
- hand or electric drill with a drill with a diameter of 3-3.5 mm.
From this set you will need keys, screwdrivers and pliers
Note. Using keys, you unscrew the terminals, distributor fastenings and coils. A drill will be needed to make 2 holes for mounting the switch. In some cars you can find ready-made holes designed for mounting electronics; they are located on the left side member (in the direction of travel of the car).
With a 30 mm wrench you can easily turn the crankshaft
It’s good if you manage to find and borrow a special wrench designed to turn the crankshaft of a VAZ 2107 by grabbing the ratchet nut. Another option is to rotate the crankshaft with a regular 30 mm open-end wrench or by turning the suspended rear wheel with 4th gear engaged.
Work on installing and configuring contactless ignition can be carried out in any convenient place, as long as weather conditions permit. Since you don’t need an inspection hole, a flat and well-lit area will do.
Installation of BSZ on a car
Before installing the electronic ignition, you need to remove the old system from the car, proceeding in this order:
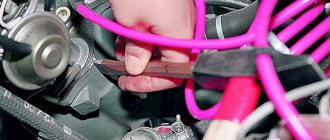
- Lift the hood cover of the "Seven", disconnect the battery from the on-board network and remove the high voltage wires from the spark plugs.
- Remove the spark plugs and turn the crankshaft to bring the piston of cylinder 1 to top dead center (TDC). A long screwdriver inserted into the spark plug well will help you with this. Make sure that the notch on the crankshaft pulley is opposite the first mark on the cylinder block (it is the longest of the three).
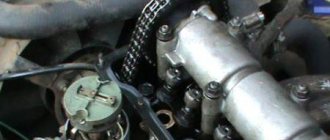
- Unlock the metal latches of the ignition distributor cover and remove it along with the wires. To be sure, place a mark on the engine valve cover opposite the moving contact of the slider.
- Disconnect all wires from the distributor and the thin tube that connects it to the fitting on the carburetor. Loosen the nut holding the distributor skirt to the cylinder block and unscrew it. Remove the old distributor, making sure that the gasket is not lost (it is located between it and the block).
- Disconnect the wires from the contacts of the high-voltage coil and remember where they were connected. Unscrew the coil bracket and remove it from the body.
Disconnecting the negative terminal of the battery
Start installing the BSZ by installing an electronic unit equipped with an aluminum mounting plate with holes (it serves as a cooling element for the device). If there are ready-made holes on the left side member, screw the commutator to them with two self-tapping screws. Otherwise, find a free space near the coil, drill holes and secure the control unit.
Spark plug placement
Advice . Do not place the switch under the windshield washer fluid reservoir. If it leaks, it will flood the delicate electronics and the ignition will stop functioning.
To replace the coil, you need to disconnect the wires and remember their pinout
Install the elements of the contactless system in the following sequence:
- Take a new distributor, remove the cover from it and put on the gasket. Install it into the socket on the cylinder block so that the movable contact is opposite the chalk mark drawn on the engine valve cover. Lightly press the distributor skirt with the mounting nut to prevent it from accidentally turning.
- Screw the high voltage coil into the old place (the fastenings are the same). Connect the wires from the ignition switch relay, tachometer and switch to its terminals. The wire coming from contact “1” of the electronic unit is connected to the terminal marked “K” of the coil, and the wire from contact “4” is connected to terminal “B”.
- Having established a gap of 0.8-0.9 mm between the electrodes of the spark plugs, screw them into the holes of the cylinders. Place the cap on the distributor and connect all the high voltage wires, including the central one leading to the coil. Connect the vacuum tube, after which you can start starting the engine and adjusting the timely spark formation.
The notch is placed opposite the long score
Advice . When installing a high-voltage coil, the terminals are swapped, which causes some inconvenience. The issue is solved by loosening the nut of the mounting clamp and turning the coil body 180°, after which it can be put in place.
Stages of ignition installation in photographs
Position of the slider when the marks are aligned
The switch is attached to the spar with 2 self-tapping screws
Before setting the marks, you need to remove the distributor cap
Instructions for setting the ignition
If you strictly followed the instructions, connected all the wires according to the diagram and did not misalign the marks, then the motor will start without problems. To adjust the ignition, you need to ensure stable engine operation, so first warm it up for a few minutes, without letting it stall by pressing the gas pedal.
Advice . If the engine does not start successfully, and when you turn on the starter there is not even a popping sound, then you probably made a mistake with the wiring. Check everything again according to the diagram included with the factory set of electronic ignition parts.
Adjustments can be made on a warm engine using two methods:
- without the use of special devices - “by ear”;
- fine adjustment using a strobe light.
A strobe is a device with a light bulb that flashes simultaneously with the transmission of a pulse by the Hall sensor. When the switched on strobe is brought to the crankshaft flywheel with the engine running, the position of the notch becomes visible. Hence the possibility of precise adjustment.
This is what a strobe looks like for fine-tuning the ignition
To set up, connect the strobe power supply to the battery, and the thick wire to the high-voltage wire of the spark plug of the 1st cylinder. Loosen the distributor fastening nut and bring the flashing lamp to the pulley. Slowly turn the distributor body until the notch on the pulley aligns with the short notch, then tighten the nut.
Tuning in the traditional way “by ear” is done like this:
- Start the engine and loosen the nut holding the ignition distributor.
- Rotate the distributor smoothly and slowly within 15°. Find the position at which the motor operates most stably.
- Tighten the fastening nut.
When adjusting, turn the distributor by the membrane body
Advice . When you turn the ignition distributor by hand, try not to touch the high voltage wires so that you do not get an electric shock. The best option is to grab the body of the membrane mechanism, where the tube from the carburetor is attached.
It is quite natural that after installing a contactless ignition system, the engine idle speed will increase to 1100-1200 rpm due to the increased spark power. Set the rate to 850-900 rpm by tightening the idle screw on the carburetor and using the tachometer as a guide. On VAZ 2105-2107 carburetors of the “Ozone” type, this screw is located in the lower section of the unit on the right side and is large in size. The VAZ 2108 carburetors of the Solex type (these were also installed on the “seven”) have a long plastic handle protruding from the right (in the direction of travel). The second screw, which regulates the composition of the air-fuel mixture, cannot be turned.
The arrow shows the idle speed adjustment screw.
Advice . If, when you sharply press the accelerator, a loud knock is heard from the engine, then you have set the ignition timing too high and the mixture flares up earlier than necessary. Loosen the distributor nut and turn the housing a couple of degrees clockwise.
The best indicator of successful installation and configuration of a contactless ignition system is checking the VAZ 2107 while driving. It’s worth driving the car for several kilometers to check it in different modes - acceleration, driving in a straight line and coasting with the gear engaged. You will probably like the behavior of the car, and the annoying cleaning of contacts will be forgotten forever.
Let's sum it up
As you can see, converting an injector into a carburetor and vice versa is a feasible task. The main thing is to have the necessary spare parts and certain skills. We also note that the return from the injector to the carburetor can be considered rather an exception.
Much more often, owners express a desire to replace the outdated carburetor system with a more economical and practical injector. It is also important to understand that the use of new parts for such a modification puts the feasibility of the whole idea in great doubt.
Otherwise, it is more profitable to replace your existing carburetor car with an analogue with a factory injector. The most rational approach to accomplishing this task is to purchase most of the spare parts exclusively used.
The main problem will be to find and buy an intake manifold, a receiver, a controller, a ramp with injectors, fuel lines, a gas tank with a gas pump, an air filter housing and other necessary elements at a reasonable price. In this case, the cost of installing the injector can actually pay off after some time.
Replacing contactless electronic ignition on a VAZ 2101-2107
- Using a 38 wrench, unscrew the ratchet nut until the marks on the crankshaft pulley and the engine cover match, that is, you need to set the engine to the “TDC” mark.
- It is imperative to remember the location of the distributor and the slider itself; the new distributor must be placed in the same position.
- It is necessary to remember the wires that are attached to the coil marked B+. After which it can be unscrewed and removed.
- Afterwards we will need a 13 key, use it to unscrew the distributor lock nut, and then remove it. You need to be careful not to lose the gasket.
- Afterwards you need to secure the switch and attach the black wire to ground.
- We install and attach the coil to the body. Standard wires are connected to the corresponding terminals.
- Wires from the switch, which show the “+” mark, to the corresponding terminal, the second wire, respectively, to the terminal with the “-” sign.
- After installing the distributor, the lock nut is not fully tightened.
- The wires from the switch must be connected to the distributor.
- After that, the position of the distributor and the slider is checked, the cover is put on and the wires are connected in the sequence 1-3-4-2.
Also, when installing BSZ, beginners in this business can make basic mistakes, such as, for example: connecting a coil with wires mixed up. Therefore, check everything before starting. - After everything is secured, you can start the engine and begin adjusting the ignition, you can adjust it “by ear.” But of course it is better to use a strobe light.
If after installing the electronic ignition the car does not start, you need to check the correct supply of high voltage wires to the cylinders and install the distributor drive.
You might be interested in reading:
- How to remove the rear drum on a VAZ 2107 with your own hands Brake drum While the car is driving, the brake drums attached to the rear wheels rotate with them. These are massive metal parts...
- How to do sound insulation on a VAZ 2107 with your own hands For those who do not spend much time in the car, there may be no need to spend money on retrofitting. If in the salon...
- Reasons why the tachometer on the VAZ 2107 does not work. The tachometer on the carburetor engine of the VAZ 2107. On the carburetor seven, three wires come out of the tachometer. Two wires are plus and minus...
Benefits you shouldn't ignore
Lada 2105 Bright White 15 R Logbook Installation of steering column switches for Chevrolet Niva ignition switch for VAZ 2110
Along with optimizing his car, the owner, with a new ignition, additionally receives a number of special advantages.
Among them:
1. A real opportunity to customize your own engine for any attractive fuel for the car.
2. If you have a car with HBO, an increase in traction and overall power of the car.
3. Complete absence of detonations and knocking noises when picking up speed, even when less than ideal fuel is available.
4. In gasoline-powered cars, fuel burns out much faster, which reduces fuel consumption by an order of magnitude.
5. In cold weather, the car starts much faster and easier.
6. The electronic system does not require total control on the part of the owner, since control is assigned to the built-in display.
7. The machine can be converted and an additional toggle switch can be added to easily switch to one type of fuel or another.
8. With a new type of ignition, the owner receives new options; important parameters are kept at a specifically set level.
9. The starter turns off on its own after the engine starts.
10. You can control the ventilation of the cooling system.