A modern car is literally crammed with complex electronics, which are not so easy to repair. It is for this reason that car owners, at the slightest problem with on-board electrical devices, do not fool themselves, but immediately contact the nearest car service center. However, there are exceptions to this rule. For example, if the diode bridge on a VAZ 2107 is burnt out, then you can completely refrain from visiting a car service center and replace the burnt-out device yourself. Let's figure out how this is done.
- Signs and causes of diode bridge failure
- How to ring a diode bridge on a VAZ 2107
We check the diode bridge with a regular light bulb
- Checking the diode bridge for open circuit
- Checking the diode bridge with a household multimeter
- Sequencing
If a malfunction is detected
Diodes are attached to the wafers by pressing into a hole of a smaller diameter, so replacing a faulty semiconductor yourself is a troublesome task that does not guarantee 100% success.
Diode bridges for domestic cars are inexpensive, so if a fault is detected, it is replaced with a new one. Rectifier units of modern foreign cars cost a lot of money, so replacing the diode in such a bridge is economically justified. It is better to entrust this procedure to a specialist.
The quality of operation of the entire electrical system of the car depends on the condition of the diode bridge. If the previously listed signs of malfunction appear, you must immediately diagnose, repair or replace it.
Self-repair of VAZ 2107 generator
How to change the generator on a VAZ 2107
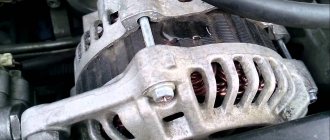
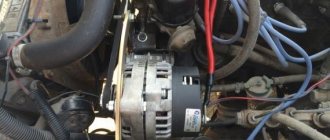
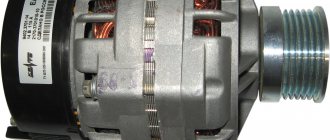
The generator of each car is designed to supply all consumers with electric current and to charge the battery. The VAZ 2107 generator is an alternating current device with a unique electromagnetic excitation. It is installed to the right of the engine and is driven by a V-belt from the crankshaft. The key elements of this assembly are the rotor, stator and covers, cast from aluminum alloy.
In the history of the VAZ 2107, there are cases when models were equipped with generators 9412.3701, which have some design differences.
Before dismantling the “seven” generator, you need to realize that this work is considered difficult. In some cases, dismantling causes some problems, so first you need to think about how and what tools you will do everything with.
Fasteners and bolted connections usually stick tightly to the fasteners, so it is usually not possible to carry out dismantling work without WD-40. To remove the generator, you need to work from under the right wheel arch, which is not very convenient, so it is better to dismantle it by driving the car onto a lift or inspection hole.
Reasons for generator failure
Without specialized equipment, it is not always possible to determine the exact cause of a unit failure. But most often the problem is caused by:
- Bearing jamming . Due to drying out of the lubricant and gradual wear, the bearings jam. First, the belt usually breaks, which necessitates rebuilding the assembly.
- Brush wear . Graphite brushes wear out gradually, so they need to be replaced periodically. If they are not replaced in time, the unit may fail completely.
- Relay malfunction . The device is designed to prevent battery overcharging. If it malfunctions, the generator does not start.
Winding burnout . Most often, the winding burns out due to the penetration of chemicals and salts used to sprinkle the road in winter.
To prevent breakdowns, scheduled vehicle maintenance should be carried out in a timely manner.
How to independently replace the diode bridge on a VAZ 2107
Generator VAZ 2110. 94.3701. examination. scheme. belt replacement
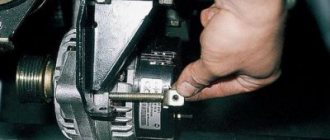
A diode bridge or rectifier is one of the parts of the VAZ 2107, the replacement of which requires almost complete disassembly of the generator. As a rule, the failure of a generator, or more precisely one of its elements, is primarily determined by a loss of battery charging. Before you begin the repair, you need to remove the generator from the VAZ 2107 engine. To do this, you will need two keys - 17 and 19. Use the 17 key to unscrew the fastening nut on the adjusting plate. This will relieve the tension on the drive belt, which can be freely removed.
After this, using a 19mm wrench, you need to unscrew the nut securing the generator to the VAZ 2107 engine housing. Having removed the bolt from the holes, remove the generator from the engine and begin repairing it.
Here you will additionally need:
- Hammer;
- Heads for 8 and 10;
- Head extension
First, let's disassemble the body. To do this, unscrew the nuts located on its back cover.
To separate both halves, you need to lightly tap one of the halves with a hammer in a vertical position at the point of their connection.
As a result, we get two parts - one with a rotor, the other with a stator. The diode bridge that we need to change is in the second half, so that’s what we’ll do.
A careful inspection of the part and the diode bridge inside will determine that the coils are held on by three nuts that clamp the wire terminals. An extension cord will come in handy here, since without it it is almost impossible to unscrew the nuts deep in the housing that secure the diode bridge.
After freeing the coil wires, the stator is easily removed from the metal case and we get free access to the rectifier. By pressing on the bolts (3 pcs.), we finally release the diode bridge and remove it from the housing.
Next, it is replaced with a new one, and you can begin assembly. It is done in the reverse order and usually does not cause any difficulties.
However, before starting assembly, it is recommended to check the remaining parts of the VAZ 2107 generator to ensure they are working properly. First of all, this concerns the bearing. Check them for lubrication and absence of play, and if the slightest suspicion arises, immediate replacement is recommended. This simple procedure will help you avoid repeated disassembly and reassembly in the future.
After replacing the diode bridge and assembling the generator, we install it in its original place. Do not fully tighten the nut securing it to the body. First, put the belt on the pulley and tighten it in accordance with the recommendations of the VAZ 2107 manufacturer. Usually, a pry bar or a large screwdriver is used for this. We fix the generator in the desired position by tightening the nut on the adjusting plate and check the degree of belt tension. The deflection of the belt, when pressed in the gap between the pulleys, should be 10-17 mm.
This procedure should not be neglected, since if the belt is loose, charging may be lost, and if it is too tight, it can cause premature failure of the bearings.
Typical problems with the VAZ electric motor
First, let's discuss what are the typical malfunctions of the VAZ 2107 passenger car.
- A particularly common type of breakdown is wear of the electric motor brushes. This problem can be indicated by too low output voltage, which means frequent discharge of the battery.
- Also, car enthusiasts often have to deal with bearing failures. Many VAZ owners complain about characteristic noises, after which they have to replace the bearing.
- There are reviews about the failure of the diode bridge. This sometimes happens due to improper handling of the electric motor.
To more specifically determine the breakdown of the generator of this seventh generation classic car or, say, a VAZ 2106, you need to prepare:
- a set of keys;
- screwdrivers;
- puller;
- block, rubber hammer.
By the way, the typical generator problems of the VAZ 2109 are the same. In general, in order to identify them all, you must first remove the unit from the car.
- But to do this, we first disconnect the battery and wires from the electric motor.
- We dismantle the unit. Now it will be easier to identify all problems with the assembly unit.
- After removing the device, we separate the pulley, while simultaneously fixing the rotor with a tool.
- Here you can immediately inspect the voltage regulator relay; it also sometimes fails. For example, if the battery is constantly boiling, it is worth checking this relay.
- By unscrewing the nuts, you can remove the electric motor cover.
- There is a bearing in the cover, which sometimes makes noise. This refers to the main malfunctions of the domestic generator. If the bearing falls apart, it must be pressed out using a puller and replaced.
- Using a block with a hammer, you can squeeze out the rotor and check it, but rotor failures are extremely rare.
- Having separated the stator from the cover, it is worth inspecting the stator winding, but a break in the circuit is unlikely. The cause of such a malfunction may be its operation at extreme conditions.
- Next, you can remove the diode bridge; it often fails. You can check it with a multimeter.
- And of course, the brushes of the electric motor - they need to be measured, if the length is too short, replace them.
- Assembly and installation of the unit is done in reverse.
Here it should be added that the faults of the VAZ 2110 are of the same nature. However, the Chevrolet Niva generator usually has the same malfunctions.
Bottom line: what are the signs?
Now let's try to summarize the above, in other words, summarize all the signs of typical generator malfunctions.
- The first is signs of a malfunction of the diode bridge of a junk generator. Namely: frequent voltage drops, the battery is either recharged or not properly charged. After all, the diode bridge serves as a kind of check valve and is responsible for ensuring that the electric current flows directly from the unit and does not return back.
- There are also frequent cases of failure of the voltage regulator relay, as evidenced by frequent recharging of the battery.
- Next is the wear of the motor brushes, which is indicated by a voltage drop.
- Bearing failure is indicated by a characteristic hum that can be heard even from under the hood.
- Less common is winding breakage, which is diagnosed after a complete failure of the unit.
Well, a car generator can show its bad side with precisely such malfunctions. However, not all of them can be identified by car enthusiasts on their own. Often you have to contact a car service for this.
General useful information
Checking and repairing the VAZ 2107 generator
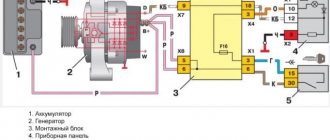
The VAZ 2107 generator converts the mechanical energy of rotation of the engine crankshaft into electrical energy. It is also intended to power the entire on-board network, and is also necessary to recharge the battery. To convert alternating current to direct current, the unit is equipped with a rectifier unit, which consists of six diodes. A special relay-regulator serves to maintain the voltage at a given level. This device is located outside the generator.
When the ignition is turned on, the voltage, passing through the vehicle's warning lamp, reaches the regulator, and from it is transmitted to the excitation winding. It is powered by three diodes. They are located in the rectifier block. If the warning lamp continues to light during startup, this means that the battery is not sufficiently charged. You need to check the voltage status of the on-board network. If it is below normal, it means:
- a short circuit has occurred in the network;
- there are faults in the battery;
- a malfunction of the automobile relay-regulator has occurred;
- malfunction of the VAZ 2107 generator.
In this situation, you should check the belt tension, as well as the condition of its bearing, and see if the relay regulator is working. It would be a good idea to look again at the expiration date and actual condition of the battery. If everything is normal, but the voltage is not enough, you need to contact a specialist auto electrician. The generator of the presented car model does not require special care. You just need to make sure that water and dirt don’t get on it.
You should also check the condition of the belt (it needs to be tensioned, approximately as in the video), and it is also important that the bearing is constantly lubricated and does not create noise during operation
Brief description, principle of operation of the generator
A car generator is an electrical machine that uses the mechanical energy of a power unit to generate electric current. Modern cars are equipped with alternating current electric generators.
The main task of the generator unit is to maintain the operating voltage of the vehicle's on-board network and charge the battery after starting the engine. Traditionally, the device is located in the front part of the engine compartment, driven by a belt drive from the crankshaft of the power unit.
Main components of the VAZ 2112 generator
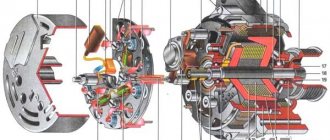
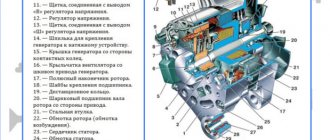
The metal case, made of two covers, is tightened with long bolts and protects the windings from mechanical stress. The material chosen is aluminum alloy, which has all the necessary qualities: lightness, sufficient strength, immunity to magnetic fields, high heat transfer.
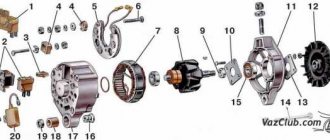
The main components of the VAZ 2112 generator: 1 – casing; 2 – output “B+” for connecting consumers; 3 – noise suppression capacitor 2.2 μF; 4 – common terminal of additional diodes (connected to the “D+” terminal of the voltage regulator); 5 – holder of positive diodes of the rectifier unit; 6 – holder of negative diodes of the rectifier unit; 7 – stator winding terminals; 8 – voltage regulator; 9 – brush holder; 10 – back cover; 11 – front cover; 12 – stator core; 13 – stator winding; 14 – spacer ring; 15 – washer; 16 – conical washer; 17 – pulley; 18 – nut; 19 – rotor shaft; 20 – front rotor shaft bearing; 21 – beak-shaped pole pieces of the rotor; 22 – rotor winding; 23 – bushing; 24 – tension screw; 25 – rear rotor bearing; 26 – bearing sleeve; 27 – slip rings; 28 – negative diode; 29 – positive diode; 30 – additional diode; 31 – pin “D” (common pin of additional diodes).
The stator is made up of tightly pressed metal plates to combat Foucault currents. The stator windings are located in thirty-six slots cut into the plates.
The rotor creates a rotating magnetic field. It consists of a core with windings of copper, varnished wires, rotates on closed, maintenance-free ball bearings. The shaft is fitted with copper rings connected to the excitation winding, a cooling fan impeller, and a V-shaped belt drive pulley.
The graphite brush assembly acts as a transmission link between the excitation winding and the battery, the self-excitation circuit.
A block of rectifier diodes, assembled according to Larionov’s circuit, converts three-phase voltage into constant power supply to the mains. A circuit of nine diodes is assembled on two metal frames used to dissipate heat during operation. Six main diodes power the on-board network. Additional semiconductor valves power the excitation winding after the generator reaches stable speeds and prevent the battery from discharging when the engine is stopped.
The voltage regulator controls the stability of the mains voltage at different engine speeds and performs temperature compensation of the battery charge depending on environmental parameters.
Algorithm for the operation of the VAZ 2112 generator
The driver turns the key in the ignition. A power circuit for the excitation winding is created from the battery. The starter rotates the crankshaft flywheel. At the same time, the generator rotor begins to rotate through the V-belt connection. The magnetic field created by the rotor current frames penetrates the stator windings. Induced electricity is generated. An alternating voltage appears at the output contacts of the device. During the time the engine is started by the starter, the generator manages to gain the required speed. The rotor winding is switched to power from a self-excitation circuit.
The rectifier module is responsible for creating direct current. The battery goes into charging mode. The voltage regulator maintains the parameters of the electrical network within specified limits.
The process of replacing the diode bridge on a VAZ 2107
Before we get started, let's select the necessary tools. Here's what we need:
- open-end wrench 17;
- open-end wrench 19;
- socket head 8;
- 10mm socket with long wrench;
- flat screwdriver;
- a new diode bridge for the VAZ 2107 (cost about 400 rubles);
- hammer.
Sequencing
When getting started, you should understand the following: before removing the diode bridge, you will first have to remove the generator and disassemble it almost completely. Without this, it will not be possible to get to the diode bridge.
- Using a 19-mm open-end wrench, unscrew the fastening nut holding the generator bracket. The generator is removed.
- There are four nuts on the back cover of the generator. They are unscrewed with a 10 mm socket head (and it is better if this head is equipped with a ratchet).
- After unscrewing the nuts, the halves of the generator need to be separated. To do this, lightly tap with a hammer on the protruding rim in the middle of the body.
- The generator is divided into two halves: one contains the rotor, the second contains the stator. The diode bridge that we are going to replace is located directly under the stator coil. Therefore, the stator will also have to be removed.
- The stator coil is held on by three 10mm nuts. To unscrew them you will need a socket head with a very long wrench; without it you won’t be able to reach the nuts.
- After unscrewing the nuts, the stator is removed from the generator housing. Access to the diode bridge is provided. To remove it, lightly press the three protruding bolts with your finger.
- The bolts easily slide down, the diode bridge is completely freed from the fasteners, removed from the generator housing and replaced with a new one.
Video: changing the diode bridge on a VAZ 2107
One mechanic I know, who was dismantling the diode bridge of the “seven” before my eyes, several times drew attention to the following nuance: if you have already disassembled the generator, please check not only the diode bridge, but also everything else. And special attention should be paid to generator bearings
They must be checked for lubrication and play. If even a very slight play is detected, it’s time to change the bearings. Moreover, it is “bearings”, not a bearing. This is the second important nuance: under no circumstances should you leave one old bearing and one new one in a VAZ generator, because such a design will last a very, very short time. I decided to change the generator bearings - change everything. Or don't touch them at all.
HOW TO RING A DIODE BRIDGE ON A VAZ 2107
To find out whether the diode bridge is working, the car owner does not need to have any special skills. All he needs is basic knowledge of electrical engineering and a couple of instruments:
- household multimeter;
- 12 volt incandescent light bulb.
CHECKING THE DIODE BRIDGE WITH A REGULAR BULB
Before starting the test, make sure that the battery is charged. It is desirable that the battery charge level is maximum.
- The base of the diode bridge (i.e., the thin plate into which the diodes are screwed) is connected to the negative terminal of the battery. The plate itself must be firmly secured to the generator housing.
- Two wires are connected to the light bulb. Then one of them should be connected to the positive terminal of the battery, and the second wire should first be connected to the output provided for the additional diode, and then with the same wire you should touch the positive output bolt of the diode and the connection point of the stator winding.
- If the diode bridge is working properly, then after assembling the above circuit the incandescent lamp will not light up. And when connecting the wire to various points of the bridge, the light should not light either. If at some stage of the test the light comes on, it means that the diode bridge is faulty and needs to be replaced.
CHECKING THE DIODE BRIDGE FOR OPEN
This verification method is similar to the one described above, with the exception of two nuances.
- The negative terminal of the light bulb is connected to the positive terminal of the battery.
- The second wire of the light bulb is connected to the negative terminal of the battery. Then the same points are checked as indicated above, but here the control light should be on. If the light does not light (or it lights up, but very dimly), then there is a broken bridge.
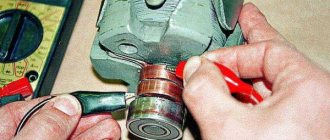
CHECKING THE DIODE BRIDGE WITH A HOUSEHOLD MULTIMETER
Before checking the diode bridge using this method, it will need to be completely removed from the generator. There are no other options. With this testing method, each diode will have to be ringed individually.
- The multimeter switches to ringing. In this mode, when the electrodes touch, the multimeter begins to beep (and if the multimeter’s design does not provide sound signals, then in the ringing mode, a resistance of 1 kOhm should be displayed on its display).
- The multimeter electrodes are connected to the two contacts of the first diode in the bridge. Then the electrodes are swapped and connected to the diode again. The diode is working properly when, upon the first connection, the resistance on the display is 400–700 Ohms, and upon the second connection, it tends to infinity. If, both during the first and second connection of the electrodes, the resistance on the multimeter display tends to infinity, the diode has burned out.
It should be noted here that when burnt diodes are discovered, today no one fools themselves by replacing them. A bridge with a burnt-out diode is simply thrown away. Why? It's simple: firstly, the burnt-out diode will have to be desoldered very carefully. And for this you need to have the skill of working with a soldering iron, which not everyone has. And secondly, diodes of the 2D219B brand must be installed in the bridge, and only them. Yes, there are many other diodes on the market with similar electrical characteristics. There is only one problem with them: they burn, and very quickly. And finding the above-mentioned 2D219B on sale is becoming more and more difficult every year. I don’t know why this happens, but this is a fact that I personally encountered.
How to determine generator malfunctions
Signs of a faulty generator diode bridge. A car generator and a generator, a household power station are similar. Accordingly, the principles of troubleshooting and repair are the same. The only difference is that the car generator contains a rectifier and a voltage regulator, so the car network is designed for 12 Volts. The article discusses generator malfunctions and how you can fix them yourself. Your vehicle is equipped with a warning light that can alert you that the alternator has lost power. If this happens, you need to make sure that the sensor is working and the lamp is connected correctly.
It often happens that these lamps use a bad connector or the control relay fails. It is also possible that your battery, charging terminals are faulty, or it is simply discharged. When there is a lot of energy consumption, for example, when using lighting devices to the maximum, charging, or leaving the radio on overnight. Generator malfunctions may occur due to increased energy production when the voltage is above 14-15 Volts. The numbers vary depending on the model.
Therefore, if the battery breaks down, you should always check the generator too. Sometimes the generator begins to deliver current below the required limit of 13.2 Volts, then it is urgently necessary to check it for damage.
Before removing the generator, it is necessary to check the tension of the drive belt. Lack of electrically conductive connections between the battery or generator and the car body; voltage may be lost “on the way” to the battery. Also check the bearings for clearances and the integrity of the fuses.
For some types of faults there is no need to remove the generator. If there are knocks or noise during work, it is necessary to disconnect the wires: the noise will disappear - but a short circuit will form, unfortunately, these are expensive repairs, their cost exceeds the price of new equipment.
The noise remains - replace the bearings, they have worn out during use. Check the brushes, maybe it's time to replace them too. The contact brushes and rings may not be pressed well, then the spring should be adjusted. Get rid of dirt and burnt marks on the rings, if any. Sandpaper is the best way to remove scorch marks. If the rings become unusable, the rotor must be replaced. Check the rotor contacts with a multimeter.
Generator malfunctions in the form of a damaged rotor must be removed in the following order. Since a faulty rotor cannot be replaced, it must be completely replaced if it fails. The same applies to the stator. Remember that the rotor and stator must not have electrical contact with the body or other parts of the vehicle. A faulty stator must be replaced. Voltage rectifier diodes should not conduct current in both directions.
Diagnostic methods
As practice shows, diode bridges periodically fail on any vehicle, regardless of make and model
It is also not fundamentally important whether you use diode bridges from Valeo, Bosch or any other manufacturer
Most often, one or several diodes burn out in a DM. As for the reasons, here we can highlight:
- dust ingress;
- negative impact of dirt;
- contact of diodes with oil;
- accumulation of moisture in the generator;
- polarity error when lighting;
- incorrect battery connection;
- overload in the electrical network;
- errors in the installation of electrical equipment;
- factory defects, etc.
If you set a goal, the bridge can be checked in normal garage conditions. For such tasks, use a light bulb or a multimeter.
Before starting work, remove the protective casing from the DM, and also do not forget to disconnect the terminals on the regulator. Remember that all bridges are positive, that is, positive diodes are equipped with red wires, and negative ones are black. Don't get confused.
Now in more detail about each of the methods.
Multimeter
If you decide to use a multimeter to check the bridge, you will need to perform several sequential procedures.
The whole process looks like this:
- the bridge is dismantled from the generator (no other way);
- each diode will need to be checked separately;
- the beeper mode is selected on the measuring device;
- This setting will allow you to hear a signal when the probe is shorted;
- if this mode is not available, select the 1kOhm position;
- the probes are brought to the edges of the diode;
- a measurement is made;
- the probes are swapped.
Now regarding the measurement results. Everything is fine with the diode, if in one position you see an infinity sign on the screen, in the second it gives a value in the range from 500 to 700 Ohms.
If the device shows a lower resistance value, or there is an infinity sign in two positions, you have found a faulty diode.
Bulb
Now let's see how the procedure is carried out using a regular light bulb. This is a good alternative for those cases when you don’t have a multimeter.
The most ordinary 12 V lamp will do the job.
- The DM housing is connected to the negative of your battery;
- the plate must fit tightly to the car generator;
- one end of the lamp is connected to the minus of the generator;
- the second to the positive terminal 30 through the battery;
- if the lamp is on, then one or several diodes have failed;
- check negative diodes;
- the minus of the lamp goes to the body of the autogenerator;
- plus to the axle mounting bolt;
- if the lamp lights up or starts blinking, the problem is with the negative diodes;
- Next, the positive diodes are checked;
- the plus goes to terminal 30, and the minus also goes to the mounting bolt;
- when the lamp is on, we conclude that the problem is with this group of diodes;
- additional bridge diodes also need to be tested;
- the minus remains in its place, and the plus goes to terminal 61;
- if the lamp is on, the problem is diagnosed again.
To solve the identified problem, you will need to remove the problematic diode. A new one is installed in its place.
Nobody forbids you to simply buy a completely new DM and install it in place of the old one, then the question is a more substantial amount of money.
In total, checking and repairing the bridge will take no more than 2-3 hours for a technician without much experience. If you are an experienced auto mechanic, then you definitely won’t spend more than an hour of your time on such events.
Checking the windings
First you need to visually inspect the windings. If there are no visible defects, you should use a multimeter. First you need to do the following:
- Remove the brush holder.
- Disconnect the voltage regulator.
- Clean the slip rings.
- Diagnose the winding for defects.
The resistance measurement function on the multimeter should be activated. The measurement is taken between the slip rings and the stator. In normal mode, the value will be from 5 to 10 ohms.
Assembling a VAZ 2107 generator
Before assembling the generator, it is necessary to clean the parts from contamination. It is better to wash metal parts with gasoline, and wash windings and other complex parts with air from a compressor.
The new bearing is pressed onto the rotor using a mandrel. You can use a head or tube with a diameter that matches the size of the inner ring of the bearing.
Before installing the rear and front covers, it is necessary to check the condition of the bearing seats. They must not be damaged or scratched.
If there are cracks in the cover, they must be replaced with new ones. Bolts and nuts of poor quality must also be replaced.
The sequence of assembling the generator corresponds to the procedure for disassembling it.
After installing and connecting the generator, it is necessary to tighten the belt with the necessary force. If it is overtightened, the bearings will fail; if it is loose, the generator will slip under load and will not produce the required charging current.
Rectifier circuit diagram, explanations
To increase the power of the generator, an additional arm of diodes VD7, VD8 is used, that is, an eleven-diode bridge. The additional diodes are connected to the common point of the stator winding, wound in a WYE (star) configuration where the phase voltage is applied. With the help of these diodes, the generator power is added, it increases by 15 - 20% without design changes or harm to the generator components.
Rice. No. 2. Schematic diagram of the generator, where under the number 4 on the diagram there are diodes of the power rectifier, VD7, VD8 - diodes that increase the power of the generator. Under the number 7 are the diodes of the excitation winding rectifier.
Circuit of its own rectifier using diodes VD9, VD11. Thanks to these diodes, the battery holds a charge for a long time when the engine is turned off.
We are sorting out the VAZ 2107 37.3701 generator
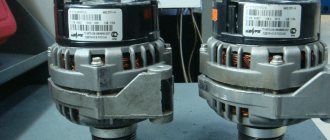
So in this article I will describe the generator overhaul. We will talk about the 37.3701 generator, although everything on the G-222 generator is almost identical and this article will be suitable for it with some adjustments. I bought for replacement: 1. Diode bridge - 190 rubles 2. Generator capacitor - 15 rubles 3. Bearings - I took Andycar - 65 rubles 4. four nuts for 8. The relay regulator on the generator is new, so I decided not to change it. We will also need a universal puller (I personally used a rod puller instead, it wasn’t very convenient, but after fiddling around I removed the bearing with it). It is very desirable to have a brush for metal; I bought a set of three brushes and some sandpaper.
So the generator itself
Clean the generator from dirt with a brush. And unscrew the pulley nut. We place the generator so that the pulley rests on the floor, put a 19mm wrench on the nut and, holding the pulley with one hand from turning it, apply strong and sharp blows to the wrench with a hammer. The pulley will of course turn, but the nut will eventually begin to unscrew, I knocked like this for 2-3 minutes
Using a 10mm wrench, unscrew the four bolts and remove the studs holding the generator together.
further, unfortunately, several photos were lost
Method No. 1 - without dismantling the block.
1. Remove the generator protective cover.
2. Check the functionality of the entire diode circuit; to do this, connect a light bulb (1..5, 12 V) with one end to the negative on the battery, and the other to the positive terminal “30”. If the lamp lights up, there is a short circuit in the circuit, therefore, one or more diodes in it are faulty, all that remains is to decide which ones (positive or negative)
This information will tell the knowledgeable car owner what to pay attention to so that the working diode bridge of the generator installed in place of the faulty one does not burn out either.
3. So, let’s check the negative group first; to do this, connect the minus of the light bulb to the generator housing, and the plus to one of the mounting bolts of the diode bridge. If the light comes on (constantly or blinks), it means that there is a short circuit of either the valves or the turns of the stator winding.
4. Let's move on to the positive diodes. We connect the plus of the battery through our light bulb with the generator clamp “30”, and connect the minus to one of the bolts securing the rectifier unit. A light that comes on is a clear sign of a short circuit.
5. The last stage is diagnostics of additional diodes. We leave the minus of the battery on one of the mounting bolts of the diode bridge, and connect its plus through the lamp to the terminal of the generator “61”. The light-emitting lamp again indicates the presence of a short circuit in this group of diodes.
How to determine the health of the generator
Information about the operating status of the main unit responsible for generating electrical energy in the car is displayed on the dashboard for the convenience of motorists. The icon on the instrument panel that resembles a battery should go out after starting the vehicle’s power unit. This means that the power to the main electrical components has been switched from the battery to the generator. If the indicator does not go out, this indicates a breakdown in the electrical circuit. Problems may also be indicated by insufficient battery charge due to the lack of normal current rating.
How to increase on-board voltage
Where and how is a diode placed in the LV circuit on the generator in order to increase the voltage in the car network and better charge the battery? Here I propose a simple solution, raising the on-board voltage, without going anywhere in the car and its circuits. I searched in my archives and did not find the material from which I read this decision. “Structurally, voltage regulators have an upper limit of 13.6V. This is due to the “old” connection diagram, from which the new one was copied and “successfully improved”. In it, the necessary voltage from the on-board network, supplied to the regulator for comparison, passed through a chain of wires. On them it dropped to normal. According to the new scheme, we have a chronic undercharge of the battery. Which, with the arrival of winter, makes starting the engine in the cold quite problematic. But if you install a pre-heater, starting the engine will be much easier.
It should also be noted that the battery begins to absorb energy (charge) only when its temperature is above zero. Therefore, in winter, if you make short runs and the battery does not have time to warm up under the hood to at least zero (plus charging time), it will be constantly discharged. And soon it will die... It is believed that after starting the engine, in order for the battery to recover, you need to drive for at least 20 minutes. Just go, and not stand in traffic jams! How to increase the voltage in the network?
Very simple! It is necessary to make the regulator “think” that we have low voltage in the network. Thus, the generator will give us the missing volts. A diode will help us do this. In a generator with a built-in voltage regulator, you need to place a diode in the circuit, as shown in the figure.
About installing an additional diode
Installing an additional diode is quite rare. Why is this being done? In order to slightly increase the voltage of the on-board network. The need for this increase arose due to new laws. As you know, in 2015, changes were made to the traffic rules, forcing drivers to constantly drive with their running lights on. And owners of classic VAZ models are forced to constantly drive with their low beams on. In such a situation, both battery charging and on-board voltage drop significantly. To somehow solve this problem, craftsmen install additional diodes, which are located between the voltage regulator terminals and the common output wires for the additional diode, as shown in the figure below.
For installation, KD202D diodes are usually used, which can be found in any radio parts store.
If the above diode is not available, you can choose any other one. The main thing is that the direct forward current is at least 5 amperes, and the maximum permissible reverse voltage is not lower than 20 volts.
So, in order to change the diode bridge on a VAZ 2107, you do not need to go to the nearest service center and pay a mechanic 800 rubles. Everything can be done on your own, and in a fairly short time. To remove and disassemble the generator, 20 minutes is enough for an experienced car enthusiast. It will take a beginner more time, but in the end he will cope with the task. All you need to do is follow the recommendations given above exactly.
Generator VAZ-2107: removal, installation and repair
To ensure that the battery is charged while the engine is running, the car is equipped with a generator. Car enthusiasts often find that this mechanism does not properly charge the battery while driving. If you leave everything as is, the battery may die, and you will have to call a tow truck and go to a service station. But this can be avoided if you check and, if necessary, replace the elements of this device in a timely manner.
Removing the alternator belt and checking the tension
Sometimes the cause of a weak charge while driving can be insufficient tension on the alternator belt. Fortunately, this problem is easily solved. To do this, you just need to tighten the belt or, if there are visible defects (cracks, surface wear), simply replace it with a new one. To install a new one, you need to loosen the generator mounting nut and try to move it with a pry bar or something else closer to the engine.
If we are dealing with a carburetor engine, then our manipulations are completed - and we can remove the belt. If we are talking about how to change the VAZ-2107 generator (injector), then you also need to remove the crankshaft position sensor.
After this, install the pre-prepared belt. He dresses without any tension. And after the belt has sat on all the pulleys, it is tensioned. To do this, you need to loosen the nut to the mounting plate and move the generator with a mount, thereby adjusting the degree of tension. Upon completion of work, tighten the nut and perform a check.
Generator VAZ-2107: repair
Before repairing this device, you should figure out what the cause of the malfunction is. But I would like to immediately note that few people know how much a generator on a VAZ-2107 costs, and its cost is no less than 2200-2500 rubles. Therefore, if it fails, there is no need to immediately run to the store and buy a new one, because in most cases the old device can be repaired. It’s easier to turn to specialists, but doing it yourself is a completely feasible task.
To remove the device, you need to put the car in a pit, remove the engine protective shield, and then unscrew the nuts, brackets, remove the belt and the generator itself. To check we need an ohmmeter. We connect the plus of the ohmmeter to terminal “30” of the generator, and the minus directly to the generator housing. If the display shows “0”, then the diodes have failed or the winding has shorted out.
To find out which diode has failed, we check the positive ones with an ohmmeter, then the negative ones. After this, you can replace them. If there are no faults, the resistance should be in the range of 4.3-4.8 Ohms. Often the brush holder is to blame, the brushes of which in the neutral position do not protrude by 5 mm.
A few tips for motorists
If while driving the VAZ-2107 generator seems to whistle, then the belt tension is lower than required. This is fraught with its slippage and insufficient charge. But excessive tension can cause the belt to break, which is also not good.
If, while checking the device, you find a fault in one of the diodes, then in this case it is necessary to replace the rectifier unit. A faulty stator or rotor must also be replaced immediately.
If both positive and negative diodes are working, but the generator does not work, it is recommended to check for a short circuit in the winding. To do this, connect the ohmmeter to the housing and rotor ring. If the value on the dial of the device is close to zero, then a short circuit has occurred.
Also, during work, it is advisable to clean the VAZ-2107 generator from dust and dirt. This can be done with compressed air. Metal parts must be lubricated periodically, using kerosene. It is advisable not to lubricate the bearings.
How to test a generator with a multimeter
The diode bridge of the generator can be checked with a multimeter, but you can also use the stand that was used to check the regulator.
But before that, first of all, without removing the rectifier bridge from the generator, connect the red wire of the tester to terminal 30 of the generator, and the black wire to the housing. Set the tester operating mode to dial (diode icon). If it is not there, then set it to 1-2 kOhm. The multimeter should show infinity. If the readings are different, the diode bridge is faulty.
Then check the current rectifiers for breakdown. Leave the positive (red) probe on terminal 30, touch the negative one to the bridge mounting bolts one by one. The multimeter display should show infinity in all cases; any others mean a breakdown.
Next, connect the positive probe to the axle mounting bolts, and the negative probe to the generator housing. In this case, the tester should also output infinity.
But in practice, such verification is most often not enough. In most cases, it is necessary to ring the generator in more detail.
Careful testing
To do this, unscrew the fastening bolts of the rectifier unit, disconnect the copper wires of the stator winding and remove the diode bridge from the generator. Now you can test each semiconductor individually. Before checking, it is advisable to rinse the stabilizer with running water using a medium-hard brush, and then dry thoroughly. For quick drying, a hair dryer is quite suitable.
Attach one of the tester probes to the diode plate, connect the second to the central terminal of each diode fixed to this plate. Then swap the probes. In one case, the multimeter should show infinity, in the other - a nominal resistance of approximately 570-590 Ohms. Rectifiers are considered faulty if:
- In the first and second measurements (when the polarity was changed), the multimeter readings are the same;
- Diode resistance is greater or less than nominal values.
Perform the same actions with the second plate of the diode bridge. If a fault is detected in one or more diodes, it will be easier to replace the entire rectifier unit. True, there are craftsmen who replace failed diodes individually, but such work requires a certain skill and dexterity.
Checking the armature and stator windings
Further inspection requires completely disassembling the generator. First of all, visually check the anchor. Brush rings should not show any blackening, chipping or wear on the treadmills. Blackening and slight wear can be smoothed out with zero-grade emery cloth. Rings with deep grooves must be replaced or, if the thickness of the rings allows, turned on a lathe.
The armature winding should not clearly smell like burning. The color of the winding must be uniform and free of damage and breaks. To check the armature winding for a break, you will need a multimeter. Set the operating mode to continuity testing or resistance measurement and connect the probes to the brush rings. The winding resistance should be within 3-5 Ohms. Then leave one probe on the ring, connect the other to the body. The multimeter display should show infinity.
The generator stator is diagnosed after removal from the housing. First of all, carry out a visual inspection. There should be no visible damage to the wire or its insulation. Then connect the tester wire to the stator housing. With the second wire, touch the terminals one by one. There are only three of them. The tester must be in dialing mode. If the display shows infinity, this indicates that the stator is working properly.
Further testing consists of diagnosing the windings. The resistance of all three windings must be the same.
Before assembling the generator, you need to check and, if necessary, replace the bearings. When turning, they should not jam or make a creaking sound. This means that they are very worn out and will soon fail. Therefore, it is better to replace them immediately.
Dismantling and checking voltage regulators on a VAZ 2107
First, let's decide on the tools and devices that will be needed for the job. Here they are:
- household multimeter;
- open-end wrench 10;
- flat screwdriver;
- Phillips screwdriver.
Sequence of work
If the driver suspects that the voltage regulator is broken, then the first thing he should do is check the voltage supplied by the battery.
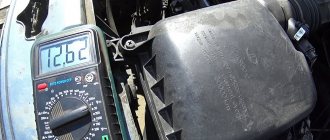
- The car engine turns off and the hood opens. Using a multimeter, the voltage between the battery terminals is measured. If it drops below 13 volts (or, conversely, rises above 14 volts), then this indicates a breakdown of the regulator.
- Having made sure that the battery is not charging well precisely because of a faulty regulator, it must be disconnected from the car's network, but first the ground wire must be removed from the battery. If this wire is not disconnected, then there is a high probability of a short circuit, which will lead not only to the burnout of many fuses in the closed section, but also to melting of the electrical wiring itself.
- If an old external regulator is installed on a VAZ 2107, then all terminals are manually removed from it, after which the nuts that hold the regulator to the car body are unscrewed with a 10-mm open-end wrench.
- If the VAZ 2107 is equipped with an internal three-level regulator, then to remove it you will need to unscrew a pair of mounting bolts holding this device in the generator housing with a Phillips screwdriver.
- After removing the regulator, the negative pole of the battery is connected to the relay ground (if the regulator is external), or to contact “Ш” (if the regulator is internal);
- The positive pole of the battery is connected to contact “K” (this contact is available on all types of regulators);
- The multimeter is connected either to the generator brushes or to the relay outputs.
- After turning on the multimeter and applying a voltage of 12–15 volts, it should also appear on the generator brushes (or on the relay outputs, if the regulator is external). If the voltage generated on the brushes or outputs remains constant, then this is a clear sign of a breakdown of the regulator. If no voltage is detected at the brushes or outputs at all, there is a break in the regulator.
- Both in the event of a breakdown and in the event of a break, the regulator will have to be changed, since this device cannot be repaired.
- The failed regulator is replaced with a new one, after which the vehicle's electrical system is reassembled.
Video: checking the voltage regulator on a VAZ 2107
Like any other device, the voltage regulator can break down suddenly. And it’s especially difficult for the driver if the breakdown occurs far from home. There is nothing surprising here: drivers who constantly carry spare regulators with them need to look further. But even in such a difficult situation, there is still a way to get home (or to the nearest service center). But you won’t be able to get there quickly, because every hour you’ll have to crawl under the hood and remove the terminals from the voltage regulator. And then, using a suitable piece of insulated wire, connect the positive terminal of the battery and contact “Ш” on the regulator. This is done so that the charging current does not exceed 25 amperes. After this, the regulator terminals return to their place, and the car starts. You can drive it for about 30 minutes, and you should turn on the maximum number of energy consumers - from the headlights to the radio. And after 30 minutes you should stop again and do the entire above procedure again, since without this the battery will simply recharge and boil.
So, even a novice car enthusiast can check the voltage regulator on a VAZ 2107. All that is required is the ability to use a multimeter and a screwdriver. Following the recommendations listed above will allow the car owner to save about 500 rubles. This is how much it costs at a car service center to check and replace the voltage regulator.
What malfunctions can occur in the generator?
What could be the problem with the generator when, when you turn on the ignition, the light flashes or does not turn on at all and the control devices do not function? You should check to see if the fuse located in the mounting block is ok. If there is a break in the power supply, the following may occur:
- the “O” wire with the wires from the mounting block to the devices is broken;
- there was a breakdown of the “GP” wire with the wires from the ignition switch to this unit.
If the battery is discharged, the generator voltage will not give the desired figure.
And the reason may lie in the fact that the control lamp has burned out, or perhaps the socket contacts are not pressed sufficiently against the printed circuit board. In this case, the lamp or faulty contacts are replaced.
You should look to see if there is an open circuit in the circuit connecting plug “D” of the generator and the devices. If this is exactly the case, then you need to look at the “KB” connections.
A lot also depends on the brushes if the VAZ 2110 generator does not produce the required power. They can wear out, freeze, the contact rings can oxidize, then you need to replace the entire brush holder along with the brushes. Oxidized parts are wiped with gasoline.
The terminals of the generator winding may become unsoldered from the slip rings, which need to be soldered or the surface of the generator rotor should be leveled.
A short circuit may occur in the valves, and the rectifier will have to be replaced. If the generator is noisy, it means there is a breakdown - the bearings are damaged; If the generator makes too much noise, you need to check the stator.
But when the generator 2110 does not produce 14.2 V, as it should, you need to start the engine - let it run for a while. In a few minutes, pressing the gas pedal, you need to increase the crankshaft speed to 3000 rpm. Now all functions should work, after which the voltage at the battery terminal is measured.
The voltage at this moment should be greater than 13 V. Other numbers indicate that there is a breakdown in the winding, or a short circuit may have occurred. You also need to check the voltage regulator with brushes; Maybe the reason lies in the oxidation of the generator winding rings.
The voltage regulator is checked by turning off all functions, but leaving the high beams on. Now you need to measure the voltage again, observing what it is now. Your mood will improve if the device shows the numbers 13.2-14.7 V.
The generator may be undercharged if the pulley is just spinning, and under heavy loads it begins to spin.
The normal output at idle is 14.2 V. Use a multimeter to take a measurement, but before that you need to check the input and output. Experienced craftsmen advise taking a welding cable, attaching the minus to the motor, and bringing the plus to the generator. If the result is negative, the generator needs to be changed.
Constant undercharging of the battery or its absolute discharge at the most inopportune moment is a headache for many car owners. One source of these problems may be the generator. But how to check it? Perhaps it's not his fault at all? Let's figure out together how much the generator must produce for the normal functioning of all car systems and maintaining the battery in a charged state.