Nowadays you can’t find classics in stock configuration. Installing contactless ignition on the Lada 2106 has long been a necessity. The standard modules have outlived their usefulness, and their resuscitation often does not bring the desired result - the system constantly fails.
Below are instructions on how to properly change the device and configure it.
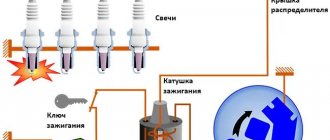
Scheme
The standard contactless ignition system on the VAZ classic consists of several modules. Typically, the installation kit includes hardware.
- Ignition coil for electronic module. Some motorists leave the old block.
- Distributor, also known as distributor. This is where the main difference lies. The two devices are similar only in appearance. The internal contents of the contactless and classic modules are completely different.
- Controller. This detail is not present on the standard system at all. The electronic unit is installed on the car body and connected to the distributor with wires.
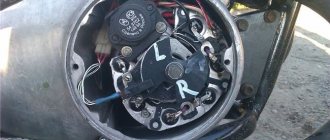
- Hall controller. This part is extremely important for the normal operation of the system. A small sensor is responsible for reading the rotation of the engine crankshaft. If a part fails, the entire system stops working.
More complete kits include spark plugs and armored wires. For the electronic system, the gaps on the spark plugs are set differently, or the elements are replaced.
Installation
It’s easy to install the BSZ on a VAZ with your own hands. You will need to perform a certain sequence of actions.
- Disconnect battery power.
- Remove the distributor cover and turn the crankshaft. Set the first cylinder to TDC so that at this moment the ignition slider aligns with contact 1 of the working chamber.
- Remove the standard ignition coil and replace it with a new one. Here the position of terminals B and K must be observed. This is necessary because the contacts on the modules can be turned out.
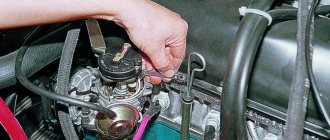
- Now we remove the high-voltage wires from the spark plugs and remove the distributor cover from the car.
- Disconnect the distributor itself and remove it from its seat.
- Now we place the switch in a suitable place. It is desirable that the back wall of the device is completely adjacent to the metal surface. This will help cool the device better. Typically, drivers place the part on the inside of the wing or the interior bulkhead. Experts also advise treating the panel to bare metal.
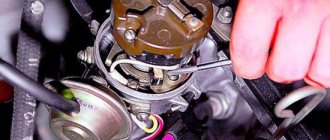
- Next, a new distributor is installed. Here you need to set the marks to the zero position. Align the slider to the ignition firing position on cylinder 1.
- Add high-voltage wires to the cover according to the engine strokes.
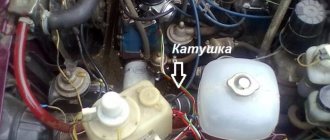
Connecting electronic ignition to a VAZ 2106
Installing the device is half the trouble. Now you need to configure it correctly. The wiring of the new module is included in the kit and is wound into one bundle. The figure above shows a diagram of connecting the device to the on-board network.
The first contact of the switch and the tachometer wire, both brown, are connected to terminal “K”. Two wires are also placed at the output of coil “B”, from terminal 15 of the ignition coil and block 4 from the control unit. The second wire from the block is routed to body ground.
How to set electronic ignition
Adding a new distributor using the marks is much easier than performing a similar procedure on a classic. The ignition timing is set using the marks. The sequence of actions looks like this.
- Set the distributor according to the marks to advance “0”.
- Try to start the engine.
- Next, you need to turn the distributor body to catch the moment of optimal advance. In this mode, the engine runs smoothly, responds quickly to the gas, and there are no dips.
If you have no experience in such repairs, it is recommended to contact a specialist. Beginners rarely catch the right moment correctly.
Adjusting contactless ignition 2106
Once set, no procedure is required. The module does not have a large number of moving parts. It is enough to set it up correctly initially and use it for a long time.
The adjustment procedure may be necessary after repairing the internal combustion engine, when the valves or carburetor were adjusted. The technician's actions may cause the device to go astray, and its position will need to be corrected.
Advantages of electronic ignition
As improvements have progressed, better contactless ignitions have appeared, and now the newest microprocessor ignitions have appeared. The contact system is based on the work of “cams”, which are driven by a rotating distributor shaft.
The high-voltage voltage is mechanically produced by a distributor, supplied alternately to the battery or generator to the spark plugs, changing with the clock of the engine.
Contact ignition is simple, reliable, with uncomplicated operation, but during the movement of the “cams” and sparking, carbon deposits form on the contacts. The car starts more and more poorly.
The contactless system is more advanced. The vulnerable mechanical contact current interrupter has been replaced by a special non-contact type sensor. A similar design to the previous one is modernized with a transistor-type switch and a pulse sensor.
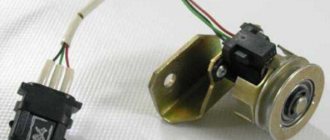
How to check the Hall sensor on Lada 2106: electronic ignition
This controller is the biggest problem on BSZ systems. Its verification will be carried out like this.
- Elimination method. The failed sensor is replaced with a known good one. To do this, you will need to purchase it or ask your neighbor for a whole sensor. If after installation the engine operation is leveled out, the part is replaced.
- The second method involves the following steps. To check, remove the terminal from the distributor and turn on the ignition. Next, you need to close contacts 3 and 6. If the sensor is damaged, a small spark will appear.
There are other testing methods that involve the use of a multimeter and other tests. We will not write about them here, since this will require special equipment and deep knowledge of auto electrics.
Coil Installation
You need to take a close look at what position the old coil is installed in and how the bracket is located on the new one. Often he can hold the reel incorrectly, in the opposite position.
In a mirror image installed coil, contact “B” is located on the left side, and contact “K” is located on the right.
- To connect the coil correctly, you can change the wires. This of course causes confusion. Chafing is possible, so it is better to do so in order to maintain the same comfortable and safe position.
- To do this, you need to loosen the bracket, change its position and secure it again. The brown wire, responsible for the tachometer, is attached to contact “K”, the green wire to “B”.
- The reel studs have threads. The reel will last longer if washers of an acceptable width are initially installed on the studs, occupying a larger area. They will protect the pin from being pressed through. Without them, the housing may burst due to pinching, resulting in oil leaking from the coil.
The electronic contactless ignition wiring kit contains soldered crimped terminals: 2 with a red wire, marked “+” and without a mark (for pins 5) and one with a black one.
The terminal with the “+” sign is installed on the “B” pin, and without the symbol – on the “K”. The black terminal refers to ground and is attached in the area of the switch.
Malfunctions
Typical breakdowns for the BSZ system are:
- Hall element failure. The engine suddenly stalls or does not start.
- Burning of the contact of the high-voltage wire. A common malfunction for all ignition systems. The engine stalls or starts poorly.
- Damage to the contact groups of the device. Here, a common cause is banal oxidation of the terminals.
- Controller failure. This can happen due to overheating, water ingress or mechanical impact.
No spark on electronic ignition
The reasons for the loss of spark on a contactless module are usually not very different from similar problems with classical elements.
- Damage to the spark plug or high-voltage wire. These parts are most susceptible to vibration and other negative factors.
- If the ignition periodically fails, check the contact groups and wiring for oxides and damage.
- The control equipment is damaged. There may be a controller or a Hall sensor here.
Lada 2106 won't start
If the car does not start, an experienced motorist can immediately identify the circuit that is failing. If the problem is the ignition, you will need to check the circuit for faults. Usually they start with candles and end with a coil.
If a damaged part is found, it is replaced with a known good one.
Removing the distributor + installing marks
Before installing an electronic contactless ignition system on a VAZ 2106 car, we initially disconnect the ground. The wires are removed sequentially and carefully from the old distributor that needs to be replaced.
They are taken away by collecting them in a bunch in a certain sequence.
- The vacuum regulator hose is removed and laid aside. Remove the distributor cover.
- If the clamps hold it, carefully open them. Using a key “8”, unscrew the contact nut “K” of the coil, freeing the wire going to the distributor.
- Next, you need to take a cap ratchet (which prevents it from turning in the opposite direction) key set to “38”.
- By moving the key from top to bottom, tightening the mount on the left, set the distributor to the position necessary to make working marks along which the new distributor will be installed.
- There are cases when such a key is not required; there is a hole under the starter curve that can be used to perform such an operation.
When the starter is installed in the desired position, marks need to be made. You can do it without a mark, choosing a reference point for yourself, for example, a valve cover stud. It is convenient to make two marks on the side of the distributor or one on the scale.
You can remember the position of the vacuum ignition timing corrector relative to the gas hose. A new distributor must be installed in the same position.
What is the price
A complete set for a VAZ 2106 costs from 3,000 to 4,000 rubles, depending on the manufacturer. Typically this includes:
- switch;
- distributor;
- coil;
- Hall controller;
- wiring.
Some kits also contain a set of spark plugs and high-voltage wires.
If the driver does not understand auto electrics, additional assistance from specialists will be required. Services at a service station will cost another 1000-2000 rubles. The specific cost of installation in each city can vary significantly.
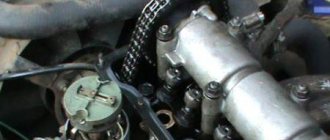
Replacing the distributor
Using the key “13”, the distributor mount is unscrewed, the bracket and washer are removed, and the old unit to be replaced is removed. The paronite ring gasket is left in place.
If it sticks well to the old part, you can carefully remove it and put it on the new distributor.
- The new unit is carefully inserted into the hole, adjusting relative to the previously made marks.
- The position in which the previous part was located is established.
The shaft is inserted onto the splines, aligned with the marks, the distributor is lowered, the required position is fixed, the bracket is put on, the washer is installed, and the fastening nut is tightened. Having secured the distributor, change the coil.
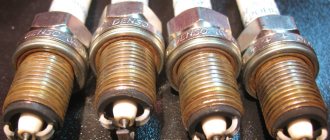
Do I need to replace spark plugs and distributor wires?
The car should start fairly quickly. After this, you can set the ignition timing as accurately as possible. In the future, you can regulate the ignition using another fuel - gas, for example.
- If the wires going to the distributor, spark plugs with minimal resistance, are of high quality and not worn out, then they can be left.
- But the spark plugs need to be removed, the gap increased (0.8 - 0.9, to 1) and, after cleaning, which is never superfluous, installed back.
If the candles were not included in the set, it is not necessary to change them.
What causes an incorrectly set ignition on a VAZ 2107
An incorrect lead angle causes the following problems:
Engine overheating. Early ignition causes detonation, which changes the temperature regime of the engine. At the same time, the load on the crank mechanism increases, reducing their service life.
Reduced vehicle dynamics. Early and late ignition of the VAZ 2107 leads to the fact that fuel energy is not optimally consumed. The explosion of the mixture must occur exactly when the piston is at TDC.
Burnout of valves. With late ignition, the mixture continues to burn throughout the exhaust phase, causing the valves to overheat and “popping” to occur in the exhaust manifold.
Principle of operation
The BSZ system on the VAZ 2106 model will work according to the following algorithm:
- After the ignition is activated by turning the key, 12-volt voltage is supplied to the primary winding. This leads to the formation of an electromagnetic field in the device.
- As a result of rotation of the crankshaft, one of the pistons of the power unit moves to the top dead center position. This causes the Hall sensor to send a signal to the commutator mechanism. The latter breaks the contact between the coil and the voltage source. It can be a battery or a generator unit.
- When an electrical circuit breaks in the secondary winding, this results in a signal with a voltage of 20 to 24 kV. This impulse is transmitted through a high-voltage cable to the runner of the distribution mechanism.
- The movable contact element of the distributor sends a signal to the corresponding spark plug, where the piston is at the top dead center position. A strong spark is formed between the contact elements, which ignites the combustible mixture consisting of fuel and air in the internal combustion engine.
- The timing pulley begins to move as a result of the action of the gear transmission, which is connected to the crankshaft. When the other piston moves to the top dead center position, the shaft rotates. This leads to the connection of the movable contact element with another spark plug. The Hall controller sends the next pulse, resulting in the spark cycle repeating.
In conventional systems, the distribution mechanism did not include a Hall controller. Instead, a contact component was installed; the switch unit was also absent. The procedure for breaking the electrical circuit was carried out by a mechanic; for this, a cam on the distributor shaft was used. This element pressed on the contact component of the BSZ.
Alexey Romanov spoke about the features of the BSZ operation and compared contact systems with contactless ones.