At the first stage, when a theft is committed, they try to neutralize the devices that emit an audio signal. It is very easy to disable the standard siren of car alarms offered by most companies - just cut the wires going to the siren module. The same applies to a car horn. In the absence of harmful factors, you can safely tinker with the engine, try to bypass the immobilizer protection, etc. The alarm will send an alarm message, but the siren will be “silent” all the time. However, there is a variety of devices that can continue to “spoil the hijacker’s nerves” even in the absence of power. They will be discussed further.
Features of installing autonomous and non-autonomous sirens
Several installation schemes for autonomous and non-autonomous sirens can be used on cars:
- If a car owner decides to convert the warning system from an autonomous siren to a regular one, then he may be faced with two connection options. When installing a conventional siren instead of a stand-alone one controlled by a positive signal, it is necessary to connect the power of the conventional device to the control wiring. The cable of the autonomous siren cut off at point “A” is insulated. The second wire of a simple siren is output to the body.
- If an autonomous siren was controlled via a negative wire, then a regular siren is connected using a different circuit. The negative terminal is connected to the negative trigger wire, and the positive terminal is connected to the power wire of the autonomous device.
- To ensure protection against disconnection of the main alarm key fob connector, it is necessary to upgrade the block. An additional jumper is installed inside the printed circuit board. When the plug is disconnected from the unit, the autonomous siren will turn on and run on its own battery.
- You can simultaneously use sirens of different types on one alarm system. A non-autonomous alarm device is connected via an additional relay and is protected by a separate fuse. In total, up to five sirens can be installed in parallel connection.
Loading …
Installation diagrams are shown below.
How to install a car alarm yourself
Any car owner thinks about how to protect their car from theft or break-in. One option for this solution is to install an alarm system on a car.
Experts say that there is nothing complicated in installing an alarm system on a car. If the owner knows how to use a screwdriver, a soldering iron and is versed in electronics, then, using the instructions, he will be able to independently install a car alarm on his “iron friend” with almost no problems.
How to control a car siren
The car siren is controlled in several ways:
- An "external" alarm siren can be controlled by a low-current negative output. To do this, the Negative Trigger wire is connected to the control output, and the second “trigger” is isolated. It is recommended to connect the second control cord to ground.
- To control the positive polarity, a cord in white insulation is located inside the siren loop. It must be connected to the output of the main unit. As soon as voltage appears on it, an alarm will sound.
- A high-frequency radio channel can also be used to transmit the control signal.
- The operating mode of the autonomous siren is selected by turning the lock located on the rear surface of its body. Depending on the position of the key, the device will work either autonomously or from the vehicle’s on-board network.
- Non-autonomous sirens are controlled using power wires.
Connecting a car alarm yourself
For perfectionists, you can prepare black electrical tape so that it does not differ from that used in standard wiring. When connecting, an additional relay is required. You just need to carefully understand the connection diagram supplied with the equipment. Before connecting the alarm sensor, you need to disassemble the left pillar. It should also be taken into account that this component should not be affected by dampness and high temperatures, so it is better to place it away from the engine itself. All information is transmitted via communication satellites. In such cases, you have to individually understand the circuitry of each car. Many of them can block the engine, preventing unauthorized start attempts. To prevent moisture from entering the unit, it is recommended to install it in such a way as to prevent water drops from flowing down the wires into the housing. The main practical aspects of panel dismantling operations can be viewed in detail in the video at the end of this article. Do-it-yourself alarm installation The modern realities of our lives make the installation of a car alarm one of the most pressing problems. Route the wire through the guard This wire will connect the car alarm to the siren.
Types of central locking elements
To begin with, the unit is put into service mode, which allows for maintenance of the device. Finally, it should be noted that there is a significant expansion of service capabilities for this type of equipment: remote engine start, turbo timer, engine idling to cool the turbocharger after parking and arming, sunroof window closer, if available - automatic raising of windows if they were open, special modes interior lighting and much more
It is important that you insulate this wire with rubber gasket or fill the hole with silicon
Possible engine blocking schemes are given in the installation instructions for the StarLine universal wireless blocking kit. Installation of a car alarm system to the central locking system. The signal will be transmitted through the glass without the need for drilling holes and repeater wires directly to the antenna wire of your alarm module.
Maximum load current mA. It often helps to run the wire near the heater core hoses, power amplifier wire, ignition power supply, or any other wire going to the other side of the guard. We install an alarm on a VAZ 2110, part 1
We install an alarm on a VAZ 2110, part 1
How are car alarms installed?
Basic principles for installing car alarms
All modern cars are very dependent on electronics. The car is filled with electrical consumers and wires connecting them to the battery. Can you imagine that there are about 30-40 kg of wires installed in your car? It is because of such a large amount of electronics that installing an alarm can be a nightmare for an unprepared person. To avoid mistakes, we are guided by the following principles:
- Reliability of operation The security of the car directly depends on the secrecy of the alarm unit, the installation location of the siren and many other factors. To protect the alarm unit, we hide it in the most hidden corners of the car - so car thieves will have to look for it for a very long time, even if they get into the car's interior. All wires and interlocks are hidden in the standard wiring - it is much more difficult to find several necessary wires if they are hidden in a large braid of similar wires. We install sirens so that intruders cannot turn them off from under the car. All these and many other factors are taken into account by our specialists when protecting your car.
- Minimal interference with standard wiring The golden rule of installation: “less is more.” We don't run unnecessary wires or connect things that don't need to be connected. If it is possible to implement any functions via digital buses instead of an analog connection, we use this opportunity rather than running new wires throughout the car - there are already enough of them. The alarm should not interfere with the correct operation of all other electronics in the car. When installing an alarm, we make sure that it is a pleasant addition to your car, and not an unnecessary problem on your head.
- Quality Almost all connections to standard wiring are made by soldering. The correct operation of the entire alarm depends on the reliable connection of the wires, so we carefully solder each connection so as to eliminate any breakdowns or malfunctions. In addition, much depends on the quality of the wire insulation. We exclude any interference with the operation of the alarm system by using electrical tape and heat shrink as insulating material. No external factors will jeopardize the safety of your car - we have taken care of that.
How is an alarm installed?
Installing an alarm system is a complex multi-stage process, however, for the experienced craftsmen of our installation center it does not pose any difficulty. Quite the contrary, for them it is a creative activity - to find the most reliable way to protect the car and outwit all the thieves.
Preparation for installation The first stage is very important - preparation for installing the alarm. At this stage, the technician disassembles the plastic trim of the car at the front of the car to find the best location for the alarm unit. It is very important to choose the most secretive and hidden place to ensure the operation of the alarm unit, and therefore the alarm system as a whole. At the same time, the technician needs to take into account the distance to the connection points to the standard wiring - you can’t hide the alarm too far, because then the wires may not reach and you’ll have to build them up, which means extra wires and extra soldering (see point 2 of the installation principles). When the master has chosen the optimal location, he prepares the alarm for installation: he connects the wires to the block, collects all the wires in one braid so that everything fits neatly and organically into the car’s wiring.
Alarm installation Next, the installer installs the alarm unit in the selected location and secures it firmly so that nothing dangles or rattles. Usually the wires are connected in the interior first, and then under the hood. In the cabin, the alarm system is connected to a digital bus (CAN/LIN), and if there is none, in an analog way to each device: central locking, dimensions, and many others. When installing an alarm with auto start, the alarm is also connected to the ignition. In the meantime, a hood switch and a siren are installed and connected under the hood; the siren must have its horn facing down - this way water will not flow into it.
Check When everything is connected and installed, before putting everything back together, the technician checks the operation of the alarm for errors and malfunctions. We carefully test each alarm function as if we were using it ourselves. After a thorough check, the master hides all the wires in standard braids and assembles the car trim. The installation is complete - now your car is under reliable protection.
Why should you choose us?
Installing an alarm is not an easy task and requires extreme care and precision. Most installers approach this with disdain, forgetting the original purpose of their work. We always remember that our task is to reliably protect your car from theft, which is why we are so careful when installing car alarms. Our craftsmen are an example of competence and attention to detail. It is important to us that your car is protected.
KIA Rio 2011 - electronics
Kia Rio, 2011
Comments 121
Hello, I want to install everything using your method, I have no experience in this, I looked and have questions. 1. Do I need a ground wire if I initially have a U-shaped metal part on which the signals are installed. 2. You don’t show here how you installed a 15A fuse on the power one (I would like to see it or a comment - did you use a remote unit for the fuse in a single number?). I would be very grateful for tips)
1. No wire needed. 2. Yes - separate fuse block (sealed).
Should it be that one horn shouted louder than the other? Or should they shout equally?
Why install an additional relay when the standard one is installed?
I also replaced the regular ones... BB, BB, it's just fire... They're honking, Mom, don't worry...
The wires are musical, they will rot quickly. I installed a powerful one from under the ignition and a powerful relay, the signal is very good
How does the signal work? Is everything normal? The question is just that the relay has enough mass from the standard minus?
Everything works fine - I’m just thinking about changing the low tone - somehow it started to work after a while. So the negative signal goes to the relay only from the standard signal. The minus and plus of the standard one - they only close the relay - there is no load. And the mass goes directly to the signals.
Well, the signals, I understand that they are powered separately) I have a Volgo on my classics)
How to control the Starline SB-20 car siren operating on an autonomous basis
In addition to the wires intended to provide power to the system (these are black and red wires), there are two additional wires on the cable loop. They are intended for control. These are a white wire called PositiveTrigger and a blue or brown wire called NegativeTrigger. The device (in this case we worked with the Starline SB-20) will work, starting to produce signals that counter theft, but the following conditions must be met:
- There is no voltage of twelve volts on the red wire;
- Power is supplied, but the Positive Trigger cord was connected to a positive voltage;
- The Starline autonomous siren was provided with power, the Negative Trigger was connected to ground.
The signaling device is capable of changing the state in which the autonomous siren operates. This means that you can activate it if necessary.
Schematically, the Starline SB-20 car siren looks like this:
The diagram shows the structure of the main Starline connector
There are a pair of auxiliary outputs that operate at a voltage of three hundred or four hundred mA. One such output is programmed using a special method: an external siren is connected, the output hole is connected to ground (or uses a twenty-volt current). The programming process is carried out on an independent basis, after the connection is made
However, be careful because only one of the auxiliary channels needs to be programmed. The main thing is not to make a mistake when connecting
Musical MP3 siren for alarm - talking car
Sirens
Siren Pandora DS-530
- Siren type: non-autonomous
- Siren power, W: 20
- Volume, dB: 117
- Country of origin: Russia
The siren is sold only with installation on a car.
The small-sized non-autonomous siren Pandora DS-530 easily integrates into any modern alarm system, providing unsurpassed sound power. A power of 20 W is enough to provide a sound of 117 dB, which is enough to scare away the most arrogant intruders.
Siren StarLine S-20.3
- Siren power, W: 20
- Volume, dB: 112
- Voltage, V: 12
The siren is sold only with installation on a car.
StarLine S-20.3 is a waterproof single-tone non-autonomous 12V siren.
Siren Pandora DS-730
- Siren type: non-autonomous
- Volume, dB: 120
- Country of origin: Russia
The siren is sold only with installation on a car.
The newest siren from Pandora! It features the most powerful sound of its analogues - 120 dB! The product body is completely dust and waterproof.
Siren StarLine SB-20
- Siren type: with built-in battery
- Siren power, W: 20
- Volume, dB: 112
- Country of origin: Russia
The siren is sold only with installation on a car.
The shock-resistant siren StarLine SB-20 is equipped with a battery for autonomous operation. Design features made it possible to make StarLine SB-20 completely protected from moisture. A sound level of 112 dB can instantly scare away potential intruders.
Siren Pandora DS-261
- Siren type: with built-in battery
- Siren power, W: 20
- Volume, dB: 115
- Country of origin: Russia
The siren is sold only with installation on a car.
The Pandora DS-261 miniature siren is designed to scare away potential intruders. The device is completely autonomous due to the built-in NiCad battery. A volume range of 115 dB can terrify anyone who attacks your car.
Siren StarLine JP1
- Country of origin: Russia
The siren is sold only with installation on a car.
The StarLine JP1 piezo siren is designed for installation in the interior. Its piercing noise will scare away intruders with the strongest nerves. Thanks to its compact size, it is perfect for installation on motorcycle equipment.
Sirens
Car sirens - why are they needed and how to choose the right one?
A car siren is a classic means of deterring thieves and intruders. When installing, of course, you can use the standard sound signal, but in most cases, on the latest cars it is very quiet and not piercing, like a siren.
How are sirens different?
- The presence of a battery allows operation even if the power is turned off.
- Operating voltage - for cars - 12 Volts, for trucks, buses and other equipment - 24 Volts.
- The actual sound power of the siren is measured in Decibels. The higher it is, the more piercing the sound.
You can install the siren yourself, or use the services of specialists from our car service center.
Wiring diagram for a piezo mini siren as a sound system for a warning security zone
For many alarms, along with disarming, the sensors are turned off and this is ideal for this scheme, but there are alarms in which, even after disarming, the sensor remains in working condition and continues to respond to influence, then in this case the connection needs to be changed, otherwise the siren will continue to squeak.
Even the most primitive alarm system has an output for blocking with normally closed contacts. After arming, a negative voltage appears on this wire, and after disarming it disappears. This is the output we use; we connect the negative power supply of the sensor to it, but through the diode with the cathode towards the alarm.
For everything to work correctly, you need to take two diodes, connect them with cathodes together and connect them to our blocking wire. We connect the negative power supply of the sensor to the anode of one diode, and a blocking relay is connected to the anode of the second diode.
Msvmaster - Installing and disabling car security systems.
Causes of system malfunction
The alarm may not work or turn on randomly if the following errors were made:
- taking preliminary measurements by inexperienced persons;
- selection and installation of the device, as well as laying of wires without taking into account various factors;
- deviations from the rules when drawing up a project;
- incorrect location of alarm elements;
- negligent work on installation of system devices;
- installation of an alarm system without a technical passport;
- damage to elements of the security system or failure to use electrical wires;
- deviation from the alarm maintenance instructions.
How to connect a security or fire siren
Rating: / 0
Have a good day, dear and much-respected readers of my blog, you will learn how to connect a security or fire siren from this article, I am sure the information will be useful to you.
- Easy siren connection.
- Connecting two, three or more sirens to one channel.
- Where to hide additional equipment.
- Video review.
1. Easy siren connection.
In fact, there is nothing complicated in connecting a siren; the connection diagram looks like this:
The main thing in switching is not to confuse the polarity.
2. Connecting two, three or more sirens to one channel.
There are situations when our siren is very powerful compared to the output of the control device (control device) and if we connect such a powerful siren, it does not work at full strength, but seems to choke.
There is also a need to connect two, three, or even more sirens to one output, as I think you understand, the power of the control device channel in this case is not enough. Therefore, to solve this problem we need a third-party power source with sufficient power for us. Our diagram will look like this:
As for the additional source, a little advice: sometimes it is possible to use the power supply of the control device itself as an additional source. The control devices are designed in such a way that roughly speaking, a power of 30 W comes to them, and the device distributes it among the channels: 5 W for the siren, 3 W for each loop, another 5 W for dialing, etc. If your control device is not heavily loaded with a large number of sensors and other consumers, then you can use this connection diagram:
With this connection, everything will work great, just be careful with the warranty on the device. Because the above manipulations can be carried out only by fully opening the device and additional soldering, which is unlikely to be appreciated by the seller of these devices and can justifiably deprive you of warranty obligations.
3. Where to hide additional equipment.
After all the connections with the appeared power source and relay, we naturally need to hide them somewhere, because the control device itself does not always, or better yet, never allow us to hide additional equipment in it, I will offer you several places to hide:
- At the design stage, install a small shield or backup power supply (RPS) with a box (there is enough space for all these manipulations).
- In plasterboard, if the control panel will be installed on a plasterboard wall.
- On the ceiling. If you have suspended ceilings and it is convenient to work with them, then from the control panel to the ceiling it is worth reserving a small piece of cable for such purposes.
- Distribution boxes (not always aesthetically pleasing, but if there is no choice).
- A dummy of a security sensor or the same siren (sometimes a siren next to the control panel looks quite decent).
- Additionally, nearby equipment (if there is a device nearby that has free space in the case, then it is quite possible to use it).
- An aesthetic hatch in the wall, it looks like this:
You can also hide any equipment there and access to it is very good and it looks quite decent.
Furniture. It can also be a worthy custodian of equipment.
You can search for options by location.
4. Video review:
How to connect a security or fire siren
- < Back
- Forward >
Video
Piezoelectric siren. Review, comparison, test. Filmed by the Alarmtrade channel.
Do you have any questions? Specialists and readers of the AUTODVIG website will help you ask a question
Was this article helpful?
Thank you for your opinion!
The article was useful. Please share the information with your friends.
Yes (100.00%)
No
X
Please write what is wrong and leave recommendations on the article
Cancel reply
Rate this article: ( 2 votes, average: 5.00 out of 5)
Discuss the article:
First, let's look at the diagram
The operating algorithm is as follows: when starting the engine, the daytime running lights should light up and the recorder should turn on. After turning off the engine, these devices turn off. In addition, the DRLs must go out when the side lights or headlights are turned on: this is required by technical regulations.
For implementation, you will need three standard 5-pin automotive relays (sold in a car store). In the diagram they are indicated by numbers 1, 2 and 3.
1. Green wire – power supply. 12 volts through a fuse are constantly supplied to contacts No. 87 (normally open) of relays 1 and 3. Output contacts No. 30 are connected to the positive inputs of the recorder and the running light module. The negative wire (ground) can be connected to the car body at the location where the devices are installed.
2. The red wire in the diagram supplies the control voltage of 12 volts, which appears after the engine starts (or turns the ignition key). In automotive circuits it is designated as “HOT RUN”. There are quite a lot of connection points: from the radio to the power supply to the fuel pump. The signal is easy to find in the description of your car.
3. When 12 volts appears on the red wire (contact No. 85), relay coils 1 and 3 are activated, the supply voltage through the green wire is turned on by the recorder and DRL (contacts No. 87 and No. 30 are closed).
4. On relay 3, control voltage is supplied through normally closed contacts No. 87a and No. 30 of relay 2. When voltage is applied to contact No. 85 of relay 2, the coil is activated and stops supplying control voltage to relay 3. The control signal comes from the side lights being turned on: The DRL goes out, but the recorder (via relay 1) continues to work.
Reworking and setting up devices
Changing the sound character of a standard car siren at the request of users in some cases requires a complete reconstruction or replacement of its main parts. To do this, you will only need basic knowledge of circuit design, as well as skills in creating printed circuit boards.
You can assemble a circuit of a two- or multi-tone car siren operating on 12 or 15 volts according to the following plan:
- Create a sketch of a printed circuit board on paper or using a computer program.
- Using a carbon copy or using a printer, transfer the drawing onto polished paper.
- Cut out the template.
- Process the single-sided PCB workpiece using fine-grained sandpaper.
- After degreasing the surface of the future board using an iron or a homemade device, stick a template on it.
- Remove it by soaking it in warm water.
- Etch the textolite plate in a solution consisting of 1 part ferric chloride and 3 parts distilled water.
- Using a thin drill, drill holes for the legs of the board elements.
- Solder the radio components according to the diagram.
- Install the generator inside the siren housing.
- Install the sounder at the location where it is installed on the vehicle.
Photo gallery
Schematic diagram
PCB design
Etched board
Track diagram on paper
Placing elements
Board in the siren housing
Multi-tone siren
Multi-tone siren - from the variants of the sound annunciator with a changing tone, is assembled on the basis of the 561LN2 microcircuit, with:
- The operating frequency of generator G2, which is responsible for the sound tone of the siren, is determined by the state of transistor VT1.
- The parameters of its operation are controlled by adjusting the resistance of the variable resistor R1.
- The sound generator G1 is responsible for the frequency of the produced signal. Its changes are achieved by adjusting the resistance R2.
To obtain a fixed sound tone, potentiometers R1 - R2 can be replaced with constant resistances with a nominal value of 33 KOhm.
Schematic diagram of a multi-tone siren
Two-tone
A two-tone siren, assembled according to this circuit, is connected to the security alarm input and the volume of the emitted signal is not inferior to industrial designs. At the same time, it consumes significantly less energy and has its own, easily recognizable sound.
The pulses generated at the output of the multivibrator D1.3, D1.4 enter the output stage assembled on the basis of the transistor VT1. By influencing them with a signal with a frequency of 2 Hz, generated by the multivibrator D1.1, D1.2, a two-tone siren sound is achieved.
Two-tone siren circuit
Siren 12 Volt
Using only two transistors and a dynamic head with an induction coil resistance of 16 Ohms (2 x 8 Ohms), they assemble a simple siren circuit with a supply voltage of up to 12 V.
Siren circuit powered by 12V
Siren up to 15 volts
To work in conjunction with a car alarm, a siren assembled using the UMS-8-08 generator is suitable. The increased power of the device requires its connection through a special relay RES-10 (indicated in the diagram as P1).
Siren with supply voltage up to 15 Volts
The microcircuit memory stores 8 melodies, for which buttons are provided for selection:
- S1 (start);
- S2 (stop);
- S3 (selection).
A sound signal at the output of the device is generated when the relay contacts close.
The microcircuit is powered through resistor R3 and diode VD1. Here the voltage drops to 3.3 Volts. The signal from the collector of transistor VT1 through inverter D2.1 goes to the input of microcircuit D2.3. It is directly fed to the D2.2 chip. Due to the phase mismatch of the signals coming from D.2.2 and D.2.3 to bridge VT2/3/4/5, the current in the BA1 speaker circuit flows either in one direction or in the opposite direction. It is amplified due to the coincidence of the positive and negative half-cycles of both signals.
The circuit is powered from a network with a voltage of up to 15V.
Siren based on a cell phone chip
A failed siren can be modified in accordance with the KA2410 microcircuit from a cell phone call.
The signal is amplified by a transistor and sent to the speaker. A protective diode VD1 is installed at the input, protecting the circuit from incorrect connection (supplying negative voltage to the positive input).
Device based on a chip from a mobile phone
Piezo siren and piezo beeper
The basis of the Piezo Siren is a piezoceramic element, which creates high-frequency sound in the range of 2.5 - 3.5 kHz, reinforced by the horn design of the siren. Piezo sirens have a powerful psychological effect and, with prolonged exposure, a headache is guaranteed, and if it is placed as an additional siren inside the car, the shrill “scream” of the siren becomes almost unbearable for an attacker. For example, the StarLine JP1 Piezosiren has a small size and powerful sound and can be used as a cabin siren.
The siren has two wires for connection: Red +12V and Black -12V and is connected like a regular siren.
Photo of Piezosiren
A piezo beeper is practically a miniature single-tone piezo siren. It is used mainly in immobilizers for audio messages to the driver about the status and processes occurring in them.
I sometimes use the beeper to confirm the locking and unlocking of the car's central locking system. We connect the beeper according to the following diagram. This is the case when the car has door control with a key and has a factory alarm, but does not have confirmation signals for arming and disarming, and the owner wants to hear whether the locks worked or not. Sometimes I use it to sound the warning zone of a microwave sensor. Probably many people were annoyed by the constant “jabbering” of the car standing under the window, and in order to save the nerves of those around me and still warn the person who came close to the car that the car is under guard, I use a piezo beeper connecting it according to this circuit.
Sirens
Sirens for car alarms are designed to notify the car owner about the actions of an intruder, attract the attention of others and scare away someone who wants to harm the vehicle. The louder the equipment, the more effective it is and the greater the psychological impact it has on the burglar.
More information about products in the Sirens category
Sirens are an essential component of car alarms. Thanks to them, the owner of the vehicle learns about unauthorized entry into it, and they also often scare away intruders. Each model has its own volume indicator, it is set in Decibels. With a large value of the indicator, the generated sound pressure increases. Modern sirens for car alarms have a volume that ranges from 90 to 120 decibels. The product body is made of durable material.
Programmable sirens with microprocessor
Devices of this type produce the usual car alarm sound when voltage is applied. It can be one-tone, two-tone, six-tone or other. This parameter is influenced by the circuit located in the siren. A special feature of the products is the presence of a microprocessor. It allows you to set different types of signals that are stored in the device's memory. The connection is made through a red and black wire.
Some sirens for car alarms have dozens of melodies in their memory, and they can be changed by the user.
Self-powered sirens
Products of this class have an integrated battery with a voltage of 12 Volts. Special keys are used to turn on and off the autonomous power source. Typically, sirens for self-powered car alarms have four wires: red with constant plus 12V, black with minus 12V, white with plus 12V, blue with minus 12V.
Resetting the battery terminals is useless
A battery is integrated into the main car alarm unit. This battery is recharged from an ordinary power supply. If this principle were not applied, then the security system would be deactivated
b very simply, by removing the terminal from the contact part of the base battery. Using the same method, it is possible to provide power to absolutely any electronic unit by installing a built-in autonomous battery. In this case, the power consumed by the unit should not be too high. Over an extended period of time, a self-contained car siren equipped with a small battery can emit loud signals. This is far from the only disadvantage of devices of this type.
To partially solve this problem, you will have to use a lithium battery. Of course, this type of battery has a rather high price. However, it all depends on what funds the car owner has. Signals will begin to be produced from the speaker, the battery charge will decrease, but the power supply will reach zero only after twenty or forty minutes. And if all wires are disconnected at the same time, an identical situation will occur.
Is the use justified?
Usually, dacha owners are upset by the operation of the alarm system if it is Chinese or cheap. In this case, a false alarm of the siren or “loss” of sensors by the control unit occurs. However, this problem can happen to any electronic device.
Despite complaints from some alarm users in their dachas, there are also positive things being said about the use of a security system. The howler and other alarm devices really save the house from intruders: they put psychological pressure on thieves, quickly send a signal to special services and urge neighbors to contact the police. Also, as owners of real estate connected to an alarm system note, sensors and other devices are easy to install themselves.
Wiring diagram for a piezo mini siren as a sound system for a warning security zone
For many alarms, along with disarming, the sensors are turned off and this is ideal for this scheme, but there are alarms in which, even after disarming, the sensor remains in working condition and continues to respond to influence, then in this case the connection needs to be changed, otherwise the siren will continue to squeak.
Even the most primitive alarm system has an output for blocking with normally closed contacts. After arming, a negative voltage appears on this wire, and after disarming it disappears. This is the output we use; we connect the negative power supply of the sensor to it, but through the diode with the cathode towards the alarm.
For everything to work correctly, you need to take two diodes, connect them with cathodes together and connect them to our blocking wire. We connect the negative power supply of the sensor to the anode of one diode, and a blocking relay is connected to the anode of the second diode.
Msvmaster - Installing and disabling car security systems.
Advantages and disadvantages of motion sensors with siren
An autonomous siren with a motion sensor is a universal equipment that can be used at various sites. Among the advantages of the equipment are:
- autonomy of operation and independence from external power sources and communications;
- ease of installation, as it does not require connection to other support systems, it is enough to simply install on site;
- cost-effectiveness due to the absence of installation and operation costs;
- not only warns owners about outside intrusion, but also has a psychological effect on the intruder, as a result of which it performs the function of preventing thefts and other criminal plans;
- Allows adjustment of different sensitivity levels to neutralize weather factors and ignore small animals;
- It is possible to connect additional functions (video shooting, sound recording, sending SMS messages).
Due to the fact that autonomous alarm systems with a siren and a motion sensor use different operating principles, the advantages and disadvantages depend on the type of sensing elements.
The elements used in the operation of sensors are:
- infrared;
- ultrasonic;
- microwave.
Ultrasonic sensors are considered the least reliable, and microwave sensors are considered the most expensive. The most commonly used siren is a motion sensor that responds to heat (infrared rays).
A common drawback for all types of sensors operating in autonomous mode is the need to monitor the state of the batteries and remember to change the batteries or accumulators so as not to paralyze the operation of the security alarm. The average battery life is several months.
TOP 5 motion sensors with siren
It is quite difficult to compare motion sensors with street alarms, since most of them are multifunctional equipment and can be used not only for security purposes, but also to turn on electricity.
Simple motion sensor with sound siren
- Control-Lux of various modifications, produced in Germany;
- Eglo Detect, which is used in parallel to turn on the light and create the effect of presence;
- Altronics, which combines a siren and indicator lights;
- PL-20 KIT, which operates regardless of weather conditions and combines an audible alarm with light indicators;
- Sensor Alarm, an inexpensive home system controlled by a key fob and featuring a powerful siren.
The products of Arduino, IEK, TDM Electric, PIR, and other manufacturers also deserve attention. Motion sensors with siren MA-795, Antivor Sirena and many others received positive feedback from consumers.
Recommendations for selection
When purchasing a battery-powered motion sensor with a siren, you need to take into account the future conditions of its operation. Different models differ in the following parameters:
- range of perception;
- viewing angle;
- fastening method;
- operating temperature;
- surface requirements for installation (vertical, horizontal, strength level);
- number of operating modes;
- ability to adjust sensitivity;
- type and strength of alarm;
- name and reputation of the manufacturer;
- operating hours, quantity and power of the power source;
- cost of the kit.
First of all, the purpose of the equipment is taken into account, i.e. performing only security functions or additionally turning on electric lighting.
The next most important selection criterion is the capabilities of the devices (what area is controlled, response speed, coverage angle and the ability to change it, and so on). When choosing an alarm device, they are guided by its volume and compatibility with tracking sensors and other equipment
To work together, it is necessary that the siren and sensors operate from a power source with the same power
When choosing an alarm device, they are guided by its volume and compatibility with tracking sensors and other equipment. To work together, it is necessary that the siren and sensors operate from a power source with the same power.
You can learn about the quality of the equipment from user reviews.
Conclusion
A motion sensor with a siren is a reliable and sensitive security equipment that can be used to protect a cottage, car, apartment or office.
How the alarm works
Depending on the type of communication channel, the alarm can be wireless, when the signals are received via a GSM network, or wired, characterized by the laying of wires throughout the house. A security system of any type operates thanks to a connection to a 220 V power supply or an autonomous backup power supply, which does not allow the devices to stop working in the event of a power failure.
An alarm system allows you to control your home
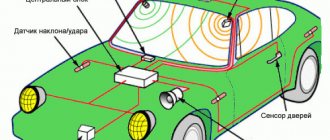
The principle of operation of a security system with a siren can be represented as the sequential implementation of special operations. It all starts with a sensor that controls the opening of doors or windows, reacts to movement in a certain area or glass breaking. This device is triggered and sends a signal to the control panel.
Motion sensors are installed in a place where they can monitor a certain area of the home and signal the movement of objects. And devices that inform about thieves entering through a window are mounted near the frames. Such sensors react to glass breaking. This or another alarm signal is received by a control panel or board enclosed in a panel and connected to all sensors.
Devices that detect movement, glass breaking, and door opening can be used at the same time.
Next, information about the break-in is transmitted to the actuator, which can turn on the light or sound, or warn the owners of the house about the trouble with a voice message on the phone. In another case, the security company employees receive an alarm signal from the actuator. A call about an intruder breaking into a house reaches them in a matter of seconds.
Employees quickly go to the place where the alarm went off
Only the owner of the house is responsible for turning off the system, who needs to press a special code to stop the siren. The alarm is always controlled using a remote control or keypad connected to the board.
How to connect a signal through a relay?
How to connect a signal through a relay?
Connecting a signal through a relay immediately solves many problems, the main one of which is electrolysis of wires due to unfavorable operating conditions of the vehicle (dirt, moisture).
What will you need?
When figuring out how to connect a signal through a relay, at the very beginning you need to stock up on everything you need. In this case you will need:
- Wire (maximum length – one and a half meters).
- Terminal set: 4 pcs. "Mother"; 1 PC. "dad".
- Soldering kit.
- Relay.
- Sound signal.
How to connect an audio signal
Having collected all the necessary elements, only now can you move on to the most important action - connection.
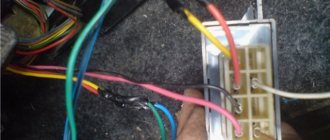
- The first step is how to connect a signal through a relay: remove the “-” terminal from the battery.
- Next, you need to remove the sound signal and install a relay in its place.
- Wire connection options