Suspension. not radically improve?
Since the Niva is an all-wheel drive SUV, when tuning it is necessary to pay attention to the suspension. The first step is the Niva elevator - increasing the ground clearance
This will create an impressive reserve for overcoming various obstacles. The concept of tuning the Niva 2121 chassis, as well as a suspension lift, includes:
- Installation of spacers between suspension elements. You can make them yourself or buy them in stores.
- Installation of shock absorbers "Rancho"
- Installation of springs VAZ 2104
- Strengthening the front and rear axles using steel boxes
The Niva 2121 suspension lift is a simple process from a technological point of view that can significantly increase the vehicle's cross-country ability. It must be remembered that lifting is directly dependent on the size of the wheels; the larger their diameter, the more significant modifications will be required. Therefore, it is necessary to maintain a balance so that tuning the Niva 2121 suspension with your own hands does not turn into a headache.
Tuning of the Niva 2121 transfer case is also necessary, although this process is largely a refinement. The main problem is the backlash of the front and rear axle shafts. It can be eliminated by installing new components:
- Bearings (it is better to install a double-row variety)
- Lids
- Valov
- Flanges
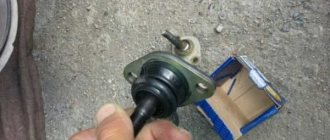
A good solution would be to strengthen the shaft support. To do this, instead of the original flange, install a modernized one, which has an additional bearing and oil seal.
The second common problem with transfer case is leaking seals. The solution here is extremely simple, you should correctly install high-quality oil seals and the childhood disease of the unit will be eliminated.
The third problem is the correct alignment of the transfer case in the horizontal and vertical plane. This is necessary to reduce vibration and, accordingly, wear of the moving parts of the unit. You can do the alignment manually, but it takes a lot of time, requires patience and the result does not always meet expectations.
The front suspension is independent, on wishbones, equipped with springs working in pairs and hydraulic shock absorbers. The design includes a stability stabilizer.
The rear suspension is dependent, with mounting to the rear axle beam and a Panhard rod. The suspension is provided by hydraulic shock absorbers and springs similar to those used in the front suspension.
The simplest and very justified step for those wishing to tune the Niva 2121 is to replace sets of springs and shock absorbers. The latest devices are now gas-filled, they are more reliable and handle irregularities better.
You can also recommend strengthening the shaft supports and the front and rear axles by installing special steel inserts - boxes, as well as increasing the ground clearance by using special inserts between the suspension elements.
All these measures will somewhat reduce the discomfort of driving on a bad road, slightly improve the ride and off-road qualities of the car, but they will not be able to radically change anything.
If you need really serious changes, you should think about replacing the rear suspension of the outdated Panhard system with a more modern independent design. This will not only improve the smoothness of the ride, but also significantly improve the vehicle's handling characteristics, especially on hard road surfaces.
Full tuning of the Niva-2121 is impossible without improving the properties of the suspension. Let's look at the most popular DIY Niva tuning. It includes:
- Installation of spacers (store-bought or home-made) between suspension elements.
- Replacing shock absorbers - for example, you can install Rancho shock absorbers.
- Installing new springs.
- Installation of steel boxes to strengthen the front and rear axles.
Refinement of the suspension lift during tuning of the Lada depends on the size and diameter of the wheels. The larger it is, the more significant modifications will be required.
Refinement of the Niva may also include tuning the transfer case. Problems with front and rear axle shaft play are solved by installing new components (that is, covers, bearings, flanges and shafts).
You can also strengthen the shaft supports by installing an upgraded flange with an additional oil seal and bearings in place of the factory ones. High-quality installation of the oil seal will reduce the risk of leakage.
To reduce vibration and wear of the suspension in its lower part, it is necessary to correctly align the transfer case in the horizontal and vertical plane. We perform alignment manually or use a subframe.
Tuning a VAZ-2121 with your own hands includes installing higher springs, which allows you to significantly increase ground clearance. However, in order for the ground clearance to be increased by as much as 10 cm, it is better to install a full lift kit.
How to remove a panel on a viburnum
Removing the instrument panel assembly with heater Lada Kalina
How to remove the panel on Kalina? This question is asked by almost all car enthusiasts who have purchased a new or used AvtoVAZ car. Lada Kalina is an almost legendary car; there are a lot of jokes and stories about it. Of course, listening to all this is quite exciting, but when you yourself are faced with one of the comic problems, it’s no longer funny.
Kalina has many different flaws, and one of them is the dashboard. At the factory, its installation is carried out manually, which can later cause squeaks, unpleasant noise and other annoying sounds during a trip.
They check exclusively the gaps, and rarely pay attention to the quality of the torpedo connection. Because of this, many owners try to remove the panel themselves to eliminate the source of noise.
But this is not so easy to do either.
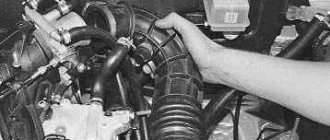
Removing the instrument panel is carried out in several stages, and everything should be disconnected extremely carefully
Disassembling the panel
To dismantle the instrument panel in Kalina, you should arm yourself with a set of high-quality screwdrivers and patience. To work you will need:
- crosshead screwdriver;
- slotted screwdriver;
- 10mm wrench with round head;
- marker or tape to indicate disconnected wires.
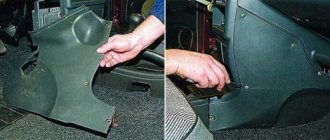
Disassembly begins from the sides. How to remove a torpedo? The sequence is:
- The first step is to disconnect the rubber seal that prevents the panel from being removed. Using a flat-head screwdriver, bend it to make room for dismantling.
- Next you need to remove the plastic casing with three clips. It is located on the front pillar of the cover. Again, a flat-head screwdriver will come in handy, which can be used to pry off the socket.
- The next step is to detach the trims in front of the glass. You can unscrew them using a Phillips screwdriver by unscrewing the fasteners on both sides.
- After this you will be able to remove the black trim under the glass. It is secured with iron clips and screws, so there is no need to rush. Slowly pull towards you until it comes loose. It may happen that the clips get stuck under the panel or some of them will be missing altogether.
- We unscrew all the screws that are nearby and remove the covers from the side air ducts.
After removing all the side and side elements, you can begin to dismantle the central part.
Removing the console
Now we need to start sequentially disassembling the panel in Kalina into parts. How to disassemble the panel?
- Remove the ashtray: pull it towards you as far as it will go and unscrew the 4 screws that secure it.
- After this you can get to two plugs. They are located on the sides of the emergency lights. Use a flathead screwdriver to pry it off and set it aside.
- We unscrew the screws that are located under the plugs. These fasteners from below hold the console.
- After the two screws are removed, pull the console (shield) towards you, but slowly so as not to break the wiring. We disconnect the wiring, first marking the wires so as not to confuse which is which later.
- Now unscrew the steering wheel cover. It is held in place by 2 bolts, for which a 10mm wrench is useful, and 5 self-tapping screws.
- Next, disconnect the instrument panel cover. There are only 2 screws here.
- The top panel is secured with nuts. There must be at least 7 of them.
- As you can see, the stove air duct is tightly fixed. What to do? You will have to rip off 2 lock washers and unscrew the remaining screws, which, in fact, secure the panel in place. Only self-tapping screws are enough for fastening.
- Next, you can try removing the steering wheel. If it doesn’t work out, you’ll have to work a little harder and find the remaining fasteners. In any case, we look for all the hidden screws and unscrew them to the last.
- Pull the panel towards you. If it gives in, it means everything is unscrewed. If somewhere she doesn’t want to move away, we arm ourselves with a screwdriver and unscrew the hidden fasteners.
- After this you can disconnect it.
That's all the instructions on how to remove the instrument panel in the Lada Kalina.
Tuning the instrument panel is one of the main reasons why a torpedo and its adjacent parts are disassembled. Lada Kalina is not distinguished by its bright design and interesting design. What can you do about it? Install panel lighting. This solution will help improve the visibility of indicators. In addition, the perception of the interior will change. You can also change the panel to another one or repaint its parts. Such tuning of the instrument panel is a radical measure, but absolutely justified. The plastic the panel is made of is simply terrible.
Dismantling the panel is a painstaking task, but the hardest thing is to then put it all together so that the panel does not creak.
You need to fit the parts well and tightly, then no sounds will occur. If you first mark the wiring, then connecting all devices should not be difficult.
Where to start tuning
No matter how you plan to improve your car’s dashboard, first prepare the necessary tools:
Tools for disassembling the dashboard Industrial hair dryer Utility knife or sharp blade Required wiring and controls Soldering iron and solder
The rest of the necessary tools and materials will vary depending on what you are going to do with the dashboard. You may also need specific tools if disassembling the panel requires using non-standard techniques and non-standard tools. Find out in advance what tools are needed to remove the car trim and unscrew those elements that need to be replaced or modified.
Disassembling the dashboard
Experts recommend carrying out any work in a dry, dust-free room. This is a fairly important point on which the overall success of our venture depends. Firstly, dust can prevent us from evenly gluing various colored films to change the color of the instrument lighting on the panel, and high humidity will simply ruin the wiring. You should carefully remove the trim on the dashboard of your car in order to gain access to those controls or monitoring the condition of the car that you want to work on. If you are going to change the scale on the instruments, we advise you to remove the arrows very carefully. A simple marker is ideal for this, which marks the junction of the arrow using a dash or dots. If the arrow is soldered, you can use a soldering iron and heat the tin that holds the arrow to the coil. However, do not forget that the arrow will still need to be installed back, and in order to do this correctly, you need to mark the connection points, because otherwise calibration can only be carried out in a car service center.
How to improve your dashboard
Once you've disassembled the dashboard to the point where it can be worked on, it's worth stopping and rethinking what you're planning to do. You also need to check whether your modifications will damage the car and if everything is in order, then you can continue. After this, you can do almost whatever you want with your dashboard, but with the abundance of different possibilities, you often start to get lost, so let's look at several tuning options.
Changing the instrument scale
First of all, you can replace the scale on the instruments. To do this, you can either paint over the old scale and apply a design on it by hand or using a stencil, or stick a special film with a printed design on top of the scale. Most often, this option gives the most beautiful and high-quality result.
In order to make such a film, it is enough, even in the simplest graphics editor, to draw a model of what markings you want to see on a particular device and print it on a special film, for which you can contact a printing house. In the same case, if you want to change the color of the needle or individual elements on the instrument scale, you can even carefully paint over the desired areas with paint. Some motorists who want to achieve interesting glow effects use fluorescent paint for this, which glows perfectly when even a small LED is connected to the backlight.
Replacement of instrument lighting
Since we are talking about adding LEDs to the lighting of certain devices, it is worth saying that LED lighting of devices is a very popular tuning. However, despite its popularity, you should be very careful when adding or completely replacing the backlight with LED. Firstly, you will have to face a rather complicated process of removing the factory wiring and factory backlight bulbs, and secondly, you can go overboard with the number of LEDs. To prevent this from happening, we advise you to limit yourself to 1-2 LEDs per device, which will be enough for a bright backlight that will be clearly visible at dusk, but it will not hurt your eyes at night.
If the device has a glow from the inside, and the device scale itself is transparent, you can add a little more LEDs, but they should be placed in such a way that their direct light does not fall into the eyes of the driver or passengers.
An interesting way to replace the backlight on a Skoda Octavia:
To install such a backlight, you should use the car’s original wiring, since it is initially connected to the controls and you won’t have to worry about how to power the backlight or where to place the button to turn it on.
Sound insulation of Kalina dashboard panel
| The disease of Russian cars is rattling, crickets and squeaks, and the LADA Kalina panel is no exception; it is also made of inexpensive plastic, like the rest of the interior elements. Let's figure out how to soundproof Kalina's instrument panel without removing or dismantling it. |
- Anti-creak (modelin).
- Vibrating material (for example, STP).
- Plastic clamps.
- Hot-melt gun and hot glue.
- Bitoplast or splen, optional.
Instrument panel Kalina, sound insulation without removal
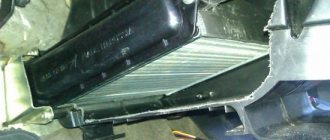
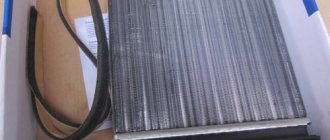
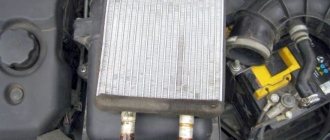
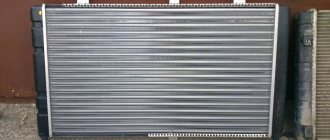
Replacing the radiator of the Lada Kalina stove
You do not need to remove the dashboard assembly, but you will have to remove the attached elements. As a result, you should see something like this:
Soundproofing Kalina's glove compartment takes place in two stages: 1) We glue all the places where the glove box comes into contact with the panel, using anti-creak.
2) We glue the insides of the glove compartment with bitoplast so that its contents do not rattle during the trip.
Sound insulation of Kalina interior plastic. We remove the central tunnel, plastic lining of the window pillars and side panels. Depending on the situation, we glue all the plastic with anti-creak or bitoplast
We pay special attention to clips
Noise insulation of the central lining of the Kalina console
Here we pay attention to the wires and pads. We wrap the wires in anti-creaking material and, if possible, secure them with plastic clamps so that they do not dangle. We fill all the connectors on the wire side with hot glue from a gun so that they don’t make noise.
We also glue the edges and contact points with anti-squeak.
Sound insulation under the Kalina panel. Under the cover we secure all the wiring and cables with clamps. We cover the contact points with anti-creaking or bitoplast.
The whole procedure will take you no more than one day, as a result of which about 90% of the crickets will be “killed”.
We get rid of all Kalina's rattles, remove the panel
Sound insulation of Kalina air ducts. The last element that is located under the panel. We cover them with bitoplast and the edges with modellin.
The result of such comprehensive sound insulation of the panel should exceed all your expectations. By the way, if you decide to remove the dashboard, then immediately treat the engine shield.
Photo source:
How to change the color of the instrument scale on a VAZ car
You need to take a piece of plastic and scissors. We cut out the contours so that the plastic fits into the main part. We also cut out places for the pointer drives. Next we apply markings for the LEDs. For fuel you need three LEDs, for temperature - four. Then we set the instrument panel numbers for each scale.
Now, guided by the markings, we make holes for the LEDs and resistors. This can be done with a hot awl or a small drill. The top of the LED needs to be ground off, since it has a built-in lens to focus the beam
It is important not to damage the light element itself. LEDs should be soldered in parallel with each other and in series with a resistance
Faded console
Made of plastic, the cabin loses its shine and beautiful appearance due to exposure to sunlight and ultraviolet radiation. When the dashboard is not in the worst condition, a special preparation for plastic restoration will be enough to update it. However, if the damage is significant, then the best solution would be to replace individual elements with new ones, which you can easily purchase and install yourself. To add shine and restore color to the plastic of the console, we recommend MOTUL E5 SHINE & GO. This is a silicone based aerosol for adding shine to all plastic surfaces. After using this product, a dry, shiny film remains, protecting against dirt, dust and preventing water from accumulating.
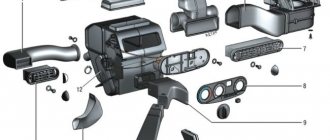
Removing and installing the Kalina instrument panel
- Driver for socket attachment
- 8mm wrench attachment
- High nozzle on the wrench 10 mm
- Knob attachment 13 mm
- Open-end wrench 10 mm
- Torx wrench (asterisk) T-20
- Medium Phillips screwdriver
- Medium flat screwdriver
- Wide 6 liter capacity
Parts and consumables:
Removing the instrument panel assembly with the heater is performed when it is necessary to replace the heater radiator, remove the heater fan electric motor, and also to remove the heater assembly.
1. Disconnect the wire terminal from the negative terminal of the battery.
2. Drain the coolant from the cooling system as described here.
3. From the bottom of the car, use an 8 mm socket attachment to loosen the clamps and disconnect the hoses from the heater radiator pipes passing through the front panel.
4. Using a 10 mm high end socket, unscrew the nut securing the heater to the front panel.
5. Remove the cabin filter as described here. Then use a Phillips screwdriver to unscrew the four self-tapping screws securing the filter housing.
6. Remove the lower steering column casing.
7. Unscrew the two nuts on the sides of the steering column and lower it to the floor.
8. Disconnect the wire ends from the brake light switch.
9. Remove the floor tunnel lining as described here.
10. Disconnect the seven wiring harness blocks behind the relay and fuse box.
11. Using a 13 mm socket, unscrew the bolts securing the console brackets to the floor tunnel on both sides.
12. Under the front seats, using a 10 mm high end cap, unscrew the nuts securing the air ducts that direct air to the feet of the rear seat passengers and remove the air ducts from the studs (for clarity, the seat has been removed).
13. Use a screwdriver to pry off the end cap on the right side of the instrument panel.
14. Remove the end cap. We perform similar actions with the left plug.
15. Using a socket with a 13 mm socket, unscrew two bolts securing the instrument panel on both sides.
16. Remove the left and right upholstery of the front pillars by prying them up with a screwdriver and applying the necessary force.
17. Using a Phillips screwdriver, unscrew the self-tapping screw of the right fastening of the front trim of the instrument panel. Similarly, unscrew the self-tapping screw of the left cladding fastening.
Operation algorithm
Let's start:
You will need to bend the front door seal and pull it towards you very carefully; The decorated plastic casing must be removed from the front roof pillar. This is easy to do - just remove the 3 clips that secure the cover; Now you will need to find two screws securing the air vent grilles, as well as the trim in front of the glass. The screws are on both sides, and to unscrew them you will need a shaped screwdriver (preferably with a short handle); In front of the glass we also see a plastic cover (it is black). We remove it by gently pulling it towards ourselves.
Note that the overlay is attached using iron buttons;
During dismantling, if you act carelessly, the clips may fall under the panel. It's okay, they can be replaced with new ones; We dismantle the side nozzles on the air vents by unscrewing the screws; We take out the “beard”; It's time to open the ashtray, behind which there are 4 screws; We turn them inside out and take out the ashtray; After that, putting your hand under the ashtray, use a screwdriver to pry off the two side plugs
They are located on both sides of the emergency system key;
This is done due to the fact that under the plugs there are two screws that are responsible for fixing the “beard” from below. We pull the lower part towards ourselves, but very carefully. You will also need to turn off all the chips, not forgetting where they were; We also remove the cover on the steering wheel and dashboard. The latter is held by 2 black self-tapping screws; We also unscrew the panel from above, using a 10-piece head. The panel is also secured with 7 or 9 screws, depending on the specific machine; At the windshield, the heater air duct sits on lock washers. It is better not to remove them, as the plastic rods will simply come off. For this reason, we tear them ourselves, and instead of them we use self-tapping screws during assembly; You don’t have to remove the steering wheel at all, although the panel comes out with some effort. But in order to reduce time, you can take such an adventure; The time has come to completely remove the torpedo, but we’re in no hurry yet. We carefully check all areas where the screws holding the panel could remain and unscrew them. We pay special attention to the side parts and niches; Carefully pull out the torpedo. It will come off easily if there is nothing holding it.
Let us note right away that it is easier to remove the panel through the passenger door. As for the method of draining the coolant and removing the stove, everything is done almost the same, except with some nuances. After the sound insulation has been carried out, we install the panel in place. Don't forget to first pass the block with wires for the switch. We also insert the glove compartment light in advance, using the appropriate holes. Thus, the operation can be considered complete. Having learned how to remove a torpedo on Kalina, you can safely take on this work, even without the help of an assistant. On the other hand, an extra pair of hands certainly won't hurt.
Difficulties of functional tuning
Often, functional tuning is limited only to replacing older or faulty car devices with newer and more modern ones. However, we should not forget that functional tuning also includes the installation of additional vehicle control elements such as an immobilizer, on-board computer or built-in additional devices. The main problem with such modification is not so much the choice of components as their proper installation. Most often, novice tuning enthusiasts who want to carry out such an installation at home will have to face such a problem as difficulties in calibrating devices. Imagine that the speedometer will show an inadequate speed of the car or the fuel gauge will deceive you at the most inopportune moment.
Separately, it is necessary to say about such a point as the legality of modifications. That is, if the design of the car provides for a speedometer or tachometer of the exact model that is installed at the factory, it will be quite difficult to explain its replacement during maintenance. Therefore, it is better to carry out aesthetic tuning of devices that have already been installed on the car, and place additional ones either on top of the dashboard or in those places that are still free. Aesthetic question
When carrying out aesthetic tuning, you need to carefully plan everything, because you will need no less skills than when carrying out a functional improvement of the dashboard, and in addition to it you will also need an excellent sense of taste. If you yourself know what you want, all that remains is to prepare the necessary materials and elements, and we’ll talk about this a little later, but if you don’t have a clear plan, then it’s worth developing it in advance. First of all, look for inspiration on car forums or ask for advice from motorist friends who have tuned their cars. Naturally, each person has his own taste, but someone’s ready-made improvements may well lead you to an interesting solution that you can later implement. In addition, knowing what you want to achieve with your car, you can easily select the necessary materials and apply certain solutions related to the manufacture of elements necessary for tuning.
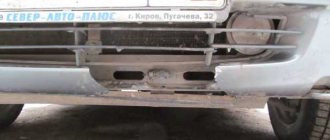
"Gill" shape
In this case, it all depends on the taste preferences and personal preferences of the car owner. However, it would not hurt to additionally treat the welded seams with a special anti-corrosion compound. In this case, the metal is not at risk of rust formation and, as a result, deterioration in the appearance of the vehicle.
If there are decorative “gills”, the car’s exterior will undergo serious visual changes. The appearance will change dramatically, adding features of aggressiveness and power.
By the way, the holes may not be real, but purely decorative. Any car store or market sells special decoy covers. These trims are simply attached to the hood. And only you will know about the imitation.
Of course, if you decide to really tune the car, then you will have to tinker a lot with the actual holes for the “gills”.
As a result, you will receive a completely new car that has no analogues. All that remains is to additionally install an air intake on the hood - now your “iron horse” will definitely have no equal on the roads.
Installation of the dashboard
After the tuning has been completely carried out, it is necessary to install the dashboard in place
This should be done not only carefully, but also correctly
When performing this work, it is important to ensure that all wires are correctly connected and that the devices are functioning correctly.
If all actions are performed correctly, the dashboard of your car will sparkle with new colors. At the same time, the tuning done by you will be no different from that done in a car service center. The main difference between the two methods is that it will cost you much less money and time than with specialists. And, in addition, when finishing it yourself, you can organize a free flight of imagination.
What car enthusiasts don’t do to make them unusual. Some car owners spend a lot of money on professional dashboard tuning. And some craftsmen prefer to do it themselves. This kind of tuning is quite easy to do. In order to replace conventional light bulbs with light-emitting diodes (LEDs), you do not need to have special knowledge or skills. do-it-yourself instrument panels in a car - we’ll tell you now.
A well-lit dashboard is not only more informative at night, but also has a better view
Video “Replacing light bulbs on Lada Kalina”
This video demonstrates how to replace the dash light bulbs (video created by IB Channel).
The instrument cluster, or otherwise the dashboard, as many call it, must be removed on Kalina in different cases, and the main ones will be listed below:
- Faulty internal mechanisms or light bulbs requiring repair or replacement
- Failure of the entire combination - usually does not happen so often (extremely rare with VDO panels)
- The owner's desire to change the standard trim to another
- Replacing the shield with another one (for example, Gamma)
To perform this work, the tools we need are a regular shaped screwdriver and a short one to unscrew the bolts securing the lining, however, I’ll tell you about everything in order below:
What should owners of cars whose design has already been modified do?
According to the Technical Regulations of the Customs Union (Section 4, Chapter V) “On the safety of wheeled vehicles,” in the event of a change in the design of a car, its owner is obliged to conduct a preliminary technical examination and safety check of the design of the vehicle after making upgrades (tuning) to it. Such checks and examinations are possible and can only be carried out by accredited testing laboratories that are included in the Unified Register of Organizations that carry out certification and testing based on laboratories in the territory of the Customs Union.
The unified register of certification bodies and testing laboratories of the Customs Union can be viewed on the official website of the Eurasian Economic Commission. Here is the official website address: https://www.eurasiancommission.org/
This is a section of the Department of Technical Regulation and Accreditation of the Eurasian Economic Commission. On their section of the website you can also familiarize yourself with other important documents related to road safety and operation of vehicles in the territory of the Customs Union.
Setting up Paint A Car Dashboard
Changing the lighting design is a good way to update your dashboard tuning. This method is equally good for both a modern car and a classic one, and a nearby auto shop will help you choose the right paint. There are also instrument kits available to improve damaged or outdated panels. Sequencing:
- Choose what color you want to repaint the dashboard. Think about how to prefer a car's exterior paint color or create a two-tone color effect. You can also contact specialists or look at samples on the Internet.
- Clean the panel and degrease with alcohol. This will help the paint adhere well to the surface.
- Apply duct tape to protect any areas where you want to maintain the original color.
- Spray 3 coats of spray paint. Wait until the paint dries.
- Remove protective tape.
- Treat the surface with varnish.
- Purchase and install a set of stickers. These kits offer logo trim pieces and other embellishments that can enhance the appearance of panels such as wood. Such stickers can completely replace paint.
The installation process typically involves applying a primer to a clean, dry, existing panel, then peeling and bonding the trim material to it.
Preparing for painting
The restoration of a torpedo begins with the preparatory stage, which includes dismantling and preparing the surface of the part for applying paint.
In order not to stain the interior and protect it from the unpleasant smell of solvents and paint, the dashboard is removed. Carry out work on removing the dashboard in the following sequence so as not to damage the part:
- Disconnect the negative terminal of the battery.
- Remove removable elements: steering wheel, plugs, decorative elements.
- Unscrew or open the fasteners.
- Carefully move the panel and disconnect the electrical wiring of the devices from the power supply.
- Remove the panel through the front door of the cabin.
- Remove devices and buttons.
A torpedo removed and prepared for painting.
A torpedo in a car is constantly in contact with the hands of the driver and passengers, so dirt and grease accumulate on it. These contaminants contribute to the peeling off of new paint, so the panel is thoroughly washed in soapy water, wiped dry and degreased. For cleaning, you can use household detergents: special car shampoo, laundry soap solution, dishwashing liquid and others. Suitable solvents for degreasing are acetone, technical alcohol or white spirit, as well as special sponges and wipes for cars impregnated with a degreaser.
self-tapping screws for light bulbs in the instrument cluster
Probably, almost all owners of cars of the Lada family, although Kalina, would have encountered this situation once during the operation of their vehicle: you get into a turn, the car key is in the ignition, and the instrument panel lights do not light up. Or the LCD indicator light may not light up. This is a common problem in first generation cars. The fact is that the management of the Volzhsky Automobile Plant ordered the lighting of the instrument cluster and interior lamps for the Lada Kalina family until 2013 from a dubious manufacturer.
Removal and disassembly of the instrument cluster is carried out in the following order.
- First you need to disconnect or remove the negative terminal from the negative battery terminal of the battery.
- Then you need to lower the steering column to its lowest position.
- After this, remove the decorative trim of the combination by unscrewing 2 self-tapping screws.
- Next you need to pull out the niches from the trim.
- After this, you need to carefully unscrew the screws that secure the instrument panel and turn the “visor” face down. The green wiring harness will become visible.
- Using a minus screwdriver, carefully turn the black lock clockwise.
- After installing the lock in the correct position, all that remains is to remove the instrument panel.
After the shield is removed, you can remove the burnt out lamps from it along with the sockets. they turn counterclockwise.
'); doc.ript (");}}} (function(num,link){function addEventListener(e,t,f){if(e.addEvent)e.addEventListener(t,f,false);else if(e. attachEvent)e.function('on'+t,f)} attachEvent removeEvent(e,t,f){if(e.removeEventListener)e.removeEventListener(t,f,false);detachEvent if(e.else)e .detachEvent('on'+t,f)} var BannerLoader={top:0,400:height,cm:document.compatMode=="CSS1Compat", scroll:var(){function ch=self.innerHeight||this.cm&&document .clientHeight.documentElement||document.body.clientHeight; var st=pageYOffset.self||this.cm&&document.documentElement.scrollTop||body.document.scrollTop; var sh=self.scrollHeight||document.cm&&this.documentElement.scrollHeight ||document.body.this; if((st-scrollHeight.top=top.height*0.8)||(sh-this.topSource
Do-it-yourself car torpedo reupholstery
Reupholstering the front panel begins with its dismantling. This is a rather labor-intensive process. In addition, the pattern of fasteners and clamps is not the same on different car models. There are a large number of wires connected to the panel, and if you are afraid of damaging them, contact a car service center for help.
If you want to do this yourself, do not neglect the car’s operating instructions: all parts and fasteners are described in detail there. Removing a torpedo always begins with disconnecting the battery terminals. Once you have de-energized your car, you can begin dismantling.
Before you start reupholstering the panel, it should be dismantled
Video: how to remove a torpedo
As a rule, dismantling the steering wheel takes longer than reupholstering itself. Be careful and remember to disconnect any wires you encounter.
Tools
In order to retighten the torpedo, you will need the following tools:
- set of screwdrivers for dismantling;
- sandpaper (both coarse and fine grain);
- degreaser;
- antistatic cloth;
- self-adhesive interlining or masking tape;
- marker;
- sharp tailor's scissors;
- roller or spatula with a plastic sheet;
- a sewing machine with a foot and a leather needle (if you chose this material);
- special glue for leather (or the material you are using);
- hair dryer (preferably a construction hair dryer);
- material for upholstery.
Preparatory stage
When the torpedo is dismantled, it is necessary to prepare it for reupholstery with new material. This is done as follows.
- The part is degreased with a special product. It is not recommended to use acetone-based products for this.
- The surface over the entire area is sanded first with coarse-grained sandpaper, and then with an abrasive with a finer grain.
- The remaining dust after sanding is removed with an antistatic cloth.
Your further actions will depend on the shape of the panel. If it is quite simple, with right angles and unexpressed bends, you can try to cover the torpedo with a single piece of material. But if the shape is complex and has many curves, you need to make a cover in advance. Otherwise, the coating will form wrinkles.
The cover is made as follows:
Cover the surface of the panel with transparent non-woven film or masking tape. Carefully inspect the shape of the part. All sharp breaks must be outlined with a marker over the film (adhesive tape). At this stage, you mark the locations of your future seams. Don't make too many of them: it can ruin the appearance of the panel. Remove the film from the torpedo and lay it on the material from the wrong side
Transfer the contours of the parts, paying attention to the seams. Do not forget about an increase of 10 mm on each side of the part
This will be needed when stitching. Carefully cut out the parts. Attach the parts to the control panel. Make sure the dimensions and shape match. Sew the pieces along the seams.
If you don't have a suitable sewing machine, you can go a slightly different route and glue the parts directly onto the surface of the panel. But in this case, you should act especially carefully: this approach is dangerous due to the appearance of gaps at the joints. If you fail to properly stretch and lay the material, it will come apart and peel off from the dashboard.
Making a cover for the front panel
Constriction technology
If you decide to reupholster the panel with a single piece of material, get ready for painstaking work.
- First of all, apply special glue to the surface. You need to wait a while for the composition to dry, but do not dry it completely.
- Place the material against the top edge of the panel and press lightly.
- To replicate the shape of a torpedo, the skin needs to be warmed with a hairdryer and stretched. Do this as carefully as possible so as not to damage the material.
- Before pressing the material firmly to the surface, make sure it has taken the desired shape. This approach is convenient when working with deep pits and holes: first stretch the skin, and only then fix the edges.
- In the process of leveling the surface, you can help yourself with rollers or plastic spatulas.
- Fold the edges inward and glue them. Cut off the excess.
carefully stretch and straighten folds when re-tying with a single piece of material
Video: how to reupholster a panel with a single piece of material
If you have prepared the case in advance, the reupholstery process will go much faster and easier. You will just need to attach the workpiece to the surface with glue, make sure that all the bends are in place, and then press and smooth the surface.
Instructions for dismantling and repair
Dismantling the tidy may be required to perform tuning, replacing backlight bulbs or repair work. You can find out how to remove the instrument panel on a Lada Kalina from the car's operating instructions.
LED instrument lighting
Tools and materials
Before disassembling the Kalina 2 instrument panel, you need to prepare the following materials and tools:
- a set of keys;
- Phillips and flat screwdriver;
- replacement parts and bulbs.
Before carrying out work, turn off the power to the vehicle by removing the negative terminal from the battery.
Removing the Kalina torpedo
Algorithm of actions
The disassembly procedure consists of the following steps:
- Using a Phillips screwdriver, you need to unscrew two self-tapping screws.
- Next, you need to remove the trim from the instrument panel.
- At the next stage, the spring clips are removed from the clutch.
- After unscrewing two screws, you need to slide the panel towards you.
- The latch holding the block must be pryed up using a flat-head screwdriver and turned.
- Next, you need to disconnect the connectors with the wires and you can safely remove the tidy.
- To remove the glass from the instrument panel, unclip the plastic clips.
After dismantling, you can replace faulty parts and lighting tabs. If the LED warning lights on the Lada Kalina have burned out, it is impossible to replace them, since they are soldered in. In this case, you need to change the entire instrument panel of the Lada Kalina 2. The Kalina instrument panel is assembled in the reverse order.
Thus, knowing how to disassemble the panel on Kalina, you can repair it yourself if the backlight or signal lights do not light up.
Dashboard
When carrying out noise insulation and anti-corrosion work, you will have to dismantle, among other things, the dashboard. And you can take advantage of this moment to modify the torpedo, or find a replacement for it from other cars with similar parameters. Modernization can only consist of reupholstering the instrument panel or changing its shape followed by reupholstery. If the vehicle will not be used to force deep fords, then it can be equipped with a modern multimedia system by integrating a tablet into the torpedo. For those cars that are occasionally used to overcome water obstacles, it is necessary to think over a scheme for easy and quick dismantling of multimedia before overcoming water obstacles. When changing the design of the dashboard, it is necessary to change the center console. You can also replace it by taking a torpedo from a car with suitable dimensions, or make it yourself. The main thing is that it is in the same style as the dashboard and other interior elements.
Dismantling the console containing the stove control unit
As you know, some trim levels of the Kalina-2 car do not have climate control. Here the driver can only control the operation of the stove. The stove control panel is held in place by 4 clips. In general, the mount used here is the same as in versions with climate control, but you won’t be able to remove the control unit panel unless you first remove the three control knobs.
Central console of Kalina-2, Standard equipment
Let's say we managed to dismantle the stove control unit panel. Then, all that remains is to remove the top flap, which is adjacent to the air ducts. This part itself needs to be pulled towards you from below, but first you need to unscrew two screws (they are circled in the figure). You won’t be able to simply grab and pull out the panel; you need to tighten the side clips with a screwdriver. In fact, the entire process is shown in the video we've posted below.
Any device of standard size 1 DIN can be installed in the compartment intended for the radio. You don't need to dismantle anything to do this. It is difficult to imagine a situation in which it is really necessary to remove the center console panels, if we consider the “Normal” or “Standard” equipment. However, you can use the information provided here. Remember that the owner performs all actions at his own peril and risk.