The main malfunction that completely paralyzes the operation of the heater in VAZ-2112 cars is the failure of the heater gear motor. The purpose of this element in the system is to control the heater damper, that is, the gearmotor (MR) is responsible for opening and closing it. The movement of the damper can be monitored using appropriate signals from the control module of the machine's stove. It is worth noting that in the VAZ-2112 the temperature in the cabin can be maintained automatically, that is, the air is either heated or cooled if necessary.
If the heater gearmotor fails, before purchasing and replacing it, you need to pay attention to one important point: there are two types of gearmotors (old model and new), which are fundamentally different in their design. In view of this, it is very important to know what type of element is installed on the car, so as not to waste your time and not make unnecessary purchases.
Problems with the VAZ 2112 stove and its repair
The design of the VAZ 2112 stove heater differs from the previous VAZ-2108, 2109 family. When the engine is running, the radiator temperature should correspond to the general temperature of the cooling system. This means that the damper is always open and the supply of antifreeze (antifreeze) does not stop. The control system is electrical; processes are controlled by electronic sensors and controllers.
The center console has two control levers and one regulator. The driver, as necessary, sets the air temperature in the cabin, activates the desired mode (speed) of the fan, and directs the air flow to heat the glass and legs. A special electric thermometer installed in the ceiling controls the temperature. As soon as the temperature drops, the controller transmits a signal to the micromotor reducer, the heater is activated, and a flow of warm air enters the cabin. A malfunction of one or more units causes a breakdown, the VAZ 2112 stove does not heat well, and prompt repairs are required.
Preparation
Preparatory activities do not include many complex operations. You will need to do the following:
- Remove the negative terminal from the battery to de-energize the car and protect the car from possible short circuits;
- Drain the coolant from the system. To do this, open the cap of the expansion tank to relieve excess pressure, and then unscrew the drain. The liquid must be drained into a special prepared container.
When draining the cooling liquid, one important rule must be observed - the procedure is carried out only when the engine has cooled down. If in the future you are going to use the same antifreeze or antifreeze, then choose a clean container for draining. If in the future you are going to use the same antifreeze or antifreeze, then choose a clean container for draining
If in the future you are going to use the same antifreeze or antifreeze, then choose a clean container for draining.
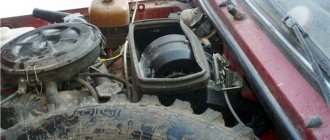
The device of the VAZ 2112 stove
Heater parts
- electro-pneumatic valve;
- front housing;
- water deflector;
- control valve;
- back of the case;
- radiator;
- radiator casing;
- lid;
- resistor;
- Electrical engine.
Heater ducts and controls
- Rear heating ducts.
- Plastic lining of the tunnel.
- Foot heating channels.
- Ventilation nozzles of the central part.
- Side nozzles.
- Heated front doors.
- Mechanical heating lever.
- Distributor housing.
- Damper for heating feet, windshield.
- Heater.
It is important to know. Differences in the design of the old and new VAZ 2112 in the shape of the heater radiator, the SAUO controller, and the micro-gearbox. Conventionally divided before 2004 and after. When purchasing, be careful not to hand over unnecessary parts.
From the above it follows that the heating system of the VAZ 2112 operates separately. The VAZ 2112 stove pumps air at the required temperature into the cabin. The pipes supply flow to heat the windshield, passengers' feet, and rear row of seats. Deformation of the dampers and deflectors creates an obstacle to the air flow, so the stove does not blow well and requires diagnostics.
Characteristic symptoms of malfunctions
In practice, there are five most common signs:
- The VAZ 2112 heater does not work, it constantly rotates at one stable speed;
- Temperature is not adjustable;
- The air flow control flaps are fixed and cannot be adjusted;
- Sensor - regulator on the ceiling is in a faulty state;
- Unstable operation of the ACS controller (automatic heater control system)
- Antifreeze leaking from under the radiator.
The list is not exhaustive, but only indicates the main malfunctions of the VAZ 2112 stove. Prevention will require a visit to a service station followed by diagnostics.
Causes of breakdowns
- violation of the terms of scheduled technical inspection;
- installation of non-original parts, components, consumables;
- filling the cooling system with antifreeze (antifreeze) of low quality or with chemical impurities, the quantitative composition of which exceeds permissible standards;
- mechanical damage to the fluid supply line, accident, collision, impact, violation of installation technology;
- short circuit in the network, electrical circuit, which contributed to the failure of the controller, sensors, resistors;
- damage to the damper control lever, malfunction of the dampers;
- poor terminal contact;
- damage to electrical wiring and cable sections.
Assembly
When installing a new damper, be sure to make sure that the fork located on its axis is clearly engaged with the lever. If the flap is in the raised position, you did everything right. Otherwise, it will be impossible to control the device, so you can forget about restoring the functionality of the stove.
Damper location
After this, reverse the assembly procedure according to the dismantling steps. Refill the system with coolant and check that the new damper is in place. It is important to ensure that there are no leaks and that the hose connections are not tight.
Turn on the stove and check how the heater behaves. If everything is normal, you have carried out competent and successful work, for which we congratulate you.
Trouble-shooting
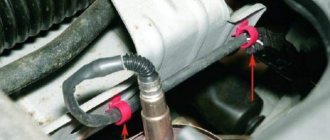
Checking the cabin air temperature sensor
You can check the serviceability yourself; special skills are not required. Carefully remove the sensor from its original place. We find the contacts on the back side. Using a multimeter, apply a voltage of 1.2V. We set the regulators of the automatic heater control system to the “Min”, “Max” positions. The motor should not be activated.
The second method is to turn off the cabin air sensor. Check fan speed settings. The first speed (“A”) should be inactive.
Design of the VAZ-2110 heater
The SAUO replaced manual control of the heater, but otherwise the stove remained structurally the same. As in earlier models, the interior heating system is a housing with a radiator installed inside, connected to the cooling system of the power unit - a heat source, dampers that redirect the air flow to the desired zones, and a fan driven by an electric motor, which creates the air flow. SAUO is a controller that, depending on the set parameters, monitors the temperature in the cabin and regulates the position of the dampers, maintaining the specified mode.
Video: Heater VAZ 2110; eleven; 12. Design and principle of operation.
The efficiency of the VAZ-2110 interior heater would be low without the forced creation of air flow, and this task falls on the stove fan.
How to prepare for the event
If you need to repair a VAZ stove fan, you need to make sure you have the necessary tools:
- head 10 millimeters, deep;
- Phillips screwdriver (2 varieties: regular and short);
- ratchet with extension.
Only if all the tools are available can the main activities be carried out. Of course, for a successful result, at least minimal experience with wrenches and screwdrivers is required. If there is no relevant experience, the task at hand becomes significantly more difficult.
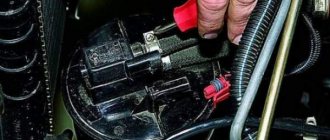
Stove fan
Structurally, the fan consists of a DC electric motor with a commutator-brush assembly and an impeller mounted on the electric rotor. motor. The electric motor is powered from the vehicle’s on-board network. There are several modes of fan operation, the difference between which comes down only to the rotor rotation speed, and this is realized by inserting a resistor into the power supply circuit of the electric motor.
The fan operating mode is set using a handle located in the heater control unit on the center console. Initially, on the VAZ-2110, this handle was part of the design of the SAUO controller, but functioned separately from the controller itself. Later, the ACS added an automatic fan control function (position “A” on the handle), using which the controller regulates the rotation speed of the electric motor in order to maintain the set temperature.
The electric motor used in the design of the VAZ-2110 fan is simple, but it has “weak points” - the commutator-brush assembly and bearings. Wear of these elements causes incorrect operation and complete inoperability of the fan. Short circuits and winding breaks in the stove drive are rare, but don’t forget about these breakdowns either.
Symptoms of failure. Heater components that affect fan operation
Signs of a malfunctioning stove fan are quite obvious and impossible not to notice. Common symptoms of failure:
- Increased noise, grinding noise during operation.
- Significant reduction in air injection efficiency.
- The fan does not turn on.
- Spontaneous change in the rotation speed of the electric motor.
- It can be determined by ear that the electric motor is operating under heavy load.
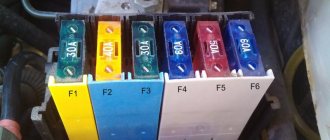
In some cases, such consequences result from malfunctions in the power supply and fan control circuits, so you should check them first. This applies to:
- fuse (blowout is the cause of complete failure of the electric motor);
- resistor (if it is faulty, some speed modes of the electric motor stop working);
- controller (the knob for switching fan modes is part of its design, so malfunctions of the automatic control system affect the functioning of the electric motor);
- wiring terminals of the power and control circuits (oxidation, damage to wires is one of the reasons for a malfunctioning electric fan).
If diagnostics of these elements shows that they are in good working order, it is necessary to dismantle and repair the fan itself. But it can be diagnosed first.
Fan repair (step by step)
The disassembly technology is very simple, but proceed carefully. Since electric motor failure lies in the wear of bearings and graphite brushes, let’s consider how to replace these elements:
- Let's disassemble the electric motor. To do this, first remove the impeller, and then the two spring clamps of the motor support.
- We remove the support.
- Unscrew the screws securing the brush assembly and remove it.
- Carefully knock out the rotor.
- We clean the elements from dust and dirt.
- From the inside of the stator, carefully bend the edges of the plate holding the bearing.
- We knock out the bearing and install a new one in its place (for replacement you need bearing No. 609).
- We bend the edges of the plate back.
- We inspect the condition of the collector plates on the rotor and, if necessary, sand them with sandpaper (fine-grained).
- We replace the worn brushes with new ones (we solder the wires of the worn ones, and in their place we solder the wires of the new elements).
- We bend the stops of the brush springs (this will allow you to easily install the brush assembly in place).
- We put the rotor in place.
- We install and fix the brush assembly, having previously seated the brushes in their seats.
- We install brush springs into the holes that covered the stops and bend the stops back.
- Install the fan support and impeller.
- We install the repaired fan on the car.
As you can see, it is not difficult to repair the VAZ-2110 heater fan, and this task can be handled in a garage, even without special skills in car repair.
Source
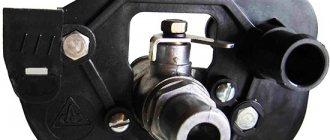
Replacement of micromotor gearbox
To replace an element, you will need to perform several not particularly complex activities. Therefore, it is not at all necessary to go to a service station and pay a lot of money for their services.
- First of all, remove the frill.
- Next, the vacuum brake booster is dismantled.
- After this, you still need to remove the pedal assembly.
- Now we begin to dismantle the old micro-gearbox along with the plastic component.
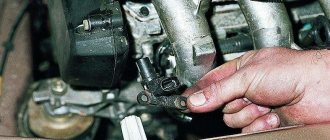
- A new micromotor gearbox should be installed in place of the damper sector. There you will see a similar square.
Article on the topic: How to change the heater tap on a VAZ 2109 yourself
Device location
Practice shows that replacing a micro-gearbox does not require special skills, a lot of time or excessive effort. However, never forget to be careful.
But in order to install the damper of your micro-geared motor, you will need to invite an assistant.
- First, the contacts are connected to the new micro-gearbox, that is, the motor.
- By turning the damper counterclockwise, you turn on the cold air supply.
- Turn on the ignition and turn the heater control system (SAUO) sensor to the position directly opposite the blue dot of the regulator.
- Or you can do the opposite, that is, check the micro-gear motor by installing the sensor opposite the red dot, and turn the damper all the way clockwise.
- The micro-gearbox rotates slightly more than required, so for proper installation it is recommended to use a special lubricant for the square.
- Install the motor so that the holes for the screws match.
- Now you need the help of your friend, since his task will be to turn the temperature regulator and at the same time press the motor inward.
- If the squares match, the replacement of the micromotor reducer can be considered successful. Now the air should flow to the desired temperature inside the cabin.
- Don't worry if the square doesn't go the full length of the flap you're using. This is normal when the gear motor goes about a third of the way. This installation will not affect the performance of the system in any way.
- Now all that remains is to return the screws to their place and twist the micro-gearbox several times - from the blue mark to the red one, and in the reverse order.
- These manipulations will allow the stove to remember what operating range the new gearbox has. Therefore, there will be no problems with its performance in the future.