Main elements of the fuel system of an injection engine
The injector is a complex mechanism for supplying fuel to the cylinders. The entire fuel supply process is controlled by the engine's electronic control unit (ECU). The fuel supply system also uses a parallel air supply.
Fuel pump glass
The fuel pump cup is a collection of the main elements of the fuel system assembled on one site.
The fuel pump glass includes:
- Gasoline pump
- Coarse filter
- Fuel level sensor
- Fuel pressure regulator (only in 1.6 liter engine versions)
Gasoline pump
It is one of the main elements of the fuel system. Serves to supply fuel to the cylinder block under pressure. A fuel pump is a kind of electric motor. Its operation is based on the principle of centrifugal force. Under the influence of the magnetic field formed in the stator of an electric motor, its armature is given rotation. A pump volute is installed on the anchor shaft, which directly pumps pressure into the fuel system.
The gasoline pump is very capricious and picky about the purity of the fuel consumed. Most often, the fuel pump fails due to low-quality fuel or its lack in the tank. In order for the gas pump to last as long as possible, it is necessary to refuel at proven gas stations and keep at least 25% of the tank volume in the car’s tank. If you drive with the fuel light on, the fuel pump will most likely fail much faster, since if there are bumps, the gasoline in the tank will squish from side to side and the fuel pump will suck in air.
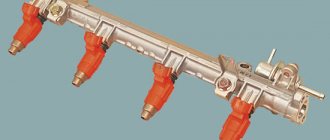
Injectors and fuel rail
The fuel rail serves as a kind of case for the injectors; it is in it that they are installed.
Fuel rail with injectors
The injectors of an injection engine are also one of the most important elements of the fuel system. Designed to supply fuel to the engine cylinder block under pressure. The injector sprays fuel into small droplets for better and easier ignition in the cylinder.
Injectors
The injector is installed directly on the car engine, namely in the cylinder head. The number of injectors depends on the number of cylinders of the car. Lada cars have 4 cylinders, therefore there will also be 4 injectors.
Injectors are also very sensitive to fuel, but are less susceptible to damage since the fuel supplied to them is filtered through 2 filters: a coarse filter and a fine filter. But more about them a little later.
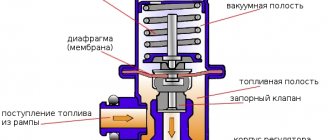
Fuel pressure control
Fuel pressure regulator for 1.5 liter engine
The fuel pressure regulator (FPR) is a sensor installed on the fuel rail in 1.5-liter engine versions and installed in the tank on the fuel pump cup in 1.6-liter engine versions. It serves to ensure the required fuel pressure in the system and regulates the fuel pressure by releasing excess fuel pressure into the return line.
The RTD is a very reliable element and fails extremely rarely. The cause of its breakdown may also be poor quality fuel or the aging factor.
Fuel line
Dismantled fuel line
A fuel line is a set of fuel pipes designed to transport fuel from the tank to the internal combustion engine. The highway in Lada is located under the bottom of the car and is protected by plastic covers.
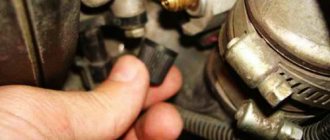
Fuel level sensor
The fuel level sensor is installed in the tank on the fuel pump glass. Serves to indicate the volume of fuel in the tank, displaying information on the instrument panel.
Signs and symptoms of low pressure in the system
Weak pressure is expressed primarily by the presence of dips. You try to accelerate, press the gas pedal, nothing happens. Stopping the engine and then starting it helps (this way the pump pumps fuel). However, after ten or fifteen kilometers the situation repeats itself.
Some drivers even change the fuel filter or pump strainer in the hope of improving the situation, but this does not help. Replacing the mesh in this case is considered as a more correct option. The fact is that the pressure can drop due to a poorly functioning pump.
If the problem is not in the mesh, then the pump itself is dying. There is another reason - it is the vacuum of the fuel tank. This is how it is checked. You need to stop the car if it starts leaking, sneezing, etc. But don't turn off the engine. Then open the tank flap and loosely close it again. Continue driving, if the dips disappear, it means there is definitely a vacuum in the tank.
The lid may not be closed at all to allow air access. When there is a vacuum it is not enough. If the problem repeats, the failures do not disappear, the fuel pump must be considered the culprit.
A clogged fuel line and a malfunction of the sensor that regulates the fuel pressure immediately before injection can also cause low pressure. To reliably verify why exactly the pressure is jumping, it is necessary to carry out competent measurements. First measure the pressure of the pump, then the lines (before and after the filter), and then directly in the ramp. Such instrumental monitoring will allow us to identify a specific cause.
This sensor is often ignored by motorists, but it is its malfunction that can lead to insufficient pressure. Symptoms of a failed sensor:
- loss of car dynamics;
- Unstable engine speed in idle mode;
- difficulty starting;
- failures;
- increased fuel consumption;
- reduction in power.
Violations with RTD occur quite often, since the design of the sensor is mechanical.
- The membrane springs weaken. As a result, the valve cannot cope with the air pressure coming from the manifold, which leads to a decrease in pressure and the amount of incoming fuel.
- The valve jams, the connections lose their tightness. Because of this, the RTD becomes clogged. In general, a stuck valve can lead to an uncontrolled flow of fuel into the manifold. Fuel consumption instantly increases, the engine stops starting normally due to interruptions.
You can verify that the RTD is faulty by determining the pressure value.
| Mode | Indicators |
| Ignition on | 2.9-3 kg/cm2 |
| Engine is running | not less than 2.5 kg/cm2 |
| Vacuum hose disconnected | 3.3 kg/cm2 |
| The return line is pinched | 7 kg/cm2 |
| Peregazovka | 2.5-3 kg/cm2 |
The pressure regulator is checked first, because it is due to its malfunction that the pressure drops. If it is in order, you need to test the operation of the pump. This is done by squeezing the fuel drain check valve.
Video: how to check fuel rail pressure
Forget about fines from cameras! An absolutely legal new product - Traffic Police Camera Jammer, hides your license plates from the cameras that are installed in all cities. More details at the link.
- Absolutely legal (Article 12.2);
- Hides from photo and video recording;
- Suitable for all cars;
- Works through the cigarette lighter connector;
- Does not cause interference to radios and cell phones.
Fuel system filter
The fuel system filters of an injection engine are used to protect against damage to the main elements of the fuel system.
Fine filter
The fine filter is installed outside the car tank. On Lada cars with injection engines, a fine filter is installed under the bottom in the rear part in the area of the beam, secured with a clamp. This filter prepares fuel for the injectors. Differences between fine filters depending on the engine.
In 1.5 liter versions of the engine, the filter is connected to the fuel system via a metal threaded fitting.
In 1.6 liter versions of the engine, the filter is connected to the fuel system using quick-release plastic fittings.
Coarse filter
This type of filter is installed in the car tank. The coarse filter is connected directly to the fuel pump and secured in the glass of the fuel pump. Serves for coarse fuel cleaning and preparing fuel for a fine filter.
Preparatory work
- Take a tire pressure gauge and wrap flax or fum tape around the tip, this will prevent fuel spills and air leakage.
- Prepare a hose with a maximum internal diameter of 9 millimeters, and you will also need clamps for fastening. It is necessary to fix the hose on the pressure gauge and tighten everything with clamps.
- Place the prepared tool on the engine so that the hose and pressure gauge fixed on it do not roll off the surface. This will avoid fuel spilling on the engine.
- We unscrew the nipple spool on the ramp (fuel splashing is possible due to residual pressure).
- We put a hose with a pressure gauge on the ramp connections and secure everything with a clamp.
- Homemade pressure gauge for measuring pressure in the rail assembly.
Absorber and its system
Some Lada cars have a fuel system with an absorber. An absorber is an indispensable thing nowadays. It serves to reduce emissions of fuel vapors into the environment.
Absorber
The absorber is a flask filled with special carbon that evaporates fuel vapors and supplies them to the car's receiver. Installed in the vehicle's engine panel.
Absorber sensor
The absorber sensor controls the opening and closing of the air supply to the absorber to control vapors. Installed on the engine cover in engine versions with a volume of 1.6 liters, in engine versions with a volume of 1.5 liters it is installed directly on the absorber flask.
Separator
The separator in Lada cars is installed under the rear left wing near the shock absorber strut and serves to expand the fuel vapor formed in the tank due to temperature changes. Externally, the separator looks like a coolant expansion tank.
Tilting valve
This valve is installed next to the separator under the rear left fender of the car. The valve serves to prevent fuel from entering an overturned car during an accident. That is, when the valve is turned over, it shuts off the fuel system, protecting the car involved in an accident from fire.
Differences in the fuel system of Lada engines
There are several types of Lada engines. Lada engines come in 1.5 and 1.6 liter, 16 valve and 8 valve. There are practically no differences in the fuel system of these engines. But there are minor modifications by the manufacturer.
Main differences between fuel systems
- The fuel rail in 1.6 engines is round and metal, in 1.5 engines it is aluminum and trapezoidal.
Fuel rail 1.5 liter engine
- The fuel pressure regulator (FPR) in 1.6-liter engines is installed in the tank, and in 1.5-liter engines on the fuel rail.
- The operating fuel pressure in 1.5 liter engines is 2.8-3.2 bar. In a 1.6 liter engine up to 4 bar.
- The return flow in a 1.5-liter engine comes from the fuel rail and back to the tank; in a 1.6-liter engine, the return flow circulates around the tank.
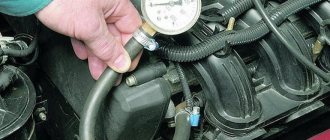
Measuring pressure using improvised means
Homemade design for measuring pressure in the fuel rail using a conventional tire pressure gauge
It’s easy to measure the pressure using available tools; you just need to have a regular tire pressure gauge on hand (which is used to monitor tire pressure - approx.). All you have to do is follow our instructions exactly. We will tell you how to carry out this operation correctly, and what the correct pressure should be in the fuel rail of the VAZ-2112.
Do-it-yourself diagnostics and testing of the fuel system
Fuel system diagnostics can be done at almost any service station, but who wants to overpay for such a trivial matter? So let's figure out how to diagnose it yourself. It is necessary to begin diagnosing the fuel system by measuring the fuel pressure in the fuel rail. Based on the measurement results, a diagnosis will be made and the culprit identified.
Checking fuel pressure yourself
What you need to check fuel pressure:
- Pressure gauge with scale up to 10 atm.
- Hose with a diameter of 10 mm.
- Two 20 mm clamps.
We need to assemble a device for checking fuel pressure with our own hands. We put the hose on the pressure gauge fitting and secure it with a clamp so that the hose sits tightly on the fitting and does not fly off when pressure appears.
Checking fuel pressure is carried out in several modes:
- When the ignition is turned on.
- When idling.
- When changing gas.
So, let's proceed directly to the verification.
Before checking the fuel pressure in the rail, it is necessary to relieve the residual pressure in the rail.
Relieving fuel pressure in the fuel rail, methods:
First way:
Remove the power plug from the fuel pump cup (located under the rear seat). Start the car with the plug removed and let it run until the car stalls.
Second way:
Remove the fuel pump fuse (located under the center panel F3 (15A) ). Start the car with the fuse removed and let it run until the car stalls.
Under the plastic cover is fuse F3
After the pressure in the fuel rail has been released, you can begin measuring the fuel pressure.
For safety, you should cover the generator with a thick cloth to prevent fuel from getting on the generator and possibly catching fire.
- Measuring fuel pressure begins by twisting the plastic cap of the ramp fitting.
- By unscrewing the spool valve from the ramp.
- We connect the device for measuring fuel pressure to the ramp fitting and securely tighten the hose with a clamp.
- We turn on the ignition of the car and wait until the gas pump pumps fuel. The pressure gauge should show a pressure of at least 3.6 bar (for a 1.5 liter engine, at least 2.8 bar).
- We start the engine, the pressure gauge readings should remain at the same level or increase.
- We re-gas the engine, the pressure gauge readings should stay in place or increase.
- We stop the engine, the pressure gauge readings should drop slightly or remain unchanged, and a slight drop in pressure in the rail is also allowed. The pressure in a working fuel system completely disappears within a few hours.
The fuel pressure measurement is completed; to quickly relieve pressure and install the spool valve in place, you can use the tips for relieving fuel pressure in the rail.
We take a measurement in the fuel rail.
To work we need a “pressure gauge”. But not every pressure gauge is suitable, it all depends on the pressure limit that it can measure. In our case, we need a pressure gauge with a measurement limit of up to 7 atmospheres. If you have a pressure gauge measuring up to 17 atmospheres, then such a device will show incorrect data, because it has too much error at low pressure.
In addition to the pressure gauge itself, we will need “plumbing flax”. We wind flax under the pressure gauge nozzle and put a hose with an internal diameter of 9 mm on it. Next, we tighten the whole thing with a clamp. Our device is ready for use.
In a store, such a device with a hose and drain will cost you about 1200 rubles. Measuring the fuel system at a service center will cost you about 200-300 rubles.
- Open the hood, turn off the ignition, find the fuel injector rail.
- We unscrew the plug of the fitting for fuel pressure, then use a spool to unscrew the nipple that appears, carefully placing a container or rag, because gasoline will spray due to remaining fuel pressure.
- Place the pressure gauge hose over the fitting and secure it with a clamp.
You need to check the pressure in 4 operating modes:
- measure the pressure when the ignition is turned on;
- measure the pressure at idle;
- measure the pressure with the tube removed from the fuel pressure regulator;
- measure the pressure with the return pipe pinched.
Troubleshooting
When the ignition is turned off, the pump does not gain the required pressure
If, when you turn on the ignition, the pressure gauge shows values below the permissible values, then the culprits may be the fuel pump itself, injectors, RTD, fuel filters and a rupture in the fuel line.
The first step is to replace all filter elements in order to eliminate them, since they are not expensive. When replacing the coarse fuel filter, you should pay attention to the corrugated tube connecting the fuel pump glass to the fuel pump for cracks and breaks. Then re-measure the fuel pressure. If replacing the filter elements does not help, move on.
Checking the fuel pump and RTD
Without removing from the tank
It is necessary to connect a device for measuring fuel pressure directly to the fuel pump glass (this can be done in 1.6-liter engines) or clamp off the return line of the fuel system (1.5-liter engine). The pressure gauge reading should increase to 6-8 bar. If the readings remain the same, then the culprit is the fuel pump. If the pressure gauge readings increase, the fuel pressure regulator should be changed.
With removal from the tank
After removing the fuel pump glass from the tank, you need to dismantle the fuel pump and check it for pressure in the “wall”. A working pump should produce 6-8 bar. If the pump gives out, the culprit will be found, if not and the pump presses 6-8 bar, then we go further and replace the RTD.
After replacing the RTD, we put the glass back in place and check the fuel pressure again. In three modes. The pressure gauge readings should be normal. If during installation on the car the pressure gauge readings dropped again, then we move on and most likely it’s the injectors.
Injectors
Injectors are the last option for fuel system pressure instability. Due to wear or contamination, they may not hold fuel pressure. The injectors need to be washed. How to properly and quickly wash the injectors with your own hands can be found in detail in our article . If washing the injectors does not help, they should be replaced.
Fuel pressure diagnostics
© Alexey Pakhomov, aka Is_ 18, Izhevsk
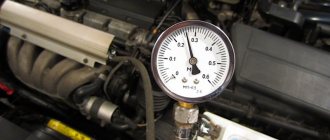
Fuel pressure is one of the most important engine parameters from a diagnostic point of view. The composition of the mixture, and therefore the behavior of the car in various modes, depends on it. Let's try to integrate diagnostic methods based on fuel pressure into a system. Naturally, you will need a fuel pressure gauge to work. It is best to purchase a device with a large, easy-to-read scale, the measurement limit is 5 - 6 kgf/cm 2. For example, like the one in the photo. The use of pressure gauges with a limit of up to 10 - 12 kgf/cm 2, used in the diagnosis of foreign cars, is hardly advisable due to the relative inaccuracy in the range of 2 - 3 kgf/cm 2. So, we connect the pressure gauge and diagnostic scanner.
1 . First of all, we evaluate the operation of the pressure regulator. To do this, turn on the pump with the engine not running. The pressure gauge should show 3. 0 +/- 0 . 2 kgf/cm2. If the pressure is below 2. 8 kgf/cm 2, it is better to change the RTD, because in power modes the machine will be dull. We pronounce the final verdict on RDT only after the next point.
2. Next, check the zero supply pressure. The name of the parameter speaks for itself - this is the pressure developed by the pump, as they say, “to the plug”, that is, fuel is not supplied. Indirectly, this parameter indicates the residual life of the pump; as it wears out, it gradually decreases.
So, take the pliers and pinch the “return”. This needs to be done quite sharply. The pressure gauge needle should literally shoot towards the limit value. If it rises slowly, then the fuel filter or fuel inlet mesh may be clogged. The limit value itself speaks volumes. If the pump is new, it will reach 5 - 6 kgf/cm2, and on pumps made in the Czech Republic - up to 7 kgf/cm2. In any case, if the pressure exceeds 5 kgf/cm2, then the pump has a sufficient resource. The manuals give different values of zero supply pressure at which the pump supposedly requires replacement. But in practice, if the pump “on the plug” presses at least 4 kgf/cm 2, it can still go on and on. In reality, customers complain about the dullness of the car when this parameter no longer reaches three “points”.
3. Turn off the pump. The pressure should drop to approximately 0. 7 kgf/cm 2 and remain at this level. If it immediately drops to zero, then either the pump check valve or the RTD is faulty. This defect, of course, is not fatal, and is often eliminated by briefly squeezing the return line. If it turns out that the RTD is at fault, it can be replaced, but changing the fuel pump due to the check valve does not seem advisable, at least according to customers.
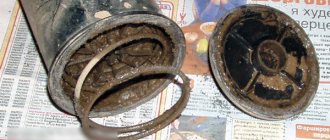
4 . We start the engine. We carefully monitor the pressure gauge needle. This is where the larger scale comes in handy. The needle may tremble slightly, this is a consequence of large pulsations of absolute pressure (pressure in the intake receiver). These pulsations are a topic for another discussion; let’s forget about them for now. But if the needle does not tremble, but “walks”, and within a fairly wide range (up to 0.3 kgf/cm2), then the gas inlet mesh is probably clogged. For example, like in the photo. (note from Sim - this is not the most extreme option - see more “cool” cases HERE)
5 . With the engine running, the pressure will be about 2. 3 kgf/cm2. If you remove the vacuum hose from the RTD, it will rise sharply to 3 kgf/cm2 (or to the value obtained in step 1). Put the hose back on. Smoothly raise the speed to about 3000. If the pressure gradually drops, then this is another sign of a “dead” pump.
6. You can also check the performance by unscrewing the fuel supply line and applying power to the fuel pump. About 1 should run up in a minute. 5 liters. To be honest, in all my practice I have never done this; I somehow made do with the pressure gauge readings.
7. The most extreme option is a pressure of about 1 “point” and an uneven sound of the pump. The reason is there is no gasoline in the tank. Not funny. I regularly send my cars to refuel once a month.
That's all simple science. If you had to disassemble the gas tank, it makes sense to look into it with a flashlight. At the bottom you will find water, rags of dirt, sand and other unnecessary substances. They need to be removed with a pear. Or better yet, if you have one, use a vacuum unit for changing the oil. Since we remembered the tank, one more piece of advice. To prevent the gas tank from turning into a cake in winter, drill its cap from the back side. The method is stupid and not recognized by all experts, but it is radically effective. Good luck!