The brake system of the VAZ 2109 is the same as that of all cars produced in the distant 90s. To this day, it has not undergone significant changes.
The system can already be considered classic, for the simple reason that it uses a hydraulic drive and a dual-circuit design.
The main disadvantage of such a system can be considered the high pressure, which requires the use of reliably reinforced hoses and metal tubes. If these elements are neglected, fluid leakage may occur.
The advantage is that if one hose breaks, it will not affect braking and it will be carried out in the same way on both wheels. This allows you to avoid emergency situations, and in extreme cases it becomes possible to use the parking brake.
Scheme
The diagram of the VAZ 2109 brake system is quite simple and does not have any complex parts. This simplifies its repair and makes it an ideal car for novice car owners.
Generally speaking, it consists of:
- Main brake cylinder;
- Working mechanism of the brake;
- Brake booster of pneumatic vacuum type;
- Contact pipelines with high pressure;
- Expansion tank into which brake fluid is poured;
- Wheel brake discs located on the front axle;
- Brake drums for wheels located on the rear axle.
Below is a drawing of the VAZ brake system.
The feasibility of installing a vacuum brake booster
The vacuum booster dramatically improves the driving comfort of the VAZ 2108. It reduces the pedal effort required to stop the car. All modern cars are equipped with a vacuum booster. Domestic and imported. Nowadays, it is impossible to imagine a car without a vacuum brake booster.
The amplifier is aggregated with the master brake cylinder and is mounted on a shield separating the engine compartment from the interior of the VAZ 2108. It is connected to the engine crankcase with a flexible hose to supply rarefied air necessary for the operation of the amplifier. A malfunction of the amplifier is clearly indicated by a noticeable increase in the force on the brake pedal. Braking acceleration decreases.
Continuing your trip with a broken amplifier is very risky. You can drive to the nearest car service center with caution. A cracked hose can be wrapped with several layers of electrical tape. If replacing the cracked hose and check valve does not produce results, the unit must be replaced.
Work on removing the amplifier is carried out in this order.
- Disconnect the negative battery terminal. De-energize the electrical system.
- Disconnect the wiring block from the hydraulic reservoir cap located on the brake master cylinder body.
- From the passenger compartment, remove the amplifier pusher pin using pliers. Disconnect the pusher.
- Disconnect the hose going to the engine crankcase.
- Unscrew the two nuts securing the brake master cylinder.
- Move the cylinder away from the amplifier housing. Leave it hanging from the metal hydraulic pipes.
- Unscrew the four nuts securing the amplifier bracket to the engine shield and carefully remove the amplifier.
- Unscrew the two nuts securing the amplifier to the bracket. Disconnect the bracket and amplifier.
Install the new VAZ 2108 vacuum booster in the reverse order.
Main elements of the brake system
The brake system of the VAZ 2109 car includes many auxiliary parts, but the main design elements are:
- GTZ. Master brake cylinder. The most important part of the system, which creates pressure in the pipes. This element is made of a piston moving along an ideal, flat surface. Rubber rings are used to seal connections between components.
Please note that these rings must be replaced during repairs, regardless of whether they are intact or not.
- The brake fluid that is poured into the GTZ is quite aggressive. It contains many additives. But they are the ones who guarantee high-quality engine operation. The disadvantage of such a system is that the components of this liquid quickly evaporate. Therefore, it is better to change the brake fluid at least once a year;
- Vacuum booster. It is located between the passenger compartment and the compartment where the engine is located. It is a large container, cylindrical in shape. The booster is connected to the master cylinder and the booster runs a hose to the fuel injection system (carburetor).
- The function of this element is to make driving easier. And this simplification lies in reducing the effort required to press the brake pedal.
On a note. If you think that this element of the brake system is not particularly important, then drive an old-style Zhiguli, which does not have a vacuum booster. The difference is simply huge, both in ease of control and in braking efficiency;
- Brake calipers. The function of these calipers is to press the brake pad against the top of the disc. When repairing a VAZ 2109 model car, calipers are replaced in very rare cases for the reason that their service life is very long. The design consists of a housing made of aluminum, in which there are two holes. A tube is connected to one of the holes using a hose. A fitting is inserted into the other. Inside the device itself there is a piston made of steel that activates the pads;
- Pressure regulator. An element whose purpose is to increase the efficiency of the braking system. The entire braking process is 70-80 percent done by the wheels of the front axle. The remaining percentage of braking is performed by the rear brake system of the VAZ 2109. Of course, this parameter is conditional and depends on many factors such as the load on the car, etc. Therefore, the developers made sure that the brake system of the VAZ 2109 model could, independently of anyone, regulate the forces on the wheel calipers of the front and rear axles.
Diagram of the VAZ 2108 brake system and its features
The VAZ 2108 has two brake systems:
- working;
- parking
The working one ensures that the car slows down and stops when moving, and the parking one fixes the VAZ 2108 in the parking lot. The VAZ 2108 uses a dual-circuit brake system as a working brake system. One circuit provides braking for the left front and right rear wheels. The other stops the right front and left rear wheels. This ensures increased directional stability of the VAZ 2108 even if one of the circuits fails. Neither side of the car is left without a braking wheel. This is a very important factor in ensuring the safe operation of the VAZ 2108.
The brake system of the VAZ 2108 demonstrates high continuity with the brakes of rear-wheel drive models. They have proven themselves well when used in Russian conditions. It was considered justified to replace the rear disc brakes of the Italian prototype Fiat 124 with drum brakes, more adapted to domestic conditions. Unlike the first generation of rear-wheel drive models, the VAZ 2108 brakes have a vacuum booster and a pressure regulator in the rear wheel cylinders.
The VAZ 2108 brakes work like this:
- To stop the car, the driver presses the pedal with his right foot.
- The lever system transmits the action to the vacuum booster.
- He, using a connection with rarefied air in the engine crankcase, transmits force to the main brake cylinder.
- In turn, this unit distributes pressure between two diagonal hydraulic circuits of the system.
In each of the diagonal circuits, pressure is transmitted through pipelines to the front disc and rear drum brakes. The pressure on the rear brakes is transmitted through a dual-circuit pressure regulator, which ensures an increase in braking force as the load on the rear axle increases.
The parking brake of the VAZ 2108 has a cable drive and is connected to the brakes of the rear wheels. It is activated using a lever with a locking ratchet located under the driver’s right arm, next to his seat.
Possible malfunctions of the brake system
Malfunctions of the VAZ 2109 brake system can be of different nature and there are quite a lot of them. In this paragraph we will look at the most basic ones:
- Brake pedal malfunction. In this case, it may not only not work, but also not work as it should. This means that when you press the pedal, the load increases. That is, the driver presses lightly, but the braking occurs too sharply. With such a breakdown, the car may brake irregularly;
- Long braking distance. In this case, when you press the brake, braking itself does not occur or the braking distance of the car increases several times;
- The wheels do not brake at the same time. This case is quite rare, but if it occurs, the braking distance of the vehicle increases several times and the car begins to wobble when braking.
- As for the cost of repairing these faults, everything is ambiguous. After all, the price of the VAZ 2109 brake system may depend both on the region of residence of the car owner and on the service you use.
On average, a major overhaul costs about 10-15 thousand, taking into account the replacement/repair of all parts.
Despite its simplicity and relatively outdated design, the brake system of the VAZ 2109 has more advantages than disadvantages. It should be noted that the repair of the brake system is cheap, which allows people with even low incomes to service the car. On our website you can also watch a video about the brake system of the VAZ 2109.
A question such as replacing brake hoses on a VAZ 2109 and 2110, at first glance, seems simple for a car enthusiast who has an idea of what a wrench and a screwdriver are. But there are still some nuances that you need to know about for high-quality technical performance. We will talk about them in this article.
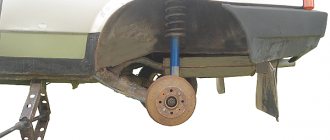
Replacing the front brake hoses on a VAZ 2109 and 2110 does not require any additional equipment from the car owner. This can be done even without a hole, right in the yard or garage, on a homemade small overpass, or just on the asphalt in a convenient place. The rear ones will most likely require an inspection hole or a lift.
Replacing the pressure regulator
The breakdown of the rear brake pressure regulator of the VAZ 2108 is most clearly evidenced by the car’s tendency to skid when braking on a straight, flat, dry road. If the regulator breaks down, it is recommended to replace it as an assembly. Repairing this unit in a private garage is extremely difficult, and the brakes directly affect safety. If you are forced to repair your brakes yourself, but do not have the proper experience and training, replace the entire adjuster. Do not disassemble it to avoid problems with the brakes.
The regulator is replaced in a pit or on an overpass. Work order:
- Use a screwdriver to lift the bracket of the regulator drive lever, remove the lever from the hole and remove the bracket from the lever.
- Unscrew the hydraulic hose fittings from the regulator body and remove the hoses.
- Plug the pipe fittings to prevent liquid from leaking out.
- Unscrew the two screws securing the regulator to the bracket.
- Remove the regulator.
Install the new regulator in the reverse order.
Why do you need to change?
Why is it necessary to periodically inspect the brake system, in particular the hoses? One of my friends on the highway, at a speed of 100 kilometers per hour, when pressing the pedal, suddenly “lost the brakes.” The pedal simply went to the floor, and the car continued to rush towards the accident. It’s good that he knew how to slow down the car by changing gears, so to speak, “with the engine.” Gradually slowing down, he stopped on the side of the road and, wiping sweat from his forehead, opened the hood.
As it turned out, the brake fluid was “gone”, and at the nearest service station they discovered a break in the rear right brake hose, and all the others had such a degree of wear that they could “shoot” at any moment.
Required tools and replacement
- Using a jack, lift the front wheel and remove it. Don't forget that the wheel bolts can also become stuck. To make them easily unscrew, spray WD-40 from a can several times and wait about 10 minutes. If the bolts are unscrewed but the wheel cannot be removed, there is also a “folk” method. For these purposes, some drivers carry a piece of board and a small sledgehammer in the trunk. We place the board next to the wheel and hit it with a sledgehammer several times. The wheel should come off;
- Hold the tip on the brake hose with a “15” wrench. At the same time, turn the fitting on the tube with a “ten”;
- To prevent brake fluid from leaking, put on a protective cap. If the nut is stuck, use VD. We wait 10-15 minutes, unscrew;
- Next, you need to remove the sensor wires from the rubber holders based on pad wear;
- The hose coupling must be removed from the shock absorber strut holder;
- Unscrew the “15” hose fitting from the cylinder. The copper seal ring also needs to be replaced. Usually seals are sold as a set;
- Install the new hose, carefully tightening the nuts;
- We repeat the procedure in a similar way on the other front wheel (since, we remind you, it is best to change the hoses at least in pairs);
- After everything, we bleed the brake system, checking the presence of fluid in the reservoir (by level). If necessary, top up!
The main stages of replacing brake pipes on a VAZ 2109, 2110
You can replace the pipeline lines in the direction from the main brake cylinder to each wheel according to the following diagram.
- Disconnect the battery terminals.
- Raise the car to the desired height using a jack.
- Remove the car wheels.
- Using a “10” wrench, unscrew the nut securing the tube to the master cylinder and install a plug for dust and dirt in the supply hole.
- Carefully release the pipeline towards the wheels. Remove the protective plastic box and remove the line from the metal and plastic holders. Try to do this carefully so as not to damage the clips.
- Unscrew the brake hose fitting and remove the damaged line.
- Start installing the new tube in the opposite direction: from the wheel to the master cylinder.
- Reinstall all holders, replacing worn or damaged parts as necessary.
- Blow out the pipeline with compressed air, connect it to the system and bleed the brake system according to the instructions, replenishing the missing fluid as necessary.
Tip: when replacing a pipeline, it is advisable to fill the system with new brake fluid.
Important: when installing a new line, plug it at the inlet and outlet. Dry all connections to prevent dirt from entering the system. During the installation process, it is advisable to treat the surface of the copper or steel pipeline with an anti-corrosion coating.
Don't forget to change the connecting tube between the wheel calipers. To do this, use a brake wrench set to “10” so as not to strip the thread, unscrew the fittings and install a new tube. This element is replaced after replacing the elastic hose on the wheel.
Replacing the rear brake hose
- We unscrew the fitting using two keys: 10 and 15;
- Remove the hose from the eyelet securing the rear beam to the body;
- We put a protective cap on the end of the tube;
- Using two wrenches, disconnect the hose and tube. Remove the brake hose. When replacing it, do not forget about the seals;
- We put everything back in reverse order. We perform the same procedure on the other rear wheel. We pump the hydraulic drive (brake).
Thus, you are convinced that replacing brake hoses on VAZ 2109 and 2110 is not such a difficult matter. And with your own hands, if you have certain skills, it’s quite possible!
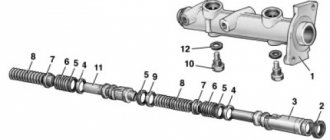
Brake structure of the VAZ 2109: 1. Check valve, 2. Vacuum booster, 3. Master cylinder reservoir, 4. Master cylinder, 5. Vacuum hose.
Diagram of the brake force regulator VAZ 2109: 1. Pressure regulator, 2. Elastic lever, 3. Rear suspension beam.
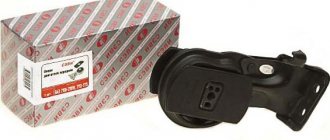
Replacing brake hoses VAZ 2109
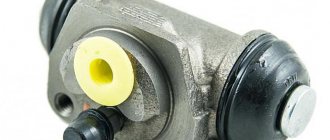
Brake hose VAZ 2109: 1 – tips, 2 – copper gasket, 3 – rubber seal, 4 – spring clip.
Brake hoses of the VAZ 2109 must be elastic and free from tears and cracks. Hoses must be firmly sealed at the ends. The threads of the hose ends must not be damaged. If the hose swells when you press the brake pedal, it means the cord threads are torn. If any of these defects are detected, the hose must be replaced.
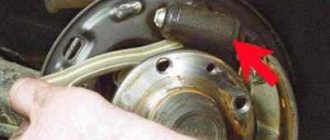
While holding the brake hose from turning with a wrench, unscrew the pipe fitting. Remove the spring clip
Remove the rubber seal along with the hose from the bracket
Unscrew the end of the VAZ 2109 brake hose from the wheel cylinder and remove it. Plug the holes in the pipeline and wheel cylinder
Install the hose in the reverse order of removal. When installing a brake hose on a VAZ 2109, do not forget to install a copper gasket under the tip attached to the wheel cylinder
When installing the hose, make sure that it is not kinked. For control, a colored stripe is applied to the hose
The rear brake hose of the VAZ 2109 is replaced in the same way, supplying working fluid to the brake mechanisms of the rear wheels. After replacing the hose or hoses, add brake fluid to the reservoir and bleed the brake system.
Replacing the main brake cylinder of a VAZ 2109
To replace the master brake cylinder on a VAZ 2109, disconnect the negative terminal wire from the battery and drain the brake fluid from the brake system. Repairing the VAZ 2109 master cylinder often does not lead to the desired results, so it is recommended to replace the master cylinder assembly
Disconnect the block with wires from the brake fluid level sensor installed in the reservoir cap
How to change the brake hose on a VAZ 2109-2115?
1. The first thing to do is disconnect the negative (-) cable from the battery terminal.
2. Next, you need to remove the wheel whose brake hose needs to be replaced.
3. Then remove the wire connecting the block and the wear sensor.
4. With a sharp movement, push the tip of the wire out of the block on the other side.
6. Holding the tip of the tube with a “10” wrench, unscrew the hose from the brake pipe. At the same time, use the “15” key to hold the tip. If the nuts have “soured” in the tube mount, it should be cut in half and the tip removed from the tube.
7. Remove the tip and seal from the bracket on the rack and body. Using a 15mm wrench, unscrew the tip from the wheel cylinder... remove the hose.
8. Now we replace the broken spring clip.
9. Remove the seal from the bracket on the rack.
10. Unscrew the tip of the brake hose of the VAZ car from the wheel cylinder.
11. Please note that there is a copper O-ring on the tip. When installing a new brake hose, it must be replaced.
12. We install the new brake hose in the reverse order. Make sure it doesn't twist. The colored stripe on the hose control will help you avoid kinks.
13. The rear brake pipes should be replaced in the same way. After replacing the hoses, it is recommended to bleed the brake system to make sure everything is correct.