Features of the design and location of fuel pumps VAZ 2108/2109
The DAAZ gasoline pump has a simple mechanical design. It includes:
- a body consisting of an upper and lower part;
- lid;
- mesh filter;
- valves (inlet and outlet);
- diaphragms (3 pcs) with spacers;
- the rod to which the diaphragms are attached;
- return spring;
- manual pumping lever.
Design of the DAAZ fuel pump
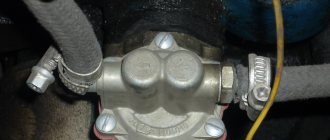
The VAZ 2108/2108 mechanical fuel pump is located in the engine compartment of the car and is installed on the auxiliary drive housing (in front of the ignition distributor). It is driven by the camshaft through a cam mechanism and a rod (pushrod). The camshaft rotates an eccentric, which transmits force through a pusher to a balancer at the bottom of the pump housing. The latter raises and lowers the rod with the diaphragms. Thus, a vacuum is formed at the pump inlet, and pressure is formed at the outlet. Valves located in the device body are responsible for its maintenance.
The VAZ 2108/2109 mechanical fuel pump is located on the auxiliary drive housing
On injection VAZ 2108/2109, the fuel pump is not a separate device, but an element of the fuel module. It also includes:
- plastic storage cup;
- coarse mesh filter;
- fuel level sensor.
Fuel module assembly
The module is located in the car tank. Its lid (base) is located at the top of the container. You will find it by removing the back seat and peeling back the carpet.
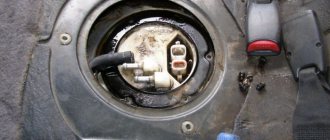
The electric fuel pump in the injection VAZ 2108/2109 is located in the car tank
Structurally, the fuel injection pump VAZ 2108/2109 is an electric motor with an impeller on the shaft, which, rotating, pumps gasoline, creating a vacuum at the inlet fitting and pressure at the outlet. The pump is powered from the machine’s on-board network, protected by separate relays and a fuse.
Design of the electric fuel pump VAZ 2108/2109
Article: 2108-2915004, additional articles: 2108-2915402-01
Order code: 000011
- Buy with this product
- show more
Shock absorber VAZ-2108 rear (2108-2915004-01)
- Connecting dimensions, mm:
- Maximum: 593.5
- Minimum: 364.5
Piston stroke, mm: 229 Weight, kg: 2.25 Nominal forces at piston speed 0.31 m/s, N (kgf): compression stroke: 247 (25.2) rebound stroke: 565 (57.6) Suspension: Rear Version: HydraulicRequirements TU: 37.370.026-2004
CHECKING AND ADJUSTING PUMP PRESSURE
Everyone knows that all car parts have a certain resource. Thus, the “nine” fuel pump, like any other part, sooner or later fails. It stops pumping gasoline properly. The following instructions will help you understand the problem.
It should be said that the problems on the VAZ 2109 are not always the same.
- The cause is almost always a leaky valve or housing, fuel line or diaphragm. Often the cause is clogged fuel filters or overheating fuel supply lines. And the most important problem is insufficient gasoline pressure at the outlet of the fuel pump.
- In the case where the fuel pump initially could not show the appropriate outlet pressure, all of the above problems only further aggravated the situation.
- You need to know exactly the pressure that the fuel pump should develop when the engine is idling. As a rule, all fuel pumps must develop a pressure of 0.20 to 0.35 atmospheres. If the fuel pump has this pressure at the outlet, there should be no problems with fuel supply.
- Pressure is measured by a pressure gauge with a scale of 1.6 atmospheres.
- If the pressure is below normal, you may only need to adjust the pump.
- The fuel pump can be adjusted, moving it closer or further from the engine block by changing the thickness of the gasket.
- Another way is to strengthen the spring; washers need to be placed under it, taking into account the strength of the spring and the wear of parts.
- The third way is to change the length of the rod.
- Any of the above actions will help raise the pressure of the fuel pump to a level of 0.20-0.30 atmospheres.
- When the engine starts running at higher speeds, this figure will increase a little more.
CHARACTERISTICS OF PETROL PUMP VAZ 2109
In order to understand how a working pump works and check its operation, you need to know its characteristics:
- The rod length should be 82.4 mm.
- The rod should protrude 0.8 - 1.3 mm above the gasket.
- The thickness of the very first gasket should be 0.3 mm.
- The rod stroke is 2.5 - 2.8 mm.
Some useful tips
Please note that on vehicles that have a return line, the problem may be caused by the vent hole being too large, as most of the pressure is released by the return line. If the pump installed on your car cannot be adjusted, it will have to be replaced. Today, the market sells a wide variety of models of pumps for VAZ from various manufacturers. Approach your purchase very responsibly so as not to purchase a fake. Choose a branded store and a reliable manufacturer
Buy only those models of fuel pumps that are recommended by the VAZ plant. The best option would be to contact an official VAZ spare parts dealer in your region. This will allow you to quickly get the part you need without worrying about it being of poor quality. This way, you don’t have to look for and buy another gasoline pump.
VAZ 2109 carb stalls while driving.
titoff2100
Young-green
- 17 May 2014
- #1
- 17 May 2014
Oduvan4ik1988
Experienced
titoff2100
Young-green
- 17 May 2014
Oduvan4ik1988
Experienced
- 17 May 2014
titoff2100
Young-green
- 18 May 2014
titoff2100
Young-green
- 20 May 2014
Removing and replacing the fuel pump on VAZ 2108, 2109, 21099 (injector, carburetor)
Hello, in this article you will learn how to replace the fuel pump on injection and carburetor VAZ 2108, 2109, 21099. The fuel pump is usually changed if there is low pressure in the fuel system, or the pump does not pump fuel at all. First, let's look at replacing a fuel pump on a carburetor car. In fact, in the case of a mechanical fuel pump, such situations as pump leakage are possible, i.e. when it starts to drip, and if your fuel pump on a carburetor car starts leaking, under no circumstances drive it, gasoline will drip directly onto the hot outlet. Automotive stores sell repair kits for mechanical fuel pumps, but usually repairing a fuel pump has a short-term effect, so it is better to replace it with a new one. In order to remove the fuel pump, you need to unscrew the clamps on the fuel hoses and pull them off the pump (gasoline will flow from the hoses, so prepare some kind of container and plugs for the hoses in advance)
Now unscrew the 2 bolts securing the fuel pump and remove it
Also remove the thermal insulation spacer and gasket
Installing a new fuel pump on a carburetor car is done in the reverse order.
Now let's look at the situation with the electric fuel pump on the injection VAZ 2108, 2109, 21099. The electric fuel pump is located under the rear seat. Raise the seat and unscrew the bolt securing the protective cover of the fuel pump. Before we begin removing the fuel pump, we need to relieve the pressure in the fuel system. This can be done in two ways, either remove the fuel pump fuse with the car running, wait until it stalls and turn the engine with the starter for a couple more seconds, or do the same thing, only remove not the fuse, but the block from the fuel pump itself. In fact, by lifting the rear seat and removing the fuel pump cover, you can encounter 2 situations. Access to the fuel pump is completely open, i.e. you can unscrew all the nuts securing it and pull it up, and the second situation is when access to the fuel pump is half open. Usually, in the second situation, you need to remove the gas tank and only then change the fuel pump, but this is very time-consuming and difficult; later we will look at a simpler method. So first about the first method. If access to the fuel pump is completely open, then simply unscrew the fuel pipes from it, remove the block (if you haven’t removed it before), unscrew the nuts securing it and carefully lift it up
In the second case, you will need to use either metal scissors or a grinder. We cut through the metal as shown in the picture below
After this, we bend the cut piece of metal, and just as in the first case, disconnect the fuel pipes, unscrew the nuts and remove the fuel pump
Installing the fuel pump occurs in the reverse order.
Avtochanel
We jerk after 80 km/h?! The fuel pump is sick!
And if there is a chance to purchase a low-quality fuel pump, but it is small, then you can buy a repair kit of a very low grade. From my own experience, I will say that I personally purchased kits in which the valves either did not fit into their grooves at all, or fell into them like a spoon in a mug. I don’t know, it’s quite possible that fate doesn’t like me very much, but this happened not only to me. Therefore, I decided that the best way to repair the VAZ 2101 fuel pump is to purchase a new one. Did you pick up speed over 80?! And suddenly there were pokes? Is the car jerking?!.. Most likely, your fuel pump has caught a cold! In this video, Nail Poroshin explains the reason and shows how easy it is to solve! Be careful, don’t let yourself be deceived!.. Enjoy your viewing everyone.
Malfunctions of the pump with carburetor
Repairing the VAZ 2109 carburetor fuel pump should also begin with diagnostics. But in this regard, there is a significant difference from the injection version of the car. It lies in the fact that the fuel pump, in this case, is mechanical. The principle of operation, and therefore the repair, is different. Diagnosis involves the following basic steps when checked:
- general condition of the fuel pump;
- intake and exhaust valves;
- tightness;
- filter for clogging or damage;
- pump diaphragm;
- pusher
VAZ mechanical fuel pumps come in two types: DAAZ and Pekar. The principle of operation is similar, there are slight differences in design. The main parts of all mechanical pumps are: inlet and outlet valves, fittings, pusher, diaphragm and rod.
To check the inlet valve, you need to disconnect the hose from the suction fitting. Close the fitting with your finger and pump up the pump manually. If the finger is attracted to the valve, everything is in order - this part is serviceable; if not, the valve must be replaced. The outlet valve is checked by unscrewing the discharge fitting. By placing your finger in the same way and pumping up the lever, you should feel pressure.
It happens that the filter mesh is clogged. You need to take out the filter, clean it, wash it and blow it with compressed air. In case of obvious deformation or damage, the fuel pump mesh is replaced. If the fuel pump leaks or gets hot, the sealing diaphragms are most likely damaged. To replace them, remove the pump cover and unscrew the nut that holds the rod. Next we remove the diaphragms. In the case of the DAAZ pump there are 3 of them, while Pekar has one.
If the pusher is damaged, you need to unfasten the pump, and leave the heat-insulating insert, gasket and the pusher itself on the engine. Rotate the crankshaft to extend the pusher as much as possible.
We measure the size of the protrusion above the topmost gasket (acceptable value is 0.8 - 1.3 mm). If this value does not correspond, you can try to adjust the gap using thinner or thicker shims. If that doesn't work, change the pusher.
Diameter of the rear shock absorber rod VAZ 2108
1200 rub. for the photo report
We pay for photo reports on car repairs. Earnings from 10,000 rubles/month.
Write:
The shock absorbers on VAZ 2108 and VAZ 2109 cars are installed identically. There are no differences depending on the vehicle configuration or year of manufacture. The manufacturer of factory shock absorbers for both cars is Russian SAAZ. From the assembly line, these VAZs were usually equipped with two-pipe oil struts from this manufacturer.
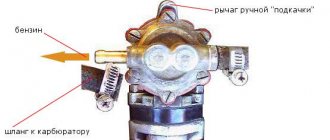
Fuel pump VAZ 2109 (carburetor)
If the VAZ 2109 carburetor fuel pump does not work correctly, then this affects such an important process as the supply of fuel to the carburetor. Failures lead to a lack of fuel in this part of the car.
Now we will talk about such a procedure as replacing a VAZ 2109 fuel pump. But, before starting the process itself, let’s do primary diagnostics. To find out the reasons, perform the following steps:
• First, remove the hose from the discharge pipe. Using the pumping lever, you need to check the fuel supply. If gasoline does not enter the carburetor, the hose is removed from the suction pipe. Now you can find out if there is a vacuum. If it is not there, the fuel pump should be disassembled to check all parts.
On average, the price for a VAZ 2109 carburetor gas pump ranges from five hundred to seven hundred and fifty rubles. In the first case, we get the native DAAZ. For a large sum you can buy imported Pekar. The second, according to many drivers, is more durable. For 450-500 you can buy an Italian equivalent. A little simpler than the French, but not bad. Some drivers install an electric fuel pump on a VAZ 2109 carburetor. Others prefer to install a carburetor with automatic suction on a VAZ 2109.
The procedure for disassembling the fuel pump and replacing it
- first of all you need to remove the air filter;
- After this, the hose through which gasoline is supplied to the fuel pump is removed. To do this, loosen the clamp;
- the hose supplying gasoline to the carburetor is also removed in the same way;
- unscrew the nuts securing the fuel pump.
We remove it as carefully as possible, otherwise you can simply ruin the gaskets. We examine all parts for cracks and chips. We check the valves (intake and discharge) for leaks. We also check the pipes - they should not rotate in their sockets.
We make sure that the diaphragms are in order - without damage or peeling fragments. Now we wash the parts with gasoline and blow them with air under pressure.
When you have checked all the spare parts, you can begin to replace those that have already worn out; the pump gaskets must be changed. Believe me, this will not make things worse for you or your car. During installation, Litol-24 lubricant is used.
If the damage is serious enough, we replace the VAZ 2109 fuel pump (carburetor) completely
After you have checked all this and replaced the necessary parts, the VAZ 2109 fuel pump (carburetor) can be put back in place. During the process, the fuel supply should be adjusted. This is done using gaskets. You need to find out how far the pushrod protrudes from the gasket surface. The correct distance should not exceed 1.3 mm. If the distance is greater, the fuel pressure will be higher than necessary.
This, in turn, causes the shut-off valve to malfunction. When the distance is less than 0.8 mm, in situations where the car is driving faster or is experiencing increased loads, the amount of fuel entering the carburetor is insufficient.
When installing the pump, the steps are reverse to those for removal. Note that there is an arrow on the fuel pump body that should be directed to where the gasoline flows - to the carburetor.
The last thing you will need to do for the VAZ 2109 fuel pump (carburetor):
When the pumping lever is released, you need to tighten the screws on the fuel pump housing cover. If the car does not start or stalls, also check the accelerator pump of the VAZ 2109 carburetor.
How to replace the fuel pump or is it the fuel pump itself?
Removal: 1) First, disconnect both hoses from the pump, or to be more precise, you need to disconnect the left and right hoses from the pump, to do this:
1. Take a screwdriver in your hands, and then use a screwdriver to loosen the screw of the left and then the right hose clamp.
2. Next, disconnect both hoses from the fittings that are located on the fuel pump itself.
Note! The hoses can be removed in any order; there is no sequence as such when removing them!
2) Then use a wrench to unscrew both nuts securing the fuel pump to the engine.
3) And then remove the fuel pump from the studs, thereby removing it from the car engine.
Replacing fuel pump gaskets:
1) After removing the pump, where it was located, an external sealing gasket is installed immediately behind it, which must be removed and preferably replaced with a new one.
Note! The size of the new outer sealing gasket is 0.75 mm!
2) Next, in the same place where the outer sealing gasket was located, there is a heat-insulating spacer, which you will also need to remove in order to get to the inner gasket.
Note! Inside the heat-insulating spacer there is a pusher, which, if deformed, must be replaced with a new one!
3) After removing the heat-insulating spacer, the last internal sealing gasket will remain on the seat studs, which must also be replaced if it burns out.
Note! The size of the new internal sealing gasket is 0.30 mm!
Installation: 1) First install the new inner sealing gasket onto the thermal insulation spacer.
2) Then install the thermal insulation spacer, together with the new internal sealing gasket, into its seat.
Note! If you previously removed the pusher from the heat-insulating spacer, then install it back!
3) Next, install the outer gasket in its place.
4) Next, check whether there is a small plug on the clutch housing; if it is there, then remove it, because under it there is a flywheel that will need to be turned in the future.
5) After removing the plug, place your finger on the tip of the pusher “upper arrow”, and at the same time, using a screwdriver, gradually turn the flywheel by its teeth “lower arrow”.
Note! You need to turn the flywheel until you feel the minimum protrusion of the pusher with your hand!
6) When the minimum protrusion of the pusher from the spacer is reached, use two metal rulers and use them to measure the protrusion of the pusher from the spacer, as shown in the figure:
Note! The protrusion of the pusher from the spacer should be within 0.8-1.3 mm, if the protrusion of the pusher on your car goes beyond the limits, then it needs to be brought back to normal; how to bring it back to normal, read in the “Important” section!
7) After all the operations performed, install a new fuel pump in the reverse order of removal.
Note! When installing the pump, pay attention to the arrow that is shown on it; when installing, this arrow must be strictly directed towards the carburetor!
Important! 1) To bring the pusher protrusion back to normal, for this: 1. Replace the outer gasket with a thinner one if the pusher protrusion is less than 0.8 mm! 2. And if the protrusion of the pusher exceeds 1.3 mm, then replace the same outer gasket, only this time with a thicker one!
2) When turning the flywheel, set the gearbox to neutral gear!
Checking and adjusting pump pressure
It's no secret that any car part has a certain resource. So the “nine” fuel pump, like any part, eventually stops pumping gasoline properly, our instructions will help you figure it out:
- Moreover, on the VAZ 2109 the problems with the fuel pump are always the same
- As a rule, the reasons are not tightness of the valves or housing, fuel wire, or diaphragm, perhaps the fuel filters are clogged, or the fuel supply lines are overheating
- The main problem is ultimately insufficient gasoline pressure at the outlet of the fuel pump.
- And in the case when your fuel pump initially could not show the appropriate (required) output pressure, then all the problems stated above only aggravate the situation
- You need to know exactly the output pressure (immediately before the carburetor) that the fuel pump should develop when the engine is idling.
- As a rule, all fuel pumps - both cars and trucks - must produce a pressure in the range from 0.20 atmospheres to 0.35 atmospheres. When your gas pump has a similar output pressure, then you should not have problems with gasoline supply
- The pressure is measured with a pressure gauge that has a scale with divisions of 1.6 atmospheres - on such a pressure gauge it will be possible to record the pressure of the fuel pump
- When the pressure is measured and it turns out to be below normal, you may just need to adjust the pump
- It is possible to adjust the fuel pump either by moving it closer or further from the engine block (by changing the thickness of the gasket)
- The second method is to strengthen the spring (washers are placed under it, the operation is performed taking into account the wear of existing parts and the strength of the spring)
- The third option is to change the length of the rod
- Any of the listed measures (or all in combination) make it possible to increase the pressure of the fuel pump to the level of 0.20 - 0.30 atmospheres
- The best thing, of course, is to bring the figure to 0.30-0.35 atmospheres at idle speed
- When the engine starts running at higher speeds, this figure will increase a little more.
Characteristics of the VAZ 2109 fuel pump
To understand how a working pump works and check its operation, it is important to know its operating characteristics:
- The length of its rod is 82.4 millimeters
- In this case, the rod protrudes above the gasket by 0.8 - 1.3 millimeters
- The thickness of the very first gasket is 0.3 millimeters
- And, the stroke of the rod is 2.5 - 2.8 millimeters
Useful tips
A couple of very useful recommendations for beginners on what to do if a fuel pump malfunction occurs on a VAZ 2109:
It is important to note that on machines that have a return line, the problem may arise due to the release hole being too large, then most of the pressure is relieved by the return line. In the event that the installed pump on your machine cannot be adjusted, you will have to replace it Today on the market Dozens of models of pumps for VAZ from different manufacturers are sold. In order not to buy a fake, you should approach the purchase very responsibly - choose a company store and a reputable manufacturing company, purchase exclusively models of gasoline pumps recommended by the VAZ plant. And the most ideal option is to contact an official dealer of VAZ spare parts in in your region, then you will receive the required part quickly, and you won’t worry about whether you got a bad quality fuel pump, and you won’t have to look for and buy a new pump a second time
How to remake: step-by-step instructions
Before starting work, wash the car thoroughly and remove dust and dirt from around the engine.
- In the rear of the car we remove the old carburetor fuel system.
- Pull out the gas tank and fuel pipes.
- We screw on the new bracket and use it to secure the new injection lines.
We install the bracket in its original place and secure the lines - We install the fuel filter along with hoses.
We fix the fuel filter with hoses - We attach the fuel pump to the injection gas tank.
- We go into the engine compartment and remove the ignition.
- We disconnect the wires that go from the sensors to the ignition braid.
- We pull out the old ignition tee and install an injection tee in its place.
Before doing this, completely drain the antifreeze from the system. We install the injection ignition tee in place of the carburetor - In place of the distributor, we make a plug with a seal and treat it with sealant.
- Remove the carburetor along with the intake manifold.
We dismantle the old carburetor along with the manifold - We replace the gasket and install a new injection manifold.
We install the injection manifold in place of the carburetor - We install the injectors on the ramp and secure it to the manifold.
- We connect the hoses and install the receiver.
We install the injection receiver and connect the hoses to it - If your model has an oil pump without a casting, then it also needs to be replaced.
- The generator on the nine must be replaced, but the pulley itself is suitable for the new system and can be left.
- Instead of a carburetor ignition cable, we install an ECU wiring cable.
- We connect the wiring to the controller and the motor.
- In our case, the fuel sensor will remain the same; you just need to connect it to the new pump.
- Turn on the ignition and check the operation of the fuel pump. The entire fuel system must be sealed and leak-free.
- We replace the carburetor module with an injection one.
We remove the carburetor ignition module and install the injection module in its place - We install a new ignition system (spark plugs and module).
- We install the air filter.
- Drill a hole for the knock sensor (depth 16 mm).
- We start the engine and check its operation.
Disassembling and replacing the fuel pump
So, now we’ll tell you specifically about how to properly disassemble, replace damaged elements of the fuel pump, or completely replace this device with a new one.
Hatch
- In any case, we recommend purchasing a repair kit. It doesn't cost much. But there is no need to rush into buying a fuel pump. Who knows, maybe a simple repair will bring the pump back to life.
- Remove the air filter along with its housing.
- Disconnect the fuel supply and return hoses from the fuel pump fittings.
- Unscrew the mounting nuts that hold the pump itself.
- Carefully remove the pump, being careful not to damage the gaskets.
- Inspect the pump parts for cracks or damage. Check the fuel pump valves for leaks and perform all the operations we described above.
- Assess the current condition of the suction and discharge fittings. When dismantling, they must remain motionless in their seats. They break extremely rarely, but nothing should be ruled out.
- Check the fuel pump diaphragm. The presence of ruptures and peelings indicates that it must be replaced.
- Look at the current filter. Damage and excessive contamination are clear signs of wear and warrant replacement.
- Treat the filter components with clean gasoline and blow with compressed air using a compressor.
- If you find damaged elements, replace them with new ones using a repair kit.
- Replace the pump gaskets if necessary.
- When installing new gaskets, be sure to first treat their surface with Litol 24.
- If the pump housing itself is damaged or there are other serious problems, you will have to completely replace the fuel pump. Repairs won't help him.
- Next, when partial repairs are completed or you decide to take a completely new pump, it’s time for reassembly.
- Be sure to adjust the feed using shims of the required thickness so that the pusher output has an optimal indicator. We talked about this above.
- If the pushrod protrudes too much, it will cause the fuel pressure to be too high, causing your carburetor check valve to break.
- If the distance is less than required, as the load increases and the vehicle speed increases, the engine will not be able to receive enough fuel.
- Reassemble by following the reverse sequence of dismantling the fuel pump.
- Make sure the arrow on the body points towards the carburetor.
- When installing the diaphragm pump assembly, the holes in the gasket are located away from the muffler pipe.
Well, you figured out how you can repair and replace the fuel pump yourself. The task is really not difficult, although this unit plays a very important role in the performance of the entire VAZ 2109 car.
VAZ 2109 fuel pump malfunction, types of VAZ gasoline pumps
On a VAZ 2109, signs of a fuel pump malfunction are a complete or partial cessation of the supply of gasoline to the carburetor, this entails the inability to start both a cold and hot engine, it will start and stall, in addition, unstable idling is possible. If you suspect that the fuel pump in the VAZ 2109 is not working, then you should check it. It's not difficult to do it yourself, just read this article.
Checking the general condition of the fuel pump
First of all, let’s check whether the supply system of your VAZ 2109 is working at all. To do this, you need to take the following steps:
- Remove the pump fuel hose from the source or discharge fitting;
- Manually press the fuel pump lever several times;
- If the pump is operational, a strong stream of fuel will immediately flow through the fitting;
- If there is no jet or it is very weak, it will be necessary to carry out other checks.
Intake Valve Check
- Disconnect the hose from the suction fitting so that both hoses are eventually removed, each from its own fitting.
- Simply plug the suction fitting with your finger, then pull the lever several times to manually pump fuel. If everything works fine, your finger will begin to be sucked into the fitting. This effect indicates that the pump is working properly. Therefore, we look for the problem in the tank or lines.
- If there is no suction, you will have to disassemble the device to replace the inlet valve. Its tightness is most likely broken.
Fuel pump VAZ 2109 (carburetor)
If the VAZ 2109 carburetor fuel pump does not work correctly, then this affects such an important process as the supply of fuel to the carburetor. Failures lead to a lack of fuel in this part of the car.
Now we will talk about such a procedure as replacing a VAZ 2109 fuel pump. But, before starting the process itself, let’s do primary diagnostics. To find out the reasons, perform the following steps:
• First, remove the hose from the discharge pipe. Using the pumping lever, you need to check the fuel supply. If gasoline does not enter the carburetor, the hose is removed from the suction pipe. Now you can find out if there is a vacuum. If it is not there, the fuel pump should be disassembled to check all parts.
On average, the price for a VAZ 2109 carburetor gas pump ranges from five hundred to seven hundred and fifty rubles. In the first case, we get the native DAAZ. For a large sum you can buy imported Pekar. The second, according to many drivers, is more durable. For 450-500 you can buy an Italian equivalent. A little simpler than the French, but not bad. Some drivers install an electric fuel pump on a VAZ 2109 carburetor. Others prefer to install a carburetor with automatic suction on a VAZ 2109.
The procedure for disassembling the fuel pump and replacing it
- first of all you need to remove the air filter;
- After this, the hose through which gasoline is supplied to the fuel pump is removed. To do this, loosen the clamp;
- the hose supplying gasoline to the carburetor is also removed in the same way;
- unscrew the nuts securing the fuel pump.
We remove it as carefully as possible, otherwise you can simply ruin the gaskets. We examine all parts for cracks and chips. We check the valves (intake and discharge) for leaks. We also check the pipes - they should not rotate in their sockets.
We make sure that the diaphragms are in order - without damage or peeling fragments. Now we wash the parts with gasoline and blow them with air under pressure.
When you have checked all the spare parts, you can begin to replace those that have already worn out; the pump gaskets must be changed. Believe me, this will not make things worse for you or your car. During installation, Litol-24 lubricant is used.
If the damage is serious enough, we replace the VAZ 2109 fuel pump (carburetor) completely
After you have checked all this and replaced the necessary parts, the VAZ 2109 fuel pump (carburetor) can be put back in place. During the process, the fuel supply should be adjusted. This is done using gaskets. You need to find out how far the pushrod protrudes from the gasket surface. The correct distance should not exceed 1.3 mm. If the distance is greater, the fuel pressure will be higher than necessary.
This, in turn, causes the shut-off valve to malfunction. When the distance is less than 0.8 mm, in situations where the car is driving faster or is experiencing increased loads, the amount of fuel entering the carburetor is insufficient.
When installing the pump, the steps are reverse to those for removal. Note that there is an arrow on the fuel pump body that should be directed to where the gasoline flows - to the carburetor.
Shock absorber rod VAZ 2109 diameter
We ensured high quality of the rod by implementing the entire rod production process at our enterprise in the form of a single technological chain.
Share with your friends
Applicability
Advantages of the SS20 shock absorber rod
- high durability and hardness of chrome coating;
- the alignment of the working part of the rod and the piston mounting neck ensures minimal wear of the guide and piston;
- high accuracy of rod geometry;
- high surface cleanliness grade 11-12;
- High-frequency hardening provides the necessary hardness of the rod surface with sufficient ductility of the core.
Guarantee
Damage to the shock absorber rod is a fairly common cause of failure of the strut itself. Such damage includes wear of the chrome coating of the rod, shell and corrosion of the rod, while the shock absorber oil seal and guide are damaged. Following this, an oil leak appears and the shock absorber fails.
The high quality of the SS20 rod is ensured by the fact that all production is carried out as a single technological process. In this way, the entire technological chain is fully controlled - from the receipt of the rod to 100% quality control of all produced rods. In addition to control of finished products, intermediate control is also carried out when performing individual stages of the production chain.
The SS20 shock absorber rod comes with a 1 year/unlimited mileage warranty
The table shows recommended retail prices in Samara
1200 rub. for the photo report
We pay for photo reports on car repairs. Earnings from 10,000 rubles/month.
Write:
The shock absorbers on VAZ 2108 and VAZ 2109 cars are installed identically. There are no differences depending on the vehicle configuration or year of manufacture. The manufacturer of factory shock absorbers for both cars is Russian SAAZ. From the assembly line, these VAZs were usually equipped with two-pipe oil struts from this manufacturer.
If we talk in general about the quality of the original shock absorbers, many drivers have seen a tendency for it to deteriorate over time. There are many cases where the racks on nines and eights of earlier releases lasted much longer.