Device
Modern cars use a disc brake system. However, on budget class cars, it is installed only at the front. The rear wheels are driven by drums. To actuate the pads, the rear brake cylinder is used. The VAZ-2110 is also equipped with it.
The brake system of this car itself includes the following elements:
- Front calipers.
- Hoses and tubes.
- Rear brake slave and master cylinder.
2110 and other VAZ models include a vacuum booster. It is controlled using the brake pedal. Pressure is created from the cylinder pistons, which acts on the pads.
Principle of operation
The brake fluid coming from the main one under pressure acts on both pistons in the working cylinder, which, in turn, compress or expand the brake pads, which leads to braking. The front brake circuit is disc, while the rear brake circuit in many cars is drum type.
- Front calipers.
- Pipe supplying hydraulic fluid to the front wheels.
- Rear pipeline.
- Rear wheel rollers.
- Tank.
- Main roller
- One of the pistons.
- Stock.
- Pedal.
Characteristics and manufacturers
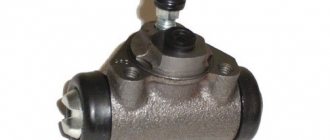
On VAZ cars, the rear brake cylinder is a device containing 2 pistons inside. The body itself is made of metal. But sometimes it cracks. Most often due to marriage. Today there are several original manufacturers of these elements:
- "Craft".
- "Basalt".
Among foreign ones it is necessary to note:
- "Phoenox".
- "AND THOSE".
- "Lucas".
How much do VAZ rear brake cylinders cost? The price of a new element ranges from 300 to 500 rubles. The most expensive is a vacuum booster. Its cost varies from 1.5 to 2 thousand rubles for domestic cars.
Braking of one of the wheels is observed when driving
Most often, such a breakdown is caused by the destruction of the tension spring on the rear brake. The damaged one will have to be removed and a new one put in its place.
It is also common for pistons in wheel cylinders to not function properly if dirt has gotten inside or they have begun to rust. Cleaning and rinsing will eliminate the problem.
Sometimes braking occurs due to loosening of the bolts that secure the guide pads directly to the steering knuckle. If they are re-tightened or replaced with new ones, the problem will be eliminated.
And finally, this can happen because the parking brake system has not been adjusted correctly.
Symptoms of a problem
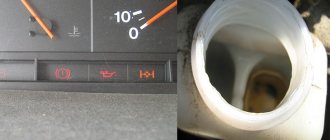
How to determine that an element requires replacement? First of all, a breakdown can be detected by the level of hydraulic fluid, which has begun to disappear in the master cylinder reservoir. The latter is located under the hood, near the vacuum brake booster. It is worth noting that when the pedal is operated, the liquid always decreases from the reservoir. But as soon as you release it, the pistons will return to their original position and the level will resume. If this does not happen, look for the problem.
Leaks can also come from the cylinder itself. In this case, the rear drum will be wet. Well, the last sign is the behavior of the car when braking. The pedal begins to “grab” at the very end, sometimes you have to press several times to create the required pressure. These signs indicate that the car needs to replace the rear brake cylinder. Don't put off repairs until later - it's for your safety.
Repair work
Disassembling, repairing and replacing the brake cylinder of a VAZ car is not particularly difficult. Having purchased the necessary repair kit for the working brake cylinder, unscrew the wheel and, having disconnected the pipes, remove the faulty cylinder (the dismantling diagram will be described in more detail below).
For convenience, by holding the body in a vice and removing the boot, we gain access to the retaining ring that secures the piston, after removing which we remove all the working parts.
After disassembling the housing, you need to rinse everything with brake fluid and inspect the housing mirror for mechanical damage.
If no damage is found, then open the repair kit for the working brake cylinder and replace the faulty parts.
A prerequisite, regardless of their condition, is the replacement of all rubber parts included in the repair kit for the working brake cylinder. This list includes: boot, cuff, etc.
Why is this happening?
In most cases, failure of this element occurs due to natural wear and tear. The rear brake cylinder is a very reliable part, and its service life is about 200 thousand kilometers. If the car has not yet reached this mileage, the cuffs are most likely damaged. This happens when you neglect to replace the brake fluid or mix it with other brands. It absorbs moisture well, which makes it ineffective. And the water begins to corrode all metal parts. Therefore, the fluid must be changed every two years, regardless of the mileage of the car. Also, the rear brake cylinder fails due to squeezed out pistons. This happens when the rear pads are not replaced in a timely manner. Sometimes the pistons simply jam, causing the car to constantly slow down while driving or slow down a little. At the same time, the drum begins to get very hot.
The next thing you need to pay attention to is brake bleeding technology. When performing this work, do not break off the fitting on the cylinder. If it gets stuck (which often happens), purchase a repair kit so that in case of deformation you can replace the damaged element. Some motorists tap the body around the fitting with light blows of a hammer and spray WD-40. In some cases this helps. Next, we will look at how to remove the old rear brake cylinder and install a new one in its place.
Dismantling and repair of GTZ
After dismantling the GTZ, it is necessary to carefully inspect it for fluid leaks. If the rear oil seal is damp or damp, most likely some of the brake fluid has entered the VUT and is corroding its membranes. It is necessary to pump out the liquid from the VUT using a syringe and a thin tube.
To disassemble the GTZ, drain the liquid from it, then carefully clamp it in a vice so that the holes for installing the tank are at the bottom. Remove the locking screws that prevent the pistons from returning too far. Remove the GTZ from the vice and use a puller to remove the retaining ring from the VUT side. Pull out the first piston and spring. Often the second piston comes out with difficulty, so you have to either knock the gas turbine engine on a wooden block, or plug one of the holes in the far cylinder using a suitable bolt and connect a compressor with a pressure of at least 6 atmospheres to the second hole. When removing the pistons, be sure to remember how the rubber seals are installed and how the pistons are located, this will greatly help during assembly.
Carefully inspect the inner surface of the GTZ. Any scratches lead to a decrease in braking efficiency and are therefore unacceptable. If scratches are found on the inner surface, the body or the entire GTZ must be replaced. After making sure that the internal surface of the GTZ is not damaged, buy the appropriate repair kit. When choosing a repair kit, give preference to products that are manufactured by partner enterprises of major automakers. Often original repair kits from one brand or model fit another.
Remove all old rubber seals from the pistons. Wash the pistons with water and dry with compressed air. Install new seals from the repair kit. Before installing, be sure to lubricate them with brake fluid, this will make them easier to fit into place and prevent damage. Do not confuse the direction of installation of the cuffs. Before assembling the GTZ, wash its body with water and detergents, dry it with compressed air and lubricate it generously with brake fluid. Do not use gasoline or other petroleum products for flushing; if you do not wash them off properly, they will corrode the rubber seals. Reinstall the pistons, tighten the retaining bolts, and insert the rear oil seal and retaining ring.
Replacement
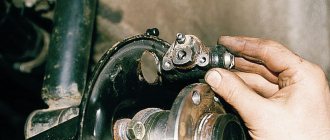
To do this, we need a jack, a balloon, a hammer and a set of wrenches (if it’s a VAZ, then two for 10 and 12). First we put the car in gear. The handbrake cannot be used as it uses our cylinders. Next we remove the bolts on the rear wheel. Raise the car on a jack. Remove the wheel and unscrew the bolts on the drum using a 12mm wrench. We take the last one out. If it has become stuck, you can “stir” it with blows of a hammer. In order not to damage the drum (since such actions can crack it), we use a wooden block as a lining. After that, remove the pads and use a 10mm wrench to unscrew the brake hoses.
Be careful - when dismantling, liquid will flow from them. Wear rubber gloves. To prevent the liquid from splashing on the floor, prepare a container (for example, a plastic bottle). To remove the rear cylinder, use the same wrench to unscrew the two mounting bolts. At this stage, dismantling is complete. Now we fasten the new part into place. Installation is in the reverse order. After assembling the system, be sure to bleed the brakes. This operation is also performed when replacing pads and any elements of the system, be it a tube or a vacuum booster.
How to remove the brake master cylinder
The technology for dismantling the GTZ on any car is the same. First, use a syringe to pump out the brake fluid from the reservoir (the reservoir can be removed either on the car or after dismantling the GTZ). Then, using a special wrench, unscrew the ends of the brake pipes (it is advisable to immediately put rubber caps on them). After this, unscrew the nuts securing the GTZ to the VUT and remove the cylinder.
How to upgrade
To completely remove air from the system, you will need an assistant. The latter must press the brake pedal on command. You will also need a container into which the airy liquid will be released. It is best for it to be transparent. A regular mineral water bottle will do. You will also need a hose through which the liquid will flow from the fitting into the container. This can be any rubber or silicone tube. It is desirable that it is also transparent.
So, how to properly bleed the brakes after replacing the rear cylinder? First, add fluid to the plastic reservoir of the master cylinder to the required level. Then we connect the hose with one end to the unscrewed fitting, and lower the other into the bottle. The assistant should press the brake pedal 4-5 times and press it “to the floor” at the last time. As you press, hydraulic fluid will begin to exit the system. The first time it contains many small air bubbles. It would seem that it was possible not to pump. But they are the ones that interfere with effective braking. The compressive force of air is much lighter than that of liquid, which results in greater heating.
When to finish the procedure? After each pumping step, the amount of air, namely bubbles, will decrease. This is done until they completely disappear from the liquid. To determine this, use only clear tubes and a container. After this, screw the fitting back and check the fluid level in the master cylinder reservoir. It should decrease. Top up again to the maximum level. Remember that the brand of the substance used for topping up must be the same as what is currently used in the car.
The brake pedal has too much travel
In this case, one might suspect that:
- air has entered the hydraulic drive;
- the rear cylinder piston thrust ring lost elasticity, as a result of which it shifted inward;
- Brake fluid has leaked from the system;
- There is too much clearance between the main cylinder piston and the vacuum booster adjusting bolt.
Respectively:
- in the first case, you will need to bleed the system;
- in the 2nd - you will need to completely change the cylinder;
- in the 3rd - eliminate the leak by replacing seals or hoses that have become unusable.
Adviсe
After this work, it is necessary to check the serviceability of the new element. To do this, press the brake pedal and lock it in this position (it is advisable to have an assistant). Next you need to spin the wheel. It must be in hanging condition. The drum should not rotate. If this happens, or when you press the pedal, liquid flows out of the fittings, check that the part is installed correctly.
It would be a good idea to check the serviceability on the go. Do this at low speed, because after bleeding the pressure in the system drops, and the first time you press the pedal, usually nothing happens. The car should brake well and hold the handbrake.
The structure of the main elements of the brake system of the VAZ 2106
Let's consider the features of the design and operation of all the main parts that provide vehicle braking.
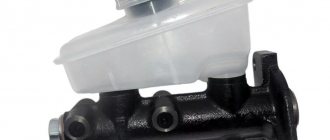
Main brake cylinder
The braking system on the VAZ 2106 is divided into two circuits: primary and secondary. This is done so that if the front brakes break down, the driver can use the rear ones and vice versa. Both the primary and secondary circuits are equipped with hydraulic cylinders that push the pistons out of the shoes. And the pressure in this entire system is created by the master cylinder. After braking begins, the piston in this cylinder begins to move, pumping fluid into the primary circuit (or into the secondary circuit - it all depends on which brakes the driver used).
The master cylinder creates fluid pressure throughout the entire brake system.
The fluid reaches hydraulic cylinders through hoses, from which pistons extend, pressing on the pads. In general, in the main cylinder of the “six” there is not one, but two powerful pistons placed in special sealing containers. The main piston is connected to the main brake pedal rod, and the additional one is connected to the main one and begins to move after it. When there is no longer a need to brake, the driver removes his foot from the brake pedal. After this, return springs come into play, removing the displaced pistons to their original positions until the next braking.
Under the hood of the VAZ 2106 there is a reservoir, a vacuum booster and a master cylinder, assembled into a single system
If you open the hood of a VAZ 2106, the main brake cylinder can be seen under the vacuum booster, with which it forms a single system. And next to this cylinder there is a small tank, divided by a partition into two unequal halves. This reservoir stores a small reserve of brake fluid. If a leak begins in some circuit, then liquid will flow into the system from this tank for some time, replenishing the losses. If the fluid supply runs out before the leak is found and repaired, the brakes will fail and the driver will be in mortal danger.
Video: how to change the main brake cylinder on a classic
Vacuum booster
The vacuum booster is an intermediate link between the pedal and the main brake cylinder. As soon as the brake pedal is pressed, its pressure reaches the vacuum booster through several small levers. This device is a sealed housing divided into two halves by an elastic membrane.
The vacuum amplifier is a simple housing with a diaphragm inside
The engine exhaust manifold pipe is connected to one half. When the engine starts, the pressure in this half decreases greatly (and a real, deep vacuum is not formed there, it is just an area of very low pressure, but in everyday life the amplifier is still called a vacuum amplifier). The second half of the intensifying chamber has access to the atmosphere at normal pressure.
It is the vacuum booster that transmits the driver’s force to the master brake cylinder
When the pressure in one half of the chamber is very low and normal in the other, the elastic membrane gradually begins to bend to where the pressure is low and put pressure on the pusher. And it causes displacement of the piston in the main brake cylinder.
Video: we disassemble the vacuum booster ourselves
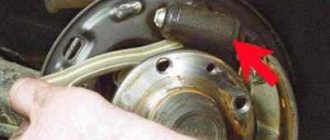
Working cylinders
As mentioned above, the brake wheel cylinders must use their pistons to cause the pads to move. The cylinders on the “six”, installed at the front and rear, are not very different in design. They consist of sealed housings with retractable pistons. Each piston is contained in a sealing container. This is necessary in order to prevent brake fluid from leaking while the cylinder is operating.
The front working cylinder of the VAZ 2106 consists of a housing and a piston, which comes out of its container during braking
The difference between the front and rear cylinders is only in the force application pattern. The working cylinders in the front calipers (those with discs) press on the pads so that they move and clamp the brake disc. And the cylinders of the rear drum brakes press on the C-shaped shoes so that they move apart and rest against the inner wall of the drum.
The rear working cylinder presses on the brake drum walls from the inside
Brake pads
The principle of operation of the “six” brake pads is absolutely the same for all wheels. When the pads work, they simply convert one type of energy into another. The driver sees an obstacle, presses the brake pedal, and the pads come into contact with the brake disc or the inner wall of the brake drum. Friction appears at the point of contact, which causes rapid heating. That is, the kinetic energy generated when the wheels of the car rotate is converted into thermal energy, which warms up the brakes. The result of this transformation is that the machine stops.
The front pads on the VAZ 2106 are flat
A special protective material is attached to the working surface of the pads, which has an increased coefficient of friction. And its hardness is significantly lower than the hardness of the brake disc. To obtain such properties, manufacturers use various composite materials, the main filler of which is sawdust of soft metals, such as copper. The pads on the front wheels are flat and they compress the brake disc from the outside. On the rear wheels, the pads are C-shaped and rest against the walls of the brake drum from the inside.
The rear pads on the VAZ 2106 are C-shaped, following the internal contours of the brake drum
Brake hoses
Brake hoses, along with the pads, are the most important element of the VAZ 2106 brake system. It is through the hoses that the brake fluid is supplied from the master cylinder to the brake working cylinders. During the trip, the life of the driver of the “six” and his passengers literally depends on the reliability of the hoses, so the requirements for them are very strict. Brake hoses on the “six” are made only from high-quality rubber and tool steel. They must have the highest wear resistance, corrosion resistance and be immune to the effects of various chemicals that are sprinkled on roads in icy conditions.
Brake hoses are subject to the highest technical requirements
In addition, all hoses are checked for:
- high pressure. The minimum pressure that a VAZ 2106 brake hose must withstand is 200 bar. At this load, no leakage should occur;
- gap The hoses are stretched with a pressure of 1200 bar. A high-quality product should not tear;
- bending and volumetric expansion.
Only after going through all these procedures are the parts installed on the car.
Brake pedal
The pedal is the main control element of the brake system of the VAZ 2106. It is located under the steering column, next to the gas and clutch pedals, and is used as a lever that allows the driver to transfer muscle force to the main brake cylinder.
Using the pedal, the driver controls the car's braking system
A correctly adjusted pedal must have a free play reserve of 4–6 cm. After the foot pressing the pedal has passed this distance, the car should begin to brake smoothly. If this does not happen, then one of the breakdowns mentioned above is present.
Video: Long brake pedal travel - what could it be
Bleeding the brakes
After repairing the GTZ or RTC, as well as replacing the fluid, brake hoses or pipes, the brakes need to be bled. The essence of the event is to remove air from the braking system. For this procedure you will need:
- 8 (10) mm key;
- silicone transparent tube according to the diameter of the fitting;
- capacity;
- brake fluid.
All classic Zhiguli models use DOT-3 or DOT-4 brake fluid. Its volume in the “penny” hydraulic drive system is 0.66 liters. It is more convenient to bleed the system with a partner.
You need to start pumping the brakes from the right rear wheel . The process consists of the following steps:
- We install the machine on an overpass or inspection hole.
- Unscrew the filler plug of the expansion tank and check the fluid level. If necessary, bring it to the mark on the tank.
If the brakes are pumped correctly and there is no air left in the system, the pedal should feel tight when pressed and braking should be effective.
Video: how to bleed the brake system on a “classic”
I have repeatedly had to bleed the brakes alone, because there is not always an assistant available, for example, if a breakdown occurred on the road. For such situations, I always carry an expansion tank cap with a valve from a tubeless tire in stock. To make such a simple device, just drill a hole in the lid and insert a valve into it. When it becomes necessary to bleed the brakes, I screw this cap onto the reservoir. Using a piece of hose, I connect the valve to the spare wheel, having first unscrewed the valve valve from it. This creates pressure in the tank. Then I bleed the brakes according to the above scheme, ensuring that all air leaves the system, not forgetting to control the fluid level. I bleed the clutch in a similar way.
If there is a problem with the master brake cylinder, as evidenced by characteristic signs, the part needs to be diagnosed and subsequently repaired. If the unit has severe wear, then the problem can only be solved by completely replacing it. To carry out repair work, it is not necessary to visit a service station. It is enough to prepare the necessary list of tools and materials, read the step-by-step instructions and follow them during the work.
2 1 vote
Article rating
Reasons why the brakes might fail
Any problems during the braking process reduce its effectiveness, which can lead to dire consequences for everyone - the driver, passengers, and other road users.
Very often, problems arise simply because the driver uses low-quality brake fluid. If your car suddenly loses brakes, this may be due to several reasons, the main thing is not to blame the master cylinder for all the problems.
Below are the reasons why the brakes on a car fail:
- One of the main causes is usually a leaking slave cylinder. Gradually, slowly or quickly, all the contained liquid flows out of it.
- You should also check the level of brake fluid in the reservoir and the condition of the main brake.
- If traces of smudges are noticeable on the main brake, then this is the reason.
- Another possible cause of brake failure could be that the brake line is torn. For example, rubber brake hoses could fray, partially rot in some places, or get punctures.
- The working cylinders may have jammed;
If it is nevertheless noticed that the main brake cylinder is not working:
- it will show where traces of brake fluid leaks appeared;
- it will be impossible to press the brake pedal;
- on the contrary, the brake pedal can move on its own without the driver making any effort to do so.
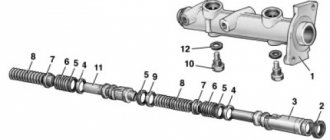
Master brake cylinder with reservoir: 1 — master cylinder body;
2 low pressure o-ring; 3 — drive piston of the “left front-right rear brake” circuit; 4 - spacer ring; 5 - high pressure sealing ring; 6 — pressure spring of the sealing ring; 7 — spring plate; 8 — piston return spring; 9 — washer; 10 — locking screw; 11 — drive piston of the “right front-left rear brake” circuit; 12 — connecting sleeve; 13 - tank; 14 - emergency brake fluid level sensor; A - gap.
Therefore, it is possible to repair the VAZ 2110 brake cylinder, but not always. Most often, if it leaks, a repair kit will help fix the problem and restore the cylinder’s functionality. If the internal mirror in the cylinder is damaged, then, unfortunately, nothing can be corrected, since grinding is prohibited. If everything is not so scary and repairs are possible, you can do it yourself, because the price of the repair kit is quite reasonable, and almost every motorist can afford it.
What tools are required to replace a brake master cylinder?
- key to 17;
- key to 10;
- half-liter bottle of brake fluid;
- syringe;
- brake fluid.
2 more reasons why rear brakes stick
Rear brakes jam like this: the pads stick to the brake discs or drums, as a result the wheels do not rotate and the vehicle does not move.
Why do the rear brakes stick? There may be two reasons:
- The car “rested” on the handbrake for more than a month.
- The brake pads got wet when the vehicle got into a puddle, and the driver drove the car into a garage or parking lot without drying them.
You will have to be quite nervous in such circumstances. The rear brakes are jammed, there is no way to even get to the service station. You'll have to do the repairs yourself. Below are tips on how to deal with this situation.
Are there any advantages to a drum mechanism over a disk mechanism?
It would seem that this is simply impossible. How can an archaic system be better than a more modern one? But there are several undeniable advantages of drum brakes that cannot be taken away from them:
1. Because the contact patch extends around the entire circumference of the drum, the braking force transmitted to drum brakes is greater than that of a brake disc of the same size.
2. Don’t take it as a joke, but we read on specialized websites that using drum brakes saves weight, money for the production of an element for a car company and, ultimately, money in the wallets of car owners.
If we knew about the last two points for a long time - indeed, it is difficult to find a simpler and cheaper design, then we didn’t even know about the weight. Somehow the cast iron bass drum did not inspire too much confidence in this. However, if you consider that in a disc brake, in addition to brake hydraulics, there is also a huge disk (also cast iron), then that’s what it looks like. With the same weight, the drum brake will be more powerful due to the larger contact patch of the pads in it. But with the same power, it will be lighter than its modern counterpart.
Sources
- https://skolkogramm.ru/info/zamena-zadnego-tormoznogo-czilindra-vaz-2106-svoimi-rukami-foto-remont-vaz-2106
- https://prometey96.ru/modeli/ustrojstvo-zadnego-tormoznogo-cilindra.html
- https://avto-lover.ru/drugoe/zadnij-tormoznoj-cilindr-2108.html
- https://alfcars.ru/brake-system-diagram-and-repair/how-to-disassemble-the-brake-cylinder-vaz-2106-replacement-of-rear-brake-cylinders-vaz.html
- https://bumper.guru/klassicheskie-modeli-vaz/tormoza/tormoznaya-sistema-vaz-2106.html
- https://AutoManya.ru/lada-drugoe/remont-zadnego-tormoznogo-cilindra.html
- https://otdelka-remont.ru/remont-zadnego-tormoznogo-tsilindra-vaz-2106/
[collapse]