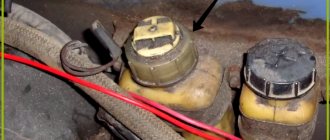
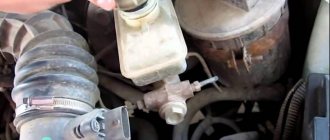
The brake system on Kia Rio 3 cars is equipped with a hydraulic drive that operates under pressure; when the brake fluid (F) decreases, the F level sensor in the master brake cylinder turns on a lamp on the instrument panel indicating a possible problem in the car's brake system. As a rule, simply adding brake fluid cannot solve the problem; to do this, you have to at least bleed the brake system or replace it. Also, the need to replace the fuel tank arises during preparation for routine maintenance.
2272-4-13-03
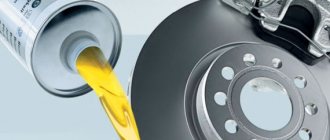
After pumping out the old brake fluid, pour new brake fluid into the reservoir.
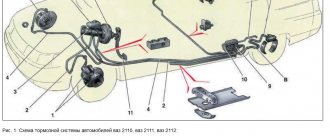
We carry out the replacement with the engine not running, first in one circuit, and then in the other in the following sequence:
- brake mechanism of the right rear wheel.
- brake mechanism of the left front wheel.
- left rear wheel brake.
- brake mechanism of the right front wheel.
We clean the bleeder fitting of the brake mechanism of the right rear wheel from dirt.
Shift interval and volume
A large number of motorists want to know when to change the brake fluid in the 2014 Kia Rio.
Experts advise changing the TZ in a vehicle every two years or upon reaching thirty thousand mileage.
It is important to adjust the periods based on the conditions of use (this may include using the brake too often when in long traffic jams).
How much to fill the TJ in the Kia Rio? The volume of the hydraulic drive is eight hundred grams, if you change it, then one liter will be enough.
2272-6-12-02-01
Remove the protective cap from the brake bleeder fitting.
Use a spanner wrench or a 10mm socket to loosen the bleeder fitting. We put a hose on the fitting, and immerse its free end in a container partially filled with working fluid.
An assistant should vigorously press the brake pedal all the way 4-5 times and keep it pressed.
Required Tools
The table below presents the tools for replacing the TJ on a Kia Rio 3.
Table - List of tools required to change brake fluid
| Tools and materials | Note |
| Tester | To check the quality of the filled fuel fluid |
| Key | "on 10" |
| tube | Transparent |
| Tara | Volume up to 2 liters |
| Syringe | Extension hose |
| Wire brush and rags | To clean the fitting from contamination |
2272-6-12-02-02
Using a 10mm wrench, unscrew the bleeder fitting 1/2–3/4 turn.
In this case, liquid with air bubbles will flow out of the hose, and the brake pedal will move forward.
As soon as the liquid stops flowing out of the hose (the pedal should go all the way), tighten the fitting, and only after that can the assistant release the pedal.
We repeat pumping until the liquid coming out of the hose becomes light-colored. We remove the hose, wipe the bleeder fitting dry and put a protective cap on it.
Rules for replacing brake fluid
Brake fluid is highly hygroscopic. By absorbing moisture, it lowers its boiling threshold. Therefore, it is prohibited to use liquid fuel that was stored in an open container for filling.
Due to hygroscopicity, it is prohibited to reuse drained fuel fluid, even if it is relatively fresh. For refilling, it is allowed to use only liquid from a hermetically sealed container. Otherwise, the behavior of the braking system may become unpredictable.
When replacing the TJ, it is important to follow the sequence of bleeding the wheels. Otherwise, it is possible to mix old and new fuel fluid, which is unacceptable. The image below shows the correct pumping sequence for the Kia Rio 3.
Brake fluid is aggressive to the paintwork of the Kia Rio 3 body. Therefore, if it gets on the surface, you should wipe it off as quickly as possible with a rag. After this, it is advisable to rinse the area with water.
TJ has an aggressive effect not only on paintwork, but also on the environment, as it is toxic. Therefore, it is forbidden to dump slurry and fresh brake fluid onto the ground, into a river or lake. It is not advisable to pour TJ down the toilet. For proper disposal, it is recommended to take brake fluid to special collection points for toxic and toxic substances. In addition to hygroscopicity, another property of TJ is its reaction with oil. Therefore, when carrying out work to replace the fuel fluid, its contact with rags containing traces of lubricant should be avoided.
2272-6-12-02-03
We pump, as described above, the brake mechanism of the left front wheel.
Similarly, we bleed the brake mechanisms of the other circuit.
When pumping, you need to monitor the fluid level in the tank and add fluid.
We pump the hydraulic drive of the brake system until new fluid (lighter than the old) begins to come out of the bleeding fittings of all working cylinders. After pumping, bring the fluid level in the hydraulic brake reservoir to normal.
There is an even simpler option for replacing brake fluid. This method does not require the presence of an assistant. With this method, a certain supply of brake fluid is desirable (at least 1 liter).
We place the car on an inspection ditch or overpass and ensure free movement between the brake fluid reservoir in the engine compartment and the brake cylinders of all four wheels.
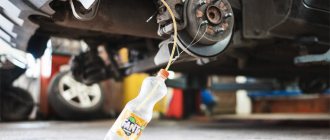
Use a rubber bulb or syringe to pump out the brake fluid from the reservoir. Add new fluid to the top edge. To speed up the process (to release fluid from all cylinders at once), it is advisable to select four pieces of tubes that fit tightly onto the bleeder fittings of all cylinders. We lower the free ends of the tubes into small transparent bottles.
We unscrew the fittings of all brake cylinders. We make sure that the liquid has flowed through all four tubes. We control the decrease in fluid from the reservoir located on the brake cylinder and immediately replenish the reservoir. We observe an increase in the level of liquid in bottles located near the wheel brake cylinders.
It is necessary to move several times from the position of observing the flow of fluid from the brake cylinder fittings to a position where you can check and replenish the fluid level in the reservoir located on the brake cylinder in order to prevent the reservoir from drying out.
Usually the level rises most quickly in the bottle into which the hose coming from the brake cylinder of the front left wheel is lowered. As soon as there is about 200 ml of liquid in the bottle of the front left wheel, wrap and tighten the fitting of this cylinder. Next, we wait for the same result for the front right wheel cylinder and tighten its bleeder fitting in the same way. The process can be completed after 200–250 ml of liquid comes out through the fitting of each rear wheel.
We make sure that all fittings are tightly tightened. We put on protective caps. Check the fluid level in the master cylinder reservoir.
[We save up to 5,000 rubles on Kia Rio maintenance] [Kia Rio maintenance for 15 thousand km] [Kia Rio maintenance for 45 thousand km] [Kia Rio maintenance for 60 thousand km] [Do it yourself Maintenance - general recommendations] [Safety rules for carrying out vehicle maintenance yourself] [ Tools required for carrying out maintenance of the Kia Rio]
Replacing the working fluid in the hydraulic brake system of Kia Rio
Choosing brake fluid for Kia Rio 3
According to official recommendations, the brake circuit of the Kia Rio 3 should be filled with the original Hyundai Brake Fluid. The price for branded consumables starts from 380 rubles. The volume of the canister is one liter. The first generation of machines uses DOT-3 fluid. On later versions of the car, exclusively TJ DOT-4 is used. In this case, it is possible to transfer a vehicle from DOT-3 to DOT-4.
On the Kia Rio 3, the use of TZ from third-party manufacturers is allowed. It is important to check whether the brake fluid is DOT-4. The table below presents a list of brands whose technical characteristics perform well during operation on the Kia Rio 3.
Table - Good brake fluids for Kia Rio 3
| Brand | vendor code | Estimated cost, ruble |
| Mann-Filter | C21014 | 500-550 |
| Bosch | 1987479106 | 160-220 |
| Peugeot/Citroen | 469934 | 500-810 |
| Castrol | 155BD0 | 290-300 |
| Opel | 1942058 | 500-620 |
| Filtron | AP1397 | 280-340 |
| General Motors | 93160363 | 400-600 |
| Purflux | A1011 | 410-520 |
| TRW | PFB450 | 190-250 |
| Motul | 100950 | 250-330 |
Step by step procedure for replacing pads
When replacing pads, you first need to take care of your safety. To do this, place the machine on a level surface. Place wheel chocks, wedges or, in extreme cases, stones under the rear wheels. It is better under both wheels or diagonally from the lifted front one. And set the car to the parking brake. The further procedure will be as follows:
- Start on the right side, so turn the steering wheel all the way to the right.
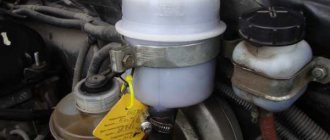
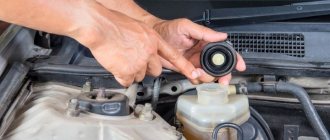
- Open the hood and brake fluid reservoir cap. If the level is close to the maximum, pump out the liquid to the minimum level.
- Loosen the wheel bolts, but do not unscrew them completely.
- Raise the car with a jack.
- Unscrew the bolts and remove the wheel.
- Clean the caliper from dirt with a brush and remove dust with a rag.
- Try to push the brake piston into the cylinder. To do this, rest your thumbs on the caliper, and with the rest, pull the bracket with the brake cylinder towards you. If that doesn’t work, then carefully, so as not to damage the rubber seal, insert a slotted screwdriver between the block and the piston and try to press it into the cylinder.
- Use a 17 key to hold the nut, and use a 14 key to unscrew the lower and upper guide bolts of the caliper.
- Remove the caliper bracket and tie it to the spring.
- Remove the brake pads.
- Check the condition of the rubber protective seals and replace them with new ones if necessary.
- Unscrew, lubricate and reinstall the guide bolts.
- Insert new pads. The block with a wear indicator is installed on the inner side.
- Check whether the brake piston is completely recessed into the cylinder. If not, you'll have to press it in. To do this, press the piston with adjustable pliers or sliding pliers. Be careful not to damage the rubber cuff! The lack of pliers or pliers is not a problem. Use another method. Attach an old block, or better yet two, to the piston, with the entire plane, insert a wheel wrench into the window of the bracket and press the piston. It is not recommended to do this with a bracket screwed to the caliper. In this case, you will hit the brake disc with the key and may damage it.
- Reinstall and screw the bracket. Also holding the nut with a 17 wrench.
- Install the wheel and tighten the bolts.
- Lower the car and be sure to finally tighten the bolts.
- Remove the jack, turn the wheels the other way and move on to the next wheel.
When finished, do not forget to adjust the brake fluid level and close the reservoir and hood. Try pressing the brake pedal several times. It should spring well. Drive slowly for ten meters and brake carefully. If everything is in order, go on your way.
Do not accelerate or brake sharply for at least the first 150 km. The pads should rub in.
Replacing brake pads on a KIA Rio is not difficult even for a novice motorist. You will spend a little time, save money and be confident in your safety. Please note that regular replacement of brake pads must be accompanied by checking the rubber seals, lubricating the guides and adjusting the volume of brake fluid.
Bleeding Kia Rio brakes
How can you tell if your brake system needs bleeding? If you notice at least one of the following symptoms, we recommend contacting a car service:
- uneven braking force on the wheels - when braking, the car pulls off the trajectory
- additional force is required when pressing the pedal to stop the car
- pedal travel increased
- depressurization of the hydraulic drive occurred (both during a breakdown and as planned during the repair process)
Trust bleeding of the brake system only to professionals!
WHEN DO YOU NEED TO BLEED YOUR KIA Rio BRAKES?
Bleeding the brakes - removing air - may be necessary for several reasons:
- The Kia Rio brake system was repaired with the disconnection of the main pipes, that is, airing occurred: hoses and pipes were replaced, the master cylinder or vacuum booster was dismantled, and the brakes were tuned.
- Depressurization has occurred - damage to the brake fluid lines.
- Kia Rio brake fluid was replaced.
- The brake fluid level in the expansion tank has dropped to a critical level.
HOW TO KNOW THAT THERE IS AIR IN THE Kia Rio BRAKE SYSTEM?
When the brakes are aired, the driver’s sensations when pressing the brake pedal change noticeably:
- The braking distance increases noticeably.
- The stop occurs in jerks.
- Pedal travel also increases.
- The Kia Rio brake pedal becomes unnaturally soft, “cotton-like”.
WHAT BRAKE FLUID SHOULD BE FILLED INTO THE KIA Rio SYSTEM?
There are four grades of brake fluid: DOT 3, DOT 4, DOT 5 and DOT 5.1. As a rule, the car system uses a glycol-based composition - DOT 3, DON 4 and DOT 5.1. DOT 5 is made on the basis of silicone, which is not able to absorb moisture, but during operation it is saturated with air, which is unacceptable for ABS, ESP and other electronic braking systems. To understand what kind of fluid is in the brakes of your car, just look at its color: glycol is yellow, silicone is red.
Mixing silicone and glycol fluids in the Kia Rio brake system is unacceptable! You should also not add fluid that is not intended for this purpose to a composition intended for brakes with ABS. Mixing DOT 5.1 or DON 4 with DOT 3 results in a significant reduction in the boiling point of the brake fluid.
If you do not know what kind of fluid is in the brakes of your car, it is recommended to inspect the hoses, tubes and connections for leaks, and then completely replace the fluid and then bleed the brake system.
IS IT POSSIBLE TO BLEED THE Kia Rio BRAKE SYSTEM IF IT IS EQUIPPED WITH ABS AND ESP?
It is not recommended to bleed Kia Rio brakes with ABS yourself. When the valve block and hydraulic accumulator are of the same design, it is enough to disable the ABS system, but if these elements are located in different places, additional knowledge and a professional scanner, which is only available in car services, will be required. The same applies to cars with ESP.
WHAT IS THE PROCEDURE FOR BLEEDING KIA Rio BRAKES?
Before starting the process of pumping the brakes, be sure to check the volume of fluid in the reservoir - it should be at the maximum level. You should also unlock the pressure regulator located on the rear axle and clean the air bleed valves on each caliper.
The standard algorithm for bleeding the Kia Rio brake system requires starting the procedure with the rear right wheel, then starting with the rear left, then working with the front right and finishing with the front left. However, it is worth familiarizing yourself with the sequence in the service book of your car. If such data is not available, then the standard approach described above is applied.
Replacement frequency and filling volume
Many car enthusiasts are interested in how often to change the brake fluid on the Rio 3. According to the vehicle maintenance schedule, it is necessary to change the brake fluid every 2 years of vehicle operation or 30,000 km , depending on the event that occurs first.
However, it is necessary to adjust the replacement period depending on the operating conditions of the car. For example, due to frequent braking of a car during traffic jams.
If it is necessary to replace the fuel fluid in a Kia Rio 3, you will need to fill the system with 0.7-0.8 liters of fluid.
conclusions
So. We found out what brake fluid is and what functions it performs. We figured out its classification and the appropriate type specifically for the Kia Rio.
We found out different approaches to determining its service life. And finally, we looked at several replacement methods.
Ultimately, whether to replace it with an official dealer during maintenance, do everything yourself or with a friend is up to you to choose. We hope this article has revealed all the nuances and will make your choice as easy as possible. Ask questions in the comments.
Signs that replacement is needed
It is difficult to visually determine the condition of the fluid in the brake system. For this purpose, specialized service centers have a special tool. When dipped into a liquid, it measures the amount of water in it.
A green light on the device indicates a minimum amount of moisture and good condition of the liquid, a yellow light indicates an imperfect but serviceable condition of the liquid. The red LED indicates that the fluid needs to be replaced.