Save article:
In this article:
- How do brakes work?
- What are the main causes of front brakes sticking?
- What other faults can cause the front brakes to jam?
What daily manipulations does every person who moves during the day by car do? He gets into his car, starts the engine, warms it up a little and starts driving. And here an unpleasant surprise can await him: the car does not move! If this has not happened before, then it is difficult for the driver to understand what is going on, especially if his driving experience is not yet very long. The reasons why the front brakes stick can be different. To learn how to distinguish and eliminate them, you must first understand the theoretical side of the issue.
The pistons of the brake cylinders are jammed, what should I do?
Welcome! Brake cylinders - thanks to them, braking is carried out, and without the pistons that are in them, these cylinders will not work at all, so if a piston fails, then you have to go to a car store and buy a new brake cylinder, because driving without brakes is scary and even more dangerous , but not in all cases the pistons stop working forever, sometimes they can be revived, and we will write in detail about how to do this in this article.
Note! To work, you will need to stock up on: A jack to lift any side of the car, as well as a wheel wrench and you may also have to stock up on bricks, and you may also need a basic set of wrenches and sockets!
Summary:
How to understand that the pistons of the brake cylinder are not working? Let us answer this question before we move on to the repair of pistons, namely inoperative (That is, the pistons do not move in the cylinder), the pistons are recognized if they do not move at all and stand in one place, as a result of which the car, namely the brakes, begins a number of problems occur, that is, the car cannot drive normally because it constantly slows down even though you don’t press the brake pedal at all, or it may be that the car will drive but it will brake much worse than it should, in general, let’s figure it out Why do these cylinder pistons fail?
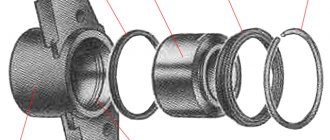
From time to time, the sealing ring (indicated in the photo below by an arrow) that fits the piston in a circle either wears out, or micro cracks form in it through which dirt begins to get into the piston itself, where the lubricant is located, and as a result the piston becomes unusable.
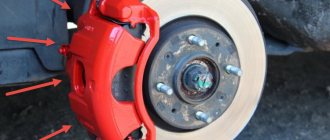
And also, the piston can simply sour in the brake caliper, and this can happen because of our roads, which in winter are mostly sprinkled with sand and salt, and the brake system is located in the very bottom of the car and therefore is subject to heavy braking. and in general, when moving, all this salt flies which little by little brings the situation to the point where the piston simply rusts, otherwise it simply sours, and therefore it will then be very difficult to move it from its place and thus it stops moving and therefore stops working.
By the way, you can very easily understand if your piston is somehow soured, if your car’s fuel consumption on the highway increases, and also if the car, as already mentioned earlier, starts to drive worse, and also if you notice that In neutral gear, the car began to slow down a little, this can also be understood if the car begins to skid on a winter road from braking, all this indicates that your piston has stopped working.
Causes of automatic transmission jamming
An automatic transmission has little in common with a manual transmission, so the reasons for the wedge differ. Since this is a complex unit consisting of many different devices and mechanisms, anything can break in it. However, completely locked wheels are the result of only one malfunction - activated protection of the electronic unit.
Automatic transmission electronic unit
If any important component in the automatic transmission fails, the ECU recognizes it as a threat and, in order not to aggravate the situation and preserve other parts, completely blocks the transmission.
If we talk about jamming in gear, there are several reasons:
- Wear of the automatic transmission link. On the first automatic machines, the selector was connected to the transmission mechanically, through a slide. During operation, it, accordingly, wore out and failed, which made it difficult to move the lever and subsequently block it.
- Low pressure in the system. If the hydraulic pump fails or the oil level is low, the pressure in the system drops. Consequently, there will not be enough force to compress the clutch pack and the car will not move at all.
- Failure of sensors. Let's imagine that the car was moving in a certain gear. If any sensor fails, information stops flowing to the control unit and the automatic transmission does not respond to the speed of the car, and accordingly does not change gears.
These are the main reasons for automatic transmission jamming. But it is worth considering that if the electronic unit is damaged, it operates in emergency mode, that is, with the original parameters. Complete blocking is possible only in case of mechanical damage, so often no one experiences problems with this.
How to turn an inoperative brake cylinder piston into a functional one?
1) At the very beginning of the operation, you will need to remove the wheel from the car.
Note! By the way, when you remove the wheel from the car, try to spin it while it is in the air; if it slows down, then some piston has actually become unusable!
2) After your wheel is removed, immediately remove the caliper from the car after it in order to get out the brake piston that is not working. (For information on how to remove the brake caliper on front-wheel drive cars, see the article: “Replacing the brake caliper on a VAZ 2109”, and for information on how to remove this caliper on a classic, see “this article”)
3) Now, when the caliper is removed from the car, you will need to find a vice, or a very strong compressor, in order to remove the piston from the brake cylinder, so if you have a vice, then go to it and clamp the piston itself and behind the caliper after Once you clamp the piston, pull it, and thereby the piston will be removed from its installation location.
Note! If you don’t have a vice, then pick up a compressor or something else where air can come out under pressure and thereby insert the hose from the compressor into the small hole in the caliper, namely where you connect the brake hose itself and then turn on the compressor and the piston will fly out of its installation location!
A little history
The first to create such a model of brakes (disc type) was Frederick Lanchester (Great Britain). It was in its design that a caliper was used that pressed the pads. However, technology at that time did not allow the creation of reliable disc brake systems.
Disc brakes were revived in aviation, and in the 50s they began to be installed on cars - first on sports models, and then on production ones. The first car with serial front disc brakes was the Chrysler Crown Imperial (in 1949).
The importance of this component is difficult to overestimate, because the brake disc and pads are passive components, while the caliper plays an active role. Due to this, the pads are pressed
Therefore, the brake caliper is the most important component.
Why does the brake caliper squeak and jam?
Secondary causes of jamming:
- the pads are not installed correctly initially, so they begin to creak;
- discs are worn out by 70–80 percent - due to aggressive driving style or natural reasons;
- the lubricant is incorrectly selected or is missing;
- Dirt and moisture got inside the mechanism.
One of the main reasons why a mechanism creaks or jams is overheating. Friction during active braking causes heat production. This causes high loads not only on the pads, but also on the presser itself. Therefore, at least conscientious manufacturers try to make it from the most durable material.
Chevrolet Aveo maintenance frequency
Cars are produced with sedan and hatchback bodies, gasoline and diesel engines. Power units consist of 4 cylinders, each of which has 2-4 valves. The engines are characterized by a power of 70-115 hp. With. and capacity 1150-1598 cm3. The Aveo's maximum speed ranges from 157 to 189 km/h. The car accelerates to 100 km/h in 11.3-14.3 seconds. The torque of the power plant is from 104 to 210 Nm. Depending on the type of engine, it burns from 3.7 to 7.6 liters of fuel per 100 km.
The model is reliable, but requires periodic maintenance. It is better to do it according to the manufacturer’s regulations - every 15 thousand kilometers. If you follow the recommendations, repairing a Chevrolet Aveo if breakdowns occur will cost much less. Timely maintenance will save you from unnecessary expenses and the need to buy expensive spare parts.
Symptoms of a problem
- oily spots on the visible or inner side of the wheel, which indicates a leak of DOT fluid, a decrease in its level in the expansion tank;
- unexpected, spontaneous pulling of the car to the side after braking - while the wheels are normally inflated and the suspension is fully operational;
- a grinding sound after releasing the brake pedal is the main sign of a situation where the piston is pressed in and does not return to its original position;
- The discs overheat greatly and give off an unpleasant burnt smell - even after driving with relatively infrequent braking.
How does the GTZ function?
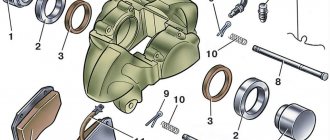
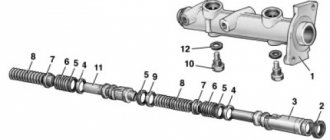
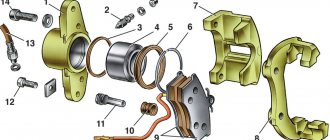
The unit consists of the following parts:
- metal housing with holes for supplying brake fluid, pedal rod and connecting the expansion tank;
- 2 pistons with rubber seals;
- 2 return springs;
- guide bushings;
- end plug with gasket.
An expansion tank is attached to the top of the main distributor body, where excess fluid goes through compensation holes. Inside, the element is divided into 2 cylinders with separate pistons standing on the same axis.
The blind end of the housing is closed with a threaded plug; on the other side there is a flange for attaching to the vacuum booster. The brake pedal rod is attached to the first piston. The brake circuit pipes are connected to the lower holes - separately for the front and rear wheels.
The operating principle of the master brake cylinder looks like this:
- When you press the pedal, both pistons simultaneously move forward and push fluid into the circuit tubes. Under its pressure, the wheel cylinders are activated, compressing the pads on the discs.
- Part of the liquid that does not have time to pass into the tubes flows into the expansion tank through special bypass holes.
- When the driver releases the pedal, the springs push the pistons back, returning them to their original position. Liquid from the tubes and reservoir refills the cylinders.
- To compensate for the expansion of the liquid (for example, from heating), another pair of holes is provided leading to the expansion tank.
Front caliper jammed
If the front brake caliper is stuck, this is often due to an aggressive driving style. This can be explained by the design difference of modern cars, where the brakes are applied faster at the front. Therefore, the burden here is incredible. Many cars are equipped with a pressure regulator or “sorcerer”. During heavy braking, it blocks fluid access, but only to the rear axle. The front axle continues to work and heat up.
However, if the rear caliper is equipped with a handbrake system, which is provided on some modifications, the likelihood of breakdowns and the rate of wear also increases.
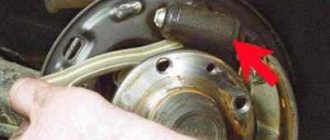
Wedging the rear drum brakes with a hammer
What to do if the pads on the rear wheel are stuck? In most situations the hammer works great. We do everything ourselves. To do this, you need to dismantle the rear jammed wheel and use a hammer to tap the drum around the entire perimeter. After which you just need to turn it - if it rotates, you can put everything back together and move on.
We recommend
“Replacing a car’s flywheel: what to look for” Read more There is an alternative way to free a jammed drum. To use it, you need to give maximum load to the rear of the car - you can seat several large passengers on the seat or load the trunk with something heavy (for example, bags of construction materials) and make a sharp start from a standstill
If the result is not achieved immediately, attempts can be repeated. By the characteristic knock you will understand that the pads have come off. This, of course, is not the most humane method for a car, but it is very effective.
What to do if the caliper is stuck on the road
The first thing that is recommended is to give the elements half an hour to cool down. Then identify the problem wheel by conducting an effective test. You need to drive 20–30 meters, stop and touch all four disks with your finger through the provided holes. If the part is hot, it is this particular wheel that jams. It is removed, the car is first placed on a jack.
Cold water will help to quickly cool the elements, but you can water it on a surface that has already partially cooled. Otherwise, the disk will simply blow apart due to strong temperature changes.
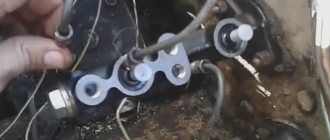
If the handbrake cable jams, the inner or outer braid is most likely damaged. It is possible that the return spring has weakened and needs to be replaced with a new one. Also, both return brackets often become dirty. In this case, they must be cleaned of rust and treated with VD-40.
Consequences
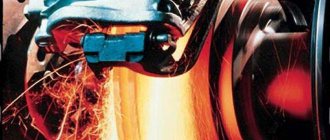
When the bracket wedges, the block remains pressed. This causes the discs to become very hot and the shoes to burn. If the speed of movement is high, and the degree of constriction is maximum, then it’s red-hot. It is obvious that braking efficiency drops sharply, the linings and disc become washed out and lose their properties.
After several heating and cooling procedures, the disks are sure to become deformed. After pressing the pedal, you will feel a beating, and you will not be able to brake at all. You will have to replace the repair kit, but the troubles will not end there, because the cause of the malfunction is in the caliper. If the hub begins to heat up, then the bearing will crumble and the CV joint will be destroyed.
Prevention measures
Maintenance of the caliper must be carried out every time the pads are replaced, every two years. It is during this period that the lubricant loses its original properties. In Russian conditions, the timing of the inspection activity must be significantly reduced, and an inspection must be carried out in case of any extraneous sounds, the vehicle slipping and other signs of damage to the mechanism listed above.
The large loads to which the clamp is subjected require the use of special lubricants. Poor-quality compounds quickly harden and are destroyed by water or aggressive brake fluid. You need to use only high-temperature lubricant, with minimal dripping characteristics, moisture-resistant and not susceptible to chemicals. In addition, the correct lubricant must be compatible with plastic and rubber parts. A special type of lubricant is used for the fingers—the elements that guide the mechanism’s brackets.
Why the brake caliper jams: how to identify and fix the problem
Hi all! Any problems associated with the braking system of vehicles are potentially very dangerous. Therefore, every motorist should know why the brake caliper jams, what can provoke such a situation, how to diagnose and eliminate it. On your own or with the help of specialists, decide for yourself.
Our regular readers remember that we have previously talked about situations when the caliper knocks. Now let's consider a slightly different situation. Moreover, it is even more dangerous and unpredictable in terms of possible consequences if nothing is done after noticing the symptoms.
Let's start with the theory. The caliper on a car is part of the brake system. It is used in the design to press automobile brake pads when the corresponding pedal is pressed against the brake disc. As you understand, the node is extremely important.
But sometimes it can jam and creak because of this.
Which wheel is sticking?
If suddenly the car stops driving normally, nods, making characteristic grinding sounds and creating the impression that there is a weight hanging on each wheel, then we can safely state that some element of the brake system of one of the four or several wheels at once is jammed. Typically this list includes the handbrake cable, calipers, pads or the brake cylinder itself.
For this it is recommended:
- let the mechanism cool (half an hour is enough);
- drive about 10 meters, although the car will most likely move at a stretch, resisting movement in every possible way, as if the parking brake was on;
- feel the brake discs of all wheels with your finger, using the air vent holes for this purpose.
A hot disc indicates that this particular wheel is seizing, after which it will be much easier to identify and fix the problem.
How to use a multimeter in a car: detailed instructions for dummies
- VAZ 2110;
- VAZ 2109;
- Lada Kalina;
- Chevrolet Lanos;
- Lada Priora;
- VAZ 2114;
- Chevrolet Niva;
- Lada Kalina;
- VAZ 2112;
- Daewoo Nexia;
- Volkswagen Polo Sedan;
- Skoda Octavia;
- Mercedes E class, etc.
Regardless of whether it is installed on a Niva or a BMW, the caliper must be in constant working order.
This is the direct task of the car owner himself. Or persons responsible for maintaining the machine and maintaining it in proper technical condition.
Before determining why it does not press out and what to do to prevent the car caliper from jamming, you need to understand the principle of its operation.
In optimal condition, when the brake assembly is working properly, the operating diagram looks like this:
- the driver presses the brake pedal;
- pressure is built up inside the braking system;
- this pressure is transmitted to the piston group of the auto calipers;
- the calipers, being under high pressure, bring the brake pads to the disc;
- the braking disc is attached to the car wheel;
- friction force arises;
- wheel rotation slows down;
- the car stops;
- or reduces the speed to the required values.
How does the GTZ function?
The unit consists of the following parts:
- metal housing with holes for supplying brake fluid, pedal rod and connecting the expansion tank;
- 2 pistons with rubber seals;
- 2 return springs;
- guide bushings;
- end plug with gasket.
An expansion tank is attached to the top of the main distributor body, where excess fluid goes through compensation holes. Inside, the element is divided into 2 cylinders with separate pistons standing on the same axis.
The blind end of the housing is closed with a threaded plug; on the other side there is a flange for attaching to the vacuum booster. The brake pedal rod is attached to the first piston. The brake circuit pipes are connected to the lower holes - separately for the front and rear wheels.
The operating principle of the master brake cylinder looks like this:
- When you press the pedal, both pistons simultaneously move forward and push fluid into the circuit tubes. Under its pressure, the wheel cylinders are activated, compressing the pads on the discs.
- Part of the liquid that does not have time to pass into the tubes flows into the expansion tank through special bypass holes.
- When the driver releases the pedal, the springs push the pistons back, returning them to their original position. Liquid from the tubes and reservoir refills the cylinders.
- To compensate for the expansion of the liquid (for example, from heating), another pair of holes is provided leading to the expansion tank.
“First Family Car” program: conditions, reviews, timing
It is the creaking that indicates that the element is seriously worn out. In the near future, the unit must be replaced without fail, which the car literally and figuratively screams about. It is extremely difficult not to hear such a creak. But for some reason, thousands of motorists still stubbornly ignore it. As a result, they pay a rather high price. Sometimes even to the point of road accidents resulting from brake failure while driving. To prevent this, you need to understand the issue and understand the essence of what is happening.
The first step is to look at the possible causes. In fact, there are several potential problems to look for. Some of them arise due to the fault of the motorist, others are caused by the natural process of wear and tear.
In any case, the appearance of a squeak as a symptom is a harbinger that at the most inopportune moment the caliper may simply jam.
If you know the reasons, you can prevent them and troubleshoot them by contacting a car service center or solving the problem yourself.
- The brake pads were initially installed incorrectly. As a result, they are not strictly parallel to the response drives. Because of this, creaking often appears;
- The brake discs are seriously worn out. The reasons are natural wear and tear and aggressive use of the car;
- There is no lubrication in the unit. Initially there was little of it, or it was used up;
- The lubricant was selected incorrectly. Many people skimp on lubricant intended for calipers, hence the consequences.
The most undesirable and dangerous situation is rightly considered when the piston does not return and the unit begins to jam during operation.
Imagine that you are driving a car, press the brake, and then accelerate again. But at the same time, the calipers do not release the front brakes. Additional resistance arises, the car tries to move, but cannot. The result is uncontrolled braking, extremely intense wear and serious overheating of the entire system.
What to do in such a situation
If you were able to diagnose creaking and signs of wedging in this unit, you need to perform a number of measures.
And here it is not necessary to contact a car service. You need:
- put the car on a jack;
- remove the wheel;
- unscrew the caliper;
- remove it;
- unscrew the problematic piston;
- remove the piston from the cylinder;
- visually inspect the element;
- check for chips, damage, corrosion;
- if there is rust, clean it;
- if severely damaged, replace;
- drain the working fluid from the element;
- remove the sealing ring;
- clean all surfaces;
- dry;
- fill in new hydraulics;
- assemble in reverse order.
When putting the assembly back together, pay special attention to not accidentally damage the old boot. If you notice cracks on it, then no restoration will help. Replacement only.