Features of replacing the rear brake cylinder 2114
It is well known that the serviceability of the brake system in a car is of great importance, since it is directly related to road safety. Therefore, if any problems occur in this system, it is necessary to urgently repair and replace parts that are problematic.
Rear brake cylinder
Brake system
All modern cars have a hydraulic brake system, and discs or drums are used as braking elements. Discs are considered more efficient in their action, but drums do not wear out longer. The brake system of the VAZ 2114 contains the following parts:
- Brake master cylinder;
- Front caliper (right and left, they are not interchangeable with each other);
- Rear brake service cylinder (one for each rear wheel);
- Vacuum booster;
- Tubes;
- Hoses;
- Disks (on the front wheels, identical to each other);
- Drums (on the rear wheels, interchangeable with each other).
From the cabin, the system is controlled using a pedal, the free play is regulated by a rod.
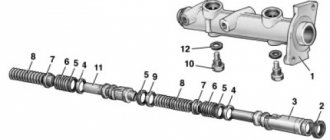
Rear brake device for VAZ 2114
The design of the rear brake system of the VAZ 2114 is as follows:
- Hub nut
- Hub flange. The brake drum is attached to it
- Lower tension spring
- Left pad
- Thrust spring
- Cylinder
- Upper tension spring
- Guide bar
- Eccentric
- Right pad
- Pad cover
The car has drum brakes at the rear. This design has been time-tested and is considered very effective. In addition to the above elements, it also includes a parking brake. It ensures reliable fixation of the car even on an inclined surface while stopping or parking. The handbrake on the VAZ 2114 has the following structure:
The braking system of cars of this model is quite reliable and durable. But it also needs regular maintenance. To ensure effective braking, it is necessary to change pads and discs, as well as drums and other elements in a timely manner. System parts require regular inspection to identify external damage and defects. When they are identified, broken elements are replaced, even if their scheduled replacement period has not yet arrived. Particular attention should be paid to the serviceability of the handbrake; you need to monitor the condition of the cable. If the handbrake does not provide reliable fixation of the car on an inclined surface, then the cable needs to be tightened or replaced. It is wrong to leave a car in a parking lot in gear. The parking brake is used for this. Driving with a faulty brake system is illegal and very dangerous. Sudden brake failure can cause a serious accident with unpredictable consequences. Therefore, the system requires regular inspection, maintenance and repair when faults are identified. You can usually check and repair your brakes yourself. Contacting a car service is required in difficult cases and when the owner is unsure of his own abilities.
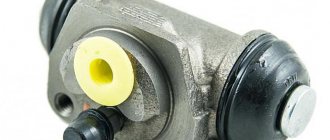
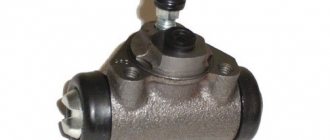
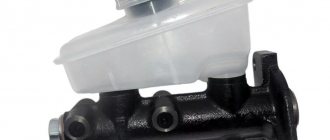
Rear brake cylinder
The working rear brake cylinder on a VAZ is a device in which two pistons, under pressure created by the liquid, push the rear pads apart. The pads are pressed against the drums and braking occurs.
The rear brake cylinder for 2114 (ZTC) can be of different manufactures. In Russia there are quite a lot of enterprises specializing in the production of spare parts for cars. The original parts are produced by AvtoVAZ; many spare parts for VAZ cars are produced in Samara.
But there are also products from other companies (including foreign ones):
- Ate, Germany;
- Samco, Italy;
- Lucas;
- Fenox;
- AP Lockheed;
- "Basalt";
- "Craft".
ZTC Kraft
Among all the listed companies, according to customer reviews, the products of ATE have proven themselves the best. Among Russian brands you can about
Depending on the manufacturer and region of sale, the price of a cylinder on average ranges from 250 to 700 rubles (as of 2105). There is no difference between the VAZ 2114 and VAZ 2115 models; the parts are completely interchangeable with each other.
On a fully assembled car, it is not visible where the rear brake cylinder is located; it is located inside the rear drum. But you can understand where it is by looking at the brake pipe that goes to the cylinder.
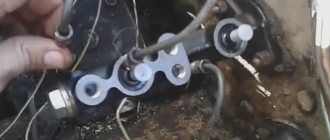
The principle of operation of the GTZ and its main problems
The master brake cylinder of the VAZ 2114 is a device that converts pressing the brake pedal into increased pressure inside the system. It works on the vacuum principle and requires complete sealing of the brake fluid path.
Any violation of this tightness becomes the reason for the “disappearance” of the brakes, namely:
- air entering the system;
- the appearance of cracks in the line and leakage of brake fluid;
- wear or damage to the integrity of the gaskets.
Checking the tightness of the brake system is very simple - you need to press the brake pedal with the engine not running, and then, without releasing it, start the engine. If immediately after this the pedal “fails,” then the line is completely sealed and the brakes are working properly.
Malfunctions
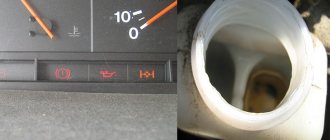
Symptoms of a malfunctioning TTS:
- The brake fluid leaves the reservoir;
- The rear drum is wet, fluid leakage is noticeable;
- The braking efficiency has disappeared, the pedal “takes” at the very end of the stroke, sometimes not from the first stroke.
Reasons for inoperability:
- Natural wear and tear;
- The cuffs are corroded due to mixing different types of brake fluid;
- Poor quality of the part;
- The pistons were squeezed out due to severe wear on the pads.
It happens that the pistons inside the housing become jammed. If this happens with the pistons spread apart, the car begins to constantly slow down and the drum overheats. You cannot drive with such a defect; the car must be urgently repaired.
There is one nuance that is worth focusing on. Often, when bleeding the brakes, technicians try to unscrew the bleeder fitting on the cylinder and break off. Even WD-40 doesn't help. This happens due to the fact that over time, the “pumping” begins to boil in the ZTC body. Therefore, before bleeding the brakes, you should have a supply of new replacement parts.
There is also a tricky way that will help you avoid breaking off the fitting. Before unscrewing, you must carefully (do not break the fitting with a hammer!), but thoroughly tap the housing around the bleeder fitting and try to move it out of place.
After this, without using much effort, we try to weaken the “pumping”. Doesn't work? Then tap again. Most likely, patience will be rewarded, and problems associated with unscheduled cylinder replacement will not arise.
Replacement
It is recommended to replace the rear brake cylinders in pairs at once, even if only one of them is leaking.
To replace, you will need the following tools:
- Car jack;
- Wheel key;
- Wheel stops;
- Keys for 10 and 12;
- Hammer;
- A wooden block (or better yet, a brass or bronze drift);
- Brake bleeding wrench.
Replacing the rear brake cylinder on a VAZ 2114 occurs as follows (if there is no car lift):
- We loosen the bolts on the rear wheel, lift the car with a jack, and remove the wheel;
- We unscrew the two bolts on the drum (they also serve as guides for the wheel) with a 12mm wrench;
- We remove the drum. If it does not come off, tap it with a hammer through a drift or wooden block. Important! You cannot put the car on the handbrake; the handbrake lever must be fully released;
- Removes the pads;
- Unscrew the brake pipe with a 10mm wrench;
- Unscrew the two cylinder mounting bolts (also a 10mm wrench).
That's it, rear brake cylinder 2114 has been removed. One more small nuance. When we disconnected the tube from it, liquid began to flow.
It’s better to plug the pipe with a wooden tip - less fluid will have to be filled, and it will be easier to bleed the brakes.
Installing the rear brake cylinder is done in the reverse order.
That's all, we've figured out how to replace the rear brake cylinder. You should also remove air from the system by bleeding the brakes. After all work has been completed, the functionality of the new part should be checked.
Check:
- Is there any fluid leakage after the replacement?
- Are the brake pads spread on the wheel where the brake caliper was changed?
The functionality of the new part can be checked before installing the wheel in place, but this check must be done by two people. However, you won’t be able to pump the brakes alone.
We do the check as follows:
- One of the participants gets behind the wheel, presses the brake pedal and holds it down;
- The second participant tries to spin the drum and looks for any liquid leaks.
If everything is in order, install the wheel in place. If the drum spins or fluid leaks, the cylinder will have to be replaced.
There is one more point here that masters do not always take into account. After bleeding, we start the engine, press the brake pedal several times, and only after that we check the effectiveness of the brakes while driving (making sure that the system is in full working order). There have been many cases when the brakes were checked while accelerating in front of an obstacle. The result was a wrecked car. Replacing a rear brake cylinder is not a difficult task, but it is very important and requires care and attention.
Dismantling
To carry out dismantling work that entails replacing the master brake cylinder, it is necessary to prepare a certain set of tools and materials. It includes:
- Brake fluid;
- Tool for unscrewing fittings;
- Pliers;
- Dry rags;
- Metal brush for cleaning contacts;
- Key for 17, 13 and 10 millimeters;
- Spring tensioner;
- New brake cylinder.
Before starting work, prepare yourself a site where you can place all the elements to be removed. Write down or photograph, or otherwise record where this or that unit was removed from. This will greatly simplify the reassembly procedure.
After all the preparatory activities, you can start working.
- Be sure to remove the negative terminal from the battery of your VAZ 2114. Without this, almost no repair or maintenance work on the car can begin.
- Raise the hood and lock it securely.
- Use a syringe to remove any remaining brake fluid from the container.
- Unscrew the brake fluid supply pipes using an open-end wrench. Unscrew it carefully so that the brake fluid does not get on other units in the engine compartment.
- In some cases, the thread becomes stuck, making it very difficult to remove. In such a situation, we recommend treating the threads with brake fluid and letting it sit for a while. Then the hoses are removed using a 10 mm wrench.
- If these measures do not help, you will need a special wrench with a clamping bolt and a cap slot. It is attached to a nut, clamped with a bolt and rotates the part.
- After dismantling the brake fluid pipes, be sure to mark them with a marker or corrector so that you know which pipe is connected where during reassembly.
- Now you need to remove the brake master cylinder. To do this, first remove the two main nuts that hold the GTZ to the amplifier.
- That's it, the damaged element can be removed from its seat.
- Clean the installation sites so that there are no problems with the new cylinder in the very first months of operation.
- Follow the reverse assembly sequence so as not to confuse the location of certain elements.
- Do not clamp the brake fluid hoses too tightly, otherwise there is a risk of stripping the threads. Restoring connections is a hassle.
- It is recommended to replace the brake fluid used before repair, and then be sure to bleed the brakes.
- To level up, you will need help, so make an agreement with a friend in advance. One will gently press the brake from inside the car, and the other will wait for brake fluid to start coming out of the holes. At this very moment it will be necessary to return the front tubes to their places.
Be sure to simultaneously check the correct operation of the vacuum booster. If it is faulty, it will need to be replaced.
Expert advice
Experience is useful. Therefore, listen to some very practical advice regarding replacing the brake cylinder and interfering with the brake system in general.
- Before reassembling the unit, be sure to treat all dismantled elements with isopropyl alcohol. Blow out the openings of the units and wipe them thoroughly with a dry cloth. This will significantly increase their service life and avoid a number of problems in the early stages of operation.
- Try to prevent rubber, plastic elements, seals, and pipes from coming into contact with gasoline, kerosene and other chemically powerful substances. Their contact can lead to damage and loss of integrity of the elements.
- Before changing the GTZ, put the device body in order. It is necessary to remove all traces of oxidation, dirt, and plaque.
- Make sure the device is sealed. Carry out periodic checks of the sealing rings even if the gas turbine engine does not show any signs of malfunction.
- When assembling the unit, treat all elements with brake emulsion.
- Under the screws securing the GTZ there are sealing gaskets that will need to be replaced during the repair process of the device.
- After replacing the master cylinder, do not forget to bleed the brakes. This is necessary in order to remove air trapped in the system. The presence of air locks can lead to accidents, since the brake pedal simply will not work at some point.
- When removing the block with wires (when replacing the vacuum booster), be sure to close all open holes so that dust, dirt, and brake fluid do not get there.
- When carrying out dismantling work to remove the main brake cylinder, it is recommended to first remove the main brake reservoir, and only then unscrew the mounting screws. This will make it much easier to remove the unit and all other elements of the system.
- Most often, the turbocharger fails due to leaks in the brake fluid supply system. Lift the hood and look at the joint of the device. The presence of traces of leakage indicates that the gas turbine seal is worn out and needs to be replaced.
Always remember that any intervention in the brake system requires mandatory bleeding of the brakes after completion of the work. Ignoring this step can have serious consequences.
As you can see, it is more than possible to carry out work on replacing the gas turbine engine yourself. This will save an impressive amount of money, since such services at professional service stations will cost at least 1,000 rubles. Moreover, this is in ideal situations and the presence of good friends at the service station.
Source
How to remove and install the rear brake cylinder on a VAZ 2114
The rear brake cylinder is responsible for effectively braking your car. Therefore, you need to check its operation from time to time. After all, your safety on the road depends on it. It is located under the rear wheel drum. To gain access to it, you need to remove the wheel and pull out the drum.
Selecting a brake cylinder
Today there are a huge number of manufacturers of spare parts for cars. And it’s easy to get confused when choosing quality spare parts. In order to make a choice, you can read reviews on the Internet. We also read and came to certain conclusions. The most reliable brake cylinder is considered to be the ATE cylinder. The cylinder is also not inferior to it. You can also look at Kraft products.
How to determine whether a brake cylinder is faulty
The first sign of a problem in the brake system will be a brake fluid leak. You can also evaluate the condition of the cylinders when replacing the rear pads. Usually the rubber bands in the brake cylinders break and the pistons become sour. Of course, they can be repaired, but it is much easier to replace them with new ones, since they are not expensive. In stores you can find cylinders for around 400 rubles.
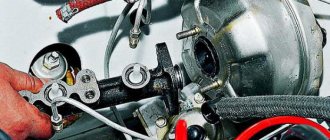
Replacing the rear brake cylinder
The first step is to remove the brake drum.
Raise the handbrake all the way.
Remove the cap from the bleeder fitting and use a size 8 wrench to completely unscrew it.
Lubricate the fitting with grease.
Loosen the brake pipe fitting.
We finally unscrew the fitting.
Unscrew the 2 bolts securing the working cylinder.
Place the fitting cap on the tube to prevent brake fluid from leaking out.
Remove the brake cylinder from the shield.
Before installation, we clean everything from rust and dirt and degrease the working surfaces.
Reinstall the brake cylinder in reverse order.
Reinstall the brake drum.
We bleed the brake system and check everything for leaks.
Video on replacing the brake cylinder:
Replacing the rear brake cylinder on a VAZ 2114
Rear brake cylinder VAZ 2114
It’s not uncommon for many car enthusiasts, including the domestic auto industry, to have a problem with their brakes. This type of car malfunction is the most dangerous and there are many reasons for this.
According to their principle of operation, brakes can be:
- foot hydraulic;
- manual, mechanical locking.
VAZ 2114 cars are equipped with drum brakes in the wheels in which the rear brake cylinders are installed. But, in other respects, as on all manufactured cars. The only differences can be in the type of blocking element: disk and drum. But also according to the manufacturing technology of the brake cylinders themselves.
Where is the brake cylinder located? The rear cylinder is located at the rear on the inside of the metal casing. In order to find it, just look under the car and above the bridge you will immediately see tubes through which it is simply difficult not to find it.
Location of the rear brake cylinder on a VAZ 2114
Front brake mechanism
The design of the front brake mechanism on the VAZ 2114
The front brake mechanism consists of the following components:
- Brake disk. Directly connected to the wheel hub and rotates with it. Slowing down the rotation and stopping the disk leads to the slowing down and stopping of the wheel.
- Pad guide. Serves as a holder for the pads and a base for the guide pins.
- Caliper. It combines the pads, cylinder, and piston into a single unit and ensures uniform transmission of force from both pads to the disc.
- Brake pads. They directly act on the disc, squeezing it on both sides and slowing down the movement.
- Cylinder. A sealed cavity in which the piston moves.
- Piston. Under the influence of hydraulic fluid pressure, the pad is pressed against the disc. Thanks to the “floating clamp” system, the second block is pressed simultaneously. This ensures uniform wear of their linings and discs and guarantees effective braking.
- Seal ring. Prevents fluid leakage and ensures system tightness
- A cover to protect the guide pin from dirt, allowing for unhindered movement of the pads.
- Guide finger. Allows the pads to move evenly and adhere to the disc with their entire plane.
- Protective cover. Protects the disc from road dirt.
The front wheels are equipped with disc brakes. They automatically adjust the clearance from the pad to the disc. The caliper and cylinder form a floating caliper, which creates the same even force on both pads. This ensures uniform wear of the linings. To monitor their wear, there is an indicator on the inner block.
Car brake system repair
When repairing the brake system, replacing the rear or front brake cylinder, connecting pipes, front cylinder or hoses. Everything requires subsequent pumping of the entire system. Therefore, it is necessary to provide access to all wheels at the same time. To do this, lift the car evenly and place it on supports; for greater convenience, you can remove all the wheels, and not just the one on which you need to directly replace the cylinder. When carrying out such actions, always remember the precautions that you need to take for your own safety.
Replacing the brake cylinder itself does not seem difficult, but there are quite a lot of additional manipulations that must be performed. In order to do this, you can refer to the technical instructions for the car for maintenance and repair, or you can do without it, because there is nothing supernatural in this.
Necessary tool
In order to replace the brake cylinder you will need the following tools:
- wheel wrench;
- jack;
- WD-40;
- socket wrench 10;
- a device for unscrewing fittings if necessary;
- metal brush;
- rags;
- pliers;
- a screwdriver or pin for tensioning the springs.
Before starting all types of work, be sure to provide a place for laying out all spare parts; when removing them, it is advisable to remember the sequence and methods of removing them. This will make the reverse process much easier. In addition, before such a procedure, it is advisable to stock up on a set of brake pads, because they still need to be changed every year depending on the intensity of driving. And besides, they don't cost that much. So, having everything listed in our arsenal, let's get to work.
The procedure for replacing the brake cylinder on a VAZ 2114
Replacing the rear brake cylinder on a VAZ 2114 is no different from the same procedure, say, on 2106 or 21099.
- At the first stage, it is necessary to provide access to all wheels at the same time, because this will make it easier to subsequently pump the entire system. To do this, they placed the car on supports and raised it. It is most convenient to do this on a screw lift, but you can do without it.
- Using a wheel wrench, unscrew the wheel we need.
- Using pliers, unscrew the studs that secure the drum to the hub. And we remove it evenly, while you may have to tap a little with a hammer on its back through the wooden spacer. Be careful when doing this because the drum is made of very fragile material. Additionally, use a metal brush to clean the cylindrical surface of the hub from rust and dirt.
- Then carefully remove all parts of the brake system. But most often it is better to remove everything, because the casing, as a rule, needs to be processed and painted with at least primer.
- Next, we proceed to dismantling the cylinder itself. To save yourself the hassle, be sure to thoroughly clean the connection between the cylinder and the brake pipe. However, remember that they can be either steel or copper. In this regard, it is necessary to be careful in all actions so as not to damage them.
How to unscrew the rear brake cylinder on a VAZ 2114 if the connections are stuck?
- You can try to unscrew the fitting with a 10mm wrench, but most likely this will result in the edges breaking, so generously moisten all connections with WD-40 for a while. In a relatively short period of time it will corrode and dissolve all metal oxide, and due to its microscopic nature it even gets into micro gaps. Usually after such actions the fitting is easily unscrewed. But if this does not help, and there are practically no edges, then there is a special wrench on sale, which is a socket wrench with a slot and a clamping bolt. This simple device allows you to unscrew any stubborn connections without much effort. You need to securely attach it to the nut, tighten it with the bolt and turn it.
- So, having defeated this connection, proceed to unscrew the brake cylinder itself. Here everything is much simpler, because it is bolted with only two M6 bolts, with a 10 key. As a rule, it is easily unscrewed and the cylinder is easily removed from the hole.
- After dismantling the old cylinder, carefully inspect the condition of the newly unscrewed fitting and the installation location. All defects should be removed and burrs cleaned.
- Reassemble the brakes in reverse order. Start checking the cylinder only after assembling the entire wheel brake mechanism. Install the pads, trims, do not forget to hook the handbrake cable back on. This is a common problem in this business. The main thing is to put everything back together exactly as it was.
We figured out how to replace the brake cylinder, now let's start bleeding the system.
- After installing the drum, you can begin bleeding the system. It must be started from the farthest wheel in a clockwise direction. This is due to the fact that the system is quite large and in order to pump air out of it it is necessary to start from distant areas, gradually filling the entire system.
- After bleeding, carefully inspect the new cylinder and its connection to the tube for leaks. In this case, you need to press and hold the brake pedal as hard as possible a couple of times.
- To simplify your task, in the event of a malfunction of the newly purchased cylinder, and not do a bad job. You can check the cylinder without a drum, but here you will need good physical strength and two mats to press and hold the pistons.
- With properly adjusted brakes, the front wheels first grab dead when you press the pedal sharply, because they are closer to the master cylinder, and then both rear wheels grab at the same time. If this is not the case, then the system should be bled again or re-maintained.
But sometimes the rear brake cylinder can be repaired; for this purpose, repair kits are sold, which include several o-rings and two boots. But this is only advisable if the condition of its inner surface is excellent.
Examination
You should make sure that the master cylinder is the culprit for the malfunction of the brake system. This is easy to do; you don’t even have to go to a service center and spend money on it.
- Press the brake pedal with the power unit off.
- During normal operation, the gas turbine engine fails under the influence of vacuum.
- If the pedal does not fail, you will need to conduct more thorough diagnostics and restore the device to functionality.
Start the engine without taking your foot off the gas pedal.
Most likely, you will need to restore the tightness of the return regulator connection. It is located on the intake manifold amplifier housing.
Repair kit or new GTZ?
Many car owners face a question when the brake master cylinder fails: how exactly to repair the brake master cylinder. After all, there are two main options:
- Purchase a new GTZ;
- Use repair kit.
First, let's take a look at the price tags.
New GTZ entry-level quality
New high quality GTZ
Purchasing a repair kit and using it to restore the functionality of the brake cylinder entails uneven wear of old and new elements, breakage of rings and a number of other problems. In this regard, we advise you to eliminate the breakdown by completely replacing the gas turbine engine, and not by using a repair kit.
The rear wheel brake cylinder is leaking. What to do?
How to troubleshoot the rear brake cylinder if it is leaking (leaking)
A leaking rear wheel brake cylinder is a malfunction that requires immediate elimination.
Using the example of brake cylinders (wheel brake cylinders) of the rear wheels of the braking system of a VAZ 21093 car, let’s look at the cause of this malfunction and how to fix it yourself.
Symptoms of trouble: the rear wheel brake cylinder is leaking
Brake fluid leaks on the bottom of the brake drum and brake support plate
Noticeable if you inspect the rear wheel from the inside. If you remove the brake drum, everything inside it will be filled with brake fluid.
Leaks under the bleeder fitting and (or) the tip of the tube to the cylinder
After repairing or replacing the brake cylinder, the bleeder fitting and/or the tip of the tube to the brake cylinder were not tightened completely or were tightened misaligned.
Drop in brake fluid level in the reservoir on the master cylinder
You have to constantly add brake fluid.
Reduced braking performance
The brake pedal becomes “wobbly” as the brake drum is lubricated with brake fluid from the cylinder and the pads slide over it. The desired rapid braking does not occur after pressing it.
The handbrake doesn't work well
The handbrake grips the car worse, despite the lever being fully raised.
Causes of the malfunction: the rear wheel brake cylinder is leaking
Worn brake cylinder sealing rings
O-rings are located on the cylinder pistons. They constantly move with them when the car is braking and prevent brake fluid from escaping. Over time, they wear out due to age and, accordingly, depressurization of the cylinder occurs. The brake fluid first just oozes (the cylinder “sweats”), and then it just flows more and more (the cylinder leaks).
The rate of wear is also affected by the quality of the brake fluid (contamination), the condition of the mirror inside the brake cylinder (along which the sealing rings move), the condition of the cylinder boots (dirt can get under them), the degree of wear of the brake pads (if the wear is severe, the pistons are pushed out too far). cylinders, which may cause displacement and rupture of anthers).
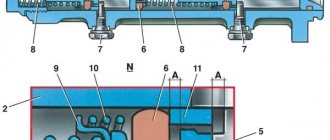
Parts of the brake cylinder of the rear wheel of a VAZ 21093 car
Worn brake cylinder mirror
An increase in the roughness of the working surface - the internal mirror (polished coating) of the brake cylinder leads to a violation of the tight fit of the piston sealing rings to it and its depressurization.
Reasons for damage to the mirror: dirt ingress through torn or displaced boots, brake fluid that is contaminated and (or) of poor quality, has not been changed for a long time (absorbed a lot of water, and where there is water, there is corrosion).
Worn or displaced brake cylinder boots
Brake cylinder boots fail due to age-related fatigue wear. They can also move (jump from their seats) after improper installation during repairs, or when their pistons are strongly pulled out of the cylinders due to excessive wear of the brake pads and (or) drums.
Low quality parts
Rear wheel brake cylinders and their parts behave unpredictably if the workmanship is poor. In this case, they may fail immediately after they are installed in the brake mechanisms of the rear wheels.
The tip of the tube to the cylinder or the bleeder fitting are not properly tightened
It was loosely tightened during repairs.
What to do if a malfunction occurs: the rear wheel brake cylinder is leaking?
Replace the cylinder with a new one
The best option, since a new cylinder is not expensive, changing it is not that difficult, and problems with brake fluid leakage can be avoided for a long time.
Replace o-rings and boots
Such repairs are advisable if the cylinder mirror is in good condition. The repair kit for the rear brake cylinder of a VAZ 21093 car is not very expensive. But installing it is more complex and time-consuming than simply replacing the cylinder with a new one.
Pull the tube tip to the cylinder and (or) the bleeder fitting
We use a special wrench for tightening.
Turn off the rear wheel brake cylinder
There are several ways to plug. Here is the simplest one: disconnect the brake pipe going to the current cylinder of the rear wheel from the main brake cylinder, and in its place screw in a plug (a piece of bent brake pipe with a tip).
After all manipulations with the wheel brake cylinder, it is recommended to bleed the brake system.
Notes and additions
It is recommended to replace the brake fluid in the brake system of the VAZ 21093 with new one every five years. Since it is hygroscopic, it absorbs moisture from the surrounding air. Increased water content causes corrosion of the internal surfaces of the brake cylinders and causes them to leak.
Some tips
- If you start having problems with the brakes, first of all you need to carry out an external inspection of the vehicle: check the fluid level in the reservoir, make sure that the front/rear cylinders are not leaking. There should not even be stains of brake fluid in the brake hydraulics.
- “Brake fluid” must be filled with the same brand; it is recommended to completely replace the brake fluid at least once every two years.
- If faults are identified in the gas turbine engine, and it has already served for at least a year, it is more advisable to replace it completely than to repair it. The same can be said about the rear working cylinders.
- Before changing the turbocharger, the brake fluid should be removed from it; this operation is usually done using a syringe.
- Usually a leak in the master cylinder is not visible, but if there is any suspicion that this part is faulty, you should remove the main cylinder - there will be traces of leaks at the rear, and this indicates its faulty condition.
- If, during an external inspection, cracks were found on the brake hoses, it is better not to take risks and immediately replace the defective parts.
Didn't find the information you are looking for? on our forum.
How to replace a rear brake cylinder yourself
Brake cylinder
What is a brake cylinder and what is its working principle?
The brake cylinder is one of the main elements of the brake system. The rear brake cylinder body is made of alloy. Do not confuse the rear brake cylinder with the master cylinder.
The main brake cylinder is designed to convert brake fluid pressure into fluid pressure, and the rear brake cylinder on the wheel is designed to convert brake fluid pressure into brake pressure on the pad. In other words, the rear brake cylinder presses on the pads, thereby stopping the car.
Where is the rear brake cylinder located?
The rear brake cylinder is located under the rear wheel drum. To access it, you need to remove the wheel, then pull out the drum.
Which brake brake should I choose?
The modern market is full of different types of rear brake cylinders, so when buying this element, it is not easy to make a choice. Numerous reviews on the Internet will help us with this. Having studied the content on this topic, we came to the following conclusion: By and large, all brake cylinders in the same price category have the same quality, but the rear brake cylinder from ATE turned out to be the highest quality and most desirable. Our Basalt, which is one of the best domestic manufacturers of these products, does not lag behind.
It’s only recently that I started making quality products. The Belarusian company fenox, whose products are, to put it mildly, “unreliable,” even wanted to buy it, but they couldn’t buy it. The products also perform well.
Signs of a bad rear brake cylinder
The first and most important sign of a brake cylinder malfunction is a brake fluid leak. But as a rule, the condition of the rear brake cylinder can be fully assessed when removing the drum, so most often it is changed along with replacing the rear pads and replacing the parking brake cable, which is not good and is fraught with consequences.
Most often, the pistons in the rear brake cylinders become sour, rubber bands break, and the like. In principle, the brake cylinder can be repaired, but it is better to simply replace it with a new one and not waste a lot of time and effort, since the price for them is not outrageous.
How much does a brake cylinder cost?
The average cost of a rear brake cylinder ranges from 250 to 400 rubles, depending on the region.