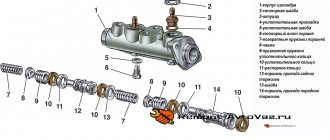
The main brake cylinder of the VAZ-2109 is necessary to ensure the normal operation of the cylinders and calipers, which clamp the pads and stop the car. The design of the entire system is quite simple - there are no frills like a traction control system, and you won’t even find sensors signaling excessive pad wear.
The condition of the elements must be monitored by the driver. To help him, there is only a level sensor on the expansion tank. When the brake fluid level drops below a critical level, a warning light on the dashboard will light up.
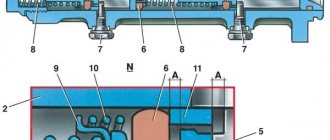
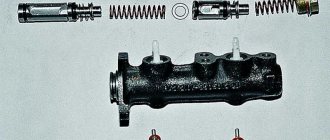
The device of the rear brake cylinder of the VAZ 2109
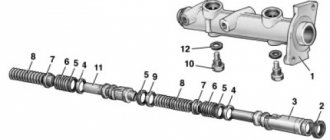
1 – main cylinder for hydraulic brakes; 2 – pipeline of the “right front – left rear brake” circuit; 3 – flexible hose of the front brake; 4 – master cylinder reservoir; 5 – vacuum booster; 6 – pipeline of the “left front – right rear brake” circuit; 7 – rear wheel brake mechanism; 8 – elastic lever of the pressure regulator drive; 9 – flexible rear brake hose; 10 – pressure regulator; 11 – pressure regulator drive lever; 12 – brake pedal; 13 – front wheel brake mechanism.
Drive unit
Drive shaft, CV joint (grenade), Outer CV joint, Inner CV joint, Right CV joint, Left CV joint, CV boot, Tripoid, CV joint nut, Retaining ring, Cardan, Crosspiece, Suspension bearing, Cardan bearing, Elastic coupling, Axle, Front axle, Rear axle, Axle reducer, Gearbox bearing, Gearbox oil seal, Differential, All-wheel drive sensor, Haldex coupling, Differential bearing, Differential oil seal, Planetary gears, Axle bearing, Axle shaft, Axle shaft bearing, Axle oil seal, Axle shank, Shank bearing, Axle bearing, Transfer case, Transfer case, Transfer case oil seal, Transfer case bearing, Transfer case chain
Rear cylinder design
Replacing the rear brake cylinder of a VAZ 2109
In turn, the cylinder consists of:
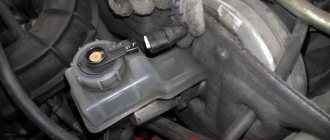
- Brake fluid reservoir. A special sensor regulates the liquid level;
Note: The brake fluid reservoir does not have to be installed on the actual cylinder. It can be installed in another location if it is more convenient. It is important that it is connected to the cylinder cavity through tubes.
- The housing in which the pistons and return springs are concentrated;
- Return springs, allowing the pistons to return to their original position after pressing the brake;
Replacing the rear brake cylinder on a VAZ 2109
- Sealing cuffs that create the correct pressure in the tank;
- Pistons with pushers;
- Differential pressure sensor.
Note: with its help, the driver learns about the loss of tightness in one of the circuits.
How it all works
Replacing the rear brake cylinders of a VAZ 2109
As a rule, in normal condition and under optimal environmental conditions, the cylinder works like this:
- To slow down, the driver needs to press the brake. After this, the force is transmitted along the rod to the piston. This rod moves forward, helping to close the compensation hole. Thus, the brake fluid pressure begins to increase.
Note: the same thing happens in the front cylinder, which helps the car brake quickly.
- After the car has been stopped, the driver stops pressing the pedal. As a result, the pistons return to their original positions. In addition, the pistons begin to act together with the reservoir. This helps the pressure in the second level out and become similar to atmospheric pressure. In addition, the wheels also return to their original position.
Note: If the front or rear cylinder fails, the second one will operate with less force.
Algorithm for removing the GTZ VAZ 2108
- Remove the reservoir cap from the brake fluid and brake fluid, remove the reservoir from the brake fluid, using something wooden to remove it from the seat.
- To prevent brake fluid from getting on electrical wiring and other elements, you need to place some kind of rag under the turbocharger. After this, use a special key, which eliminates the possibility of “licking” the edges, to turn off the pipes.
TJ is toxic, leaves stains on clothes, plastic, rubber. It is better to leave marks on the tubes with paint or a marker.
Brake system VAZ 2109
Brake structure of the VAZ 2109: 1. Check valve, 2. Vacuum booster, 3. Master cylinder reservoir, 4. Master cylinder, 5. Vacuum hose.
Diagram of the brake force regulator VAZ 2109: 1. Pressure regulator, 2. Elastic lever, 3. Rear suspension beam.
Replacing brake hoses VAZ 2109
Brake hose VAZ 2109: 1 – tips, 2 – copper gasket, 3 – rubber seal, 4 – spring clip.
Brake hoses of the VAZ 2109 must be elastic and free from tears and cracks. Hoses must be firmly sealed at the ends. The threads of the hose ends must not be damaged. If the hose swells when you press the brake pedal, it means the cord threads are torn. If any of these defects are detected, the hose must be replaced.
While holding the brake hose from turning with a wrench, unscrew the pipe fitting. Remove the spring clip
Remove the rubber seal along with the hose from the bracket
Unscrew the end of the VAZ 2109 brake hose from the wheel cylinder and remove it. Plug the holes in the pipeline and wheel cylinder
Install the hose in the reverse order of removal. When installing a brake hose on a VAZ 2109, do not forget to install a copper gasket under the tip attached to the wheel cylinder
When installing the hose, make sure that it is not kinked. For control, a colored stripe is applied to the hose
The rear brake hose of the VAZ 2109 is replaced in the same way, supplying working fluid to the brake mechanisms of the rear wheels. After replacing the hose or hoses, add brake fluid to the reservoir and bleed the brake system.
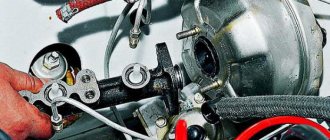
Replacing the main brake cylinder of a VAZ 2109
To replace the master brake cylinder on a VAZ 2109, disconnect the negative terminal wire from the battery and drain the brake fluid from the brake system. Repairing the VAZ 2109 master cylinder often does not lead to the desired results, so it is recommended to replace the master cylinder assembly
Disconnect the block with wires from the brake fluid level sensor installed in the reservoir cap
Disconnect the brake lines from the master cylinder by unscrewing the fittings securing them. Then unscrew the two fastening nuts and remove the master cylinder. Installation of the VAZ 2109 master brake cylinder is performed in the reverse order of removal. After this, fill the brake fluid into the reservoir and bleed the brake system&
Removal and installation of the VAZ 2109 vacuum seal
To replace the vacuum brake booster of a VAZ 2109, follow these steps:
From inside the passenger compartment, remove the retaining clip from the brake pedal pin.
Remove the brake pedal pin, thereby disconnecting the vacuum booster pushrod from the pedal
Disconnect the hose from the check valve and unscrew the two nuts securing the master cylinder to the vacuum booster and move it to the side, being careful not to damage the lines
Unscrew the four nuts securing the bracket and remove the bracket with the vacuum booster. Unscrew the two fastening nuts and remove the vacuum booster from the bracket. Installation of the vacuum seal on the VAZ 2109 is carried out in the reverse order of removal.
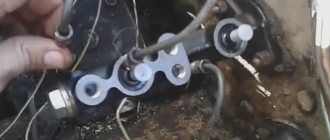
Checking the brake pressure regulator VAZ 2109
Check if brake fluid is leaking from the pressure regulator
Check - the plug should be recessed by 1-2 mm
Rock the earring. There should be no play in the connections of the shackle with the elastic lever and the bracket on the rear suspension beam
Have an assistant press the brake pedal. In this case, the regulator piston should move out of the housing by 1.6–2.4 mm, compressing the leaf spring until it rests against the lever. If at least one of these conditions is not met, the regulator is faulty. To repair or replace it, contact a specialist or read the replacement instructions below.
VAZ 2109 replacement of brake pressure regulator
To remove and install the VAZ 2109 brake force regulator, follow these steps:
Disconnect the elastic pressure regulator arm from the rear suspension beam. To do this, remove the retaining ring and washer. Then remove the shackle from the rear suspension arm pin.
Disconnect the brake pipes from the pressure regulator by unscrewing the union nuts. Plug the brake pipe holes.
Unscrew the two nuts securing the bracket to the body and remove the pressure regulator assembly with the bracket. Installation of the VAZ 2109 brake system regulator is carried out in the reverse order of removal.
Adjusting the handbrake VAZ 2109
To adjust the hand brake on a VAZ 2109, follow these steps:
Raise the parking brake lever 1–2 clicks
Loosen the equalizer locknut
Tighten the equalizer adjusting nut until the parking brake cable is tensioned. If the cable cannot be tensioned, then it needs to be replaced
Check that the full travel of the parking brake lever should be 2–4 clicks
After this, tighten the equalizer lock nut
Lower the parking brake lever all the way and spin the rear wheels. They should rotate freely without jamming. This completes the adjustment of the VAZ 2109 parking brake cable.
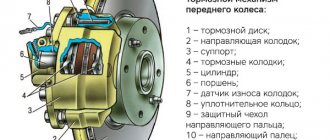
What function does the caliper perform?
In a brake system where the main component of braking is the disc, the caliper plays the role of the basis on which the brake linings and the elements that drive them are attached.
While the car is moving, the pistons and pushing linings are inside the caliper. They are held in this position by a spring. When you press the brake pedal, hydraulic fluid begins to flow into the inside of the pistons. They, in turn, push out the brake pads. Since they are located on both sides of the brake disc, they begin to tightly grip it, thereby dampening the torque of the wheel, reducing the speed of the car.
The front calipers of the VAZ-2108 are rigidly fixed with 2 bolts on the steering knuckle. Therefore, they not only absorb the braking force, but also transmit it to the vehicle's chassis.
The device of the rear brake cylinder of the VAZ 2109
Until the end of the 90s of the 20th century, all domestic cars were not spoiled with technical innovations that simplified the life of the driver. The braking system (TS) was no exception to the general rules.
For example, the driver of a VAZ-2109, one of the most popular cars of that time, could not boast of having active safety systems (ABS, EBD, SBC, HBA, etc.) and enjoy their benefits when braking. However, front-wheel drive VAZ cars represent a whole driving era, satisfying the post-Soviet hunger for owning your own vehicle.
GENERAL DEVICE OF THE VEHICLE
Speaking about the braking system of the VAZ-2109 car, it should be recognized that it would be more correct to use the term “VAZ-2108 braking system”. It was on the G8 that the scheme of the specified vehicle was implemented. The components, parts and assemblies of the new product have been refined and optimized. But the new braking system was not fundamentally different from the braking system of Russian rear-wheel drive cars.
The “nine” vehicle is represented by a working and a parking vehicle.
The structure of the working vehicle includes:
- a brake mechanism, the functions of which include direct braking;
- a brake actuator that serves to convert and deliver the driver’s command to brake and the effort he exerts for this.
The operation scheme of the VAZ-2109 brake mechanism is based on the operation of friction mechanisms that implement the principle of friction of parts.
The brake mechanisms themselves are located in the wheels and are made up of a rotating part (disc or drum) and a stationary part (special pads). Domestic cars of the VAZ family use a disc principle on the front wheels and a drum principle on the rear. The latest VAZ-2109 models began to be equipped with an electronic system for monitoring the wear of the front pads.
BRAKES DEVICE VAZ 2108,09,10-15
The brake drive of the VAZ-2109 car has a classic version, based on a dual-circuit hydraulic (liquid) operating principle. The drive circuit includes:
- brake pedal;
- expansion tank (with liquid level sensor);
- vacuum brake booster;
- master cylinder;
- hoses and pipelines;
- wheel cylinders;
- pressure regulator.
Compared to rear-wheel drive models, the VAZ-2109 brake system has some improvements in components and assemblies - master and working cylinders, vacuum booster, pressure regulator, mechanical parts, etc.
However, these changes are of a highly specialized nature and are understandable only to professionals who provide car service and repair.
Although there is a more significant innovation. Unlike “classic” models, the VAZ-2109 brake system has a slightly different operating principle for the drive.
The service braking system of domestic front-wheel drive cars uses a diagonal division of drive circuits: one of the circuits is responsible for the operation of the right front and rear left mechanisms, and the other - the front left and right rear.
Such a scheme for the functioning of independent circuits significantly increases the safety of braking and minimizes the possibility of a general failure in the operation of the braking system. It allows you to compensate for faults in one circuit by redistributing functions to another circuit.
The parking brake system of the VAZ-2109 (in driver's parlance - “handbrake”) is based on the mechanical cable principle of extending the rear shoes and blocking the brake drums. It has some improved technical solutions (compared to the “classics”), which greatly facilitates its repair.
BASICS OF VEHICLE OPERATION
Malfunctions of a vehicle's braking system fundamentally undermine road safety. For example, inadequate braking can cause an accident, making the distance to the vehicle in front insufficient for an accident-free stop.
But what if there is a need to use emergency braking? That is why the operation and repair of the brake system is an important part of the driver’s responsibilities.
The most popular malfunctions of the VAZ-2109 brake system include:
- inefficiency (both working and parking vehicles);
- brake fluid leak;
- increasing the idle speed of the hydraulic drive pedal;
- withdrawal (displacement) of the car from straight-line motion at the moment of braking;
- increasing the required force on the brake pedal.
Most often, vehicle repairs are caused by wear and failure of pads, discs or drums, hydraulic drive elements (main or wheel cylinders, hoses).
The driver must constantly monitor the braking system, promptly detect and eliminate deficiencies, and carry out the necessary repairs in a timely manner.
To do this, you should not neglect periodic visual analysis of the components and assemblies of the system that are in direct contact with the environment for mechanical damage and corrosion.
Monitoring the level of brake fluid in the expansion tank is facilitated by the presence of a mechanical sensor and an electrical (light) alarm located on the dashboard (in the form of a red lamp with an exclamation mark).
TRAFFIC REQUIREMENTS FOR THE SERVICEABILITY OF A VEHICLE
Traffic regulations exclude the possibility of driving if the service brake system is malfunctioning (ineffective or leaking). The driver must repair the working vehicle on site or refuse to operate the vehicle altogether, using towing (if permitted by Section 20 of the Rules) or transportation (transportation by tow truck).
The ineffectiveness of the handbrake is determined by specific fixed indicators associated with the stationary state of the vehicle. Thus, a VAZ-2109 car with a full load must remain stationary on a slope of at least 16%, and in equipped condition (ready for movement - with a driver, but without load) - at least 23%.
If the specified requirements are not met (and, consequently, the parking brake system is malfunctioning), the driver is also obliged to refrain from operating the vehicle. However, at the same time, he is allowed to move, subject to precautions, to the place where the car will be parked or repaired.
Thus, the braking system of the VAZ-2109 has proven its effectiveness during operation. That is why it was extended to other front-wheel drive models of the famous domestic brand. Thus, the braking system of the VAZ-2110 and the entire family of “tenths” is an exact copy of the “nine” vehicle.
If you find an error, please select a piece of text and press Ctrl+Enter.
What problems occur
When the VAZ 2108 caliper starts to malfunction, the braking behavior of the car changes. She may skid instead of moving straight. This is especially noticeable in winter - the car begins to turn when braking.
The next sign is that the master cylinder piston is stuck in the working position. In this case, there will be a constant sound of the brake linings rubbing and a very high temperature of the brake disc. Moreover, such a malfunction can lead to its deformation. This happens when a car with a hot brake disc drives into a puddle. A sharp change in temperature leads to warping of the surface. As a result, a beating sensation begins to be felt when braking. The foot on the brake pedal will feel a jolt.
The reasons leading to malfunction can be of two types:
- Rust. Due to deep corrosion, the brake piston stops working normally. It either gets stuck in the initial position, which leads to weak braking, or does not return to its original position, which is why the brake linings constantly rub against the disc.
- Caliper deformation due to impact. In this case, the piston jams due to the incorrect position of the parts in the assembly unit.
In the case of corrosion, you can try to restore the performance using a VAZ-2108 caliper repair kit. Deformation resulting from an impact cannot be eliminated by repair - only replacement of parts.
Brake fluid leak
You can find out where the brake fluid goes only by visually inspecting the brake valves, front calipers, and rear cylinders. The presence of drips will indicate a leak. If the fluid leaves, but no traces of it are visually visible, most likely the master brake cylinder is to blame, which allows fluid to pass into the vacuum brake booster chamber. This problem also does not arise instantly and before reaching a critical point, when the pedal goes to the floor and the brakes do not work, it will lose elasticity for some time until air enters the system.
Further dismantling
Holding the caliper in a vice, unscrew the two bolts under the Torx head and remove the guide pins. After this, the assembly unit splits into three parts: a movable bracket, a brake cylinder and a fixed bracket.
All these three parts must first be cleaned with a brush clamped into a drill. Then you need to proceed to the main part of the repair - restoring the mobility of the piston. To remove it from the brake cylinder, do the following:
- Using a flathead screwdriver, remove the retaining ring that secures the boot. Thanks to it, dirt does not get inside the mechanism.
- Remove the VAZ-2108 caliper boot.
- Remove the piston. Ideally, it is removed using compressed air, which is supplied to the brake fluid supply hole. If the compressor is not available, then the piston is removed using pliers. It is necessary to apply efforts alternately to opposite sides so that there is no distortion, which will complicate dismantling.
- Remove the bleeder fitting.
- Remove the sealing ring between the piston and the cylinder walls.
General structure of the vehicle
Speaking about the braking system of the VAZ-2109 car, it should be recognized that it would be more correct to use the term “VAZ-2108 braking system”. It was on the G8 that the scheme of the specified vehicle was implemented. The components, parts and assemblies of the new product have been refined and optimized. But the new braking system was not fundamentally different from the braking system of Russian rear-wheel drive cars.
The “nine” vehicle is represented by a working and a parking vehicle.
The structure of the working vehicle includes:
- a brake mechanism, the functions of which include direct braking;
- a brake actuator that serves to convert and deliver the driver’s command to brake and the effort he exerts for this.
The operation scheme of the VAZ-2109 brake mechanism is based on the operation of friction mechanisms that implement the principle of friction of parts.
The brake mechanisms themselves are located in the wheels and are made up of a rotating part (disc or drum) and a stationary part (special pads). Domestic cars of the VAZ family use a disc principle on the front wheels and a drum principle on the rear. The latest VAZ-2109 models began to be equipped with an electronic system for monitoring the wear of the front pads.
Repair of breakdowns in vehicles
To avoid emergency situations on the road, it is necessary to monitor the vehicle and carry out diagnostics in a timely manner. If damage is detected, carry out repairs.
Malfunctions in the vehicle and ways to eliminate them on VAZ 2108, 2109 and 21099 vehicles.
| Increased brake pedal travel | |
| Liquid leak from cylinders | Replace failed cylinder parts, wash and dry pads, discs and drums, and also carry out preventative maintenance on the hydraulic drive system |
| Air in the vehicle | Remove air from the system |
| The rubber sealing rings in the GTZ are damaged | Replace the rings and bleed the system |
| Damaged rubber hydraulic hoses | Replace elements and bleed the system |
| Increased runout of the brake disc (more than 0.15 mm) | Sand the disc. If its thickness is less than 10.8 mm, it will need replacement |
| Fluid leakage through the sealing rings of the RD pusher | Replace O-rings |
| Insufficient braking performance | |
| Oiling of linings on mechanism blocks | Clean the linings with a wire brush using warm water and detergent. Eliminate the cause of liquid or grease getting on the pads |
| Jamming of pistons in cylinders | Remove the causes of jamming, replace damaged parts and bleed the system |
| Complete wear of linings and pads | Replace pads |
| Overheating of mechanisms | Stop immediately and allow the machinery to cool down. |
| Using pads with mismatched linings | Use pads only recommended by the manufacturer |
| Incorrect RD adjustment | Adjust the RD drive |
| Loss of tightness of one of the circuits (accompanied by partial failure of the pedal) | Replace damaged parts, bleed the system |
| Incomplete release of all wheels | |
| There is no free play of the pedal | Adjust pedal free play |
| The protrusion of the adjusting bolt of the vacuum booster rod relative to the mounting plane of the master cylinder is impaired | Adjust the protrusion (1.25-0.2 mm) of the adjusting bolt |
| Swelling of the rubber seals of the master cylinder due to gasoline, mineral oils, etc. entering the liquid. | Thoroughly flush the entire system with brake fluid, replace rubber parts |
| Master cylinder piston jamming | Check and replace the master cylinder if necessary |
| Braking one wheel when the brake pedal is released | |
| Rear brake pad tension spring is broken or weakened | Replace spring |
| Sticking of the piston in the cylinder due to contamination or corrosion of the cylinder body | Disassemble the cylinder, clean and wash parts, replace damaged ones |
| Swelling of the cylinder sealing rings due to gasoline, mineral oils, etc. getting into the liquid. | Replace the rings, flush the hydraulic drive system with brake fluid |
| Violation of the position of the caliper relative to the disc when loosening the bolts securing the pad guide to the steering knuckle | Tighten the fastening bolts, replace damaged parts if necessary |
| Incorrect adjustment of the parked vehicle | Adjust the parking brake system |
| The car skidding or pulling to the side when braking | |
| Cylinder piston jamming | Check and eliminate jamming of the piston in the cylinder, if necessary, replace damaged parts, bleed the system |
| Blockage of any steel tube due to dent or blockage | Replace the tube or clean it and bleed the system |
| Contamination or oiling of discs, drums and linings | Clean mechanism parts |
| Incorrect adjustment of the RD drive | Adjust drive |
| RD faulty | Repair or replace the regulator |
| Wheel alignment angles are incorrect | Adjust wheel alignment angles |
| Different tire pressures | Set normal pressure |
| One of the vehicle circuits does not work (accompanied by deterioration in braking efficiency and increased pedal travel) | Replace damaged parts |
Scheme
The diagram of the VAZ 2109 brake system is quite simple and does not have any complex parts. This simplifies its repair and makes it an ideal car for novice car owners.
Generally speaking, it consists of:
- Main brake cylinder;
- Working mechanism of the brake;
- Brake booster of pneumatic vacuum type;
- Contact pipelines with high pressure;
- Expansion tank into which brake fluid is poured;
- Wheel brake discs located on the front axle;
- Brake drums for wheels located on the rear axle.
Below is a drawing of the VAZ brake system.
Choice
We will give some recommendations regarding the choice of a new vacuum amplifier.
| Selection criterion | Required parameters |
| Price | The cost of a good vacuum cleaner is now about 2.5 thousand rubles. These are not the most expensive, but not the cheapest Chinese options. Optimal for VAZ 2109 |
| Package | This packaging, used by a genuine manufacturer, is made of corrugated cardboard |
| Label | The label should be clearly legible - the production batch number, the production date of the part and the name of the manufacturer itself |
| vendor code | The vacuum unit corresponding to the technical parameters of the VAZ 2109 has article number 2108-3510010TM |
| Point of sale | You should not buy from market traders. There are many good, trusted spare parts stores in any city. Don’t be shy to ask for certificates, documents for parts |
Choosing wisely
Now there are a lot of fakes on the market. Such parts cost the same as the originals, but last much less.
Replacing rear brake pads on VAZ 2108, 2109, 21099 and VAZ 2113, 2114, 2115
Replacing rear brake pads begins with removing the wheel. Please note that when replacing rear brake pads, the handbrake must be released, the car must be in first gear, and thrust blocks must be installed under the front wheels.
First (before jacking up the car), loosen all four wheel bolts. Next, we hang the rear of the car on a jack.
and unscrew the four cone bolts securing the wheel, and then remove it.
Removing the brake drum is carried out as follows. We unscrew the two guide pins with a socket or a 12-mm open-end wrench.
These pins are screwed into the hub and attract the brake drum to it. After unscrewing them, remove the drum. If it cannot be removed, then you need to screw the pins into the holes corresponding to their diameter (M8). Only now the thread should be on the brake drum.
We screw in both guide pins until they stop or until the drum begins to move. Now, one by one, we screw them in further, thereby pressing the drum off the brake pads.
Now you need to release the parking brake cables. To quickly loosen, you need to use an extended 13mm socket, two extensions and a ratchet wrench. This will allow you to relax the parking brake cables within a minute, without resorting to removing the muffler and other labor-intensive procedures. Using two 13mm open-end wrenches, loosen the locking nut and twist it:
Now we install the prepared extension cord, as shown in the figure, and twist the nut almost to the end.
Now we proceed directly to removing the brake pads. We take out the plinth from the pin holding the parking brake lever and push this pin deep into:
Using pliers, remove the lower tension spring.
Using pliers, release the spring at the front brake pad, which keeps the pad from moving horizontally.
We release the pads from the upper tension spring using pliers or a screwdriver.
Remove the front pad.
Remove the spacer plate.
Remove the drive lever by removing it from the cable end.
Using pliers, release the spring at the rear brake pad, which keeps the pad from moving horizontally.
And remove the brake pad.
We install everything in the following order. First, we connect the new pads together using the upper compression spring, and then insert the spacer plate into the groove.
Now, slightly expanding the upper compression spring, insert the spacer plate into the opposite groove. It is necessary to insert the securing pin of the parking brake drive lever into the connected pads.
We install the assembled pads, passing the compression spring and plate between the hub and the brake cylinder. Please note that there is a concavity on the plate; when installing, it should be directed towards the hub.
Having inserted the pads into the grooves of the brake cylinders, we also install them in the lower grooves:
Install the lower compression spring.
We use pliers to install springs that prevent the brake pads from moving horizontally.
We press the finger inside, holding it so that it does not fall out. We insert the drive lever into the eye of the cable, insert it into the slot in the plate and bring it to the pin.
From the reverse side we squeeze the finger out, it should go through the hole in the lever. We put the washer on top and install the pin.
We remove the dowel pins from the brake drum and place the drum on the brake pads.
Holding the hub with your hand, rotate the drum so that the unthreaded holes on the drum coincide with the threaded holes on the hub. Screw in the mounting pins.
Install the wheel. Please note that the mounting screws must be tightened crosswise. After some time, check the tightness of the screws and, if necessary, tighten them.
We tighten the lever cables in the same way as we used to loosen them. The parking brake is considered tight if the number of clicks when lifting its lever is 2-4.
Please rate the article
If only the pads need to be replaced, I would do the following: jack up the car, unscrew the central nut and pull the wheel, drum, hub and bearing assembly off the axle. All that's left in front of you is the axle and pads, change them for good measure. and unscrewing the wheel, removing the drum (if it’s still stuck), and then the hub gets in the way - an extra headache, plus time. and with smoke breaks and chatting with a neighbor - about 40 minutes, no more (good luck to everyone on the roads!).
Dear Andrey! How would you pull off the wheel if the drum is stuck))) Even after unscrewing the hub nut, you would not be able to remove the wheel together with the hub because... the drum must be knocked down! :)))))) Everyone would do that, look!)
Dear Konstantin! Maybe everyone does this?))) The drum is stuck to the hub, so remove it with the hub and bearings, as Andrey advises!
Necessary tools for repair
To remove the brake caliper VAZ 2108, and then disassemble and restore it, you will need the following tools and materials:
- Balloon wrench.
- Open-end wrenches or heads with a knob for 8, 13, 15, socket wrench for 17.
- Internal Torx for a 15 or 16 bolt, wrench for removing brake hoses. It differs from a conventional open-end nut in that it covers the nut more completely.
- Vise.
- Repair kit for calipers. Suitable for VAZ 2108 - 21099, VAZ 2113 - 2115, Kalina, Grants. The only thing you need to pay attention to is the diameter of the wheels. The VAZ-2108 requires a repair kit for models with 13-inch wheels.
- New guide pins. Often after use they have slight deformations, as well as traces of deep corrosion, which prevents the floating bracket from moving freely. Therefore it is better to replace.
- New bleeder fittings.
- Drill with wire attachment for cleaning rust.
- Solvent, paint, corrosion converter, rags.
- Compressor. Not required, but recommended.
Bleeding brakes on a VAZ 2022, preparation and sequence of actions
Bleeding the VAZ 2109 brakes is carried out in a sequence strictly determined by the design features, namely:
- Rear right wheel (farthest wheel in the system);
- Front left (connected by the system to the already pumped rear right wheel);
- Rear left;
- Front right.
The sequence is this way because of the diagonal placement of the contours. All steps must be completed when pumping along the full circuit. You can only upgrade one at a time.
To work you will need:
Note. Brake fluid is quite aggressive; it should not come into contact with the skin and should be washed off immediately. It is also undesirable for it to come into contact with plastic parts, wires, or in the eyes; TJ vapors are poisonous.
Preparing to bleed the brakes
To properly bleed the brakes on a VAZ 2109, as necessary, you will need competent preparation according to the following scheme:
Be sure to check the system for leaks and inspect all pipelines and parts. The machine is installed on a pit or raised with a jack. Tubes, connections, hoses must be carefully cleaned with a rag, then press the brake several times and secure. When inspecting, connections and hoses must not be wet. Detected leaks are eliminated by tightening the fasteners or replacing problematic parts.- Make sure that the fluid level in the tank is maximum; if not, top up. The level will have to be checked after bleeding each mechanism, otherwise air will enter the system again.
- Pour a little liquid into the draining container so that the bubbles escaping from the system are visible.
- The fittings must be loosened before starting work.
- You also need to remember that the VAZ 2109 has a rear wheel drive pressure regulator. When pumping, it is necessary to create high pressure in the system. To prevent the regulator from blocking the flow of fluid to the rear wheels, when working without a pit, on a jack, you need to open its valve and keep it in this form until the end of work. To do this, it is enough to install, for example, a flat screwdriver between the plate and the regulator rod, pushing the rod all the way. The screwdriver is removed upon completion of work.
It is more convenient to pump the brakes on a VAZ 2109 with two people; if you work independently, the cost of brake fluid, time, and effort will increase, but it is possible to cope with the task.
How to bleed the brakes on a VAZ 2109, working together
If you have a partner (no qualifications are required from him), the action plan is as follows:
- The driving partner creates the required pressure in the system by depressing the brake pedal (5-9 presses are needed), then holds the pedal in the lower position until the bleeding is completed.
- The one under the car puts a hose on the fitting of the right rear cylinder and completely releases the fitting so that the liquid flows. The end of the hose must first be lowered into a container for draining. By the bubbles in the liquid you can judge the state of the system and notice when all the air has been removed.
- After complete cleaning, the fitting is tightened and the pedal is released, you can move to the next wheel, the diagram is the same, the front left wheel.
- The level of brake fluid in the reservoir will decrease as pumping progresses and will need to be restored to the maximum level.
- After bleeding along a full (or one, as necessary) circuit, the fittings must be finally tightened and the protective caps must be put on.
If you have to work independently, the scheme and sequence of actions are almost the same. You can press the pedal yourself, or you can use an aerator (price up to 150 rubles).
- The aerator adapter is connected to the pump, possibly with an inflated tire;
- The required wheel is removed from the jacked up car;
- Instead of its own lid, the aerator lid is screwed onto the tank;
- After loosening the fitting, pumping is performed according to the general scheme.
When pumping in this way, the wheel spool is used instead of a compressor, and in extreme cases, the brake is squeezed out and pressed down with a stone until the pumping is complete.
Upon completion of the work, a check is made, first of all, of the brake pedal travel; it should not be too soft, and the pedal should not fail. The parking (hand) brake must also be checked and adjusted once every 15,000 km.
How to bleed the brake system alone
If at the moment you cannot afford an assistant and you work alone, then without any problems you can bleed the brake system of the VAZ 2109 alone, see how to do this in the picture below, and also watch the video.
Video on how to bleed the brake system alone
How to remove and disassemble a VAZ caliper
To dismantle the caliper, you need to hang the car on a jack and remove the front wheel. Then unscrew the nut connecting the flexible hose of the brake system to the brass tube. Brake fluid will leak from the front circuit, so you should prepare a container for it in advance.
Using a 17 mm socket wrench or a socket wrench, unscrew the bolts that secure the caliper to the steering knuckle. They are located on the inside and are located next to the grenade boot.
Then, by sliding up the brake rotor, the caliper can be completely removed. The remaining disassembly work is carried out in a vice. If they are not available, then disassembly is carried out right on the spot, without disconnecting the caliper from the steering knuckle.
Replacement
VAZ 2109 rear brake cylinder
To replace the cylinder, you must have not only all the standard tools, but also a special wrench for unscrewing the pads. Replacement is carried out as follows:
- Raise the car on a jack and remove the wheel.
Note: It is advisable to install an additional stop, as the jack may not support it. In any case, it will be safer.
- You need to remove the brake drum. To do this, unscrew all the nuts that hold it in place.
- Use a large flat head screwdriver to remove the brake pads. To make it easier to remove them, you need to press on them from above, then quickly lower them down.
- It is necessary to unscrew the brake pipe from the cylinder. To do this, you will need the aforementioned key to unscrew the pads. It is needed in order to break off the tightened fitting. After this, you can use a regular key.
Note: it is important that the fitting does not rotate, otherwise the tube may be torn off along with it.
- After the tube is unscrewed, it must be plugged with a protective cap to prevent brake fluid from leaking out.
- Now you can remove the brake cylinder itself. It can be easily removed: you just need to unscrew it using a 10mm key.
- After this, you need to install the new cylinder back and screw on the brake pipes.
- Do the same thing, but in reverse order.
Replacing the rear brake cylinder is quite difficult on your own, but it is possible. Therefore, it is not necessary to go to a car service center, where the price for any repair will be very high. Before starting repairs, you need to review many photos and videos on this topic. Afterwards you can start replacing the cylinder yourself. Any instructions will help you get the job done quickly and efficiently.
Source
Rules for operating vehicles in the nine
When operating the “nine”, it is necessary to strictly observe the scheduled maintenance periods not only for the engine, but also for the vehicle, and also to carry out repairs of the master brake cylinder (MBC) of the VAZ 2109. This applies to the friction linings of the front disc and rear drum brakes. Complete wear of the friction linings threatens unexpected vehicle failure in an extreme situation.
Periodically it is necessary to check the condition of the linings, monitor their level of wear and replace if necessary. It is necessary to carefully monitor the brakes of the VAZ 2109 in terms of fluid leakage through worn gaskets and seals.
Excessive wear of sealing elements is accompanied by:
- the risk of insufficient effort in the shopping center;
- pedal failure when driving;
- increasing braking distance.
All of the above creates very serious risks. A vehicle is one of the critical systems for ensuring the safety of the driver, passengers and other road users.