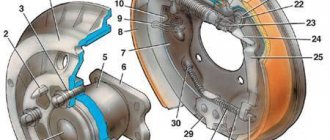
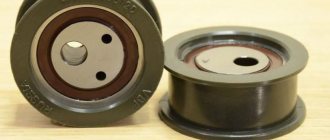
The brake mechanisms of the rear wheels of VAZ 2108, 21081, 21083, 2109, 21091, 21093, 21099 cars are drum brakes; for braking, a working pair is used: brake drum - brake pads. How the brake drum of the VAZ 2108, 2109, 21099 is constructed. The brake drums of the VAZ 2108, 2109, 21099 cars are cast from aluminum. On the outside they have stiffening ribs, on the inside there is a working surface in contact with the brake pads. The drums are drilled with one large hole for mounting on the wheel hub, four holes for wheel bolts, two holes for guide pins, two threaded holes for screwing in bolts during dismantling, as well as ventilation holes.
How does a brake drum work?
The brake drum is attached to the wheel hub and rotates with the wheel. The brake mechanism located inside it is activated when you press the brake pedal. In this case, the brake fluid presses on the pistons inside the brake wheel cylinders. They extend by moving the brake pads. With their linings they are pressed against the working surface of the brake discs - the wheel is braked.
After releasing the brake pedal, the tension springs tighten the pads, moving them away from the working surface of the drum by a certain gap, preventing the wheel from jamming. The size of the gap between the brake pad linings and the drum on the VAZ 2108, 2109, 21099 is adjusted automatically due to the automatic gap adjustment device available in each of the wheel brake cylinders.
The design of rear brake mechanisms of VAZ 2108, 2109, 21099 cars
Brake drums are also an element of the parking brake system of a car. When this system operates, the brake pads are pressed against the drums manually, by understanding the handbrake lever.
Extreme way
If you get a very stubborn drum, you will have to resort to radical measures. Considering that they are associated with a high degree of danger, the fixation of the machine must be reliable and checked several times.
The steps are as follows:
- Get behind the wheel, start the car, engage second or third gear and release the clutch. The raised part of the axis will begin to move, and the drum, accordingly, too;
- Spin the engine up to about 3000 rpm;
- Squeeze the brakes sharply 3-4 times;
- Press the gas for another 10 seconds;
- Turn off the engine and go remove the drum.
Features of removal and installation
Before removing the brake drum, it is necessary to loosen the handbrake cable so that the pads come together. Then tap its surface with a hammer with a rubber striker, clean and treat the seating surface of the drum on the wheel hub with penetrating liquid. Unscrew the pins and remove the drum.
Before installing the drum, the brake pads must be brought together.
Removing and replacing brake drums on VAZ 2108, 2109, 21099 – Avtochanel
Hello, in this article you will learn how you can independently replace brake drums on a VAZ 2108, 2109, 21099. The brake pads rub against the brake drums, and the more often and sharper you brake, the more and faster the inner surface of the drum wears out. Also, its service life depends on whether you drive with the handbrake while the car is moving (many people like to pull the handbrake when turning in winter). There is no exact service life for brake drums, i.e. it all depends on how you drive. First, remove the wheel and unscrew the studs on the drum
Removing the brake drum on a VAZ 2108, 2109, 21099 may not be a simple procedure, because it may stick, so gently tap it on the other side through a piece of wood; the most important thing is not to chip off the edge of the drum, otherwise it will lose balance and you will definitely have to replace it with a new one. You can also try screwing the bolts into the technological holes on the drum, then it should also come out of its seat.
Now remove the brake drum completely.
Avtochanel
Did you like the article? Share with friends:
Brake drum malfunctions
Brake drum malfunctions: wear of the working surface (maximum permissible diameter 201.5 mm), mechanical damage to the working surface (risks, nicks), oiling. Depending on the degree of damage, the drums should either be replaced or sharpened using special equipment. Oiling can be eliminated by wiping the working surface with white spirit and replacing the brake pads.
The brake drums of VAZ 2108, 2109, 21099 can last for quite a long time (100 thousand kilometers or more), since thanks to the brake force distributor (“sorcerer”) they brake for a significantly shorter time compared to the front brakes. The rate of their wear can be affected by the poor quality of the part, the use of pads with hard linings, the ingress of dirt and sand into the mechanism (although they are more protected than front brake discs), careless repairs, and the driving style of the car owner.
It is recommended to check the degree of wear of the brake drums every 30,000 km. An extraordinary reason for checking may be the inability to adjust the handbrake.
VAZ 2109: replacing brake drums with your own hands
Rear brake drum VAZ 2109
In a VAZ 2109 car, replacing the brake drums is necessary if the brake cylinder is leaking and has blown boots. Replacing the brake drum of a VAZ 2109 can be easily and freely done on your own.
Self-replacement
Replacing a brake drum on a VAZ 2109
To make the replacement yourself, you need:
- Raise the car with a jack.
Note: it will be much easier if you can find a lift. This way the whole essence of the problem will be better visible.
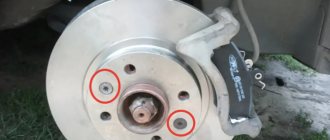
- Remove the wheel. Unscrew all the nuts that hold it in place using a 17mm wrench.
- Using a 12mm wrench, unscrew the two guides that hold the drum.
- The threads can be easily stripped, so you need to unscrew the guides very carefully. After some time, the drum will begin to slide off, making it easier to remove. However, you should not make sudden movements, as you can damage the thread that holds it.
- If you twist the guides correctly without warping the drum, you can remove it even without hitting it with a hammer. However, if this cannot be accomplished, then the hammer must be struck from the reverse side, but this must be done rather slowly and drawn out.
Note: if you plan to completely replace it and not repair it, then you should not carefully remove the drum. It can simply be broken.
- Now you just need to remove the rear hub and bearing and change them if necessary.
- After this, it will be easy to remove the drum itself.
- To install a new one, you should perform all the same steps, but only in reverse order.
Unscrewing the hub nut
Replacing brake drums VAZ 2109
If the hub nut is loose, it must be removed as follows:
- Drill a small hole in it.
Note: this procedure will loosen the thread tension, that is, it will also loosen the nut itself. This should be done as close to the thread as possible. By the way, if the thread is slightly damaged, it’s not a big deal.
- Insert the wrench into the nut.
Replacing brake drums on a VAZ 2109
Note: if the key bends, it is better not to continue. We'll have to try again to widen the hole that we started making earlier. In some cases, it is necessary to cut the nut completely if it is held too tightly. You need to hit it with a chisel until it cracks.
- After prolonged manipulation, the nut can still be unscrewed. Of course, it can no longer be repaired and will have to be replaced.
Replacing the rear brake drums of a VAZ 2109
- After this, you can easily remove the brake drum. To do this, you need to pull it towards you and quickly “rip” it out of the chain.
- Insert new one.
- Screw in the new hub nut.
Replacing rear brake pads
Replacing rear brake drums on a VAZ 2109
When replacing the drum, you can immediately replace the brake pads, since they also often fail. For this:
- Raise the side of the car that will need to be worked on with a jack.
Note: You can lift the entire car on a lift.
- You need to remove the rear wheel.
- Now you need to unscrew the brake drum.
Note: to do this, use a long socket or a 7mm wrench to unscrew the two drum guides.
- Using a hammer, knock down the drum and remove it. The impacts must be soft and smooth, otherwise you can damage the car.
New brake drum VAZ 2109 and pads
Note: If it cannot be knocked down, the car will have to be driven into a pit to loosen the parking brake adjuster nut. The brake cylinder must be dry and free of brake fluid leaks and dust caps.
- You need to remove the old brake pads.
Note: To do this, use pliers to disconnect the spring from the pad and remove the lower tension spring that secures the pads together. The upper tension spring should also be disconnected, and then the front block should be removed. Now remove the rear pad pressure spring. Remove it together with the spacer plate. Remove the shoe by disengaging the hook of the spacer arm from the end of the parking brake cable.
- Get new brake pads.
Note: Some brake pad kits also have a spacer arm. If it is not included in the kit, then you should replace the old one with the new brake pad.
- To do this, use pliers to unscrew the axial pin of the lever.
Drum brakes VAZ 2109
- Remove the washer and spacer lever from the block.
- Knock the axle pin out of the brake pad.
- Assemble the rear block structure.
Drum brakes for VAZ 2109
- Insert the axial pin of the spacer lever into place.
- Place the spacer lever on the finger and the washer on top.
- The cotter pin also needs to be placed in the lever pin.
- Insert spacer plate.
Drum brake VAZ 2109
- Hook one end of the upper tension spring. Hook the cable fasteners onto the hook of the spacer lever.
- Place the entire structure in place. Secure the pad with a clamping spring. Take the front block and hook the upper tension spring onto it.
- With emphasis on the brake cylinder mounts, stretching the spring, move the block away and fix the spacer plate. Secure the pad with a clamping spring. Place the lower tension spring onto the brake pads.
- Next you need to put on the brake drum.
Note: If replacement is necessary, a new one must be installed. They are replaced as they wear out, as well as due to uneven wear or deformation.
- The maximum permissible internal diameter of the brake drum is 201.5 mm. If the current diameter exceeds this, then the drum should be replaced (when installing an old brake drum, you may encounter a problem - it cannot be put on, and in this case you need to remove the protrusion on the edge with a file or grinder, which prevents it from being put on).
- Now the drum installs without problems.
- You need to install it so that the holes for the bolts match. Tighten the guides and tighten them with a wrench.
- Install the wheel and screw in the bolts.
Note: the same algorithm is used to change the pads on the second wheel.
Replacing the brake drum can also be done at home. You can easily perform this procedure with your own hands. Usually in car services the price for this manipulation is quite high. It is very important to review many photos and videos on this topic before starting repairs. Any instructions written above will help you get the job done quickly and efficiently.
Removing and replacing rear brake pads and brake drums on VAZ 2108, 2109, 21099
Hello, today we will show you how to independently remove and replace the rear brake pads on a VAZ 2108, 2109, 21099. If you hear an unpleasant squeaking noise from the rear while braking, then most likely the rear brake pads have worn out and need to be replaced. Also, if the pads are worn out, the handbrake will not hold, even if you tighten it.
First, jack up the car and remove the rear wheel. Now unscrew the 2 studs on the brake drum
Unscrew the studs
Most likely the drum will not come off just like that, try screwing in bolts instead of studs and pulling it off using them. If it doesn’t work, then knock it out with a hammer from the back side through a wooden board, the main thing is not to break the edges of the drum, otherwise it will be unbalanced
Screw in the bolts and remove the drum
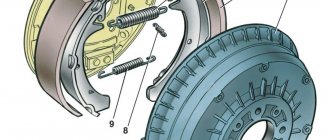
After removing the brake drum, remove the upper spring
Remove the upper spring
Next, remove the lower tension spring.
Removing the lower spring
Now remove the spring that is attached to the center of the brake pads and remove the front pad
Remove the spring according to src=»https://mcwheels.ru/800/600/https/nazcar.ru/images/1395319497_snimaem-zadnyuyu-tormoznuyu-kolodku-na-vaz-2108-2109-21099.jpg» class=»aligncenter » width=»450″ height=»360″[/img]Remove the block
Next, remove the expansion plate
Removing the expansion plate
Unhook the spring that is attached to the center of the rear shoe and unhook the handbrake cable and remove the shoe
Remove the spring using src=”https://mcwheels.ru/800/600/https/nazcar.ru/images/1395319448_otceplyaem-tros-ruchnogo-tormoza-ot-kolodki-na-vaz-2108-2109-21099.jpg” class=”aligncenter” width=”450″ height=”361″[/img]Remove the block
Now you need to remove the retaining pin from the rear brake pad and disconnect the plate to which the handbrake is attached from the pad.
Remove the fixing pin
Removing the plate
Install new brake pads in reverse order. If the brake drum does not fit on the new pads, then try using a file to file the edge of the drum, as over time, wear could appear there.